|
|

03-24-2018, 11:40 AM
|
|
Member
|
|
Join Date: Mar 2018
Location: Livermore, CA
Posts: 47
Thanks: 0
Thanked 9 Times in 6 Posts
|
|

So I picked that teaser picture on purpose. It shows that bloody great big R4 compressor in there. Between that and the cut down 300 V8 oil pan I was using I had to locate the engine around 3in further forward than I wanted to for maximum set back to get the compressor to just barely clear the upper control arm cross shaft and the oil pan to fit between the cross member and the rear steer centerlink.
I saved up my money and bought a decent and well equipped RF-31 mill drill and without much planning took a spare accessory bracket and proceeded to modify it for a small Sanden compressor. I've not gotten to the point of fitting the AC again so I have no idea if it's enough compressor for the car with all it's glass but it's something. I did go through the trouble to put the same amount of bracing as factory to support that compressor. You can barely see it in the last picture since I was in the middle of doing the wiring for the L67 EFI system. I had to mill down a boss on the accessory bracket, spot face it for the lower mount on the compressor then I put a front strap like the 'Y' shaped bracket seen on the original compressor. The back of the compressor is supported by something that looks like a tree branch but it supports the outer end of the compressor. This thing shouldn't flex on me.
I'll get more into the engine oiling system since it's kinda trick sometime later today or this weekend.
|
03-24-2018, 10:11 PM
|
 |
Lateral-g Supporting Member
|
|
Join Date: Jul 2008
Location: DALLAS, Texas
Posts: 4,544
Thanks: 296
Thanked 537 Times in 339 Posts
|
|
Nice work...I see you have some skills there. 
__________________
'68 C10 swb
'69 Camaro convertible
'72 Chevelle

|
03-25-2018, 11:05 AM
|
|
Member
|
|
Join Date: Mar 2018
Location: Livermore, CA
Posts: 47
Thanks: 0
Thanked 9 Times in 6 Posts
|
|
Thanks for all the support
One of the big short comings of almost all Buick engines is the oiling system. The stock setup using steel spur gears riding in an aluminum housing with an aluminum thrust plate that tends to wear. The front cover oiling passages also have a lot of right angles in them so it's a torturous path from the pump to where it needs to go.
Quote:
|
Originally Posted by Hot Rod Pitstop
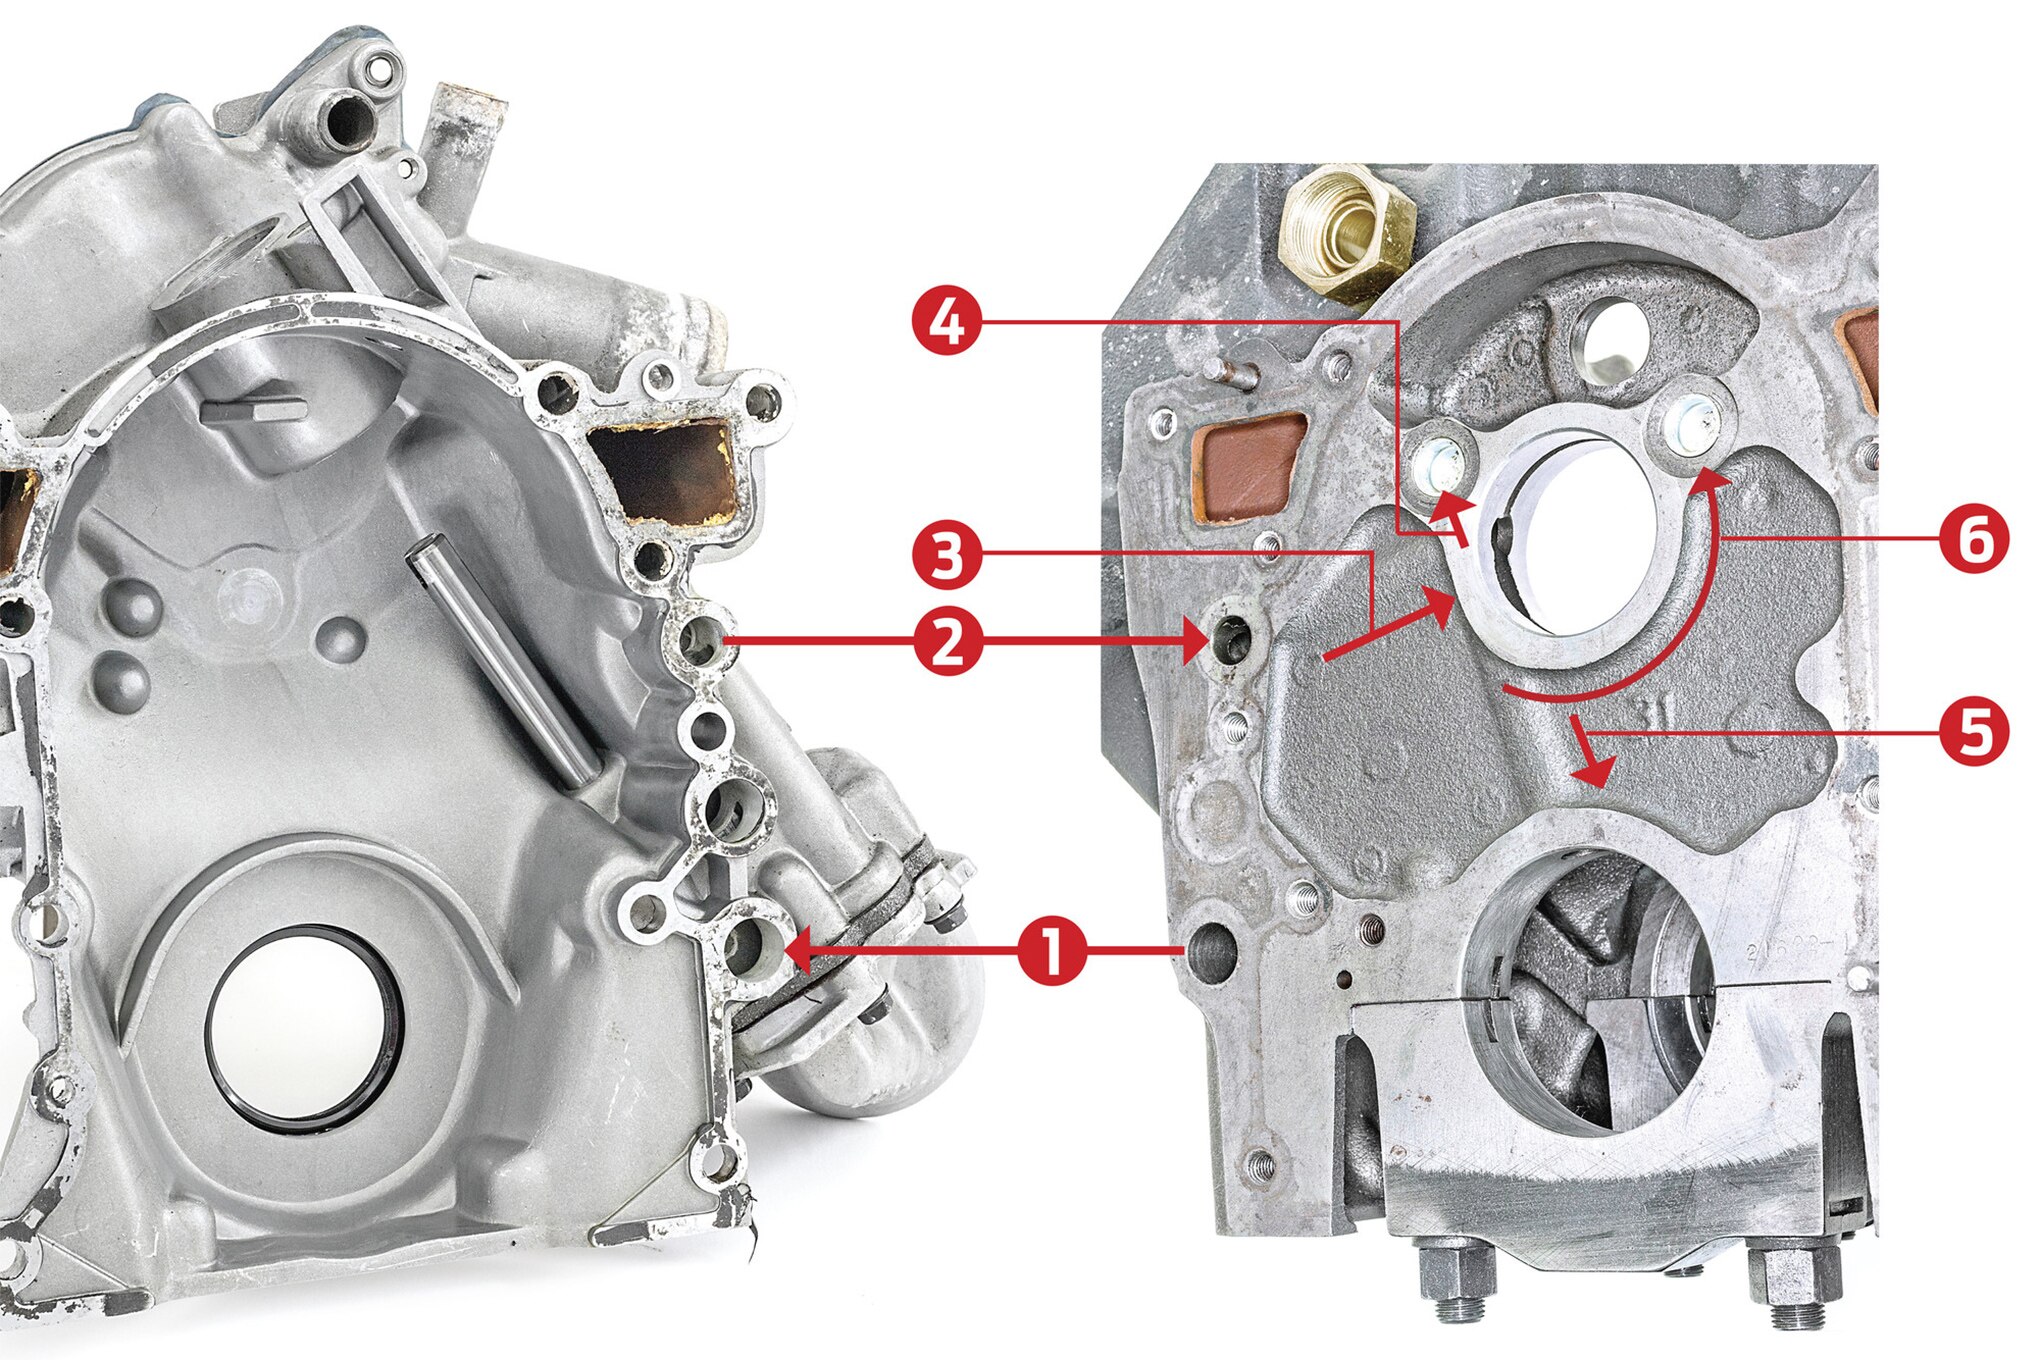
Seen At Duttweiler Engineering, This Is A Typical 1985 And Later Buick V6 Block And Front Cover. All Buick V6 And V8 Oil Supply Systems Have A Similar Oiling Layout, With The Same Problem: A Tortuous Supply Path With Multiple Right Angle Turns That Make The Engines Hard To Prime And An Undersized, Front Cam Bearing And Journal That Can Fail If It Experiences Oil Starvationeither On A New Start Up, Or If The Car Has Been Sitting For A Long Time. 1] From Pick Up Tube Out To Oil Filter 2] From Oil Pump Into Block Main Oil Feed 3] To Main Oil Distribution Junction 4] To Passenger Side Lifter Gallery 5] To Crank, Main, And Rod Bearing Oil Supply Passages 6] Transfer Groove From Passenger Side To Driver Side Lifter Oil Supply Passage
http://www.hotrod.com/articles/pit-s...t-cam-bearing/ |
Combine this weakness with the fact that the stock oil pump and filter would run smack into the engine cross member I pretty much set out to fix both of those problems in one feel swoop. Now I'm not the first person to do this general idea, there are two others that took other Buick V6 front covers with a gerotor pump and adapted them but as far as I know I'm the only one that did it with a 3800 Series II/III pump which has the slight advantage of being internally located vs. the older pumps relied on the crank snout for the drive gear. However this is even less of a bolt on than the earlier setups they used since a 3800 has a balance shaft and a slightly different front bolt pattern for the timing cover. While it does use the same oil pickup location, the feed to the block is different so I had to change that. I ended up using the lower section of the 3800 cover and the upper section of an Indy Lites dry sump timing cover. I filled the oil return section of the pump up with marine JB weld and then machined a plate that housed the pressure regulator and allowed me to use an AN-10 fitting to route the oil to the external oil filter and then back into the side the of block where the old oil pressure sensor went.
At this point in my life I was stationed at Wright-Patterson AFB in Dayton, OH and I had Ohio George Montgomery do the machine work. When he enlarged the passage for the oil supply he broke though into the water jacket above the oil gallery so he custom machined an insert that he locktited into place with a copper crush washer at the end and an epoxy blob over the top of the breach. He warned me to never tighten that fitting without a backer wrench less it start leaking.
For the upper section I didn't have my mill yet so I literally burned up (it caught on fire) a dremmel hogging out the underside of that dry sump cover and making a spacer bar to take up the space between the inside of the dry sump cover the and outside of the 3800 cover. I filled the rough spots with JB Weld again and then painted the inside with Gyptol and then used Indian Head Form-a-gasket to seal it up. No leaks believe it or not!
Here's a selection of pictures
|
03-25-2018, 01:11 PM
|
|
Member
|
|
Join Date: Mar 2018
Location: Livermore, CA
Posts: 47
Thanks: 0
Thanked 9 Times in 6 Posts
|
|
Sorry for the oversized image from Hot Rod, I tried to get it smaller but no luck.
This solved the oil delivery problems and has generated ~75psi on start up and falls down to mid to high 20's hot. I did have to have an Al welder weld a piece of bar stock across the lower opening of the timing cover since the 14 bolt oil pan that the block uses is flat across the nose vs. the 20 bolt oil pan the cover is designed to work with is pointed so it would have leaked like a sieve. I think I also had to have a small bit of overlap on the side of the cover welded up so it wouldn't leak past the gasket that didn't quite overlap the hole. I've not had any oil leak problems from the pump, housing, or the line systems once I got rid of the oil cooler. The oil cooler proved to be more trouble than it was worth both plumbing and leaks wise so I eliminated it.
The problem I solved initially by using a cut down 300 V8 pan was oil capacity on the motor. The 300 was offered in an X-frame for 1964 which made it a hard pan to find but since a V6 is just 3/4 a V8 of whatever generation it overlapped with, it sorta bolts right on. I took the pan, cut the front two cylinders worth of pan out and welded the nose back on. The pan warped a bit when I did this and it sat the engine farther forward like I mentioned but it fit. I had to get it working since I was about to move from TN to CO (car kept the nailhead for the move to TN from OH) so I worked late at night to get it functional though it was barely able to make it on and off of a transporter for the trip.
Once I got to CO I used the V8 pan for awhile while I tracked down other problems and once I got it running decently I took the chance to swap from the SP400 (switch pitch 400) I was using before to getting the 4L80E installed and working. This meant it was time to permanently solve the oil pan and compressor issues and scoot that engine back. I've already covered the compressor solution. The oil pan I decided to cut the bottom out of a stock pan and weld up my own sump. I started by making the sump out of paper and folding it up and fitting it in the car and testing the steering and such to see if it cleared. I then bent it up using a combination of my hand brake, bending pliers, and even pieces of angle iron clamped to the section and the flange hammered over the top of it. I was again rushing to beat a move, this time to DC, so not a lot of pictures. I didn't have time to deal with seam leaks so I just coated all the seams with JB weld, lightly sanded the worst of the blobs off and painted it. No leaks! I did try to make a trapdoor sump but it didn't fit in the limited space between the centerlink and the cross member so I just kept the kick outs. At some point I'll pull the engine again to fix a persistent rear main seal drip and when I do, I'll add trap doors to the kickouts so oil doesn't slosh and get stuck in there. Right now the engine is as far back as it will fit with the 4L80E tailshaft and cooler fittings being the limiting factors for scooting it back any farther.
|
03-26-2018, 10:42 PM
|
|
Member
|
|
Join Date: Mar 2018
Location: Livermore, CA
Posts: 47
Thanks: 0
Thanked 9 Times in 6 Posts
|
|
So a chance to reflect on where I'm headed with this car. Like most of us here, I want a car that has the visual and historical charm of an older car with something more modern in terms of power plant and ride quality. Chalk it up to improvements in tire technology as well as better understanding of how suspensions work together, there is something definitely to be gained. While you can get a little bit there by using good tires, new bushings, and newer alignment settings; it won't get me far enough there.
My plan is to do as much as I can for the suspension and brakes while keeping the frame side all GM so someone can bolt stock stuff back. That isn't stopping me from planning to replace the lower frame bushing with a spherical bearing or enlarging the frame hole for the brake reaction rod to put a ball joint in there. I've started to design via CAD a new spindle that helps invert the camber curve and reduce the aweful scrub radius. There isn't a whole lot of room for a wider track but I'll see what I can do there. Plan is to use Jeep WK1 SRT8 front hubs on a custom 3/4in steel plate spindle. Ball joint mounts will also be steel but bolted on. Hopefully I can quicken the steering ratio up a bit and eek out a bit more steering angle in the process. Most of the parts will be adjustable as to allow me to play with the settings as time allows. I know I'm going coil overs, it's just a a question of steel coils or air springs. Air would make me cut the frame but give me so much more real time adjustment in ride height and compliance. I do plan on keeping stock body mounts though to damp down the NVH, it is still a Riviera after all.
One big source of parts I see is the now 10yrs old category of UHP SUV. Stuff like the Cayenne, Grand Cherokee SRT8, and Q7 all are as heavy or heavier (I estimate the Riviera is now ~4000lbs). I plan on getting the Cayenne/Q7/Touareg SUV brakes and depending on if I spring for custom wheels at the same time, I might redrill the rotors for 5x5in but more likely I'll pickup a set of wheels from the same SUV family and redrill the hubs to 5x130mm. I did check, there isn't enough room to put a 1/2-20 wheel stud through the 14mm clearance hole in the rotor. It's close but doesn't quite fit.
__________________
Central TEXAS Sleeper
Experimental Physicist
'64 Riviera T-type (4.2L Turbo6, 4L80E, L67 EFI system, Custom suspension and brake bits)
Last edited by CTX-SLPR; 03-26-2018 at 10:44 PM.
|
03-26-2018, 11:39 PM
|
 |
Senior Member
|
|
Join Date: Aug 2012
Location: Bay Area, CA
Posts: 665
Thanks: 4
Thanked 62 Times in 35 Posts
|
|
This will be a blast. My first swap in 1997 was an '87 RX-7 with Buick GN engine/trans. 2670lbs with around 400hp was a good time.
__________________
Project: 1969 Chevelle, alum 5.3, GTS76 turbo, Chiseled Perf A/W intercooler, Holley Dominator EFI, Davis TC, JRi coilovers, 14" brakes, T56 Magnum. CTS-V Recaro seats!
Coffey Fabrication Nashville, TN doing the fabwork! 800rwhp+/25mpg+/9's@150mph goal  https://lateral-g.net/forums/showthread.php4?t=52976
1993 Mazda FD RX-7
https://lateral-g.net/forums/showthread.php4?t=52976
1993 Mazda FD RX-7, built LS7, T56 Magnum, Holley HP, Davis Tech TC, 8.8" 3.73 Cobra IRS diff, DSS axles, Ohlins coilovers, big brakes.
CCW 18x11 front 315/30/18's and 18x12.5 rear on 335/30/18 RA1's, 2850lbs
10.31@137mph 165mph Shift-Sector 1/2 mile speed
441ci AllPro headed motor and 200lb weigh reduction in the works....
|
04-10-2018, 10:38 PM
|
|
Member
|
|
Join Date: Mar 2018
Location: Livermore, CA
Posts: 47
Thanks: 0
Thanked 9 Times in 6 Posts
|
|
So what I'm up to now is working on replacing the rusty pieces of the floor and fitting those Acura CL seats into the car. The passengers side of the floor is going to be relatively easy comparatively since I have a whole piece of a parts car for that side. The drivers side is going to be far harder unless I can get another section from a parts car as its far more rusted out.
There is a relatively easy way to mount the seats in the car using reinforcing plates under the floor a little bent metal stand in the back but it puts the seat at full back and full down pretty much right at the close limit of comfort to the steering wheel and pedals as well as my head only a hands thickness from the headliner. Now I'm 6'2" and only 175lbs so I'm tall but thin so it might work but I'd rather have more flexibility in there. There's a hump in the floor, picture 1, (and the cross floor bracing underneath that I didn't get a picture of) that pushes that side of the seat up 1.25in off of the rest of the floor section. Additionally the seats use a 45º mounting tab, picture 2, that eats up more space. Those mounts are riveted onto the seat tracks so I've not come up with a good way to get them off as I can't even figure out how to get to the back sides of them without taking the whole slide mechanism apart which is more rivets. Not something I want to mess with.
There's nothing under that bump other than the floor bracing so I'm so now I'm debating how much hackery to otherwise good floor I want to undertake. Cutting the bump, or at least a section of it, out would let me drop the seat about an inch and scoot it back about the same. Just wondering how worth it would be...
Last picture is a set of 2002 Eldorado front seats I'm working to attach to stock frames and get in the back of the car because I've had them for something like 8yrs and have finally given up trying to bypass the memory module and the aftermarket seat cover supply has dried up so a DIY redye will wear less in the back seat.
__________________
Central TEXAS Sleeper
Experimental Physicist
'64 Riviera T-type (4.2L Turbo6, 4L80E, L67 EFI system, Custom suspension and brake bits)
|
04-11-2018, 01:49 PM
|
|
Member
|
|
Join Date: Mar 2018
Location: Livermore, CA
Posts: 47
Thanks: 0
Thanked 9 Times in 6 Posts
|
|
You know... just looking at the picture of the underside of the seats, I could remove that bolt and use it as the front mount after either cutting the front angle off or drilling out that rivet and removing the whole plate. Just means that I'd have to remove that bolt from under the car vs. from inside. Seems like a better idea than cutting the good section of the floor up.
__________________
Central TEXAS Sleeper
Experimental Physicist
'64 Riviera T-type (4.2L Turbo6, 4L80E, L67 EFI system, Custom suspension and brake bits)
|
04-12-2018, 04:45 PM
|
|
Lateral-g Supporting Member
|
|
Join Date: Jul 2008
Location: DALLAS, Texas
Posts: 4,544
Thanks: 296
Thanked 537 Times in 339 Posts
|
|
Love the buckets in the rear.
__________________
'68 C10 swb
'69 Camaro convertible
'72 Chevelle
|
04-15-2018, 10:03 AM
|
|
Member
|
|
Join Date: Mar 2018
Location: Livermore, CA
Posts: 47
Thanks: 0
Thanked 9 Times in 6 Posts
|
|
Been working on fixing the floors and installing the Acura buckets. They're mixed together since I don't want to repair the floors only to cut things out or restore complicated features that aren't used anymore.
First thing I did was get a spot weld cutter and start drilling out the spot welds on the passengers side between the under floor braces and the floor itself. Other than some large concentrations of welds near the seat mounts that went pretty smoothly as long as I didn't get too aggressive too quickly with the cutter and have it skip out of the center punch on the weld. Got both bad sections of the floor out in about 2hrs of work with other guys standing around talking about stupid stuff we've done in cars as part of a guys group that meets in my garage on Thursdays.
Over the few days after that I've been working on mounting the drivers side seat since I need it first to bleed the brakes. Y'all saw my first attempt at mounting the seat and it ended up too far forward and too high. After a major screw up where I drilled a full set of mounting holes 1.25in too over and ended up off center from the steering wheel I regrouped and came up with a new mount plan that gets me seated pretty much exactly where I want. I've got maybe 0.75in of rearward travel from comfortable for me and even at full up on the seat my head doesn't hit the headliner unless I put the seat back full upright. Quite happy. Need to get some 0.25 plate to be happy with the mount strength but the basic design is intact and even uses the original mounting points for the front. The rear I'll have to make a new version of that bent metal bracket but it should be more than strong enough.
__________________
Central TEXAS Sleeper
Experimental Physicist
'64 Riviera T-type (4.2L Turbo6, 4L80E, L67 EFI system, Custom suspension and brake bits)
|
| Thread Tools |
|
|
| Display Modes |
 Linear Mode Linear Mode
|
 Posting Rules
|
You may not post new threads
You may not post replies
You may not post attachments
You may not edit your posts
HTML code is Off
|
|
|
All times are GMT -5. The time now is 06:20 PM.
|


 Brian Hobaugh SCCA National Tour June 2014
 First Hemi 'Cuda Convertible Ever Built
 Short clips: Goodguys Pleasanton autocross and pit videos


