continued from above
TRANSMISSION CROSSMEMBER AND MOUNT
The transmission had been set at the right downward driveline angle, opposite that of the rear axle flange, so that the U-joints are in sync. It had been sitting on a temporary piece of steel clamped to the frame, but now was time to construct the transmission crossmember and mount.

The bottom of this car is going to be flat (for aerodynamic reasons), so the exhaust and driveshaft have to be tucked up well inside the transmission tunnel. That's why the tunnel is so large. Since this is a dry sump motor, the oil pan is short and the transmission sits very low in the chassis. This means the transmission crossmember had to sit low but ALSO have clearance for two 3" diameter exhaust tubes - which made for a fairly elaborate 3D plate structure.
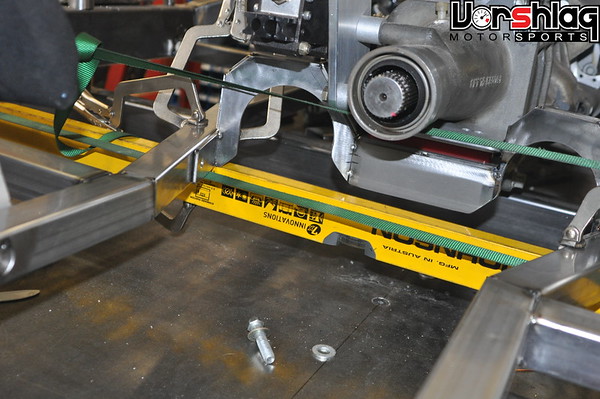
The red bushing sandwiched between the transmission and the crossmember is our 95A polyurethane rubber transmission mount busing we use on many of our LS1/T56 drivetrain swap kits. We have these molded to our specs and this bushing keeps vibration to a minimum while eliminating slop normally seen in an OEM rubber transmission mount. I will show more of this in a later post, when it is out of the car for final welding.
DOOR MOCK-UP + MORE CAGE PROGRESS

Next up in the build was the initial fitting of the fiberglass doors to the car. To save weight the doors are composite and the front sheet metal is aluminum - the only steel skin will be the roof, rear fenders and rear panel.

Mocking up the doors at this point was necessary to be able to lay out the "NASCAR" style door bars for the roll cage.

The car came in with a cage that had a flat "X" bar that was a bolt-in portion (drag racer style - not allowed in road racing). This put the bars inboard of the stock door structures, and made for a very tight cockpit.

The right side lower door bar was fitted first. As you can see above, this bar comes way out into where the shell of the stock doors would be. The amount of interior space gained with the new set-up is dramatic. 8-10 inches of additional room is available on each side.

Fitting bars like this was tricky and took lots of iterative measuring and small cuts for tubing clearance on the rear door jamb. But it is worth it in the end, and the driver and passenger will both have plenty of elbow room and additional side impact crush space inside the cabin.
 WHAT'S NEXT?
At this point it is around July 28th, and the cage was mostly done - now we just need to have the customer stop by for a "fitting". This is where he chooses the final seat among the 3 he provided as well as a half dozen other options we had at the shop. He finalized the seat placement and angle so we can add the harness bar. This test fitting also allowed us to position the shifter and final steering wheel placement.

Once we knew all of that Ryan will finish the horizontal door bars and the verticals that tie those into the frame and together. The car owner flew in July 31st for the fitting, so I will show that next time.

There's more to show on the 69 Camaro next time - front suspension work, custom exhaust headers, new floor mounted pedal arrangement, exhaust layout and component discussions, steering rack mounting, steering shaft construction, and more. I'll try to get another post written about this car in the next couple of weeks.
Thanks for reading,