continued from above
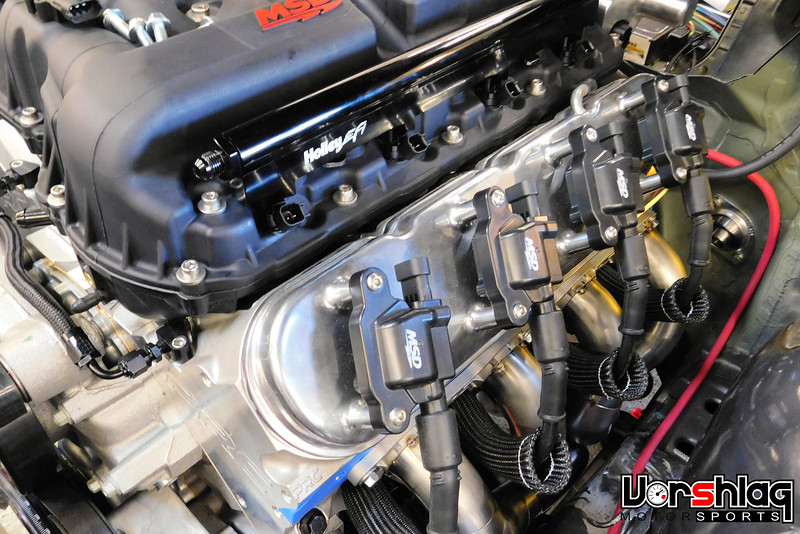
The Taylor plug wires come in a variety of boot angles and colors, as do the DEI sleeves, but for this build we went with all black. The NGK plugs are now connected to the coils, which are mounted to the Holley valve covers for a nice, tidy look.
REMOTE COOLANT RESERVOIR
I never trust the itty bitty plastic reservoirs on BMW E46 coolant systems (I've had two fail on track in two different 330s!), but instead I like to see a larger, remote mounted reservoir set high in the engine bay with as much volume as possible. Usually that means at the back of the engine bay, opposite the brake master cylinder, which is the highest part of the engine compartment. That corner usually has plenty of room.


On this build of course we have one of the twin air filter boxes taking up that space, so I asked Ryan to utilize the space in the right front corner of the engine bay. He whipped up this custom reservoir out of cardboard mock-ups and turned it into an aluminum welded tank.

If you look closely at the image above left you can see that it ties into some OEM bracketry in that corner, for a bolt-in application.


Once we were happy with the shape and placement a few more items were ordered, including an aluminum weld-on radiator filler neck and some steam vent ports from TFS (made for AN lines). A number of aluminum weld-on AN bungs were also procured for lines that connect to the reservoir.
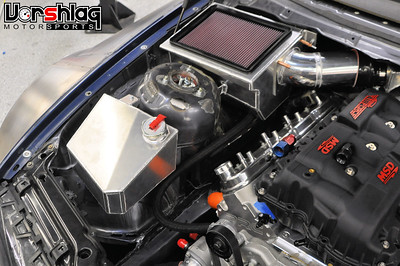

You can see the finished reservoir above, with the filler neck and welded bungs for AN lines. We used a 16 psi, lever-style pressure release cap. If this cap isn't deemed pretty enough for D&E, we will find some billet doo-dad with some shiny colors.

The various coolant lines were later built to connect to the reservoir, steam lines, and heater core hoses to the Motorsports defroster mounted under the dash. I will show this in more detail later, but the cooling system is plumbed.
MAIN BATTERY KILL
One thing virtually all race cars are required to have is a main battery kill. If you see the "magic smoke" being released from your car's wiring (it only comes out once!) or if you have any type of racing crash / incident / fire, you are supposed to hit that button first! But gone are the days of the $25 electro-mechanical kill switches, which have a high failure rate and require high amp cables to be strung near the driver's switch. Even the solenoid relay style kill switches still have moving parts that can fail. Now there is something better.

The solid state electronic "battery isolator" units from CAR TEK out of the UK are a slick, safe, and FIA approved solution.
This page shows the evolution of the kill switch. We saw how much US suppliers were marking these up so we purchased a bunch of these and became a dealer. We have used them in the past and will be putting these on everything...


There are two main models from CARTEK. The "GT" model shown above kills the engine by taking in a fixed 12v input and sending a 12v output that would power your Ignition or ECU. When the negative side of the battery has been disconnected it will also cut the 12v output powering your Ignition or ECU. This will kill the engine. Designed for cars with Standard ECUs or Historic Race cars. These can be wired with one or two remote kill switches, which have integral LED lights inside the button.

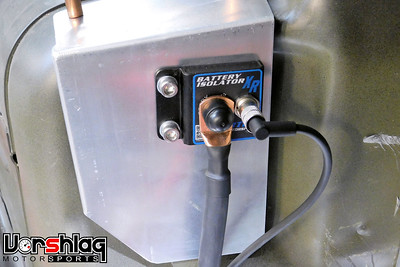
The "XR" unit we chose for this build is made to trigger a Motorsports ECU (like the Motec M150 we are using) or PDU. The "XR" unit is newer and does not have a power input or power output. Instead it sends a signal which is wired to either a Power Distribution Module or Motorsport ECU that has an ignition switch signal input. The ECU or PDU will then shut down when it sees this signal - which then kills the engine. The XR also features a 0.5 sec time delay between transmitting the engine kill signal and disconnecting the battery, allowing the ECU time to perform a shutdown sequence before electrical power is lost.
continued below