
Quote:
Originally Posted by alex n

I modified Anvil deep tub front inner wheel wells but I think I might not have clearance. Save those molds , I might buy them from you or perhaps you could make me a set. Nice work
|
Hi AJ. Looks like from your build, you have some great composite skills, this inner fender project will be a breeze for you. I source my glass supplies from US Composites. Great prices, shipping and knowledgeable staff
.and they will have everything you need. Sort of wrote this for someone who has never done glass before.
To be clear
.I did the following with the conscious decision that the surface of the final part would not be perfect. I choose to do it this way in an effort to save money/time and because cleaning up a well laminated part with a good coat of gel coat is much easier than making a perfect mold
especially a complex shape like an inner fender and more so when the tolerances to the tire are so tight. Absolutely, if you spend more time/money on the mold, the part will be smoother but the method below will give you a strong, lightweight part.
Also, not sure that you could do these fiberglass inner fenders unless the car was upside down on a rotisserie
..while welding upside down might sort of suck, laminating fiberglass upside down would be impossible.
If you look back a few pages in my build, youll see the best pics I have for building the mold, unfortunately I didnt take any up-close pics here. I used some Home Depot parts for this; underfloor layment and drywall putty and went into my wifes craft room for the hot glue gun. I built the lip that surrounds the upper A-arms with some pine. Advice: I made this way to tight up to the A-arm
.I wanted the look of the inner-fender wrapping the A-arm closely but it made laminating the glass a pain in the @ss and frankly I knew better
..you dont have time to mess around in tight spots when resin is kicking off on such a large part. For sure, building a mold with these materials isnt normal but its an inexpensive quick way to build this one-time-use mold and the beauty of the drywall putty is that it sands real easy on all the complex concave curves. In those earlier pics, you can see that I scabbed in pieces of the floor layment to help fill in the gaps and get a pleasing shape, glue them in place with the hot glue gun. And then just sweep in the drywall mud, sand and repeat. I left the mold extra long in the front where it will attach to the front air dam, will cut it later. After you get the shape done and smooth, paint it with enamel paint which will give you a hardish surface for you to laminate up to.
.remember, anything that is on the mold will print through onto the part, so get it as smooth as you can. That said, doing a mold and part this way will definitely leave some sanding/body filler work, so dont stress that its body-work straight/flat. Choose a contrasting enamel color to the gelcoat color you pick.
Materials for the part, in order of lamination: Gelcoat (about 60-70mils..get a gauge for this), 3/4 ounce mat, and 2 layers of 1½ ounce mat. Typically you would use fiberglass cloth as a final layer as it creates a nice finished look and provides a good bit of extra strength. If you choose that look, you could eliminate one of the 1½ ounce layers. I am going to spray bed liner, so I didnt really care about the finish texture of the glass without the mat. I also used a small piece of Kevlar to provide some extra protection in front of the dry sump tank. I kept my part as thin as possible because my tire clearances were so tight. Still very strong.
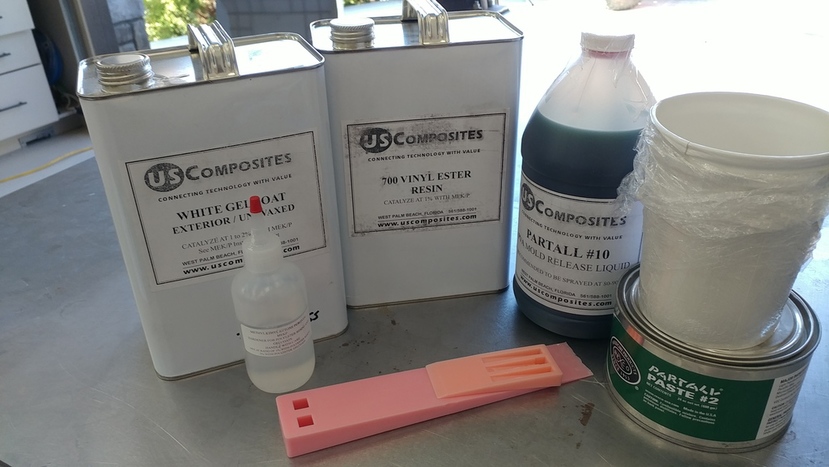
US Composites website will guide you through any questions.
Gelcoat, pick a color, thats about it. You wont need more than a quart to do both inners.
Resin: I like the 700 Vinyl Ester Resin.
¾ Ounce and 1 ½ Ounce Chopped Strand Mat. When ordering your fiberglass, make sure you choose the rolled instead of folded shipping method. Folding damages the glass strands.
Kevlar: I used 5oz Kevlar.
Mold Release: Get a small can of Partall Paste Wax and a ½ gallon of Partall PVA.
Get a handful of their resin mixing cups, a good supply of single use paint brushes large, medium and small and get a few part-releasing-wedges for prying the part out of the mold, USE a BINKS respirator you will be breathing this for the better part of an hour and be right up close to it in order to see the air bubbles. I dont use gloves cause they are a pain but a respirator is a must. As you know, Acetone is a must for clean up. Eye protection is also a must.
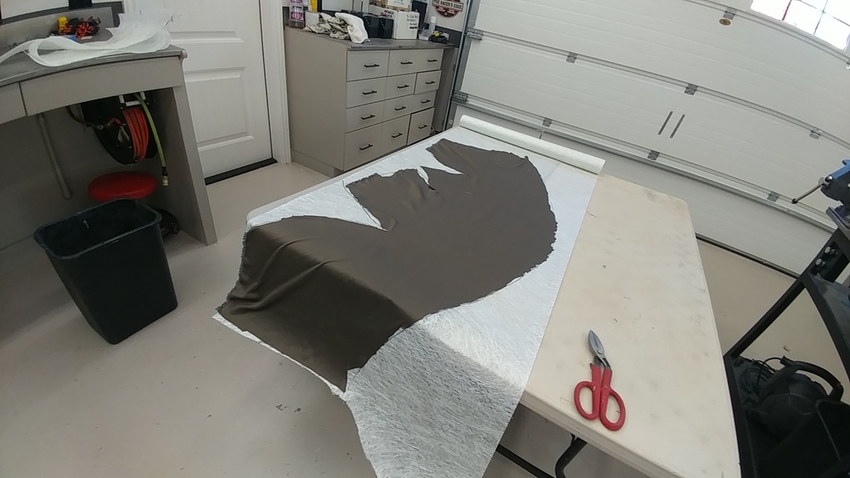
Step 1: Before you prep the mold, get a piece of cloth or an old sheet and cut it into the shape of the inner fender, let it overhang a few inches and cut it so that it lays flat in the mold. Then use that piece as a template to cut out the glass from the rolls. Put these cut individual layers of glass into the mold, one at a time and tear it so that it lays flat. Do this now, you wont have time when you are laminating. And tearing glass that is wet with resin is not good. Tear it, dont cut it with scissors, this keeps the part flatter and stronger. Its OK if you do this in a patchwork instead of one full-size piece as long as you let the torn edges overlap. Just do all of this up front before mixing the resin and have the pieces set aside in an organized fashion so you know exactly what goes where and in what order. Time is not your friend after you mix the resin. Its lame but I do a rehearsal before mixing the resin, always seem to find something that saves time.
Step 2: Mold Prep:
Wax on
wax off. Do this 5 times, no less. Then put on the PVA. You can spray PVA
best
., but I put it on with a brush because I didnt care about the brush lines, just easier. PVA is water soluble and will either just peel off or you can wash it off after laminating. Put down multiple layers, basically until you get a nice green haze. About 3 or 4 or so. No magic here. Let it dry between coats and dry thoroughly before the gelcoat step.
Mixing Gelcoat and Resin. It always cracks me up that the instructions use different measuring units from the ones on the mixing cups. I included a table I created for 1% and 1.5%. Use 1% if its warm out and 1.5% if its cold. Try to do this with ambient air above 65, if not
put a heat lamp on the area after you are done to help it cure. If its too cold the vinyl ester resin just wont kick off. Careful it doesnt get too hot.
Step 3: Gelcoat: Lay down about 65-70 mils thick. If you can spray it, you will certainly get a more consistent layer and you can put it down all at once which is better/easier/safer. I didnt want the mess of spraying it in my shop so I brushed it on. If you are careful about putting down 2 layers, brushing is fine. This is a little tricky as you have to let the first coat dry enough but not get super hard. If it doesnt dry enough, the second coat will eat the first and you will get alligators in your finish gelcoat. Not the end of the world if this happens as you can fix it with filler. Probably a few hoursish between coats. Again if you spray it, just get it all down at one time. Let this dry overnight.
Remember I said its lame to rehearse
. Be lame and rehearse. These are pretty big parts and if you fup, you might be building these molds again. Not a party.
Step 4: Set in the ¾ ounce mat into the mold sort of in its place. Then mix up about 20-24 ounces of resin. Wet out the glass by brushing the resin on and then using the brush to squeegee the resin while driving out the air bubbles. I know you know how to do this but for others: this is kind of a dabbing while dragging process with the brush. Takes a little practice but you will see a good layer of resin but not too much. I recommend starting from one end working towards the center (bottom of the mold if the car is upside down) and then go to the other side and work back towards the center (bottom). This will let you control the amount of resin so that it doesnt pool at the bottom of this U-shaped mold. Assuming you are on a rotisserie and the car is upside down.
After you get the ¾ ounce layer wetted out and the air out (do this quickly but thoroughly), then set in the first layer of 1 ½ ounce mat and do the same process wetting it out and pushing out the air bubbles. You should have a little of the resin left, just use it up quickly as its likely going off by now. Go mix 24 ounces more and get going on the first layer of 1 ½. Then do the same on the last layer of 1 ½. Only mix up 24 oz of resin at a time, and 20-24 will cover each layer. Again, try to only use just enough resin to wet out the glass, youll know if you have too much because it will be a darker brown area. If you are going to use cloth, use a rubber squeegee to get out the air and excess resin. If you are adding any Kevlar, you could do it between the 1 ½ ounce layers or do it last, doesnt really matter. Move quickly. Have some acetone in a bowl ( I use disposable aluminum 3 inch deep, baking pans from the supermarket. Wash your hands off of the resin between layers so the curing resin doesnt burn your hands and to help them not be as sticky. Again, rehearse each step before mixing the resin
my humble advice.
Open all the doors or do this outdoors cause as the styrene comes out in the curing process, its gonna smell bad. If its cold, put a heat lamp on it but watch it that it doesnt get to hot. The styrene will come out for a couple of days. Some people will say to let the resin cure overnight between layers, I dont like this because it opens a chance for delamination
in my opinion.
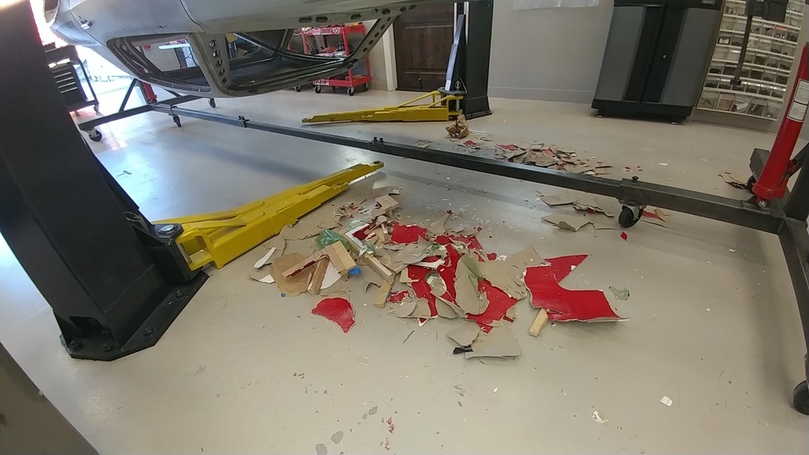
Let it cure for a couple days before taking out of the molds. I broke the mold up to get the part out which is necessary as this shape doesnt really allow for proper mold reliefs.
Let me know if you have questions.
Here is some of the supplies
Here is the cloth template
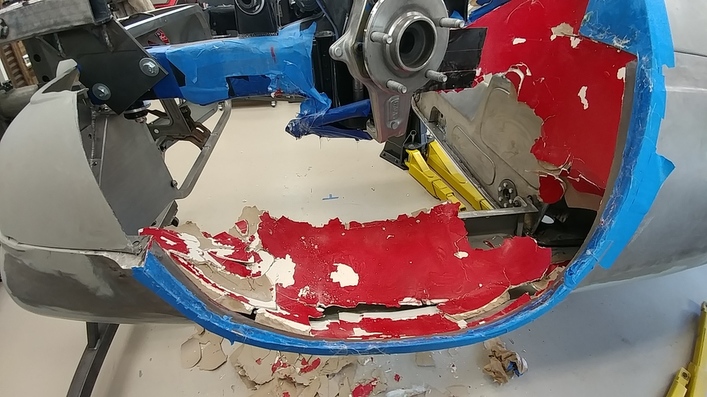
 The part all laminated up. Some people will use a razor knife to trim the excess fiberglass off as the part is curing. I don't like doing this because it adds some risk that you will accidentally delaminate some of the part. I prefer to just cut/grind it off after it cures, it's safer.
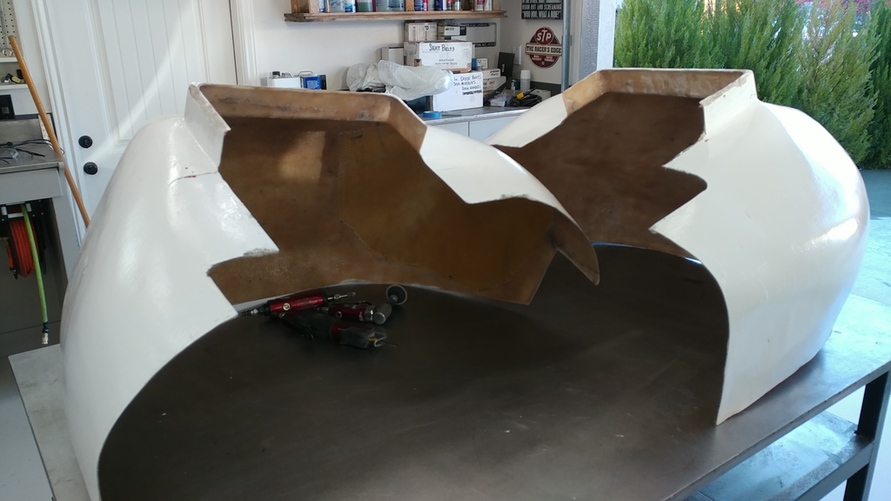
 Here is the beginning of breaking out the mold.
 Busted up mold.
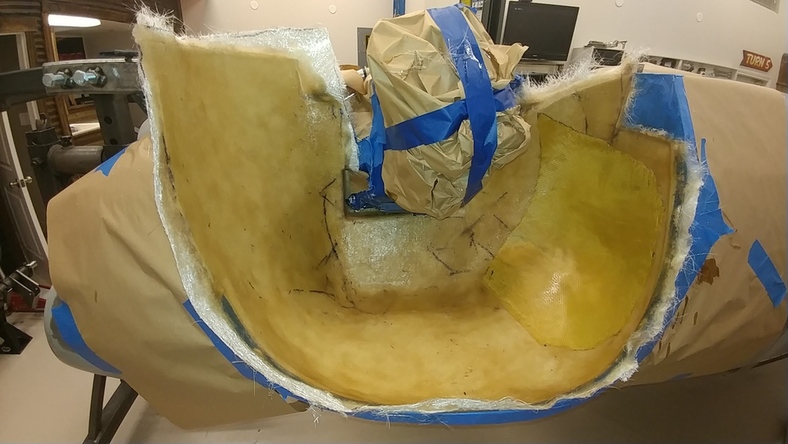
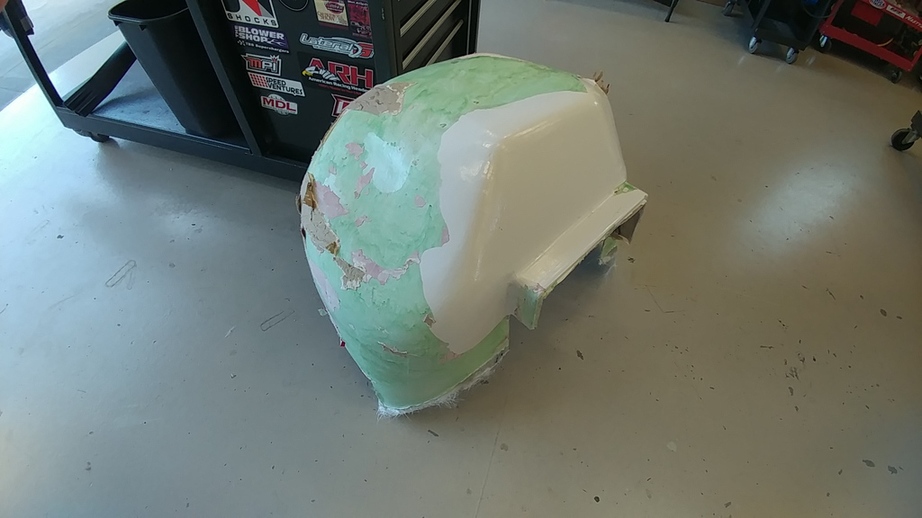
 Here is the part right after removing from the mold. The green is the PVA, you can peel off most of it, then just wash the rest off with water and a little scrubbing.
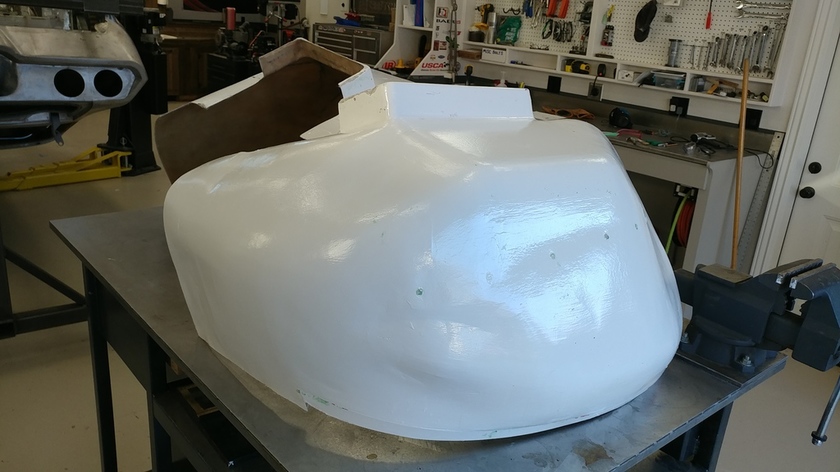
 Ready for finishing.
|