continued from above


We ordered this with the optional mounting cage from Radium. Sure, we could have built this, but not likely for as little as they charge. The work now was making this fit the larger opening of the stock tank. We experimented with front to back as well as height adjustment then Evan started making the pieces to fit that spot.


With some steel angle tack welded in place and load spreader plates at the rear frame rails, the mounting cage was clamped in place. Then some a drill fixture was made from CNC machined bushings we use for something else.


That allowed him to perfectly drill these smaller holes though the Radium cage and into his angle structure. The angle structure was then finish welded and primed in the car.


The final install of the cage (above left) uses hardware from the steel can of the fuel cell (above right) and bolts into threaded inserts through the cage and into the steel angle mounting structure Evan added.

This ended up being one of the slickest - and quickest - fuel cell installs we have ever done. This won't be the last Radium Engineering modular fuel cells we install, that's for sure.
DRIVETRAIN REVEAL
Some of this has been known before - this car came in here with a built Currie Ford 9" rear axle (below left) and we added the crate 525hp LS7 (below right).

One thing I was under NDA not to disclose until November 2020 was the
Tremec TKX 5 speed manual transmission, which we got early due to our testing relationship with Tremec.
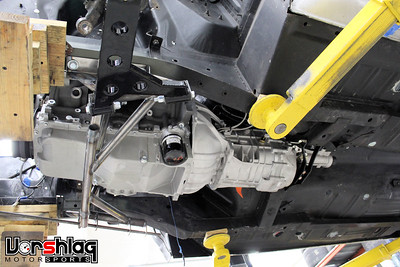
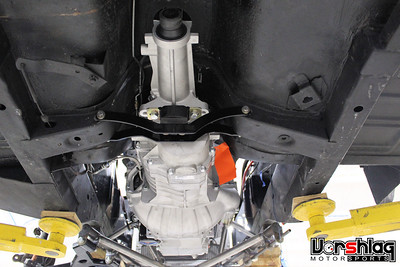
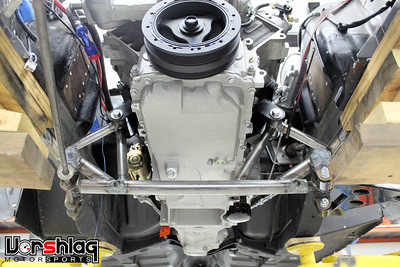
This is a clean slate redesign of the old TKO transmission with modern 3-piece synchros, carbon blocker rings, a new case, new everything. It is still very compact and lighter than any T56 Magnum, which would have taken tunnel surgery work to make fit. As it is the TKX was a super easy install. We did zero cutting, just made the transmission crossmember shown. That's it. It bolts right in.
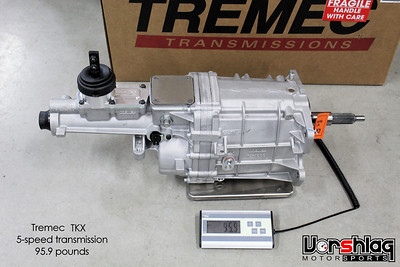
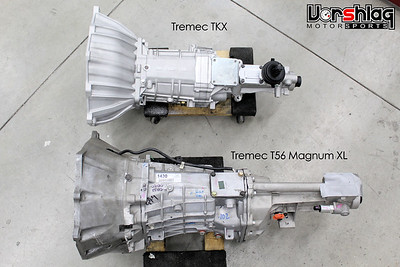
The T56 Magnum was what we would have used, but when the opportunity came up to test the TKX on two chassis in our shop (E46 LS swap endurance car + this 67 Mustang) we jumped at the chance. The TKX seems perfect for this build, as it is lighter (95.9 lbs vs 128 pounds for Magnum XL) and smaller than the Magnums in every dimension.
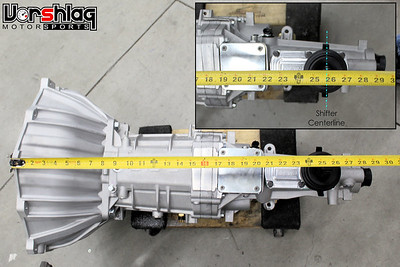

The TKX is a great size for this car, and I took a measurement showing the bellhousing to rear most shifter location above. It is rated for 600 ft-lbs of torque and comes in several gearing options. We had this bolted up to his crate LS7 engine in early May 2020.


The RAM heavy duty hydraulic throw out bearing slave kit was used, shown above left. This slides over the input shaft and one bolt on the front bearing retainer is replaced with a stud to locate the slave. This was shimmed to work with the LS7 clutch and flywheel that came with the crate engine.


We built custom lines for the Wilwood slave cylinder that Adam already had in the car for use with the T5 the car used to have. The crate motor came pretty complete but Evan removed the intake and exhaust manifolds to make installation easier.


With the appropriate bellhousing attached the engine was attached to our hoist and leveler and Brad and Evan installed this into the chassis in early May 2020. We had a mock-up LS engine in place for months while we worked on the TKX crossmember and other work.


The stock Tri-Y manifolds were too bulky to fit but these 1-7/8" stainless long tube headers we developed for another LS swap happened to fit perfectly. After 12 different chassis we have swapped so far, we FINALLY got lucky and had one set of headers that actually fit. This saved us MONTHS of development work. I will show the header install in another section, below.
ROLL CAGE WORK
In late May we made some good progress on the roll cage. We had already cut out the old 4-point roll bar, relocated the main hoop back almost 10 inches and added some "feet" to mount that onto the rear seat shelf. This gives more room to the driver and we were able to raise up the hoop to nearly touch the roof skin.


The rear downbars were re-routed to the trunk and then Evan started on the forward hoops along the top of the doors and down the A-pillars.

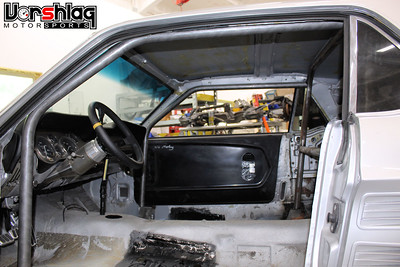
That worked out well, and we will not add a "dash bar" - which would require a lot more surgery. Instead the factory dash will remain intact. This car is being built for fun HPDE and Time Trial events, not wheel to wheel racing. It will also be street driven, so some compromises are being made to accommodate both track and street use.


At the end of May, Adam came by and we test fit him in the car (above left) with multiple seats, including this Sparco EVO II and his Corbeau seats the car came in with. This helped us design the floor mounting brackets, which will also reinforce the somewhat weak factory floor.


The shop schedule got pretty hectic but at the end of July, in his last weeks with us full time, Evan managed to wrap up the upper windshield bar. This was bent, fitted, and tacked in place.


He also finished the main hoop diagonal (above left), which was fitted around Adam's seating position. The rear down bars were also tacked in place with load spreader plates in the trunk. The only tubes left are the harness bar and door bars, which will be "NASCAR" style and cut into the composite doors. The cage is only tacked in place, and the front tubes land on removable plinth boxes. When the door bars are complete we will drop the cage down off the plinths, finish TIG weld the tops of the cage, then raise it back up and finish the rest of the welding in situ.
COOLING & OILING SYSTEM PARTS ADDED
Back in July, as the he LS7 and TKX drivetrain were installed, it was time to start looking at the cooling and oiling system parts needed. Adam had a nice oversized aluminum radiator and large electric fan, so those were reinstalled and will be utilized - with some additional shrouding panels ahead of the radiator.


It was time to lay out where the coolant reservoir and oil tank would fit. We ordered this billet remote coolant reservoir from Radium and it can fit lots of places, since the size is pretty compact. But not there, above right. Something else needs to go there.


The oil settling tank needed for the LS7 dry sump system is rather large, but the OEM version is one of the only ones out there that has an
actual dip stick. It seems crazy, but its true - so we ordered one of these from a local race shop. Measuring proper oil level in aftermarket dry sump tanks is amazingly difficult. I asked Evan make a cardboard cylinder to mimic the OEM tank's shape and it looked like nowhere would be good fit, without some cutting.


We determined that the only viable spot for this tall oil tank was the RF corner of the engine bay, and Evan cut away some of the inner fender to make room. It was at this point that we realized that we needed the fenders, hood, and headlight buckets installed to lock down the final location - as the tank was going to need every inch of room vertically, and would be close to the headlights and tires.


This is where we stopped on these systems in July 2020. We needed to finish the fuel system to finalize layout of the regulator and cold air inlet tube, and we needed the nose back on the car to layout the engine oil and power steering coolers. We knew roughly where they could fit but didn't want to order those pieces until we were sure and had the body all put together.
POWER STEERING PUMP
Adam had issues with the power steering pump with the old 1985-90 5.0L Ford V8, and had purchased an expensive KRC road race style power steering pump kit to fix that issue with on the old V8.


When it was determined that he wanted to stick with hydraulic power steering on the LS7 engine, we called up and ordered the LS7 bracket and proper pulley (above right) for use with the LS brackets and RPM range the engine could see.


These parts arrived after Evan had left us, but he came back for a few days in September and knocked out the pulley swap, which is not a trivial task unless you have the right puller and installation tools. The bracket bolted to the block, as shown above.
continued below