I almost feel bad crawling back here to do an update since it's been so long...once spring semester rolled around, it's been non-stop for me between yardwork, married life, school, work, and the car.
I honestly forgot where I left off, so I'll try to pick back up at a reasonable spot.
Finally got around to trimming the inner fenders on the car so the 275's fit, I'm sure it'll have to get a little more taken off since the rear end may have some lateral sway, but I'll cross that bridge when I get to it. For now, I just wanted to get the tires clear.

This pic really makes me rethink having 17's all the way around...kinda leaning towards 18's out back with a taller tire, but I'll wait until the engine is in the car with the front fenders on before I make my final judgement.

Ordered a bulk amount of loom clamps from Del City. I doubt I'll use them all in this build, but I still want them for the next car, regardless of what it is.

Terminal stack-up similar to how we assemble them in the aerospace industry...

Fuel feed(-6AN) and return (-4AN), more on that in the next pic...

Nicely tucked into the frame rail, third clamp is for the brake line. For now, I'm going with a -6AN feed since I'm rebuilding the 326 to go back into it. When I finish the 400, I'll probably be stepping up to a -10AN feed, and at that point I'll go hardline on the fuel feed which will be an almost identical outside diameter to the stainless braided line. Fuel return will likely stay at -4AN.

Striking a pose before the engine teardown began...and to give y'all a sense of how small of a garage I'm building this thing in, haha.

The only real victim of the 326 teardown...front timing cover. Corroded from the inside-out, took a 5 lb sledgehammer to get it off since the bolt was spinning, but corroded to the housing. If I could've gotten the crank out, I would've just spun the entire timing cover off, but that wasn't gonna happen, so I had to get violent on it.

I took all of the engine parts to Simon's Balancing & Machine in Charleston, SC. My Uncle Pete trusted them with all of his engine work before I was even born, so they were the ones who got my business, and will continue to. Boss Dawg inspecting everything on it's return from machining...

Turns out the 326 had already been rebuilt once 0.040" over, and it unfortunately had some inconsistencies and I had to step it up to 0.060". At this point, CID is 336 and it has a nearly square bore x stroke. 3.750 stroke and 3.800 bore.

Connecting rods were inspected and deemed worthy of being re-used, fresh OEM spec slugs and pins with ARP rod bolts.

Luckily the crank came out not needing any major work. Polishing on the main journals and the rod journals had to be ground to 0.030" under.
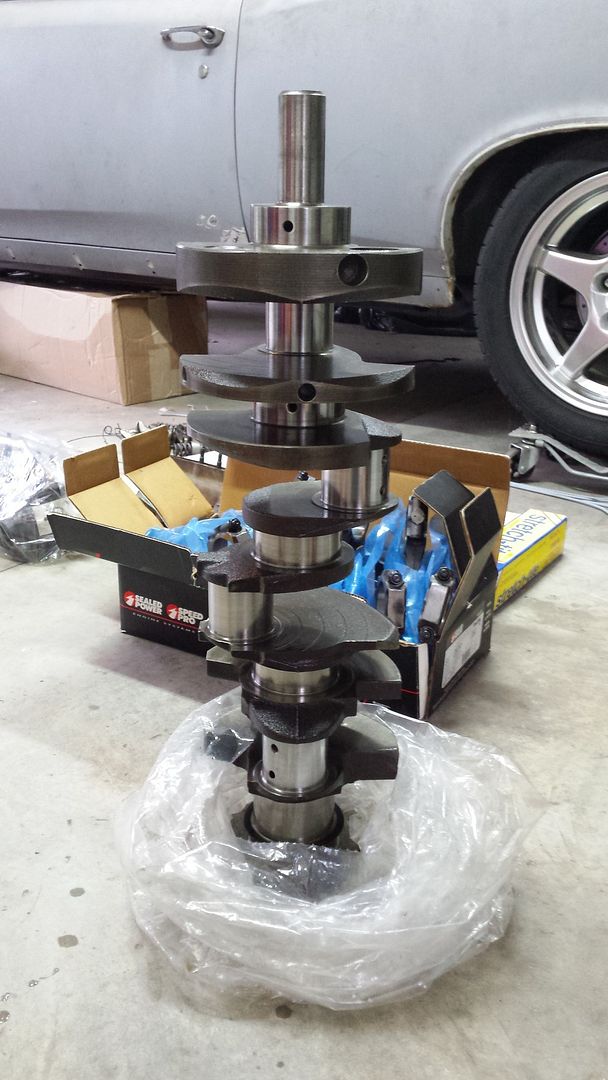
Went through and checked all my clearances, everything came out to an acceptable spec. Rod journals were a little tighter than I'd like them to be for a street engine, but the mains were spot on. But, she turns smooth and consistently which is the important thing. Boss Dawg making sure I'm working hard...

Rotating assembly complete with camshaft and timing set installed...

Speaking of the camshaft...I probably went a little more aggressive than I should have, but since it's a 326 it was never going to be fast so it might as well at least sound like it goes fast, haha.

Continued in the next post...