continued from above


The main hoop was placed behind the driver and aligned closely to the factory B-pillar, placing the tubes just ahead of the back seat floorpan kick-up for the fuel tank. The lower landing points were reinforced with steel plate as well as sitting on top of plinth blocks, to raise the cage up off the floor. In the pictures below you can see the plinth structures (below left) and how the cage was dropped at the front to weld the top joints (below right). Dropping the cage off the plinths allows the cage to be lowered by that distance, to get full 360° welds around each tube. This seems common place, but I cannot count how many cages we've seen done without full welds around all tubes. This is one of those "cost saving" features that often happens on lower cost roll cages. I talk more in depth about "why roll cages cost money"
in this forum post.

 continued from above
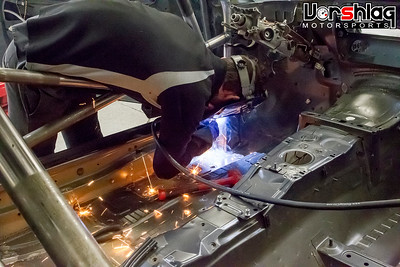
Removing the roof panel made the main hoop upper joints a little easier to weld, and we could have done this cage build with the roof installed. Since it was getting a carbon roof to emulate the CSL model and reduce weight, it made it that much easier.

The image below left shows the main hoop being welded to the upper cage bars. Even with the factory roof removed we still needed the plinth blocks on the main hoop landing points to gain enough access for final welding on the top of the cage. The upper door / roof structure panels were still in the way. You can see on the below right picture (with the cage raised up on the plinth blocks in place) the curvature of the upper cage sections and how far up into the roof area they go. More head room, better forward visibility, tighter fitting to the outer panels.


Once the main cage structure was fully welded together the front was raised up on the plinth blocks and they were welded into the chassis (below left). The main hoop was welded to the load spreading plates, which themselves had been welded to the floorpan (below right)

The door bars were a simple "X" style design due to the need for functional door windows. Not ideal, but one of the compromises we had to make for Optima series. We also added a "FIA compliance" bar at the front of the door opening to give more column strength to the side of the cage in the event of a rollover. This is commonly done on road racing cars with high rake windshields and in rally cars. The image below left has the plinth blocks removed, below right has them in place and welded.


With the main sections welded together and to the chassis we looked at additional points to tie the cage into the unibody. The low mounted horizontal bar between the main hoop's lower bars rests right against the rear seat vertical floor section, which was joined to the tub with several stitch welds along this tube. The A-pillar cage bars were also tied to the chassis with some load plates that featured dimple die formed stiffening holes. We may do the same thing at the B-pillars later in the build.


Last but not least, the horizontal harness bar was added after the seat placement was finalized. Ryan added a "taco plate" reinforcement to the X bar joint inside the main hoop.

There's still a few gussets and bits we might add, and some short sections of tube to tie the harness bar into the main "X", but the main part the roll cage is complete. Remember: this isn't the
only way to make a roll cage for an E46. This is built as a Time Trial / Optima Street Car competitor, so there are multiple compromises made to meet some conflicting needs.
LOW PROFILE DOOR PANELS
 To race in Optima series you can't do door bars like this and keep all the points. Compromises for rules are all part of the game.
After we realized we needed to keep the door glass, we knew that we would have to rework the factory door panels - which were just too thick to allow adequate room to the driver's elbow with door bars. We prefer for a race car to have fixed Lexan or no door windows at all, then we can gut the structure inside the doors and push the cage door bars out to the outer skin. This always gives more room to the driver - which is helpful to absorb energy in a side impact (more common in wheel to wheel racing).
Optima dings you heavily for not having working door glass, so the X-bar layout on the doors was a concession to that series.
continued below