...

Go Back   Lateral-g Forums > Lateral-G Open Discussions > Project Updates
User Name
Password


Reply
 
Thread Tools Display Modes
  #81  
Old 04-17-2009, 11:32 PM
67SS350 67SS350 is offline
Junior Member
 
Join Date: Jun 2008
Location: Mass
Posts: 5
Thanks: 0
Thanked 0 Times in 0 Posts
Default

I agree as well... pretty motivating... i've had my 67 since I was 15 (23 now) went thru engineering school and painted the car... but no "real" work since freshman year.... I would love to do an LS1 brake conversion, astro hydroboost... and a well sorted suspension... but theres always a but... and I just keep thinking the car is "OK" the way it is.... but it could be so much better...

so keep it up, the car's stance looks great, would love to hear how it does on the track compared to LS1 camaro's and stock C5's. AutoX'ing a 1st gen would be great, you'd deff be turning heads amidst all the wrx's and mazdaspeed3's!!!!!
Reply With Quote
  #82  
Old 04-25-2009, 08:26 PM
sik68's Avatar
sik68 sik68 is offline
Senior Member
 
Join Date: Jul 2006
Location: San Francisco
Posts: 505
Thanks: 0
Thanked 0 Times in 0 Posts
Default

Quote:
Originally Posted by 67SS350 View Post
I agree as well... pretty motivating... i've had my 67 since I was 15 (23 now) went thru engineering school and painted the car... but no "real" work since freshman year.... I would love to do an LS1 brake conversion, astro hydroboost... and a well sorted suspension... but theres always a but... and I just keep thinking the car is "OK" the way it is.... but it could be so much better...

so keep it up, the car's stance looks great, would love to hear how it does on the track compared to LS1 camaro's and stock C5's. AutoX'ing a 1st gen would be great, you'd deff be turning heads amidst all the wrx's and mazdaspeed3's!!!!!
Ugh, you have no idea how many haters/doubters there are about the level of performance of these modified 1st Gens! Thanks for checking in, and start tearing into your car! PS, my daily driver is a WRX, and its a slow POS, haha.
__________________
Steven

1968 Camaro: "TRACKDAY"

Build In Progress: https://lateral-g.net/forums/showthread.php4?t=10706
Reply With Quote
  #83  
Old 04-25-2009, 08:27 PM
sik68's Avatar
sik68 sik68 is offline
Senior Member
 
Join Date: Jul 2006
Location: San Francisco
Posts: 505
Thanks: 0
Thanked 0 Times in 0 Posts
Default UPDATE: It's all coming together

Well it's been nearly 2 months, but I finally had a chance to work on my car this weekend. Here's the latest

1) Composite Distributor Gear:

My Mallory Unilite distributor had a steel gear. For roller cam applications, I kept reading that it is important to run a bronze or composite gear. So, I bought the Comp Cams composite gear ( 0.491" for Mallorys). For what it's worth, it's less rotating inertia than the bronze, haha.

Here's a side-by-side (steel one still on distributor):


Here's showing how I knocked out the pin using a hardened nail that fit just right.


Linkage just doesn't make functional sense to me. So the next thing I did was install the Lokar throttle cable and gas pedal. This is probably one of the easiest things I have done to this car. Here's the midnight series pedal:


The arms are splined, so that you can clock the height of the pedal to your preference. Great for getting those heel-toe downshifts just perfect.


Here's where I determined where to drill the 5/16" hole, which puts it nearly dead on with the throttle lever:
__________________
Steven

1968 Camaro: "TRACKDAY"

Build In Progress: https://lateral-g.net/forums/showthread.php4?t=10706
Reply With Quote
  #84  
Old 04-25-2009, 08:28 PM
sik68's Avatar
sik68 sik68 is offline
Senior Member
 
Join Date: Jul 2006
Location: San Francisco
Posts: 505
Thanks: 0
Thanked 0 Times in 0 Posts
Default

Here's the Lokar cable. I put a washer on both sides of the nuts as I think it looks better:


Here's the linkage on the pedal side. This is the first Lokar stuff I have owned....their quality really lives up to the hype:


And here's an overview of the installation in the footwell:


Stay tuned, as I will soon jump into the transmission installation, which will signify the end of this phase of the project (I think). I want to drive this thing soooo bad.

Thanks!
Steven
__________________
Steven

1968 Camaro: "TRACKDAY"

Build In Progress: https://lateral-g.net/forums/showthread.php4?t=10706
Reply With Quote
  #85  
Old 04-25-2009, 09:17 PM
will69camaro will69camaro is offline
Lateral-g Supporting Member
 
Join Date: Dec 2004
Location: Houston
Posts: 1,479
Thanks: 269
Thanked 185 Times in 101 Posts
Default

Thanks for the update! That pedal looks pretty nice. I've been looking for a simple solution to the rigged setup I had on my car. When I go to replacing I will have to look into that pedal/cable assembly.

William
__________________
Texas A&M BSME 2008
1969 Camaro - Hugger Orange
1969 C10 SWB - Hugger Orange
1992 Corvette ZR-1
2021 Ford F250 Tremor
Reply With Quote
  #86  
Old 05-10-2009, 11:10 PM
sik68's Avatar
sik68 sik68 is offline
Senior Member
 
Join Date: Jul 2006
Location: San Francisco
Posts: 505
Thanks: 0
Thanked 0 Times in 0 Posts
Default

5/10/09 Update

Well today was the day I have been anticipating for a long time...the beginning of my first flywheel/clutch/bellhousing/tranny install ever. To be honest, I had never seen the naked back end of an small block chevy until I took delivery of my 355. This was a true first-timer experience, so I hope to offer encouragement to those of you who are on the fence about DIY tranny install.

I think this would have been a whole lot more difficult if the engine were in the car. Having it dangling from a cherry picker (with a safety lockout of course) is way easier.

First I tapped in the pilot bearing into the bore of the crank, which went in without any distress. Then hammered in the straight dowel pins, and hung the block protector plate. Summarized in this picture:

Keen eyes will notice that that is not a standard chevy pilot bearing. True; This is a lakewood adaptor bearing (15975) to put a ford tranny behind and SBC. The TKO I have is the ford style, with a longer input shaft.

Next, I mocked up the Fidanza 153 tooth aluminum flywheel (198541), 10.5lbs. Caution, the pressure plate bolts I show (6 around the outside) are for mockup puposes only, use the proper pressure plate fasteners.

I have been raising quite a few eyebrows when I tell people I am running an aluminum flywheel. Here is some discussion of the issue: http://www.pro-touring.com/forum/showthread.php?t=55266 . I think I am a good candidate for an aluminum flywheel, based on my gearing. I could be shooting myself in the foot on this one, but I know this is something that I will regret if I don't try for myself. Make sure you are using flywheel bolts, not just any old grade 8 hardware. Here I used ARP 2801.

Next, I mocked up my new starter (Summit 820323) to check for tooth alignment:

I used 2 shims to achieve proper alignment per the instructions. I didn't have to knock out the "knock out plate" on the block protector, so that was good.
__________________
Steven

1968 Camaro: "TRACKDAY"

Build In Progress: https://lateral-g.net/forums/showthread.php4?t=10706
Reply With Quote
  #87  
Old 05-10-2009, 11:11 PM
sik68's Avatar
sik68 sik68 is offline
Senior Member
 
Join Date: Jul 2006
Location: San Francisco
Posts: 505
Thanks: 0
Thanked 0 Times in 0 Posts
Default

Aluminum isn't magnetic:

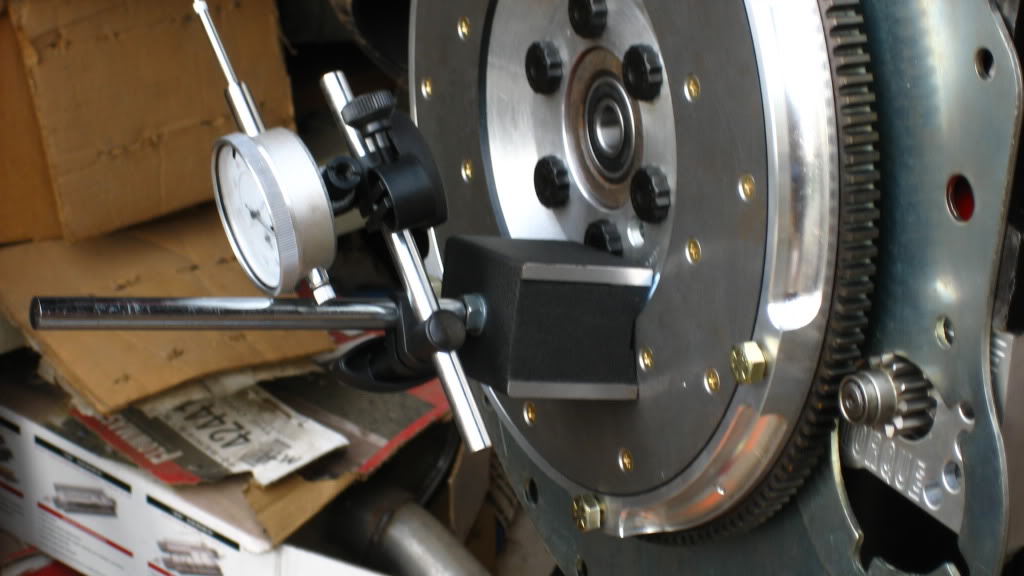
Much tougher to find a good mounting position for your dial indicator when doing a bellhousing alignment if your magnetic base indicator doesn't stick to a good portion of your flywheel. I had to use the bolts and the friction surface simultaneously...it was stable though. This was by far the most tedius task of the whole process.

About the bellhousing alignment, there is plenty of information online about how to do it. www.classicchevy5speed.com has a video, and there are tons of other resources... if your engine is out of the car, I would recommend you do it yourself. It may take a weekend of zen-like patience, because you're knocking dowel pins in and out, positioning your dial indicator, and bolting and unbolting your bellhousing, but it's not difficult.

Here's the bellhousing I am using, Lakewood 15030:

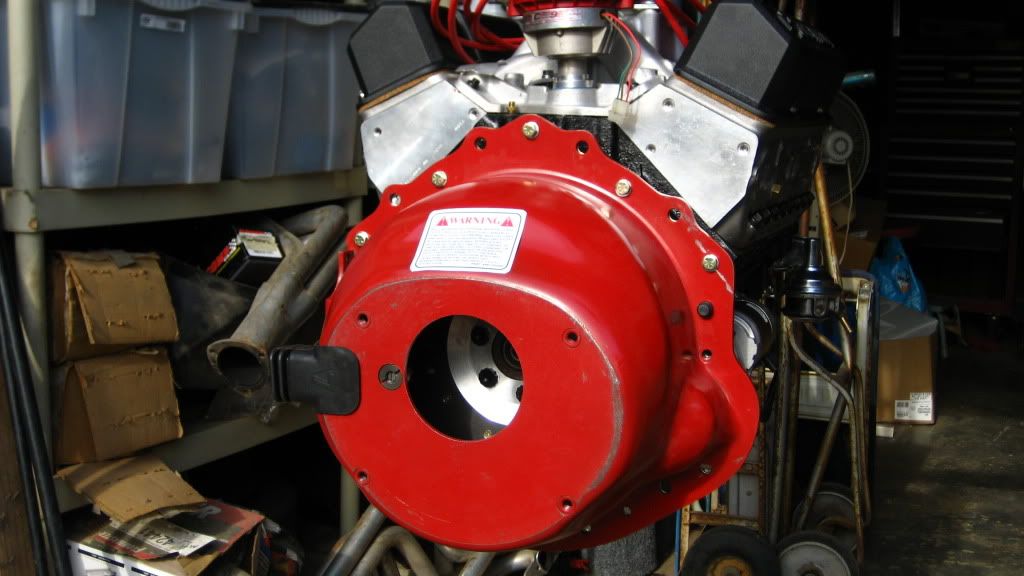
In conjunction with the pilot bearing I showed you, this particular Lakewood is used to adapt a Ford-input-shaft TKO to a small block chevy. The Ford input shaft is roughly 0.3" longer, so the bellhousing is longer to accomodate. I have read (and believe) that the Quicktime bellhousing (RM-6064) is more spot-on than the Lakewood, but I got this bellhousing used so it was worth a try.

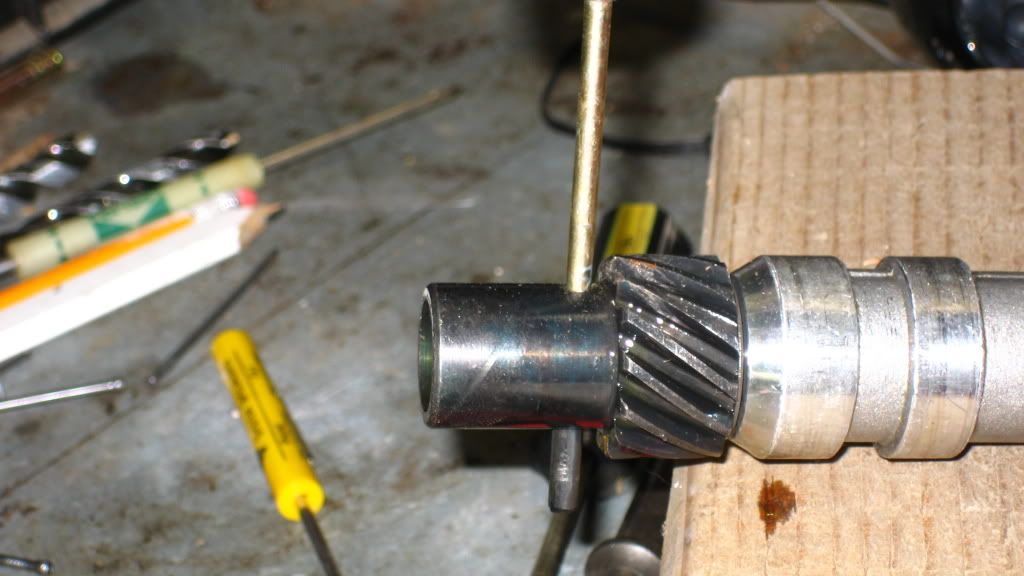
My remarks on Offset Dowels

In addition to the straight dowels, I bought all 3 offsets: 0.007, 0.014, 0.021 to have on hand. The dowels themselves come with no mention of where the high/low point actually is on the dowel, stupid. Anyways, what I did is just put a straight dowel side by side with an offset dowel and shine light through them. A little crude, but my brother and I both came up with the same point, so I was satisfied. After 6 alignment tries and the typical dial indicator math (a couple just to ensure repeatability), I came within the 0.005 tolerance using the 0.007 dowels clocked at about 12:30. Parallelism was within 0.002 as well. My experience, Lakewood isn't so bad.

To round out the weekend with some eye candy, I mocked up my 10.4" Centerforce dual friction clutch & pressure plate (DF161739) on the flywheel (note again that the pressure plate bolts I show are for mockup only...will use proper hardware for final install):


Centerforce lists 3 dual friction clutches for SBCs:
DF161056 $ XXX ftlbs <--weakest one
DF161675 $$ 430 ftlbs <--marginal for me if I decide to run slicks
DF161739 $$$ 530 ftlbs <--just right

Summit racing lists the clutch I got for Pontiacs only...but a call to Centerforce said that it can be used on SBC's as well.

Well that was 2 days worth of work; thanks for tuning in. Getting there!
__________________
Steven

1968 Camaro: "TRACKDAY"

Build In Progress: https://lateral-g.net/forums/showthread.php4?t=10706
Reply With Quote
  #88  
Old 05-24-2009, 10:06 PM
67SS350 67SS350 is offline
Junior Member
 
Join Date: Jun 2008
Location: Mass
Posts: 5
Thanks: 0
Thanked 0 Times in 0 Posts
Default

I just did the IROC Z steering box update and have had quite a time getting a replacement steering line fitting for the line that is in the car... I'll probably end up getting custom hoses made and drive the car like that for the summer.

Next is a disc brake conversion in the fall... but I'd like to keep it to a minimum investment!!!

in the meantime I'll be doing an engine swap on my winter car... 89 325iX
__________________
1967 Camaro - 350 with 4 speed
1989 BMW 325ix (winter car)
White C5
Reply With Quote
  #89  
Old 05-24-2009, 10:15 PM
67SS350 67SS350 is offline
Junior Member
 
Join Date: Jun 2008
Location: Mass
Posts: 5
Thanks: 0
Thanked 0 Times in 0 Posts
Default

meant to add that the wheels and the stance looks great
__________________
1967 Camaro - 350 with 4 speed
1989 BMW 325ix (winter car)
White C5
Reply With Quote
  #90  
Old 05-24-2009, 10:40 PM
waynieZ's Avatar
waynieZ waynieZ is offline
Lateral-g Supporting Member
 
Join Date: Oct 2006
Location: Ma
Posts: 8,491
Thanks: 939
Thanked 342 Times in 231 Posts
Default

As always very nice work and an excelent explanation of the process.
__________________
_Wayne________

___________________________________
https://lateral-g.net/forums/show...ghlight=FNQUIK
Reply With Quote
Reply


Posting Rules
You may not post new threads
You may not post replies
You may not post attachments
You may not edit your posts

BB code is On
Smilies are On
[IMG] code is On
HTML code is Off

Forum Jump


All times are GMT -7. The time now is 04:27 PM.


Powered by vBulletin® Version 3.8.11
Copyright ©2000 - 2025, vBulletin Solutions Inc.
Copyright Lateral-g.net