...

Go Back   Lateral-g Forums > Lateral-G Open Discussions > Project Updates
User Name
Password


Reply
 
Thread Tools Display Modes
  #141  
Old 09-29-2020, 09:20 PM
bkswede bkswede is offline
Senior Member
 
Join Date: Oct 2013
Posts: 163
Thanks: 6
Thanked 140 Times in 83 Posts
Default ‘63 Chevy II Pro-Touring Build

Stopped by the shop today to check out progress on the Nova and work through some questions on wiring with Kurt and his team. They’re nearly finished with the wiring, and doing a great job of routing the wiring and plumbing neatly and out of sight. A/C, heater hoses and heater control valve all hidden under the passenger inner fender well. The heater hoses and A/C hoses that are shown in the pictures routed into the engine compartment aren’t yet cut and fit to the water pump and A/C compressor. Once those are fit, we will secure those hoses and route them more neatly into the engine compartment.

Name:  IMG_0549.jpg
Views: 0
Size:  108.0 KB
Name:  IMG_0565.jpg
Views: 0
Size:  125.4 KB

The pulse width modulation fan control module is also mounted under the passenger inner fender well, as is the A/C drier. The output from the PWM fan control module is wired into a really slick Spal harness that splits the single set of output wires to the fan into two sets of outputs to feed each of the Spal fans, all using Spal wiring connectors. The dual wiring harness is fed through the inner fender well at the base of the radiator and plugs into the fans along the bottom of the radiator - barely visible in the engine compartment.

Name:  IMG_0550.jpg
Views: 0
Size:  111.7 KB
Name:  IMG_0551.jpg
Views: 0
Size:  145.1 KB

Wiring is all ready to go for headlights, parking lights, etc. The headlights are LED with halos. The halos function as daytime running lights and are white, except when you use the turn signals, when the halos flash amber with the turn signals. A little tricky to figure out the wiring as the instructions weren’t very good, but we got it figured out.

Name:  IMG_0559.jpg
Views: 0
Size:  134.9 KB
Name:  IMG_0561.jpg
Views: 0
Size:  153.0 KB

The A/C condenser is mounted nicely and A/C lines will be run discretely through core support. Once all of the A/C lines to the condenser, as well as oil cooler and power steering cooler hoses have been measured and fit to the radiator, we’ll pull the radiator and have it powder coated (except for the core itself). Hood latch still needs to be painted...

Name:  IMG_0560.jpg
Views: 0
Size:  154.9 KB

Holley engine harness is connected, but hidden nicely under fuel rail covers. Engine bay is really clean. We need to powder coat the air intake, which isn’t shown here, but first need to weld in a bung for PCV connection.

Name:  Adjustments.jpg
Views: 0
Size:  143.3 KB
Name:  IMG_0566.jpg
Views: 0
Size:  179.2 KB

View from driver’s side inner fender well.

Name:  IMG_0563.jpg
Views: 0
Size:  130.9 KB

Kurt was working on installation of Rick’s tank and VaporWorx PWM fuel control module as I was leaving. Hope to have that installed tomorrow. Great to see continued progress!


Sent from my iPad using Tapatalk
__________________
63 Chevy II - Build in Progress
2017 Camaro ZL1
2010 Mercedes C63 AMG

Last edited by bkswede; 10-01-2020 at 09:07 PM.
Reply With Quote
The Following 4 Users Say Thank You to bkswede For This Useful Post:
EVIL SS (10-02-2020), Goosesdad (10-07-2020), syborg tt (12-14-2020), WILWAXU (12-11-2020)
  #142  
Old 10-20-2020, 08:58 PM
bkswede bkswede is offline
Senior Member
 
Join Date: Oct 2013
Posts: 163
Thanks: 6
Thanked 140 Times in 83 Posts
Default ‘63 Chevy II Pro-Touring Build

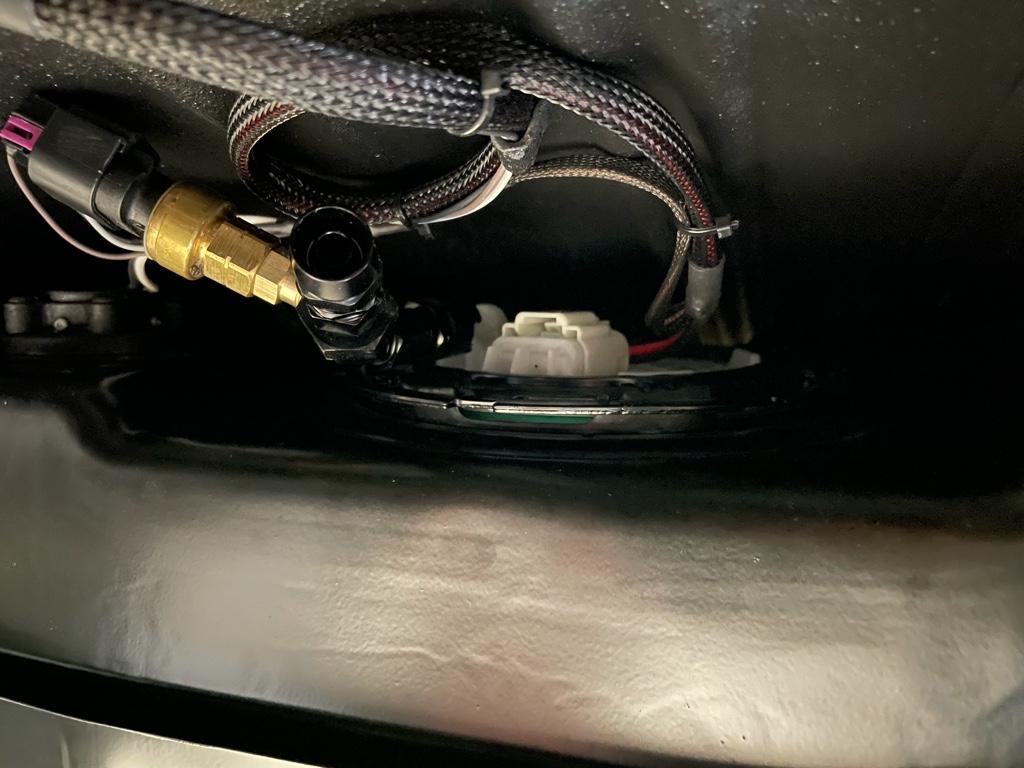
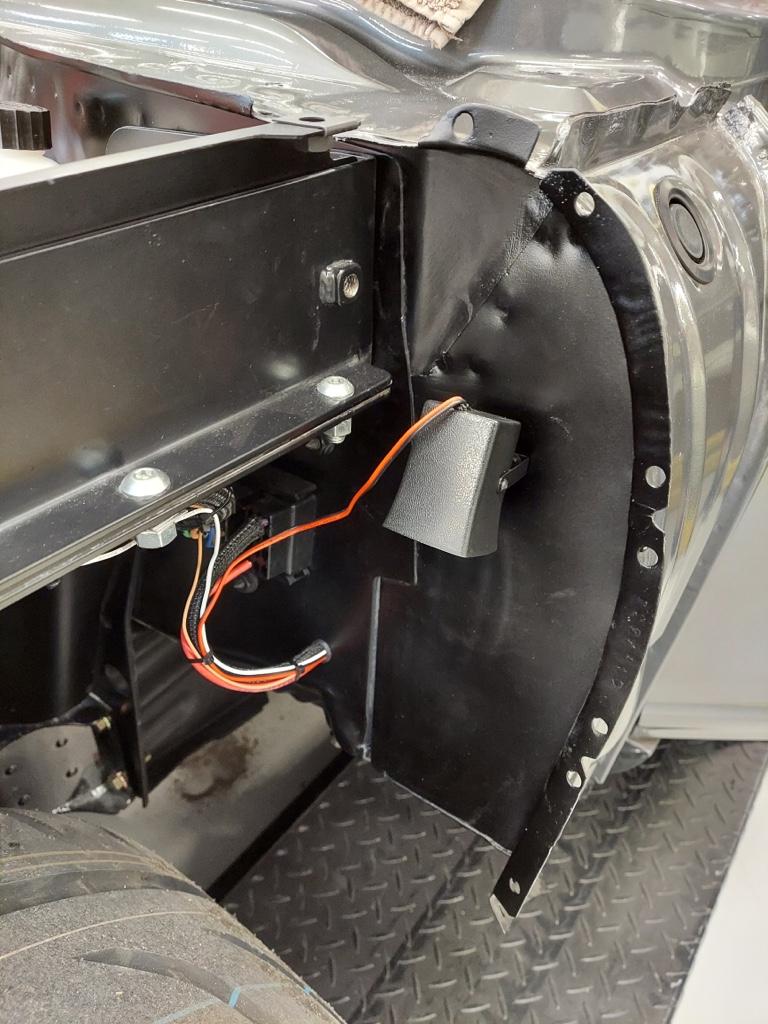
Made a trip to Eau Claire recently to meet with Kurt and check out some nice progress on the Nova. Wiring is basically finished up, but for a few items that will require mock up of center console (e.g., power window and lock switches). Kurt got the Vaporworx PWM fuel pump module mounted in the trunk (wiring is nice and tidy), along with the battery and the II Much fuel vent.

Name:  IMG_0687.jpg
Views: 0
Size:  128.9 KB
Name:  IMG_0686.jpg
Views: 0
Size:  128.2 KB
Name:  IMG_0685.jpg
Views: 0
Size:  121.5 KB

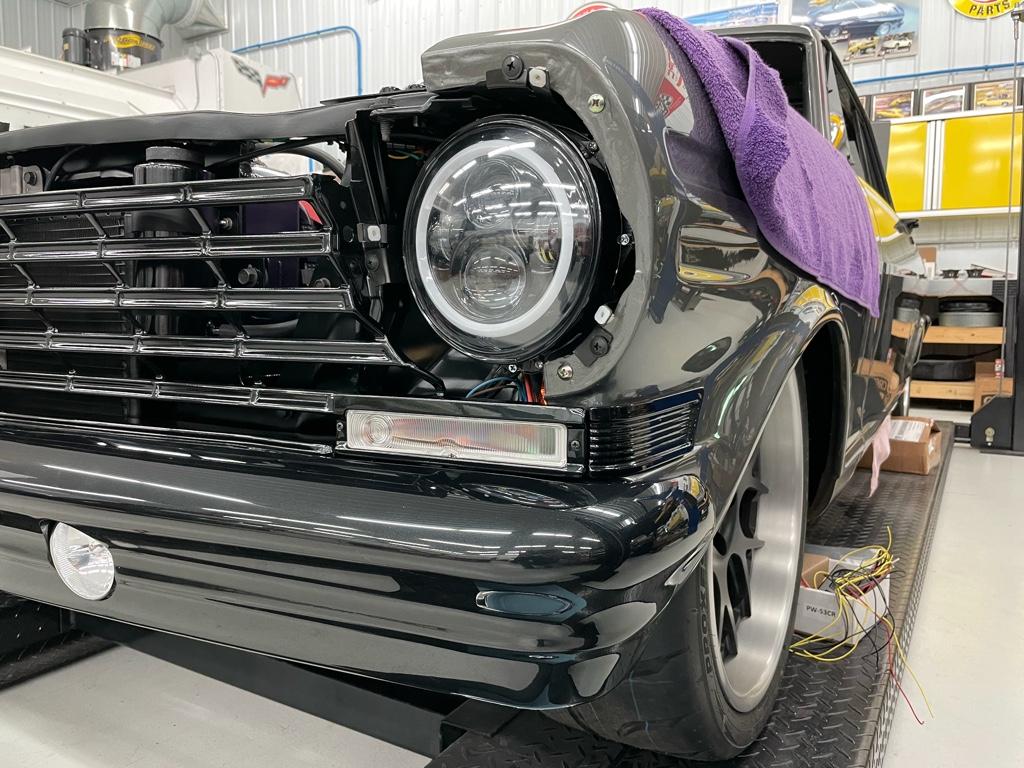
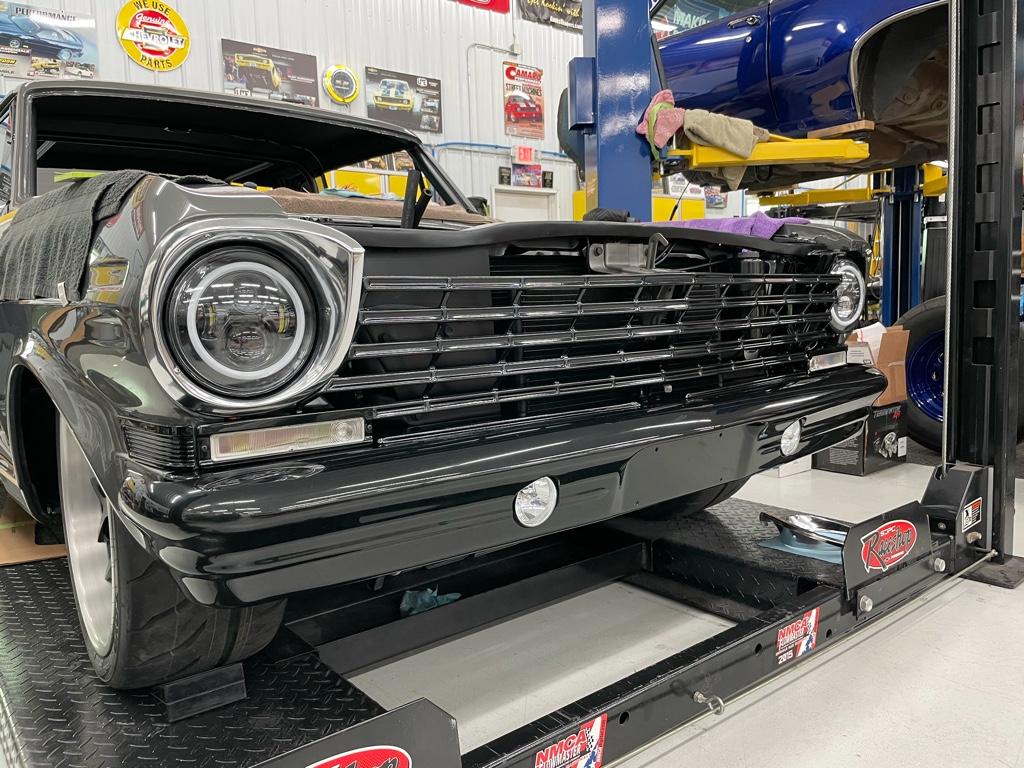
The headlights are also mounted and wired up. These headlights are LED units with halos. The halos shine white most of the time, so they serve as daytime running lights when headlights are off. When the headlights are on, I can either leave the halos on or switch them off - I have them wired to a virtual switch on the Holley pro dash. When turn signals are activated, however, the halos shine amber and blink with the turn signals. Pretty cool, and excited to see them in action.

Name:  IMG_0678.jpg
Views: 0
Size:  243.1 KB
Name:  IMG_0679.jpg
Views: 0
Size:  213.5 KB
Name:  IMG_0681.jpg
Views: 0
Size:  160.4 KB

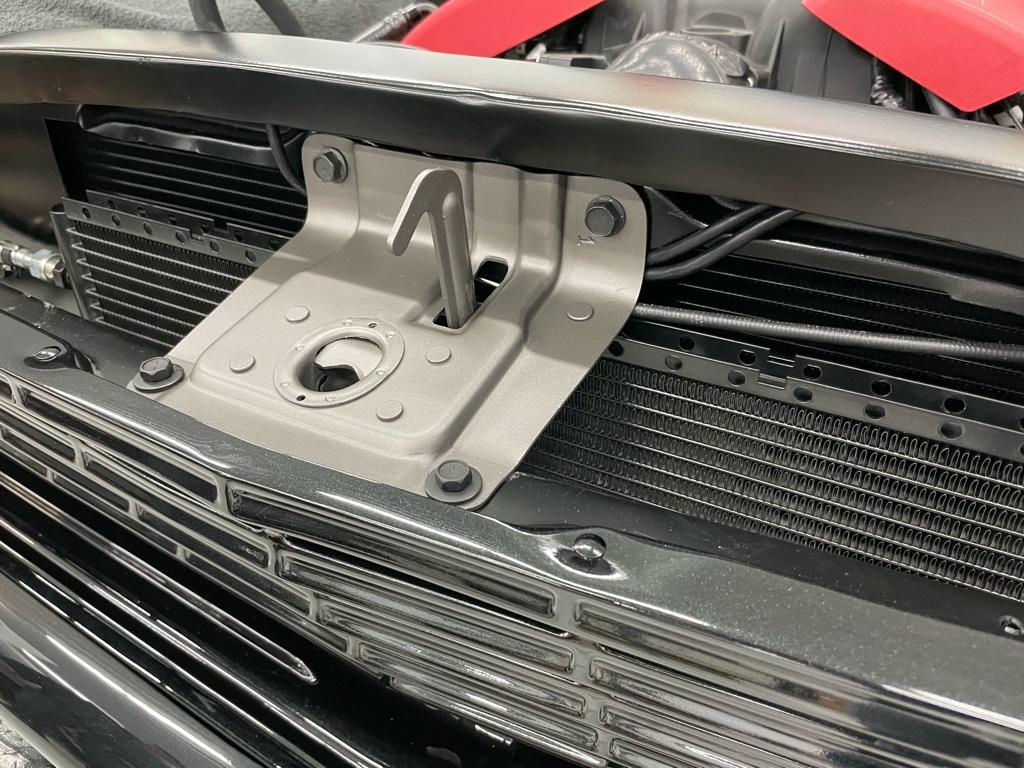
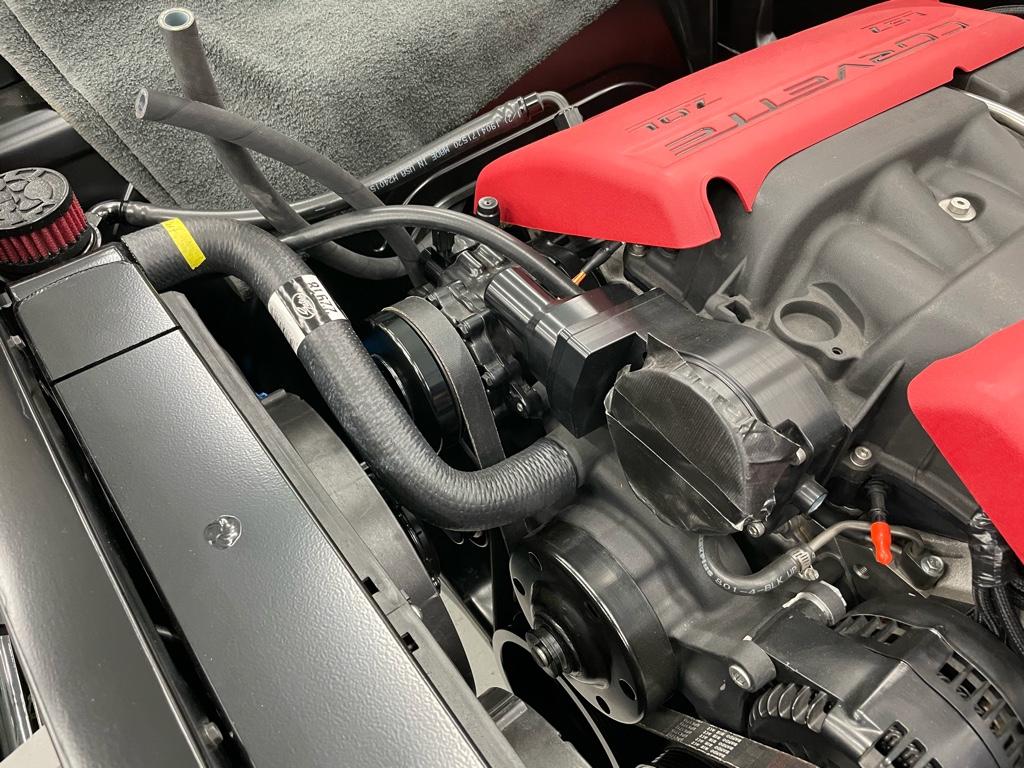
We also got the radiator back from powder coating and it turned out great! We powder coated the tanks, top, bottom and sides. The fins weren’t powder coated in traditional way, but coated in a very thin coat of similar color to ensure no degradation of thermal transmission of the fins. We still need to deal with the radiator cap. We didn’t want to coat the cap as it has a rubber gasket that we were concerned about putting in the oven as part of the curing process. Instead, we’re going to have the cap coated with Cerakote, a product similar to a powder coat, but thinner and can be air cured rather than oven cured.

Name:  IMG_0676.jpg
Views: 0
Size:  238.7 KB
Name:  IMG_0684.jpg
Views: 0
Size:  144.2 KB

We also got the catch can mounted. Went with a Mighty Mouse catch can. Will connect via a -8AN adaptor on the valve cover oil filler. We had to modify the fuel rail cover - drilled a hole and will connect a 90 degree elbow fitting with push lock hose that will connect to the catch can. Other line out of the catch can will plug into nipple on the intake manifold.

Name:  IMG_0677.jpg
Views: 0
Size:  143.2 KB

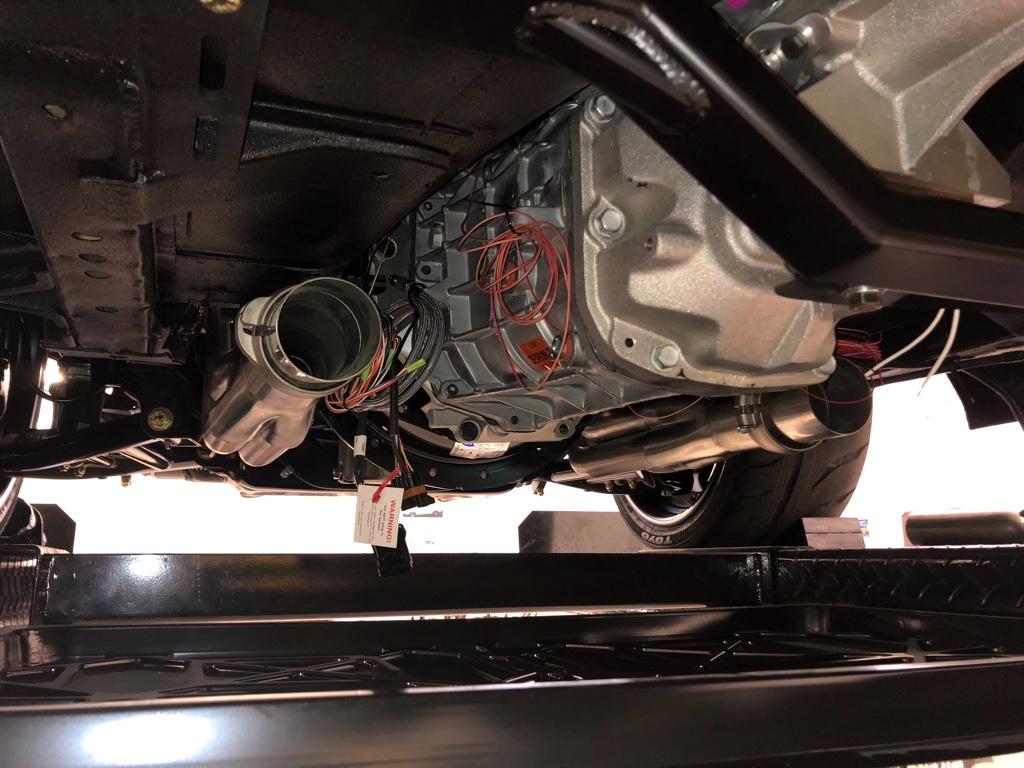
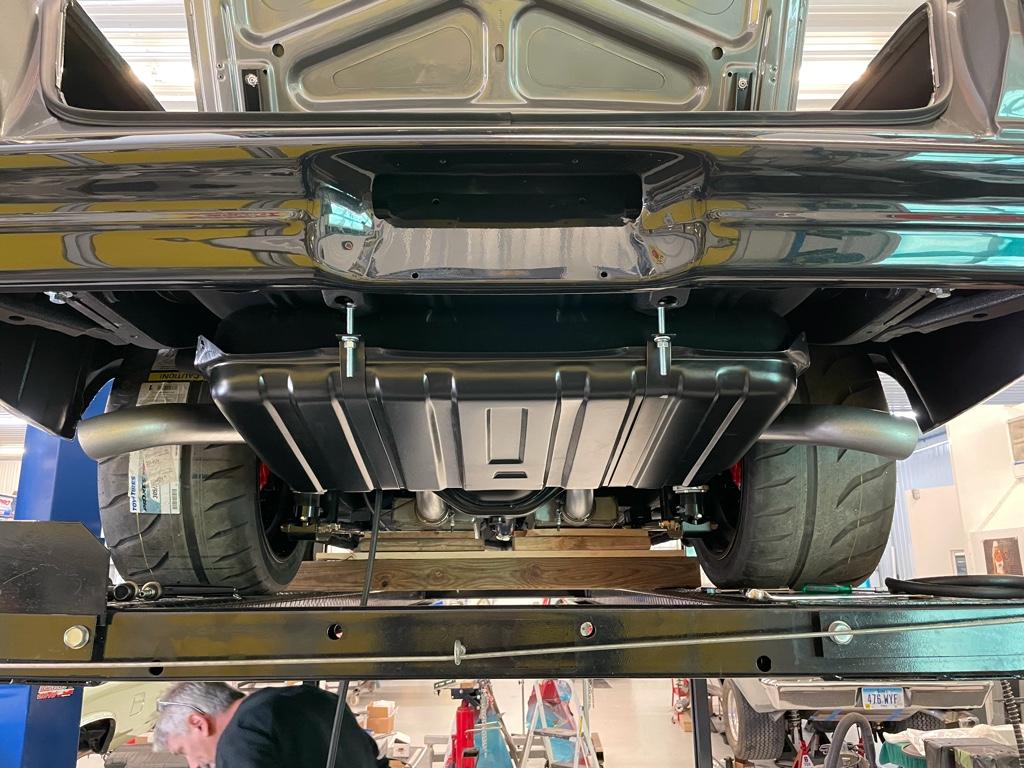
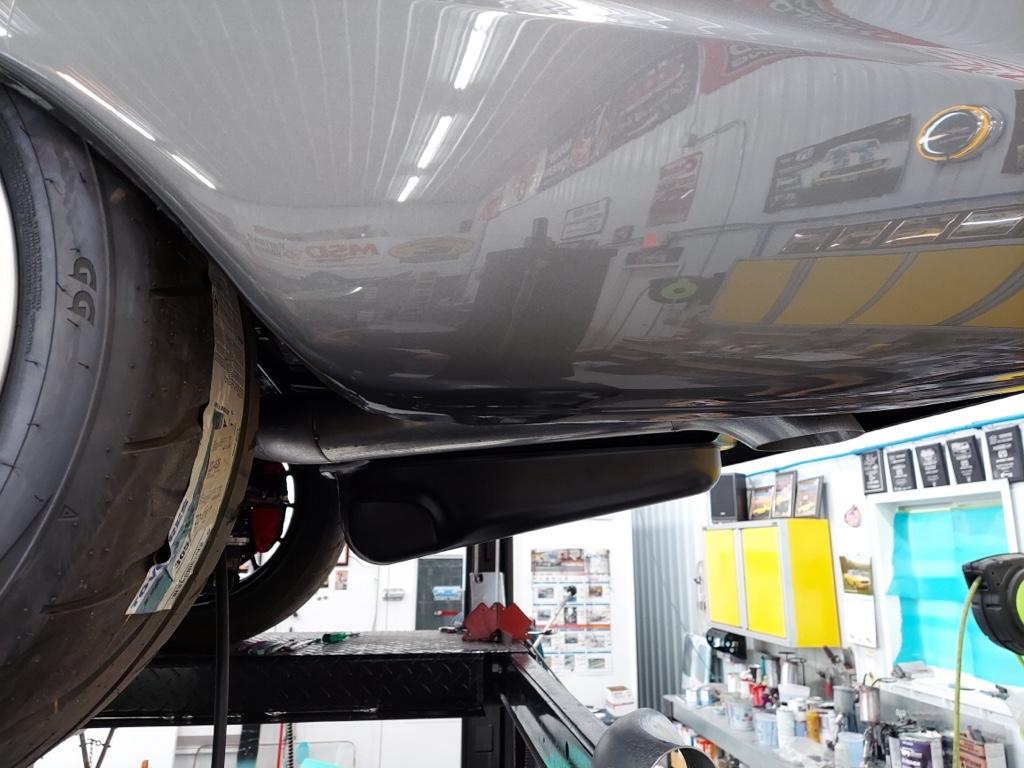
Kurt had moved the Nova on to a four post lift as we’ll be working on the exhaust next. Was cool to get under the car and see some of the work close up. QA1 carbon fiber driveshaft installed, and good look at the aluminum center section 9 inch rear end.

Name:  IMG_0646.jpg
Views: 0
Size:  122.3 KB


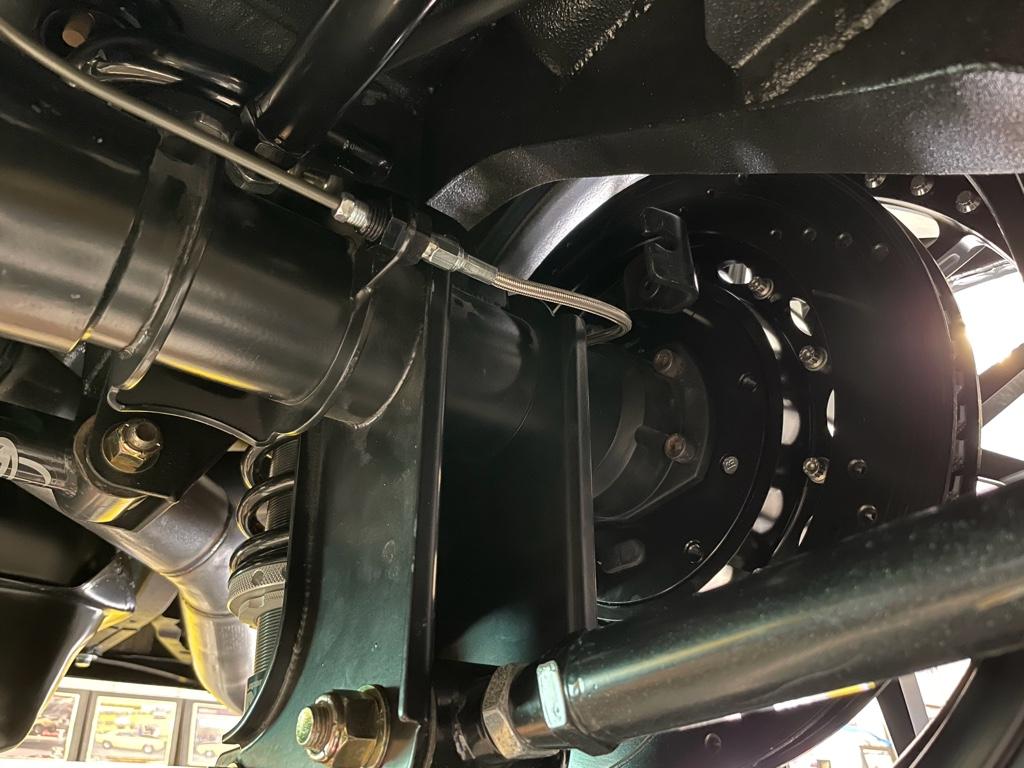
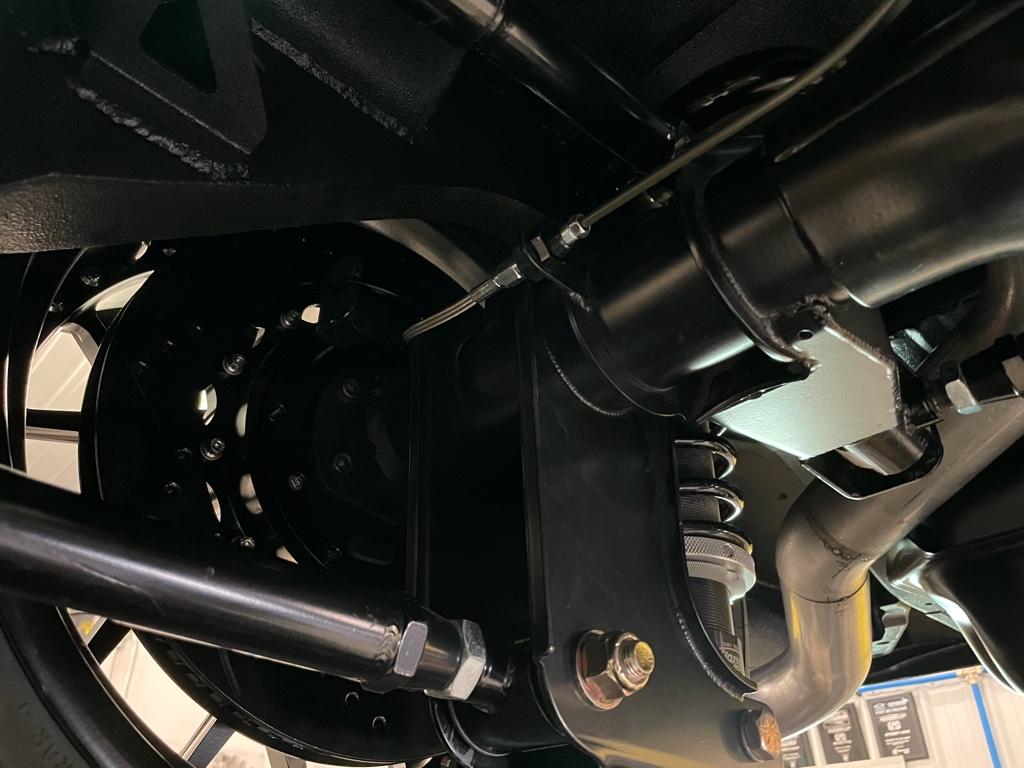
Was able to get a few pics of the inner wheels.. calipers clear, but not by much!


Got a nice view of some of the wiring that was done under the car. I mentioned previously that the C6 Corvette PWM fan unit is wired with a nice splitter harness from Vintage Air that splits the output signal from the fan control unit in two into pigtails that plug directly into the Spal fan pigtail harnesses. Works awesome... we will need to secure the harnesses so that they don’t block the air flaps in the shroud, but is super clean.


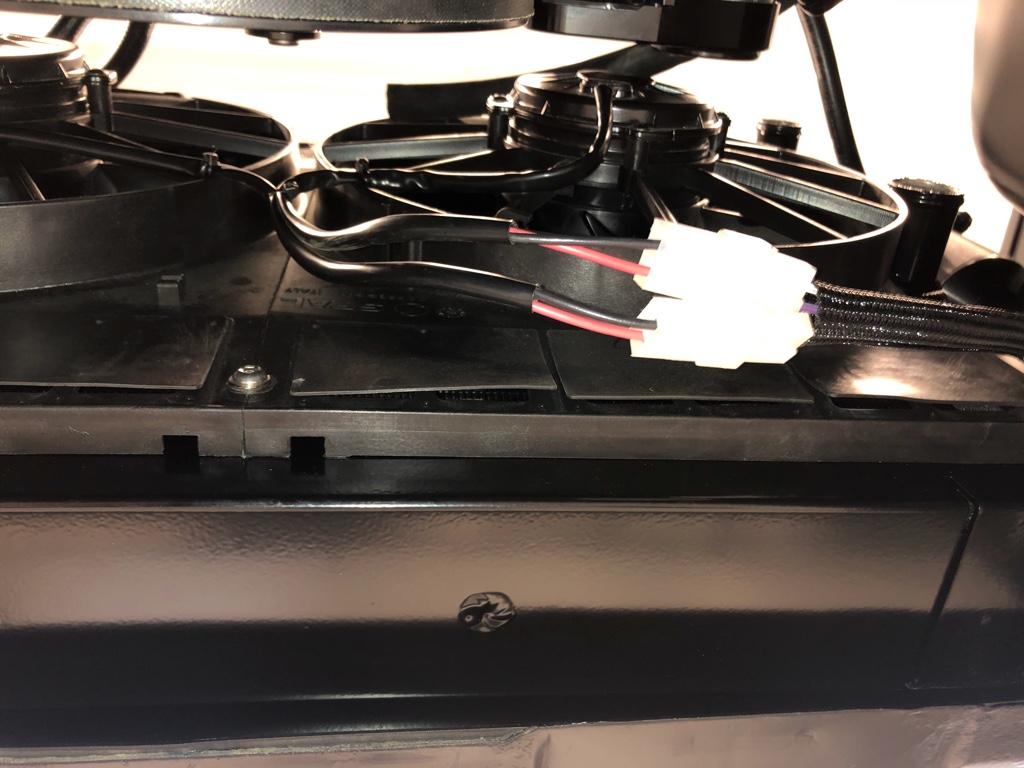
I also installed multiple temperature sensors to monitor oil temps and power steering fluid temps. My C&R radiator has oil and power steering coolers. We wired in temperature sensors in the input and output lines so that we can monitor oil and power steering fluid temps as they enter the cooling unit and after they exit the cooling unit. Because these all feed the digital dash (rather than a physical gauge), it is easy and inexpensive to monitor this data in a digital environment where you don’t need physical gauges.


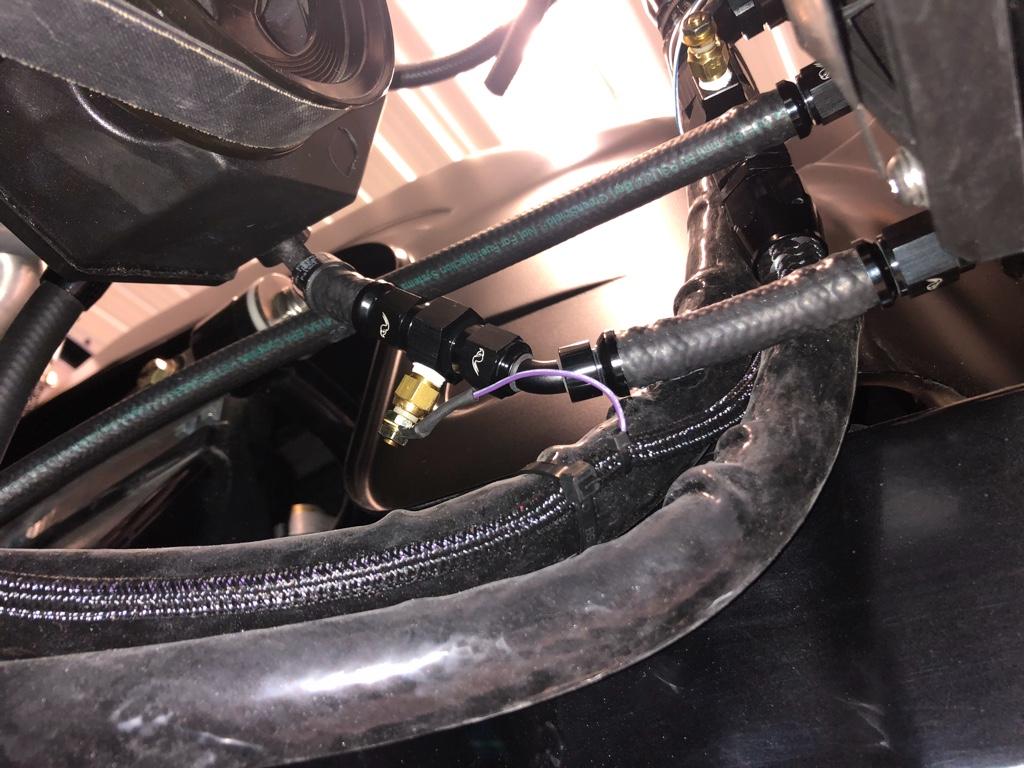
A couple of under car shots where you can see where we will run the exhaust from the headers...
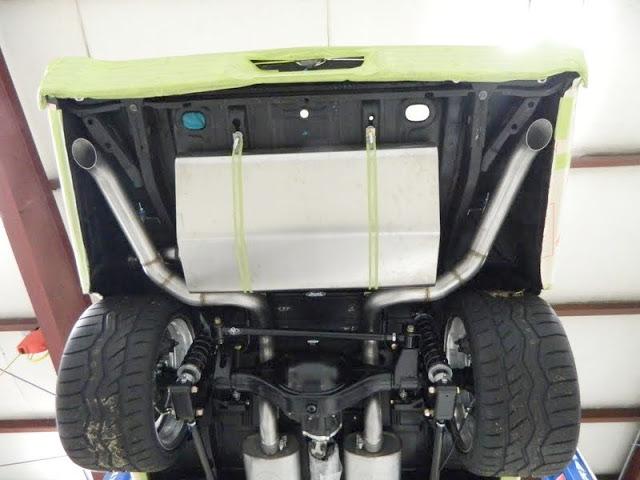
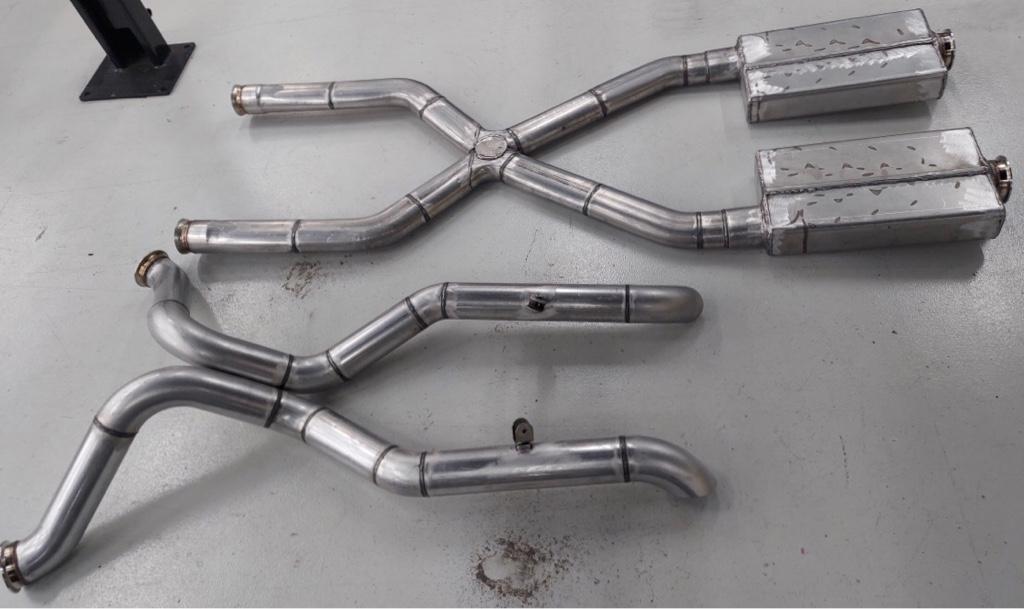


For exhaust, I’m using Spintech oval tubing from the headers to an X-pipe to their 3000 series mufflers. The oval tubing is 3 1/2” wide and 2 1/4” tall, and the equivalent to 3” round tubing. The oval tubing will give us a little more ground clearance to tuck the exhaust up tighter to the floors. The mufflers are oval inlets and 3” round outlets. The round tubing will exit the mufflers and go over the rear end, angle toward the back corner of the rear of the car (the fuel tank has clipped corners) and will exit near the rear bumper. System will be Tig welded together but for a handful of V band clamps to take it off in sections. Once completed, we’ll coat the exhaust black. You can see one of the mufflers, the X-pipe and other oval tubing in the photo below. The exhaust components are sitting on lift in front of the rear tire.


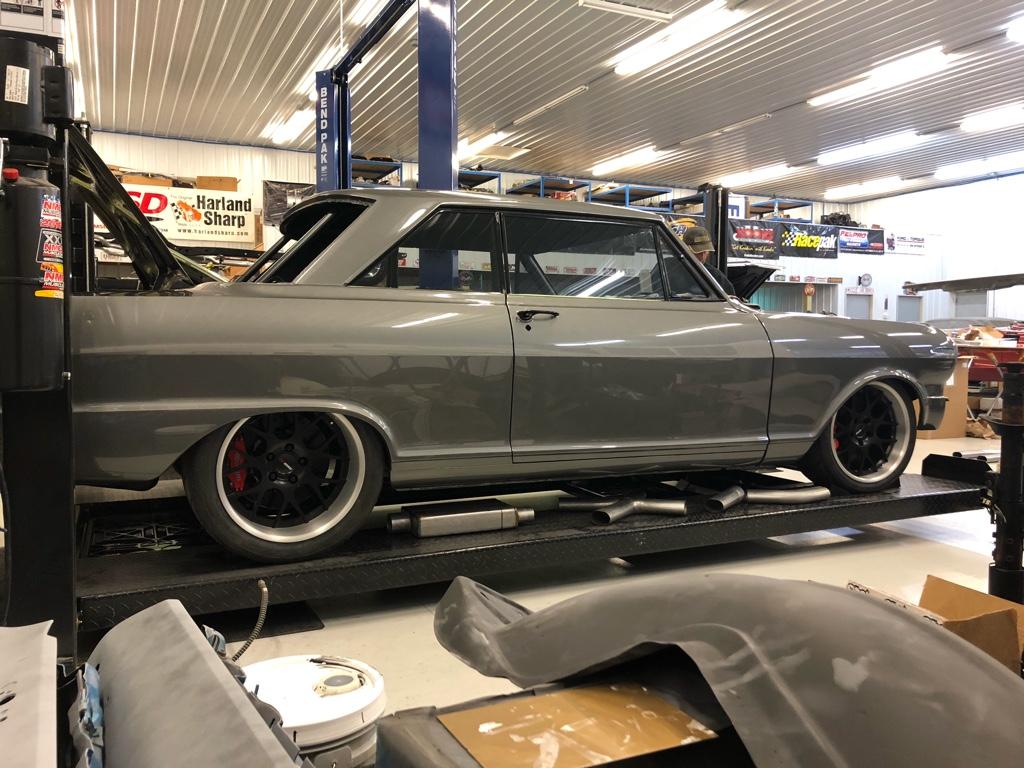
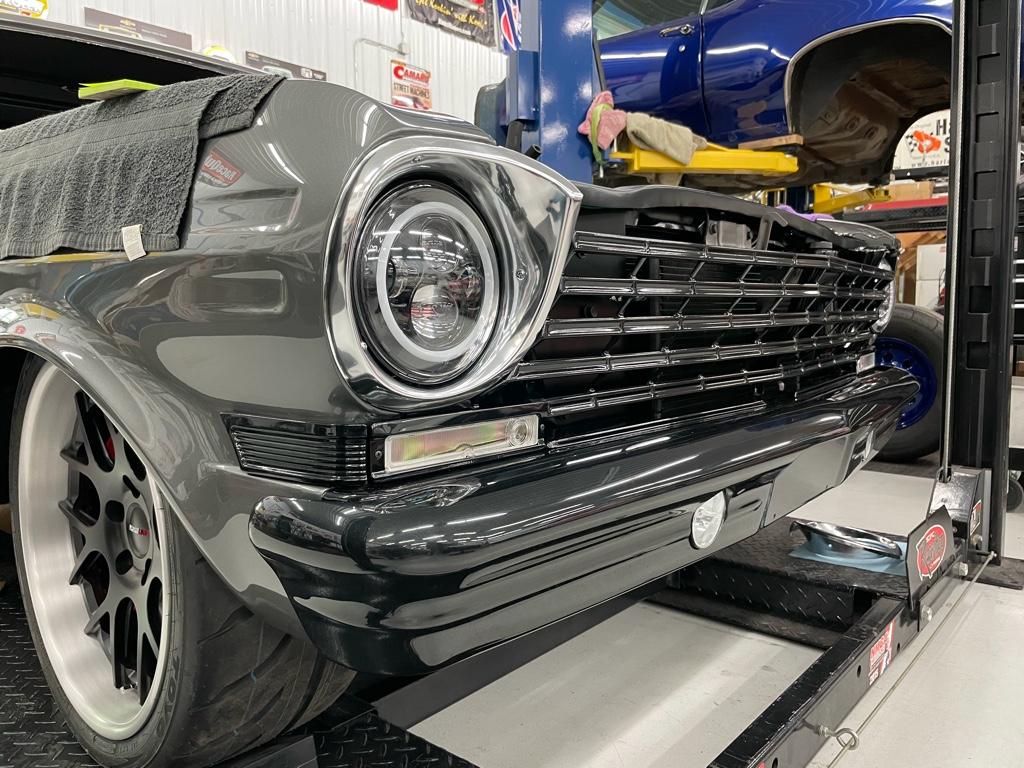
A handful of shots of the Nova on the lift. First time it’s had front fenders on it in a long, long time. Kurt adjusted the front shocks and the rake is pretty close... looks great! We’ll tweak it again after all fluids are in and weight is settled in.


Great to see the continued progress! PFTE fuel line should be in this week and will be installed. Also, as mentioned above, exhaust will be a priority this week as well. Stay safe,

Brian


Sent from my iPad using Tapatalk
__________________
63 Chevy II - Build in Progress
2017 Camaro ZL1
2010 Mercedes C63 AMG

Last edited by bkswede; 10-20-2020 at 09:25 PM.
Reply With Quote
The Following 6 Users Say Thank You to bkswede For This Useful Post:
camcojb (10-21-2020), dhutton (12-20-2020), EVIL SS (10-22-2020), Goosesdad (10-26-2020), syborg tt (12-14-2020), WILWAXU (11-04-2020)
  #143  
Old 10-25-2020, 10:38 AM
64G-lark's Avatar
64G-lark 64G-lark is offline
Senior Member
 
Join Date: Jun 2005
Location: Mapleton, IL.
Posts: 104
Thanks: 9
Thanked 74 Times in 41 Posts
Default

Fantastic build Brian. The car looks amazing. I have been watching it come together and taking notes as I’m building a 63’ myself.
Reply With Quote
  #144  
Old 10-29-2020, 07:30 PM
bkswede bkswede is offline
Senior Member
 
Join Date: Oct 2013
Posts: 163
Thanks: 6
Thanked 140 Times in 83 Posts
Default

Quote:
Originally Posted by 64G-lark View Post
Fantastic build Brian. The car looks amazing. I have been watching it come together and taking notes as I’m building a 63’ myself.

Thanks for the kind words... following your
build thread as well... lots of great work and parts coming together on your ‘63!


Sent from my iPhone using Tapatalk
__________________
63 Chevy II - Build in Progress
2017 Camaro ZL1
2010 Mercedes C63 AMG
Reply With Quote
  #145  
Old 10-30-2020, 09:45 PM
bkswede bkswede is offline
Senior Member
 
Join Date: Oct 2013
Posts: 163
Thanks: 6
Thanked 140 Times in 83 Posts
Default

Got a few pictures from Kurt showing some progress made on the exhaust this week. Front part of the exhaust pretty much done and TIG welded together... and were starting on the pipes from the mufflers to the tailpipes.
Name:  IMG_0733.jpg
Views: 0
Size:  79.4 KB
Name:  IMG_0732.jpg
Views: 0
Size:  265.1 KB
Name:  IMG_0731.jpg
Views: 0
Size:  234.4 KB

Kurt also got the front bumper polished and hung...
Name:  IMG_0734.jpg
Views: 0
Size:  190.7 KB

I’m going to try to stop by the shop early next week to check out progress in more detail. Kurt said they also got the rear sway bar mounted, the fuel lines run from the tank up to the motor, as well as fuel filler neck and fuel cap. Guys were also working on exhaust from mufflers to tailpipes today, and hopefully will have that finished up early next week. Stay safe,

Brian


Sent from my iPhone using Tapatalk
__________________
63 Chevy II - Build in Progress
2017 Camaro ZL1
2010 Mercedes C63 AMG
Reply With Quote
The Following 3 Users Say Thank You to bkswede For This Useful Post:
EVIL SS (11-02-2020), jarhead (11-01-2020), syborg tt (12-14-2020)
  #146  
Old 11-04-2020, 07:09 AM
cantcatchmitch's Avatar
cantcatchmitch cantcatchmitch is offline
Senior Member
 
Join Date: Mar 2010
Location: fredericksburg, pa
Posts: 129
Thanks: 8
Thanked 17 Times in 9 Posts
Default

very nice exhaust work, Nova floor pans are not very friendly for keeping exhaust up nice and tight.
__________________
difficult takes a day, impossible takes a week.
Reply With Quote
  #147  
Old 11-07-2020, 08:45 AM
bkswede bkswede is offline
Senior Member
 
Join Date: Oct 2013
Posts: 163
Thanks: 6
Thanked 140 Times in 83 Posts
Default

Quote:
Originally Posted by cantcatchmitch View Post
very nice exhaust work, Nova floor pans are not very friendly for keeping exhaust up nice and tight.

Thanks - we’re really trying to keep the exhaust tucked up tight so you don’t see it. Coating it black when done will help, too


Sent from my iPad using Tapatalk
__________________
63 Chevy II - Build in Progress
2017 Camaro ZL1
2010 Mercedes C63 AMG
Reply With Quote
  #148  
Old 11-07-2020, 09:37 AM
bkswede bkswede is offline
Senior Member
 
Join Date: Oct 2013
Posts: 163
Thanks: 6
Thanked 140 Times in 83 Posts
Default

Stopped by the shop yesterday and was able to check out recent progress... exhaust is mostly complete, though I don’t like the way the tailpipes are routed, so we need to re-do those, which shouldn’t be a big deal. Here are some pictures I took of exhaust - I’m using 3 1/2” oval pipes (equivalent in flow to 3” round pipe) from headers through X-pipe to Spintech mufflers. The mufflers have oval inlets and round outlets, so easy transition to 3” round pipe from the muffler on back, since the round pipe is much easier to snake above rear suspension and around fuel tank.

Name:  IMG_0747.jpg
Views: 0
Size:  135.4 KB
Name:  IMG_0748.jpg
Views: 0
Size:  169.2 KB
Name:  IMG_0751.jpg
Views: 0
Size:  174.1 KB

Kurt modified the transmission cross member slightly. The change kept the transmission mount height exactly where it was, but elevated the sides of the mount about an inch, which gave us another inch or so clearance to tuck the oval tubing closer to the floor.

Name:  IMG_0749.jpg
Views: 0
Size:  160.6 KB
Name:  IMG_0750.jpg
Views: 0
Size:  144.9 KB
Name:  IMG_0754.jpg
Views: 0
Size:  158.3 KB

Transition from muffler to tailpipes are made with V-band clamps right off the muffler.

Name:  IMG_0755.jpg
Views: 0
Size:  165.4 KB

From there, exhaust snakes up and over axle and QuadraLink, and around fuel tank.

Name:  IMG_0756.jpg
Views: 0
Size:  155.7 KB
Name:  IMG_0759.jpg
Views: 0
Size:  214.9 KB
Name:  IMG_0760.jpg
Views: 0
Size:  235.6 KB

As I mentioned above, the tail pipes are tacked together and currently turn to the side and dump behind each rear wheel. I really don’t like this look, so we’re going to re-do this portion.


There is plenty of space to turn the tailpipes up and run them inside the rear quarter panels, above the pinch weld, so they can’t be seen from the side of the car. Below are some photos of what I have in mind from a nice ‘67 Chevy II exhaust project detailed on Steve’s nova site forum. Pipes will turn down and exit toward the ground near corners of rear bumper with everything up above the bottom edge of the rear quarter panel.


Guys have most of the brake lines finished up in the rear and working on running them to the master cylinder.


Got a nice picture of the wiring and plumbing for the Vaporworx PWM fuel pump controller while I was crawling around under the car


For fuel line, I ordered some carbon lined PTFE hose from TechAFX, which is available in a cool, matte black finish. The finish is similar to regular black radiator hose and will match the hoses I’m using throughout the engine compartment (radiator hoses, push-lock hoses for catch can and PCV system, etc). Below shows the hose connected to fuel rail.


I have a fuel pressure gauge set up in my Holley digital dash, so I needed a sending unit plumbed into the system. Wanted to measure pressure as close to the fuel rail as possible, but keep it hidden. We were originally thinking we would plumb it under the car near firewall; however, we were able to plumb the port for the sensor right off of the fuel rail itself, and have the sending unit and related wiring all fit under the fuel rail cover so it is completely out of sight.


We’ll get the tailpipes redone this week and Kurt is also going to modify the hood latch for a remote hood release. We’re following a mod done by some others over on Steve’s nova site. The hood latch mechanism has two releases - first, it releases the hood lock and then as you pull the lever further, it releases the safety latch. You can modify the latch so the lever behind the grill only releases the safety latch. You then fab a bracket and have the hood lock operated by a cable mounted under the dash. That way, unless you’ve first released the hood lock via the cable in the car, the lever behind the grill doesn’t do anything when you pull on it. Take care,

Brian


Sent from my iPad using Tapatalk
__________________
63 Chevy II - Build in Progress
2017 Camaro ZL1
2010 Mercedes C63 AMG
Reply With Quote
The Following 5 Users Say Thank You to bkswede For This Useful Post:
572Camaro (11-07-2020), 64G-lark (11-07-2020), camcojb (11-07-2020), EVIL SS (11-09-2020), syborg tt (12-14-2020)
  #149  
Old 12-10-2020, 11:10 PM
bkswede bkswede is offline
Senior Member
 
Join Date: Oct 2013
Posts: 163
Thanks: 6
Thanked 140 Times in 83 Posts
Default ‘63 Chevy II Pro-Touring Build

Spent 1/2 a day with Kurt on Wednesday. Progress on the Chevy II continues... a lot of little things are being completed. Kurt got the exhaust completed, including revised location of tailpipe exits.


I had the exhaust ceramic coated black at Race Coatings in Forest Lake and brought back to Kurt Wednesday when I visited. We mounted the front section while I was there, but didn’t get a picture while the car was up on the lift. Tailpipes will be installed soon and I’ll have pics of it installed.

Kurt’s also installing stereo system as part of wiring project. The head unit, amp and sub are mounted in the trunk under the package shelf. Installing 5.25” speakers in the door and 6x9” speakers in the package shelf. Both sets of speakers are installed from behind to make it easier/cleaner when interior is installed.


Kurt finished the modification to the hood latch. Now, the lever behind the grill only controls the safety latch. The hood lock is controlled by cable remotely mounted under the dash. When that lever is pulled, it releases the hood lock and the hood catches on the safety latch. You can then pull the lever under the dash to release the safety latch and open the hood. Kurt fabricated a small pulley to route the cable through a 90 degree angle, all of which is hidden. The finished product is indistinguishable from stock, but provides additional security and piece of mind.


Kurt also got looms installed to hide wiring for power door locks and windows as well as speaker wires.


LED interior light installed. Received replacement headliner (originally ordered a dark gray (graphite) suede headliner, but color was way lighter than shown on website. New black color will look much better.


Alarm for the security system installed under driver’s side fender...

Ordered up new dash knobs from Dutch Boys, which look awesome and will compliment other metal items in the interior that are combination of black and machined aluminum edging (shift lever, turn signal lever, etc.)


Overflow tank for the radiator hidden behind grille but in front of core support...


Found some radiator hoses with correct angles and distances, the guys trimmed them up and now fit like they were custom made for the car.


Kurt is going to work on the headlight bezels so that they line up with the fenders a little better. After those adjustments, we’ll paint them black to match the rest of the front end parts. The rest of the front end is pretty much done - fender extensions are installed, as well as the grille and parking lights. I used ‘62 parking light lenses, which are clear rather than the amber colored lenses that were used on ‘63 models. The clear lenses look much better with the gray and black colors of the car.


Kurt and I also spent a couple of hours mocking up a custom center console that he’ll build. Sides of the console will be made from wood and covered in leather. Console will include A/C vents, Vintage air climate controls, custom switches for power windows and door locks and a couple of cup holders with white led lighting.

Other items the team will be working on: installation of black suede headliner, install windshield and rear windows, install tailpipes, install emergency brake cables and mount hand brake, and install fuel cap and filler tube to tank. Stay safe,

Brian


Sent from my iPad using Tapatalk
__________________
63 Chevy II - Build in Progress
2017 Camaro ZL1
2010 Mercedes C63 AMG

Last edited by bkswede; 12-12-2020 at 08:02 AM.
Reply With Quote
The Following User Says Thank You to bkswede For This Useful Post:
syborg tt (12-14-2020)
  #150  
Old 12-11-2020, 11:05 AM
Marcellus's Avatar
Marcellus Marcellus is offline
Junior Member
 
Join Date: Jan 2008
Posts: 5
Thanks: 1
Thanked 3 Times in 1 Post
Default

Man that thing is sweet. I tried to find a link to where you got the dash knobs as I think they would go well in my Chevy II. How did you order those I cant find them anywhere. Thanks.
Reply With Quote
Reply


Posting Rules
You may not post new threads
You may not post replies
You may not post attachments
You may not edit your posts

BB code is On
Smilies are On
[IMG] code is On
HTML code is Off

Forum Jump


All times are GMT -5. The time now is 09:34 AM.


Powered by vBulletin® Version 3.8.11
Copyright ©2000 - 2024, vBulletin Solutions Inc.
Copyright Lateral-g.net