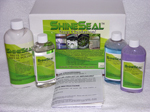
I got the ShineSeal kit in, I ordered the Master Kit which is says is good for 80 sq ft. Here it is along with the diapers I'll use for applying the sealer and the microfiber towels for polishing.


The bottle on the left is their Bio Cleaner which I mixed 1 oz with 16 oz of water in the spray bottle. This is used to clean the metal surface of any contaminants before the sealer is applied.
The Metal Sealer is the bottle second from the left, this acts and works very much like Sharkhide. It's the sealer that gets rock hard and protects the aluminum from anything penetrating it. The third bottle from the left is the Slick Finish, this may be what separates this kit from the other aluminum finishes on the market. It goes on like a wax but you don't let it dry on the surface you just keep polishing on it until it is all taken back off of the metal. It's the cat's meow... The 4th bottle from the left is a Brite Shine Metal polish that you use should you ever need to clean the Metal Sealer back off of the aluminum. I guess if you ever wanted to polish a shine back onto the surface you'd clean the sealer off with this, then polish, then reapply.
I cleaned the outsides and the insides of all 6 wheels with the Bio Cleaner and a microfiber towel. This wasn't a big deal in my case because I had just polished all of these wheels with Mother's Billet polish so they were already what I'd call very clean but the directions said to so I did.
I then used a diaper to apply the sealer to the outsides of all 6 wheels. It goes on kind of like Rain-X, is very solvent smelling, and is tacky and kind of hard to tell if you are getting an even coat on, especially in all of the nooks and crannies most wheels have. I'd much recommend anyone that is doing this project to have the wheels off of the car laying flat and everything that can be taken out of the way (center caps etc) off the wheels as well. Once I was fairly sure that all of the outside surfaces had a good coat on them, I flipped the wheels over and coated the hoops on the inside. I didn't spend the time or materials to do the back sides of the spokes as they'll never be seen. Then it had to dry and set up. I ended up letting them set for about 24 hours. You can tell if it's not set up by running your finger on the surface, if it smears...it still needs more time.
After BioClean, before Sealer

Same wheel after Sealer applied but not dry yet.

Brand new wheel before Sealer

Same wheel after sealer

All 6 caps...can you tell which two are brand new?

This morning I went out to see if the sealer was dry, and it was...so I set about applying the Slick Finish. Before the Slick finish, the surfaces were kind of tacky...well not tacky but your finger still stuck to it just a bit as you drug it across. The Slick Finish goes on pretty easy and you just apply it and polish it back off working in small areas as you go along. It turns that somewhat sticky surface into a smooth as glass almost Chrome like finish. It is unbelievable... It also lets you polish smooth the top layer of the sealer if there were any areas where you got the sealer a bit too thick. Those areas showed up after the first coat of slick finish is applied and polished out and you just go back over them with a bit more Slick Finish and a clean microfiber and it polishes the surface out super smooth. This is the step that really finishes off this process nice and I believe it HAS to make the surfaces of the wheels MUCH easier to maintain nice looking. The highly polished areas of the wheels feel just like a chrome surface now.
After I was certain the outsides of all of the wheels were as polished as I could get them I flipped them over and applied the slick finish to the insides of the hoops as well. Probably over kill and unnecessary but remember my goal is to get these wheels as maintenance free as I could get them and that includes keeping the insides of the hoops as nice looking as they can be kept as well.
Here is a close up of a used wheel done...Sorry, it's taken with my phone but again, it'll have to do for now.

The camera makes it looks more scratched than it is...to the eye they look pretty dern good.
Here is a new wheel all done...

As you can see it looks great. I wouldn't hesitate to put this treatment on any brand new aluminum wheel...in fact, I'd recommend that you do apply it to your new wheels as soon as you can. The product does nothing to the shine of a billet wheel except protect it and keep it great looking much easier.
I did the insides and outsides of (2) 17x8s and (4) 17x9.5s and this is what I've got left of the kit.

Plenty of Bio Cleaner left over which they say you can also use to clean the wheels with now to maintain them, probably enough Metal Sealer to do the outsides of the wheels one more time, the Slick finish it's hard to see but there is still lots of it left also, I barely used any out of the bottle and never even opened the Brite Shine Metal polish.
And here's the instructions that came with the kit.

Later on after I've driven with the wheels and got them dirty a few times I'll revisit and update with how they have held up. I think it's gonna be good though, it HAS to be better than maintaining just the bare billet aluminum.


 Brian Hobaugh SCCA National Tour June 2014
 First Hemi 'Cuda Convertible Ever Built
 Short clips: Goodguys Pleasanton autocross and pit videos


 Linear Mode

