|
|

07-03-2022, 02:50 AM
|
|
Senior Member
|
|
Join Date: Aug 2005
Location: Newbury Park, CA
Posts: 600
Thanks: 12
Thanked 81 Times in 29 Posts
|
|
 Honor Flight Camaro Lots of New Projects
Honor Flight Camaro – Project Updates
Going back to OLoA 2018, after our day in St. Louis doing drag racing, something did not seem the same with the clutch. It seemed to work fine, but occasionally it was difficult to shift into reverse. It did not get worse, and since the engine must be removed to get the T56 Magnum/bellhousing out, I just let ‘er ride with the understanding that the pilot bearing was a likely suspect.
Fast forward to the Goodguys Hall of Fame Road Tour last September. Hauling a$$ through Texas late at night, go to downshift, and the clutch is ineffective. Get the car to the side of the road, shut down the engine, and pump the clutch a few times. The clutch is working again, but for sure the pilot bearing has been lunched. The car made it home, another 800+ miles, while babying the transmission.
So, what was supposed to be a pilot bearing change turned into a complete drivetrain refresh and upgrade.
Exhaust:
Before tearing into the driveline, one of the big ticket items that needed to be addressed is the exhaust system. It had became progressively louder, and after 21hrs almost continuously driving from Ft. Worth to Los Angeles, annoying. The car has seen many different setups, and unfortunately, failures. The system that was most recently in the car contained the following:
- Stainless Works 1-3/4” long tube headers (repaired in late 2018 due to tube-to-head-flange cracking)
- Flowmaster 3” ball/socket.
- 3” flex joints
- Exhaust hanger support from the transmission mount
- Magnaflow “X” pipe
- 3” pipes to 18” x 9” Magnaflow mufflers.
- 3” tailpipes exiting behind the rear tires.
- All ceramic coated
The prior system had a 3” Dr. Gas “X” pipe, 3” tubes into reducers that fed 18” x 9” Magnaflow mufflers. No ceramic coatings.
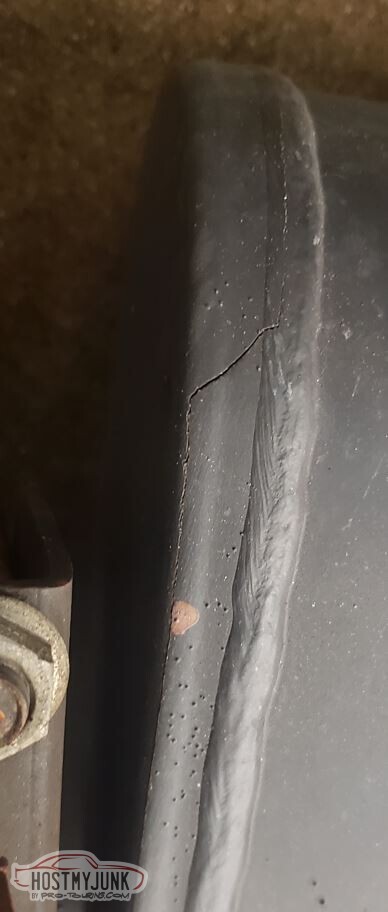
To my disappointment, each of these failed, IMO, miserably. The Dr. Gas part cracked, as did the Magnaflow X-pipe. The back caps of both sets of mufflers cracked most of the way around the perimeter weld and were missing nearly all of the noise absorption material.
Both muffler aft end caps have cracks most of the way around:
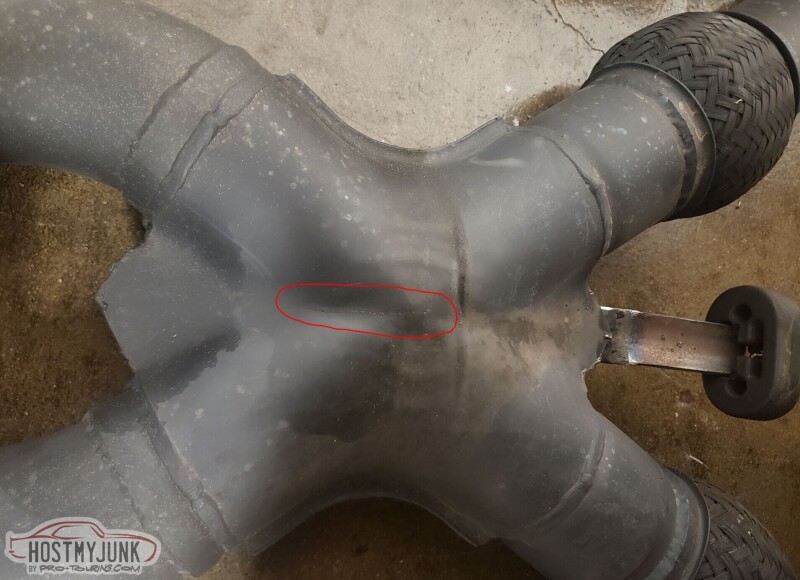
X-Pipe has an axial crack on both sides. There are flex joints ahead of the X and it is supported by the rubber hanger.
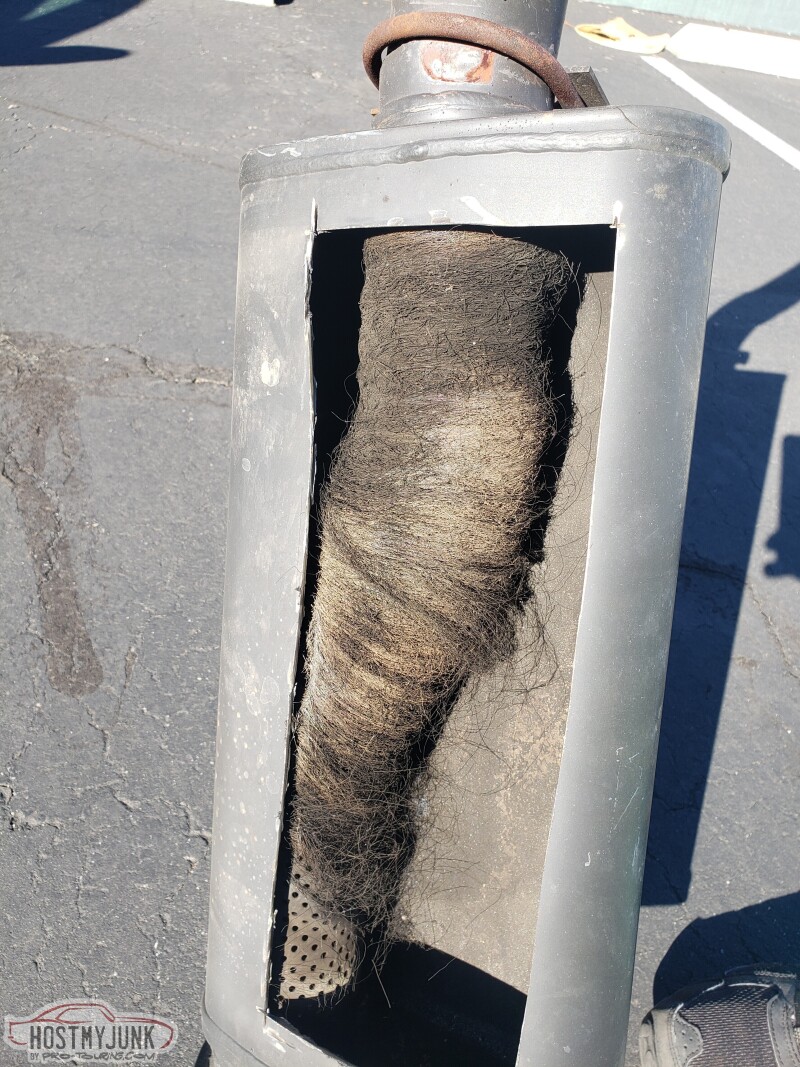
It's not known how much packing was originally there, but it seems pretty light with lots of open perforations. The prior set of Magnaflows were the same way when they came out:
Time for something new.
With the understanding that supercharging is just hard on things, and that the OEM’s have spent billions on exhaust systems that have to survive extended warranty times, I turned to a few folks way smarter than I and with really good data on said topics and came up with a plan to address not just the noise, but also the associated NVH and hydrocarbons that go along with it. Oh, and all while maintaining performance.
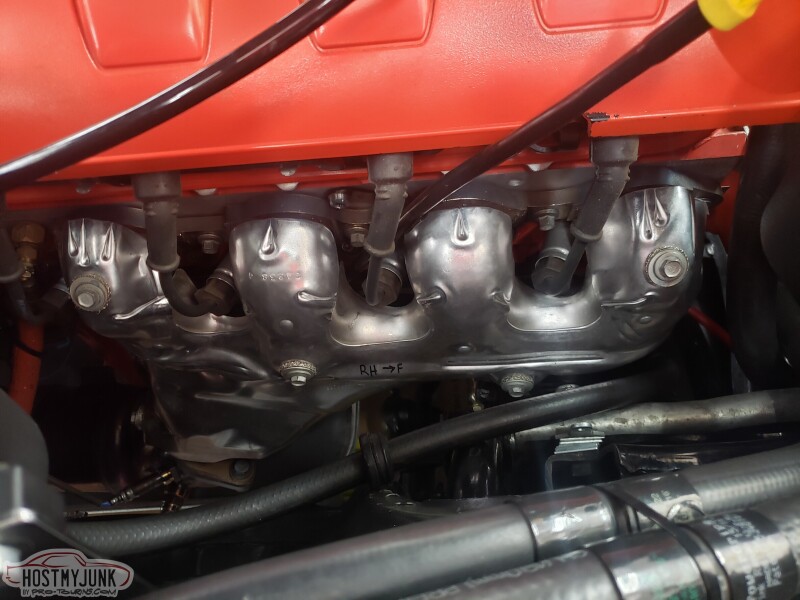
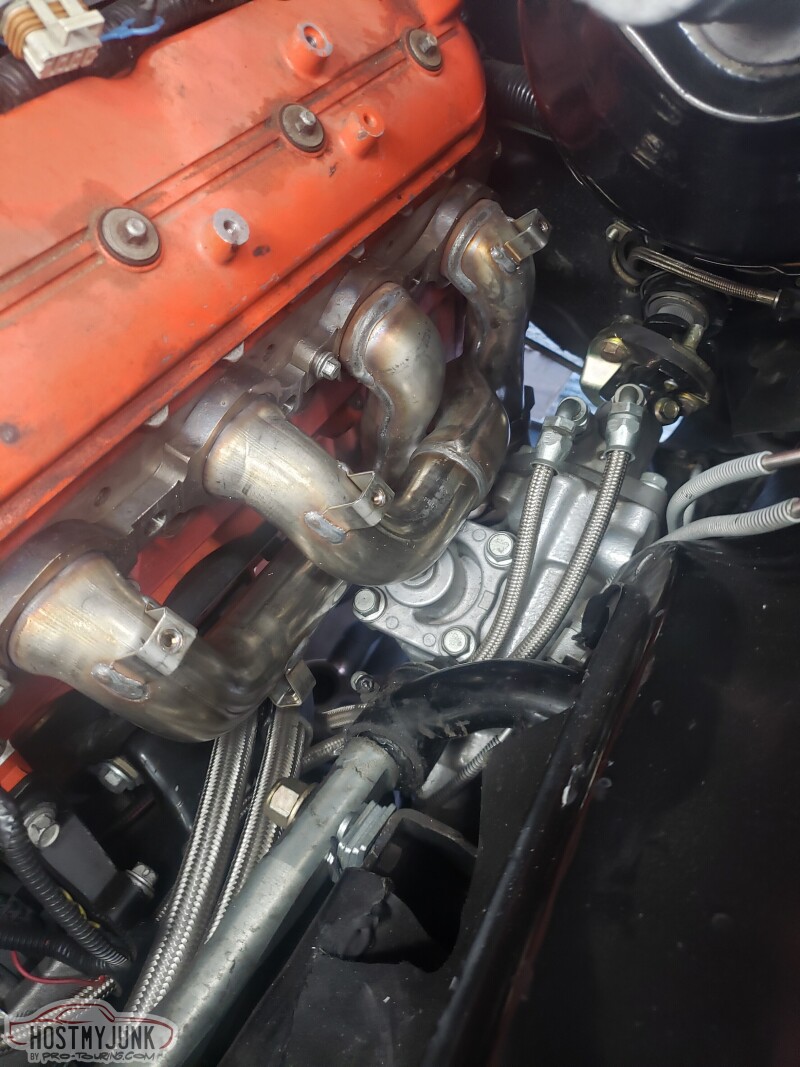
The new setup: - LS7 Z28 1-3/4” tubular tri-Y shorty headers, including the OEM heat shields.
- All four catalytic converters from a 1k mile 2021 ZL1. I'll trust OEM validated 650hp rated parts vs. anything in the aftermarket.
- 2-1/2" flex joints
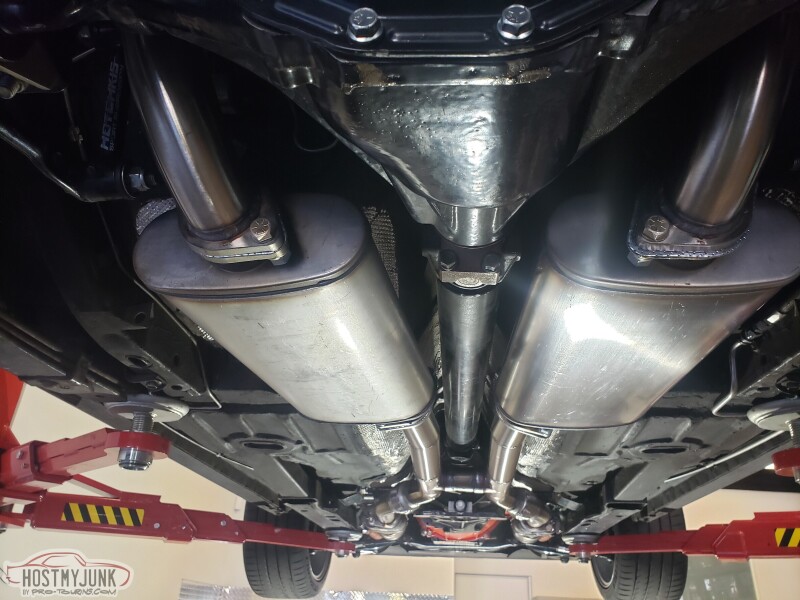
- 2-1/2” stainless exhaust, HD H-pipe, feeding big 18” x 9” stainless steel mufflers.
- Full tailpipes exiting out under the rear bumper.
With said headers in hand (thanks to a fellow member who had a new take-off set available), test fitment on the passenger side could not have been any easier. It dropped in from the top without issue, the heat shields bolted on, and stock ACDELCO spark plug wires and aluminum shields went on just like OEM.
The drivers side did need a bit of persuasion. Several sections near the steering box needed to be slightly adjusted in a hydraulic press. It took about an hour to get sufficient clearance for the tubes, but not all of the heat shields were going to fit. The top portion is fine, but the lower part had to be sectioned into two pieces. The heat shields are so effective that at full temperature I can place the back of my finger 1/4" away with complete comfort.
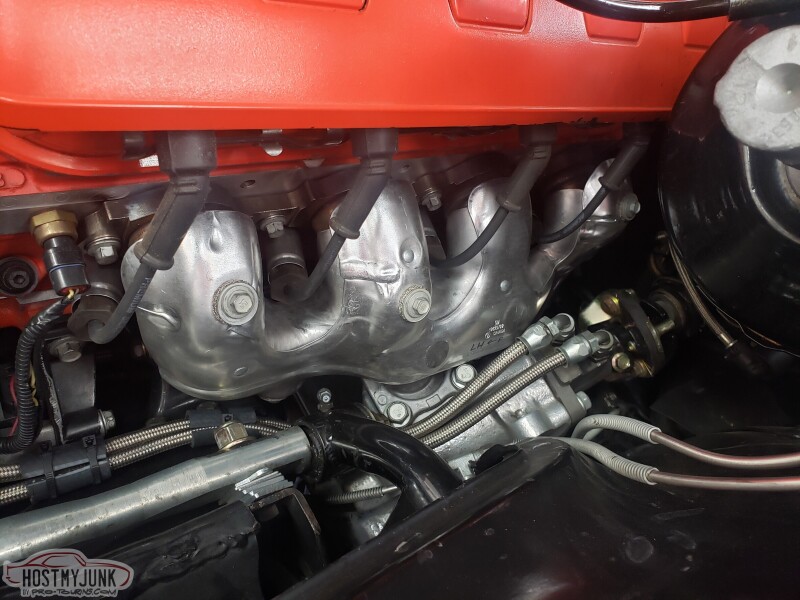
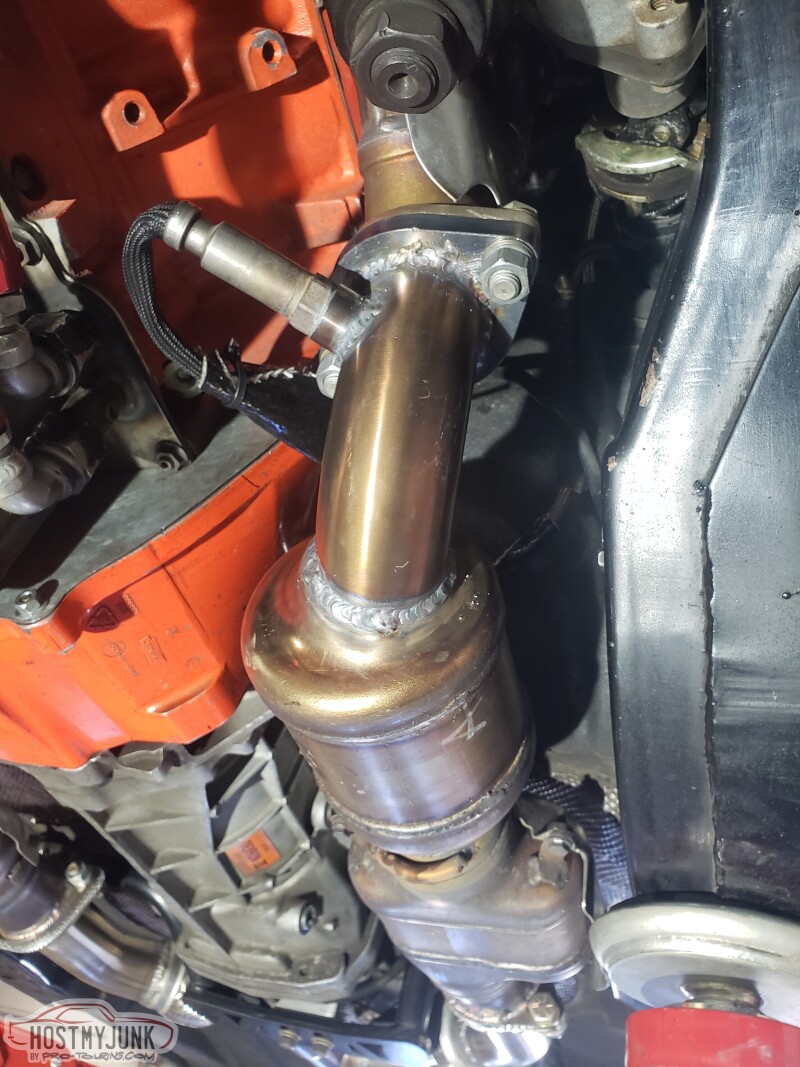
Since the LT4 that the cats came from have a different flange size and location, hacking began in earnest to make all four line up, clear the floor, bellhousing, crossmember, etc. Since the LT4 has a dedicated primary cat support structure that attaches to the driveline, I tried to mimic that by adding supports from the large tabs on the sides of the T56 Magnum. The idea is to relieve bending stresses caused by unsupported lengths of heavy components (cats). Here’s what the nearly finished system looks like:
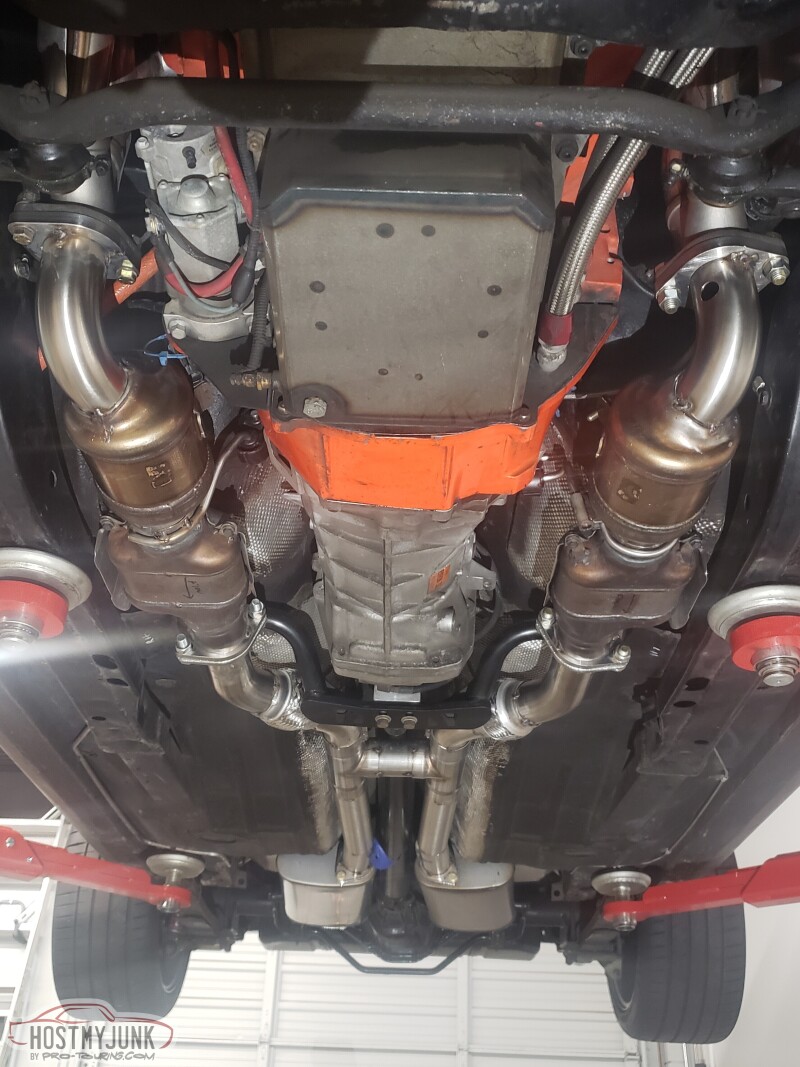
LH and RH sides.
To help protect the starter an OEM LS3 starter heat shield was modified and bolted to the aluminum starter mounting plate. The heat shield is made the same way the exhaust shields are, and for the price are less expensive than many aftermarket offerings. The had to have significant "adjustments" to make work but are completely hidden from top viewing.
There’s lots of rubber hangers in the system, along with commonality of flanges. Since I’m not trusting the mufflers to last forever, they have been set up so that they can be easily removed and replaced. When the time comes, each will have a fixture made so that the mufflers and flanges can be built on the bench and easily installed.
Speaking of mufflers, after much investigation, it was decided to use parts made by AP Exhaust. Though not well known in the aftermarket world we play in, they are huge in the standard replacement world, and look remarkably similar to those used by well-known high-performance aftermarket suppliers. Best of all, $37 each from Rockauto: AP / EASTERN XS125
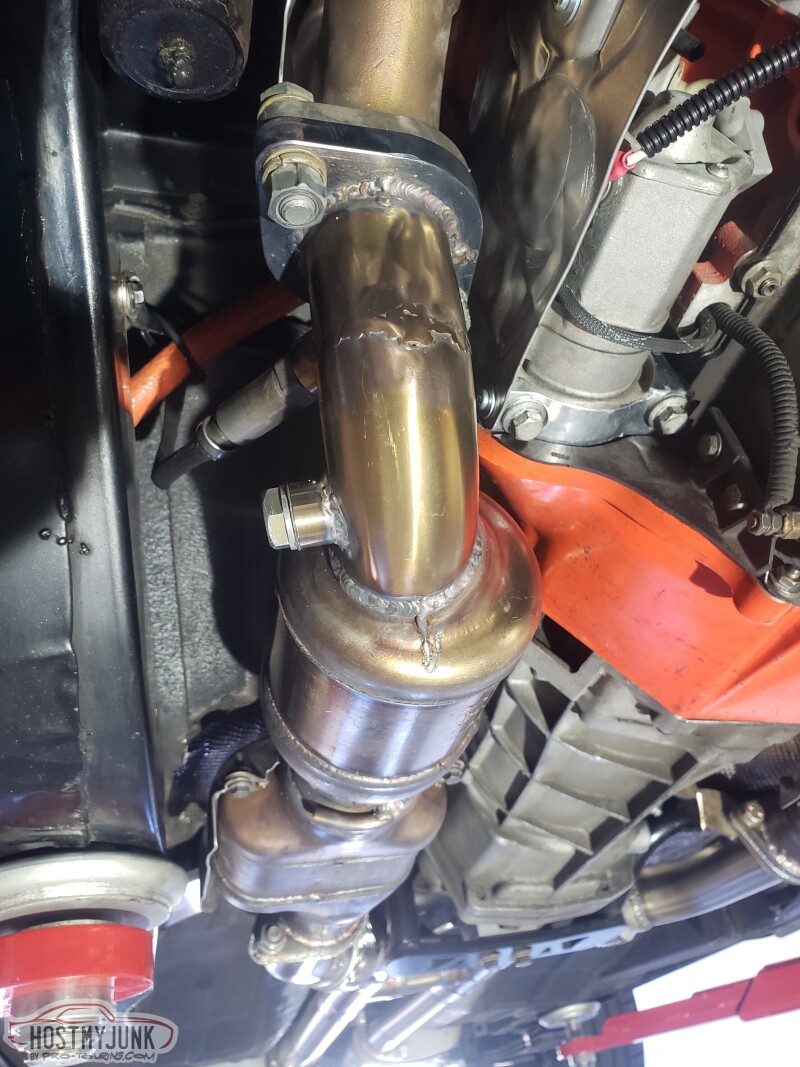
The common flanges used, except for the manifold/collector flange, were used to make work on the car easier. It meant increasing the size of the holes in the manifold and collector flanges to 1/2". So, lot's of new common length bolts were ordered from McMaster Carr. Skipping ahead a bit, after taking the car out for the first time with the new exhaust, after stopping an letting the car sit for a few minutes, there was a loud PING and the jingling of hardware hitting the ground. Here's the culprit from the manfold/collector flange:
I was hopeful that the inclusion was just an anomaly, but after several more heat cycles another bolt failed, and it too had the same inclusion problem. All the bolts had to be changed to a different type to avoid getting another bad batch. Whenever somebody states you must use Grade 8 bolts for chassis work, I'd much rather choose a G5 from Aircraft Spruce than rely on these from what should be a decent supplier.
Driving impressions:
This is an apples and oranges comparison. Think Dr. Jekyll and Mr. Hyde. Plus it can be difficult to be objective. Loud exhaust systems can have a placebo affect. If it sounds loud, it must be fast. If it's quiet, it must be holding back lots of power.
The new version does have a nice mellow exhaust tone at idle, but during cruise and acceleration it is a quantum leap quieter combined with a large reduction in NVH. Think of a modern OEM supercharged car with a stock-ish exhaust. Now I can hear the supercharger whine.
Changing the exhaust has become a good, but challenging, exercise. Good because of the noise and smell reduction, but loud exhaust systems mask other noises. Little noises not heard before now become the task of the day.
From a performance perspective, a back-to-back dynamometer test was not done. My seat-of-the-pants / known traction limits under acceleration/etc. tells me it’s still silly fast. Since it's so much quieter, I have to be careful when applying lots of power since the speedometer is racing upward at a furious pace.
Overall, the change is so far to the good that another set of new LS7 manifolds was purchased, and I’m on the hunt for another set of cats, all for spares/future projects.
Up next: Gears, clutch, and transmission alignment.
Last edited by CarlC; 07-03-2022 at 03:03 AM.
|
|
The Following 13 Users Say Thank You to CarlC For This Useful Post:
|
130fe (07-04-2022), 214Chevy (07-03-2022), Avgasman (07-03-2022), camcojb (07-03-2022), dhutton (07-03-2022), fleetus macmullitz (07-08-2022), Gmachine1911 (07-03-2022), goldfinger68 (07-22-2022), jmac (07-22-2022), Number1 (07-04-2022), OLDFLM (07-11-2022), waynieZ (07-06-2022), WILWAXU (07-04-2022) |
07-04-2022, 11:41 AM
|
|
Senior Member
|
|
Join Date: Aug 2005
Location: Newbury Park, CA
Posts: 600
Thanks: 12
Thanked 81 Times in 29 Posts
|
|
ep, the pilot bearing was destroyed, so the transmission needed to have some repairs done. Anaheim Gear performed the needed shaft repair by making a sleeve for the pilot bearing surface vs. a whole new shaft. New synchros, blocker rings, pads, etc. and she's like new again.
But, why did the pilot bearing fail? When this engine went in the block was a new GM part along with the bellhousing. Should be good, right? I was so wrong.....
Using the new Bowler T56 alignment plate, measurements were taken to determine the radial and angular/axial misalignment. For radial, 0.005" Total Indicated Runout is considered okay, and 0.002" on the axial for driver cars, 0.001" TIR for high-RPM cars. So the radial is measuring the runout on the bore of the hole, the axial is the measurement on the face of the plate.
Though the radial runout was within tolerance, the axial was 0.011". Yep, that's what took out the bearing, and I'm surprised it lasted as long as it did.
So, how to fix the axial misalignment? The traditional way is to use shims that mount between the engine block and bellhousing. But I can't seen to do things the easy way......
My friend Jeff was nice enough to let me spend the better part of a day using his mill to machine the face of the bellhousing to get it within tolerance. It took five setups to get it right, one heavy pass to get somewhat close, then multiple passes taking just a 0.001" - 0.002" and then checking on the engine. It's under 0.001" now without shims, but it was a PITA to get there. The cross-bar in the setup shown in the photo below was removed as even just a small amount of clamping force caused enough part deflection to create a wavy surface at those locations.
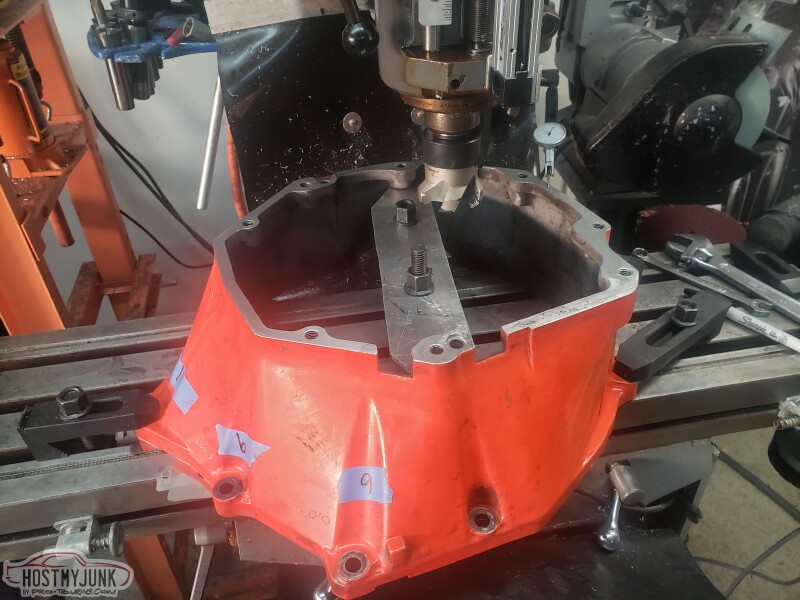
Lesson? Always check the transmission alignment even on new OEM parts.
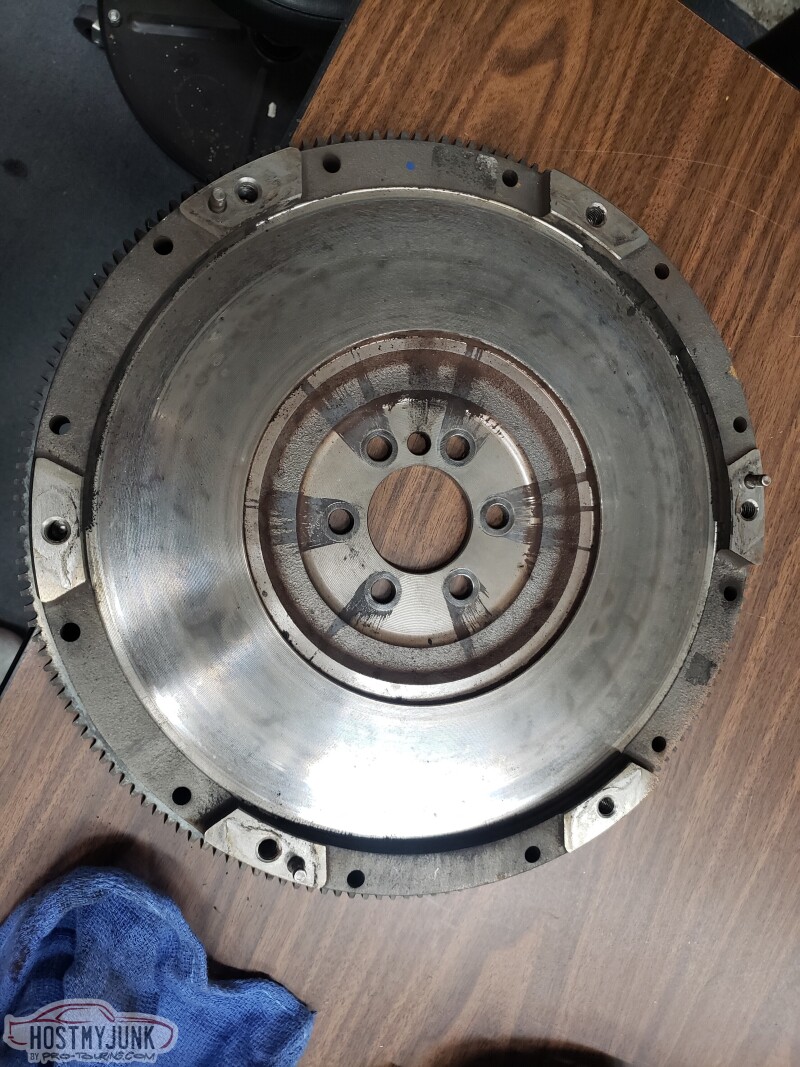
Clutch:
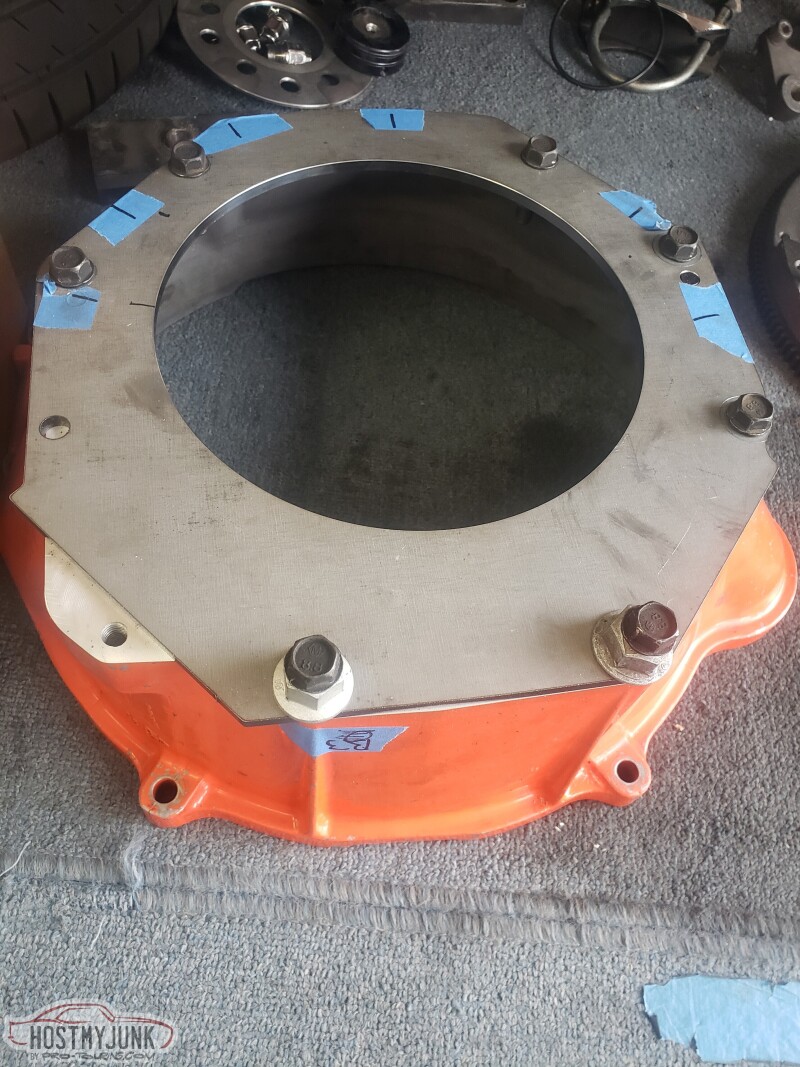
I'd show a photo of the removed LS7 disk and pressure plate, but instead show just one boring flywheel photo showing the 45k+ mile LS2 flywheel. It's still in good condition, and for how well it works, feels, and the price point, it's a great bargain for many LS builds.
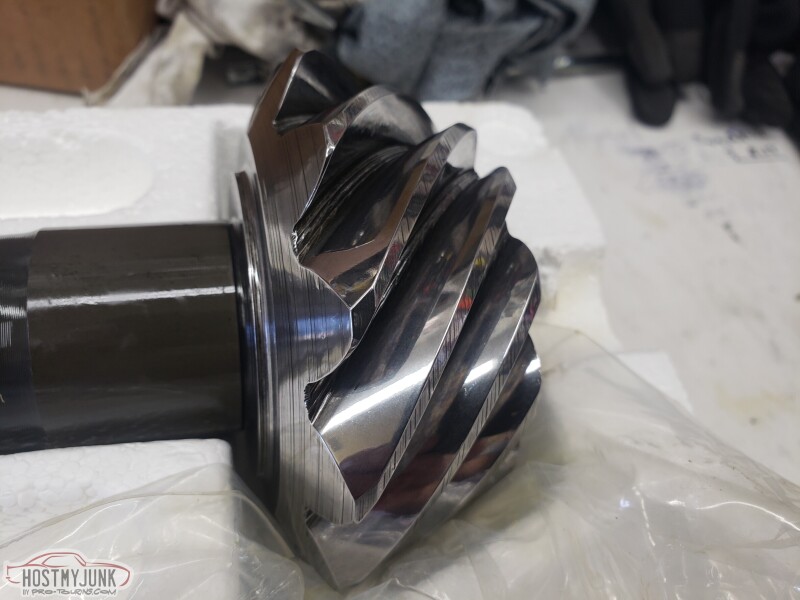
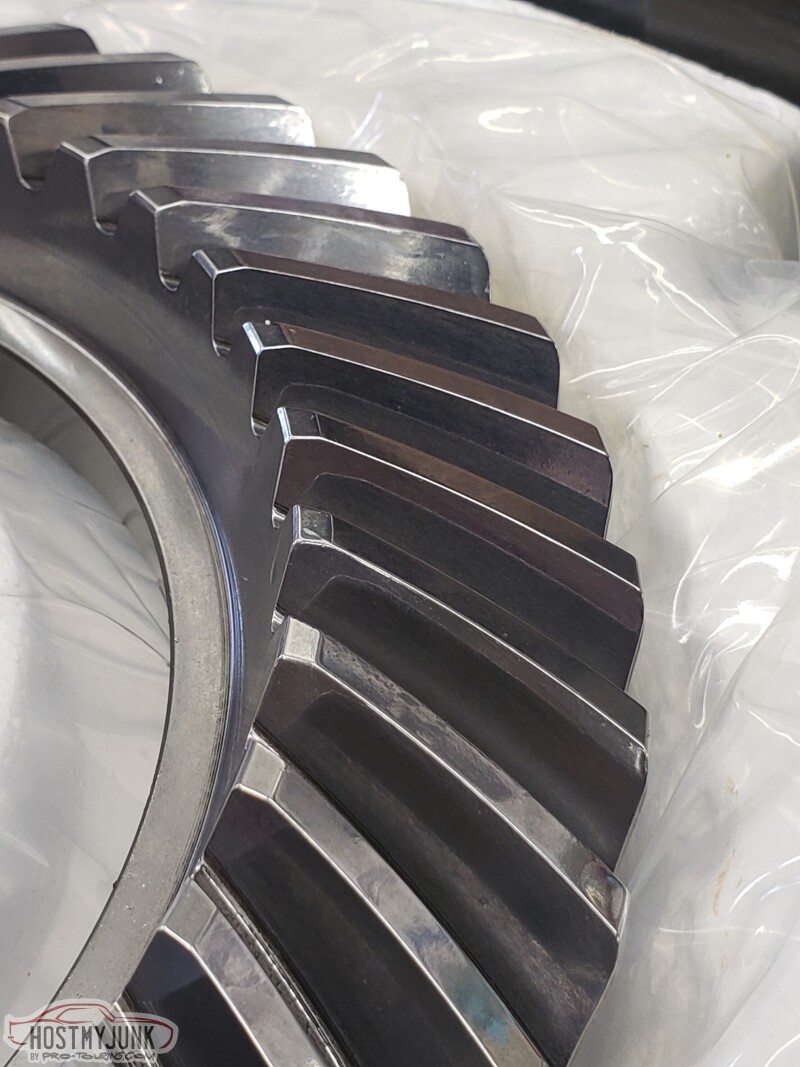
Differential:
The housing was checked for straightness by Speedway Engineering, and a local shop checked the posi unit and replaced the bearings. The C7 bearing hubs appear to be in good condition and were re-used by bolting them back up to the MillerBuilt housing ends. The MillerBuilt parts have been excellent and have cured all of the pad knockback issues the car had experienced prior. Plus, all four corners run a common C7 hub which makes spares a lot easier to deal with.
Being super fortunate, a new set of mid-1980's vintage 12-bolt 3.42:1 gears were still in possession of a forum member that no longer needs them. With the poor state of gear manufacturing for our older builds, these things are worth their weight in gold. They were sent to GearFX for REM finishing and came out beautiful:
|
|
The Following User Says Thank You to CarlC For This Useful Post:
|
|
07-04-2022, 12:02 PM
|
|
Member
|
|
Join Date: Nov 2012
Posts: 21
Thanks: 4
Thanked 1 Time in 1 Post
|
|
Quote:
Originally Posted by CarlC

Honor Flight Camaro – Project Updates
Going back to OLoA 2018, after our day in St. Louis doing drag racing, something did not seem the same with the clutch. It seemed to work fine, but occasionally it was difficult to shift into reverse. It did not get worse, and since the engine must be removed to get the T56 Magnum/bellhousing out, I just let ‘er ride with the understanding that the pilot bearing was a likely suspect.
Fast forward to the Goodguys Hall of Fame Road Tour last September. Hauling a$$ through Texas late at night, go to downshift, and the clutch is ineffective. Get the car to the side of the road, shut down the engine, and pump the clutch a few times. The clutch is working again, but for sure the pilot bearing has been lunched. The car made it home, another 800+ miles, while babying the transmission.
So, what was supposed to be a pilot bearing change turned into a complete drivetrain refresh and upgrade.
Exhaust:
Before tearing into the driveline, one of the big ticket items that needed to be addressed is the exhaust system. It had became progressively louder, and after 21hrs almost continuously driving from Ft. Worth to Los Angeles, annoying. The car has seen many different setups, and unfortunately, failures. The system that was most recently in the car contained the following:
- Stainless Works 1-3/4” long tube headers (repaired in late 2018 due to tube-to-head-flange cracking)
- Flowmaster 3” ball/socket.
- 3” flex joints
- Exhaust hanger support from the transmission mount
- Magnaflow “X” pipe
- 3” pipes to 18” x 9” Magnaflow mufflers.
- 3” tailpipes exiting behind the rear tires.
- All ceramic coated
The prior system had a 3” Dr. Gas “X” pipe, 3” tubes into reducers that fed 18” x 9” Magnaflow mufflers. No ceramic coatings.
To my disappointment, each of these failed, IMO, miserably. The Dr. Gas part cracked, as did the Magnaflow X-pipe. The back caps of both sets of mufflers cracked most of the way around the perimeter weld and were missing nearly all of the noise absorption material.
Both muffler aft end caps have cracks most of the way around:
X-Pipe has an axial crack on both sides. There are flex joints ahead of the X and it is supported by the rubber hanger.
It's not known how much packing was originally there, but it seems pretty light with lots of open perforations. The prior set of Magnaflows were the same way when they came out:
Time for something new.
With the understanding that supercharging is just hard on things, and that the OEM’s have spent billions on exhaust systems that have to survive extended warranty times, I turned to a few folks way smarter than I and with really good data on said topics and came up with a plan to address not just the noise, but also the associated NVH and hydrocarbons that go along with it. Oh, and all while maintaining performance.
The new setup: - LS7 Z28 1-3/4” tubular tri-Y shorty headers, including the OEM heat shields.
- All four catalytic converters from a 1k mile 2021 ZL1. I'll trust OEM validated 650hp rated parts vs. anything in the aftermarket.
- 2-1/2" flex joints
- 2-1/2” stainless exhaust, HD H-pipe, feeding big 18” x 9” stainless steel mufflers.
- Full tailpipes exiting out under the rear bumper.
With said headers in hand (thanks to a fellow member who had a new take-off set available), test fitment on the passenger side could not have been any easier. It dropped in from the top without issue, the heat shields bolted on, and stock ACDELCO spark plug wires and aluminum shields went on just like OEM.
The drivers side did need a bit of persuasion. Several sections near the steering box needed to be slightly adjusted in a hydraulic press. It took about an hour to get sufficient clearance for the tubes, but not all of the heat shields were going to fit. The top portion is fine, but the lower part had to be sectioned into two pieces. The heat shields are so effective that at full temperature I can place the back of my finger 1/4" away with complete comfort.
Since the LT4 that the cats came from have a different flange size and location, hacking began in earnest to make all four line up, clear the floor, bellhousing, crossmember, etc. Since the LT4 has a dedicated primary cat support structure that attaches to the driveline, I tried to mimic that by adding supports from the large tabs on the sides of the T56 Magnum. The idea is to relieve bending stresses caused by unsupported lengths of heavy components (cats). Here’s what the nearly finished system looks like:
LH and RH sides.
To help protect the starter an OEM LS3 starter heat shield was modified and bolted to the aluminum starter mounting plate. The heat shield is made the same way the exhaust shields are, and for the price are less expensive than many aftermarket offerings. The had to have significant "adjustments" to make work but are completely hidden from top viewing.
There’s lots of rubber hangers in the system, along with commonality of flanges. Since I’m not trusting the mufflers to last forever, they have been set up so that they can be easily removed and replaced. When the time comes, each will have a fixture made so that the mufflers and flanges can be built on the bench and easily installed.
Speaking of mufflers, after much investigation, it was decided to use parts made by AP Exhaust. Though not well known in the aftermarket world we play in, they are huge in the standard replacement world, and look remarkably similar to those used by well-known high-performance aftermarket suppliers. Best of all, $37 each from Rockauto: AP / EASTERN XS125
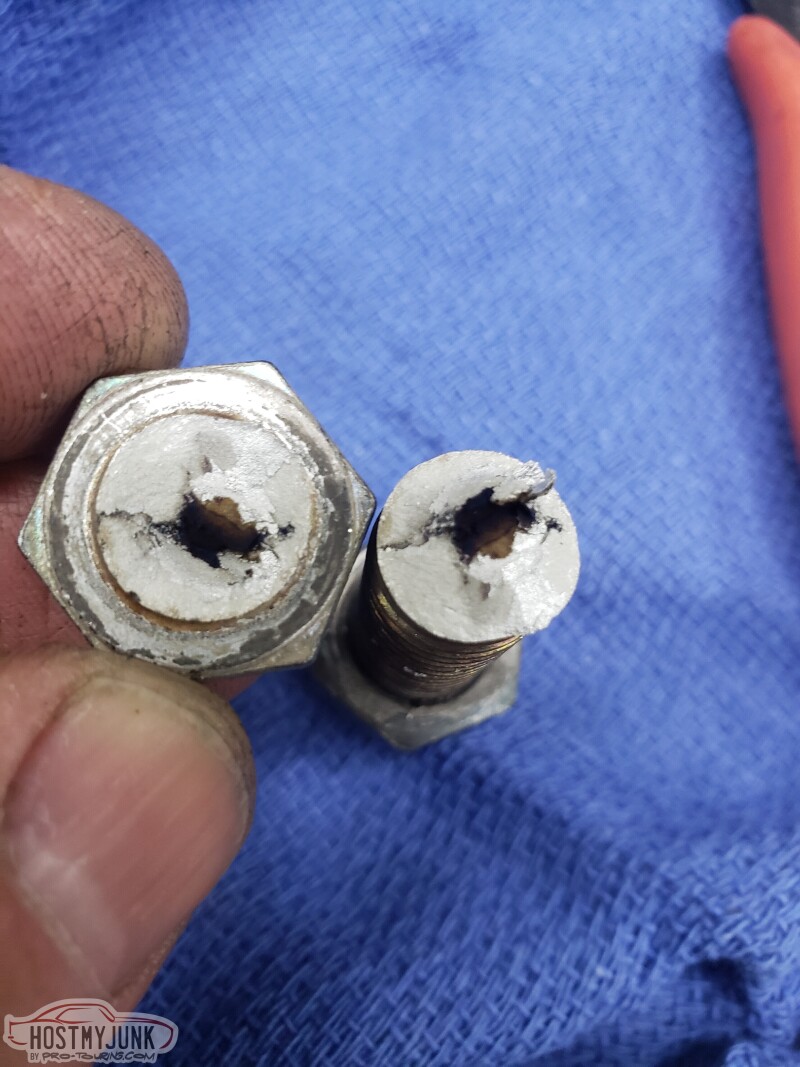
The common flanges used, except for the manifold/collector flange, were used to make work on the car easier. It meant increasing the size of the holes in the manifold and collector flanges to 1/2". So, lot's of new common length bolts were ordered from McMaster Carr. Skipping ahead a bit, after taking the car out for the first time with the new exhaust, after stopping an letting the car sit for a few minutes, there was a loud PING and the jingling of hardware hitting the ground. Here's the culprit from the manfold/collector flange:
I was hopeful that the inclusion was just an anomaly, but after several more heat cycles another bolt failed, and it too had the same inclusion problem. All the bolts had to be changed to a different type to avoid getting another bad batch. Whenever somebody states you must use Grade 8 bolts for chassis work, I'd much rather choose a G5 from Aircraft Spruce than rely on these from what should be a decent supplier.
Driving impressions:
This is an apples and oranges comparison. Think Dr. Jekyll and Mr. Hyde. Plus it can be difficult to be objective. Loud exhaust systems can have a placebo affect. If it sounds loud, it must be fast. If it's quiet, it must be holding back lots of power.
The new version does have a nice mellow exhaust tone at idle, but during cruise and acceleration it is a quantum leap quieter combined with a large reduction in NVH. Think of a modern OEM supercharged car with a stock-ish exhaust. Now I can hear the supercharger whine.
Changing the exhaust has become a good, but challenging, exercise. Good because of the noise and smell reduction, but loud exhaust systems mask other noises. Little noises not heard before now become the task of the day.
From a performance perspective, a back-to-back dynamometer test was not done. My seat-of-the-pants / known traction limits under acceleration/etc. tells me it’s still silly fast. Since it's so much quieter, I have to be careful when applying lots of power since the speedometer is racing upward at a furious pace.
Overall, the change is so far to the good that another set of new LS7 manifolds was purchased, and I’m on the hunt for another set of cats, all for spares/future projects.
Up next: Gears, clutch, and transmission alignment. |
Oe parts for the win.

|
07-05-2022, 11:20 PM
|
|
Senior Member
|
|
Join Date: Aug 2007
Posts: 339
Thanks: 4
Thanked 46 Times in 27 Posts
|
|
Nice upgrade Carl. Can you post some video/sound clips?
|
07-08-2022, 11:44 AM
|
|
Senior Member
|
|
Join Date: Oct 2010
Location: Presque Isle, WI
Posts: 291
Thanks: 114
Thanked 41 Times in 23 Posts
|
|
Great post!!
Thanks for sharing
|
07-09-2022, 09:56 PM
|
|
Lateral-g Supporting Member
|
|
Join Date: Nov 2008
Location: Dunwoody, GA
Posts: 6,298
Thanks: 664
Thanked 581 Times in 471 Posts
|
|
So how does GM not having these issues with transmissions since you used OEM parts and they were still out of spec? There's no way they're adjusting each drive train that's being built.
__________________
Trey
Current rides: 2000 BMW 540i/6 and 86 C10.
Former ride: 1979 Trans Am WS6: LT1/T56, Kore 3 C5/6 brakes, BMW 18in rims
|
07-11-2022, 12:07 AM
|
|
Senior Member
|
|
Join Date: Aug 2005
Location: Newbury Park, CA
Posts: 600
Thanks: 12
Thanked 81 Times in 29 Posts
|
|
Quote:
Originally Posted by WSSix
So how does GM not having these issues with transmissions since you used OEM parts and they were still out of spec? There's no way they're adjusting each drive train that's being built.
|
Good question. However, I did not check the initial installation, and since it's been many years later, things move.
|
07-11-2022, 12:59 PM
|
 |
Senior Member
|
|
Join Date: Jan 2008
Location: Orlando, FL
Posts: 1,300
Thanks: 155
Thanked 117 Times in 69 Posts
|
|
JP + Exhaust refinement
Went through a somewhat similar exhaust upgrade/downsize on my car!
Albeit no OEM parts were used, JP took my car from a Racecar loud 3" exhaust system with an H-pipe that went into 3" straight through "RacePro" mufflers and 3" tails... it sounded great at idle or loping into a parking lot but RaceCar loud was just too much!
Kept the Heddman headers on my 440-Pontiac but used their SS reducers to drop to 2.5" SS to an x-pipe that we placed "sideways" ahead of the BMR torque arm and then 2.5" to full stainless Dynomax Turbo mufflers and 2.5" tails out the back.
The new system is mellow at cruise, still has a muscle car sound at idle and sounds angry at WOT!
Can't wait to hear yours Carl!
__________________
Ty Ingle, USAF Retired 
FREEDOMBIRD Hoodpins.com, Inland Empire Driveline, Billet Accessories Direct, Modo Innovations, AutoRad Radiators, Morris Classic Concepts, Marquez Design, Anvil Auto, Fesler Billet, US Collision (DOOM), AGR, Pro-touringF-body.com, Phoenix Transmission Products, Shiftworks, ACC Carpet, Hedman Hedders, BMR Fabrication, American Autowire, MityMounts, TIN INDIAN Performance, Kauffman Racing Equipment, Pypes, RobbMc Performance, WMC, Holley, NOS, PST
|
|
The Following User Says Thank You to OLDFLM For This Useful Post:
|
|
07-14-2022, 02:10 PM
|
|
Senior Member
|
|
Join Date: Sep 2015
Location: USA
Posts: 288
Thanks: 65
Thanked 87 Times in 71 Posts
|
|
Man
look at those welds. Lol. I wonder if anyone has ever done a dyno comparison with the x-pipe the way you have it vs. the normal (lengthwise) as I would think the banks might be fighting each other
|
07-21-2022, 03:35 PM
|
 |
Senior Member
|
|
Join Date: Jul 2004
Location: Las Vegas
Posts: 557
Thanks: 0
Thanked 0 Times in 0 Posts
|
|
The good:
We always learn something from your pain and experience.
The bad:
Is that you have habitual people in your car building history that love to spend your money for you... lol.
Great to see your work toward reliability has put you in a great place for the future experience and trips/events planned. Good point on the checking of even OEM parts for their respective use and being within spec. Albeit, much better than it has been in the last 50 years or so, even the new stuff needs a good once over.
|
| Thread Tools |
|
|
| Display Modes |
 Linear Mode Linear Mode
|
 Posting Rules
|
You may not post new threads
You may not post replies
You may not post attachments
You may not edit your posts
HTML code is Off
|
|
|
All times are GMT -5. The time now is 09:34 PM.
|


 Brian Hobaugh SCCA National Tour June 2014
 First Hemi 'Cuda Convertible Ever Built
 Short clips: Goodguys Pleasanton autocross and pit videos


