|
|

01-16-2013, 08:20 AM
|
 |
Senior Member
|
|
Join Date: Jun 2008
Location: St. George, UT
Posts: 555
Thanks: 0
Thanked 63 Times in 29 Posts
|
|

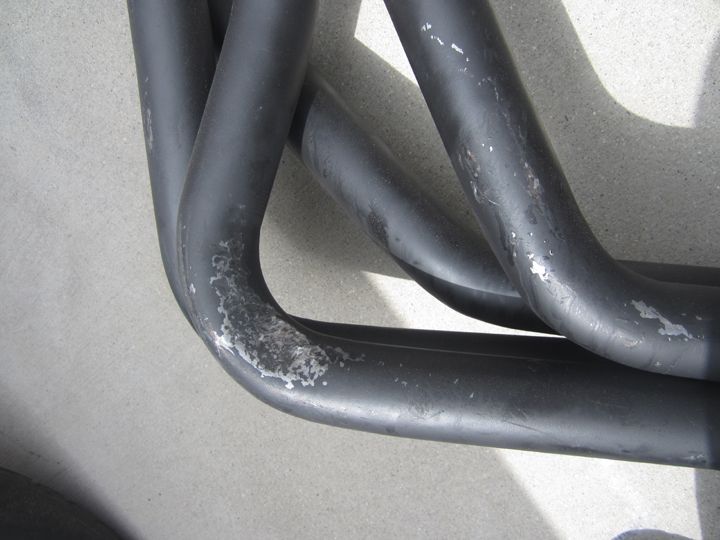
Here's one issue I had with the engine, the Hooker headers. I had a well fitting set of Hedman mid length headers on the car before but wanted the slight advantage of a basic long tube so I went with the Hooker name. Hooker doesn't have a specific G body part number, but rather the catalog lists this generic part number as one that "will fit" pretty much any GM chassis, including the listied g-body. I should've been skeptical at that, these headers are total crap. The tube alignment at the flange is off, the oval rather than round holes at the flange don't line up with the gasket at all and look like they would be a flow restriction, and worst of all they don't fit a g-body chassis without modification. In hindsight I should've sent them back, but instead I messed with them to make them work. What a pain it turned out to be.
First off I gasket matched them a bit, radiusing the ends as much as I could without taking too much out of the weld.


Then I had to bang on the driver's side lower outer tube to clear the lower control arm. I didn't want to affect flow too much so I only dented it in about 1/4", but it wasn't enough...
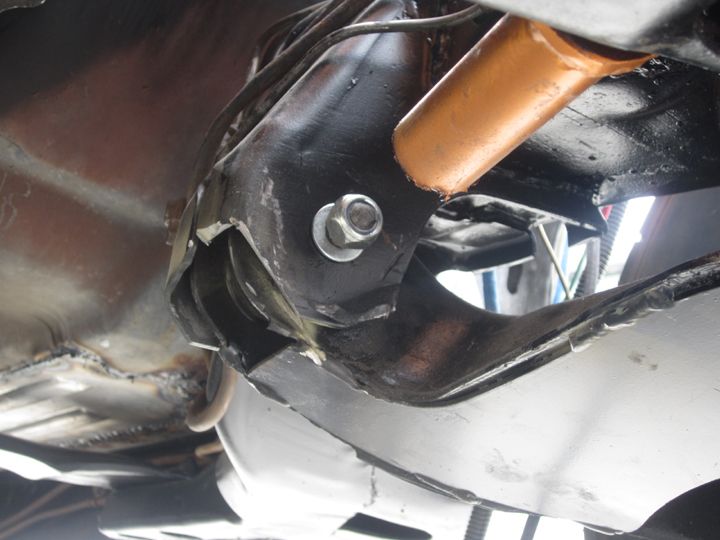
I then got up underneath and trimmed the control arm mount several times until the header would finally fit without touching the frame. I had to whack off a pretty good chunk. Remember the braces I made for this area? Yeah there was no way they'd fit with these headers either. I didn't want to remove the bolts to get them out because I was under a time constraint and removing the bolts meant that the control arm, spring, and shock would have to come out and be re-installed, so I simply cut them out. I was pretty disappointed to have to do this.
All in all I was very disappointed with them. I guess you have to buy Super Comps instead of their street header to get any sort of quality and decent fit. Boo on Hooker for being a big enough company to produce a decent product but rather to cut costs puts out garbage. I certainly wouldn't recommend them for anyone with a g-body.
|
01-16-2013, 08:20 AM
|
|
Senior Member
|
|
Join Date: Jun 2008
Location: St. George, UT
Posts: 555
Thanks: 0
Thanked 63 Times in 29 Posts
|
|
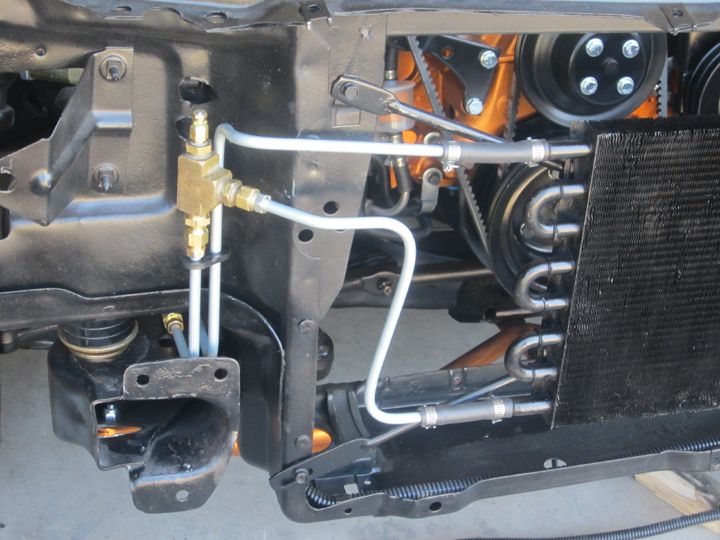
Here are my trans and power steering coolers. The trans cooler came off a parts truck I bought for some parts for my Suburban, and the ps cooler of a 90's Caddy in the junkyard.
The factory tranny lines had been worked and re-worked, so I decided to start over and bought some straight tube and some fittings and bent some new ones. These tuck up close to the block, cross over to the frame near the fuel pump, then follow the contour of the frame towards the radiator support, passing under it near the mount bushing. From there they curve back up and over to the cooler, which is mounted to the Buick Regal radiator support X bracing. Ideally the electric trans temp sensor should be mounted in the pan, but since I didn't have a welder for a bung at home I improvised a little with some old fittings I had on hand. It does the job for now, and I just assume the trans is a few degrees hotter than the gauge reads.
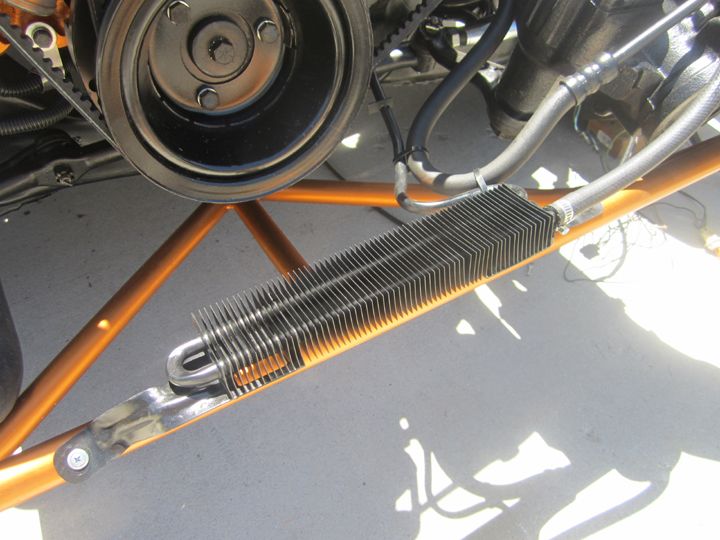
After cleaning thoroughly and repainting it black, the ps cooler was fairly easy to make work. I had to re-bend the factory metal tube to go the direction I needed, but mounting worked out perfect by using the front triangulated brace I made. I trimmed a hole to match the cooler in the bottom of the plastic factory fan shroud so the fan actually sucks air through it. It worked out great for just a few bucks from the junkyard.
|
01-16-2013, 08:23 AM
|
|
Senior Member
|
|
Join Date: Jun 2008
Location: St. George, UT
Posts: 555
Thanks: 0
Thanked 63 Times in 29 Posts
|
|
|
01-16-2013, 08:27 AM
|
|
Senior Member
|
|
Join Date: Jun 2008
Location: St. George, UT
Posts: 555
Thanks: 0
Thanked 63 Times in 29 Posts
|
|
In this post I wanted to share how I fabricated a way to effectively seal the carb to the hood on a really tight budget using some really basic materials.
First off, I had this bucket laying around. You can buy it from WalMart for about $6.00. Mine was well used and had a crack near the top so instead of trashing it I went green and recycled it.  There are several designs of these buckets, so make sure to get one that is fairly rigid and has a large enough base to allow the air cleaner to breathe well.

Step one is to cut a large hole in the bottom, about 12" in dia. Then cut the bottom away from the top, in my case it was about 5" tall from the bottom.

I then grabbed an old "flat" base 14" air cleaner bottom I had laying around which came on an old parts car. I've seen several of these in junkyards over the years. I used a metal blade on my jig saw and trimmed the center out, creating a large flat washer that had a 1/4" turned up lip on it making it plenty rigid.

I then placed the ring upside down under the plastic tub bottom, then placed the base for my Summit 14" dropped base air cleaner on top of the tub and used 4 fairly flat self tapping trim screws to hold the sandwich together. Rivets can be used too, but I like to keep things easy to change later on if need be.


Here it is at this point mounted on the carb....
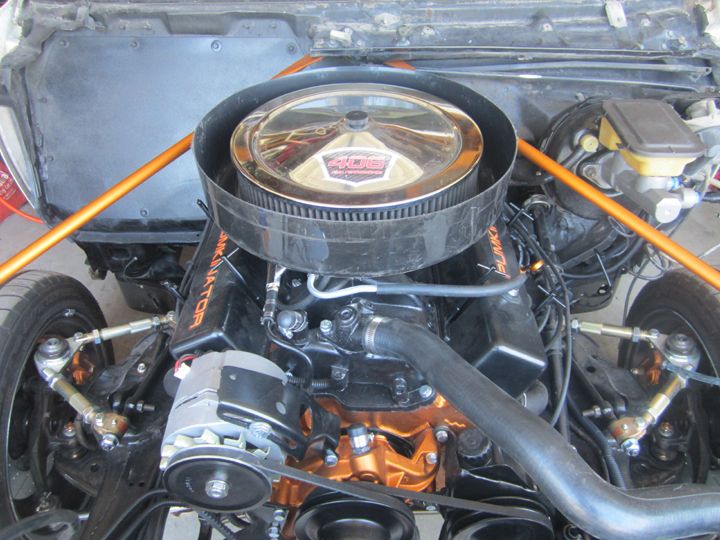
For the seal I got some 1/2" thick foam with scrim backing to the length of the dia of the tub from the local upholstery shop. The ends were sewn together to make a round doughnut of foam. I then carefully cut the foam in half length wise so I could fold it in half. You have to be careful to not cut the scrim backing as this keeps it as one unit rather than two foam rings stuck together.


Here it is slipped over the base. The second photo shows it after some black interior paint. The hood holds it in place and it works great. Yeah, it's sort of rednecky, but for the most part the foam covers the ugly base and gives it a nice clean professional look for cheap cheap.


|
01-16-2013, 08:30 AM
|
|
Senior Member
|
|
Join Date: Jun 2008
Location: St. George, UT
Posts: 555
Thanks: 0
Thanked 63 Times in 29 Posts
|
|
My factory tank had a lot of rust in it, and over the course of driving it a couple years before tearing the car down it had sprung several small pin hole leaks that I patched with gas tank patch kits from auto parts stores. This was only a temp band-aid so I got this new gas tank from Rock Auto for the rebuild. Their price spanked everyone else. A g-body forum member warned me after he saw that's where I bought it from that he had bought two of these wagon tanks from them and neither fit. I found this was the case with mine too, the filler tube wasn't even close. Luckily sheet metal flexes easily, and a few careful tugs and test fits on it, it lined up fine. I then pulled it back out, installed my sending unit and it was good to go back in. The factory fuel line was pretty rusty, so I custom fabricated the fuel line using a roll of 3/8" aluminum tubing from Summit and mounted it with some insulated clamps. The line was carefully routed away from exhaust in the front and rear, something of a problem with the factory line and a lowered car with headers.

Finally the car was ready to fire up for the first time. I didn't let it run long as there was plenty more to do, but it was pretty exciting to hear it run after 8 months and a complete disassembly.
First 406 start-up
Not long later I had all fluids filled, the carb adjusted, and the car running great. At this point I was running out of time to get ready to move across the country very quickly. The car was crazy loud inside and I wanted at least some degree of creature comfort for the drive so I addressed the interior, sort of.
|
01-16-2013, 08:35 AM
|
|
Senior Member
|
|
Join Date: Jun 2008
Location: St. George, UT
Posts: 555
Thanks: 0
Thanked 63 Times in 29 Posts
|
|
Original plans were to get a new complete dash cover, new carpet kit, have the seats reupholstered, do some custom work on the nice factory door panels I found in the junkyard, and replace the headliner. However most of my remaining budget had been spent getting the car to this point so I had to temporarily improvise. I couldn't afford dynamat so I found some foil lined mat at Lowe's. Cost me about $40 for enough to do the whole floor. All in all, I'm not sure it really helped much. Really I just need a different muffler to begin with, lol!
I didn't want the interior to look stupid or have the sun reflect off it while driving, so I broke down and decided to spend the $9.00 at Walmart to buy one 3x5' roll of that ultra cheap crap automotive carpet. Of course it wouldn't contour to the floor very well so I put to work the training I got during my internship at Kirkham's Upholstery in American Fork, UT. BTW Utah folks, they do great custom automotive work http://www.kirkhamupholstery.com/.
First step was covering the trans tunnel. Where the shape and contour changed I made a few cuts to help it lay flat...

Now onto taking what was left over from the roll and fitting the floor areas...

I used my kids' sidewalk chalk (lol) and calculated where to make pie cuts and sew together...

This is what the bottom looks like after sewing. I used my wife's Kenmore home machine with a wide stitch and a denim needle...

To make everything look nice and finished I used some material I had left over from another project. I decided to trim it with a hidden stitch. This is a relatively easy process. First I cut a length of material roughly 2" wide. You line this up on the edge of the TOP of the carpet and sew the length about 3/8" inward.

Then you simply fold that trim material over itself and snug under the carpet. Very carefully sew the length right in front of the trim. The stitch gets tucked down against the edge of the trim and the pile of the carpet hides the stitch. It's virtually invisible and looks very clean...

This is what it looks like on the back side...

Here's the final product. One 3x5' roll barely covered the front floor area. On the outer edges the sill plates covered the rough areas. I used pro-grade interior glue brushed on to hold it all in place. For a little over $9 plus a little time, it looks a bazillion times better then the thrashed factory carpet which has long since gone to the land fill. Some cheap $15 black rubber backed protective floor mats topped it all off. Eventually it will be replaced by an aftermarket carpet kit, but it was good enough for the road trip and has held up great so far....

|
01-16-2013, 08:38 AM
|
|
Senior Member
|
|
Join Date: Jun 2008
Location: St. George, UT
Posts: 555
Thanks: 0
Thanked 63 Times in 29 Posts
|
|
|
01-16-2013, 08:39 AM
|
|
Senior Member
|
|
Join Date: Jun 2008
Location: St. George, UT
Posts: 555
Thanks: 0
Thanked 63 Times in 29 Posts
|
|
Finally I'm now driving the car, after much tribulation trying to resolve the overheating issues previously discussed. The goal was to have at least 200 miles on it before our 2000 + mile trip. Luckily outside of the cooling issues the car ran flawlessly.
One last thing to do before the road trip. Out of necessity and for protection from the elements I needed to cover all the areas where I started working on body work. Although still a bit rough I think my car is pretty cool considering all the mods I've done to it, and having it look this way I thought did it a serious misjustice. I also felt just spray bombing it with a little primer here and there wasn't gonna cut it. Poor ugly duckling...


At this point the budget was all but drained and most every penny we had left in savings would be going towards the trip, so my original plans of spraying it in a booth with epoxy primer was out of the question. An old boss I had used to brag about how he spray bomb painted an old Mustang and it "looked like a real paint job". I always thought he was nuts, but for kicks I wanted to see if he was for reals. I had the fenders off again for some reason so I grabbed one and a can of Rustoleum semi-flat rattle bomb and after prepping the fender laid down a couple coats. I did a light first coat, let it tack, then laid down a fairly heavy coat with about a 70% overlay. Much to my surprise the paint laid down pretty nice! I painted the other fender and had the same positive results. "Hmmm", I thought, "I could do this..."
I decided to go to Walmart and pick up a couple six packs to get me through this next adventure...

About $39 in paint and some tape and old news paper later I went to work. I first sanded the whole car with 320 on a da sander. I then blew it all off with an air gun, then wiped the whole car down with clean water and a wet rag, drying with a terry towel and the air gun. Then it was wiped down with wax and grease remover and finally a tack cloth. Lastly I bolted the fenders and hood back on thinking I could just blend the paint. This all took the majority of the day and the sun was heading down.

After some dinner I put my painter's mask and some music on and went to town starting at the driver's front door and working around the rest of the car right there in the driveway. By now it was fairly dark, and with darkness comes lots of bugs. I swear they're drawn to the smell of paint! This was the first, it landed on the a pillar. Man was I mad to see it. Then one after another... I gave up counting at 12 and just kept spraying. A couple of them really pissed me off so I sprayed over them to really "seal" their fate, lol. All in all I think it was like 32 total bugs in the paint. By the end my son and I were laughing, "There goes another one..." Luckily most of them didn't really sink into the paint much and the next day after the paint was set they come off with a finger tip rub not leaving behind much damage to the paint surface.

Some action shots of my fine painting equipment. I know for sure it came out so nice only because of the classes I had just gone through at school...


|
01-16-2013, 08:40 AM
|
|
Senior Member
|
|
Join Date: Jun 2008
Location: St. George, UT
Posts: 555
Thanks: 0
Thanked 63 Times in 29 Posts
|
|
Here's the end result. Not too bad considering the way it was done. I wish I had had time to straighten the body but I'll get to it in due time...


I decided to leave the roof white. I figured the paint up there was fine, it would save me some time, and I wanted the car to have a bit of an old school look.

The final exterior job was to apply a couple stickers.


It rained the next afternoon, which made some cool photos. Roman took a few. I really like this one and the one above...

|
01-16-2013, 08:43 AM
|
|
Senior Member
|
|
Join Date: Jun 2008
Location: St. George, UT
Posts: 555
Thanks: 0
Thanked 63 Times in 29 Posts
|
|
So here's my thoughts about spray bombing a car. If Hot Rod mag can house paint a car with a roller, then why not spray paint one, right?
A couple things to watch out for. First off is obvious, don't paint it at night in the driveway. Second look at the fender in this shot. Spray paint doesn't blend at all. I should've masked off the already painted fenders.

To avoid dry spray I had to keep it wet and move from one panel to the next very quickly.
The new paint was close by so as one can started to give up the ghost and spray funny, even if it still had paint in the can, I'd quickly grab a fresh one and keep moving. I used 7 cans for 2 overall coats. The first coat was fairly light, the second quite heavy. I only got one slight run on the whole car, and by morning it had mostly sank in so I didn't even bother trying to fix it.
Holding a spray can vertically yields great results. Holding it horizontally, well, not so much. I sprayed the hood on the car and I tried and tried but still got some slight tiger striping. Even after 3 wet on wet coats. Bummer. Over the last 5 months it's faded just enough that it's a little harder to tell and looks fairly smooth.
Overall, Rustoleum gets 1 1/2 thumbs up.
|
 Posting Rules
|
You may not post new threads
You may not post replies
You may not post attachments
You may not edit your posts
HTML code is Off
|
|
|
All times are GMT -7. The time now is 12:23 AM.
|


 Brian Hobaugh SCCA National Tour June 2014
 First Hemi 'Cuda Convertible Ever Built
 Short clips: Goodguys Pleasanton autocross and pit videos


 Linear Mode
