...

Go Back   Lateral-g Forums > Lateral-G Open Discussions > Project Updates
User Name
Password


Reply
 
Thread Tools Display Modes
  #1  
Old 03-22-2015, 02:34 PM
lsuguy's Avatar
lsuguy lsuguy is offline
Lateral-g Supporting Member
 
Join Date: May 2008
Location: Baton Rouge, LA
Posts: 146
Thanks: 1
Thanked 17 Times in 8 Posts
Default 1969 Camaro Build Thread

So I have been lurking around these forums for years and last year finally pulled the trigger on purchasing a 1969 Camaro. This will be a very slow build so hope you guys are patient!

I took delivery of the car two weeks ago from Mike over at Mikes Custom Car's.

Everyone loves pictures so on to the pictures!

I will start with several photos of the car that Mike sent me along the way. I went ahead and had him perform the following work prior to shipping out:

Mini Tubs
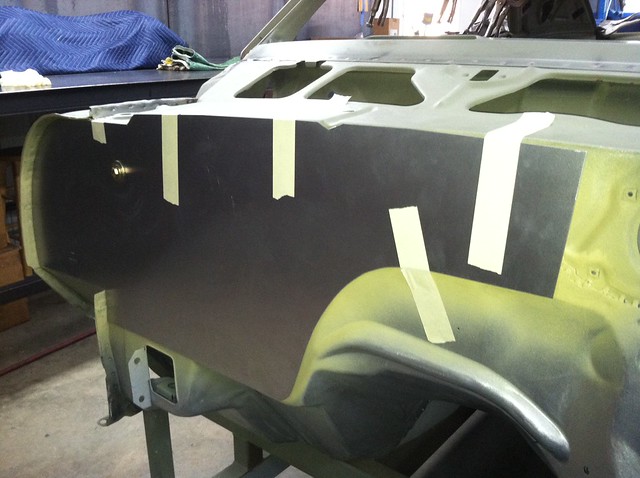
Completely smoothed firewall
Shaved Drip Rails
Detroit Speed Subframe Connectors

Firewall progress photos:


Reply With Quote
  #2  
Old 03-22-2015, 02:47 PM
lsuguy's Avatar
lsuguy lsuguy is offline
Lateral-g Supporting Member
 
Join Date: May 2008
Location: Baton Rouge, LA
Posts: 146
Thanks: 1
Thanked 17 Times in 8 Posts
Default

A few photos of the Drip Rail work, DSE Minitubs and the DSE subframe connectors getting ready to go in.


IMG_0192 by derekpeterson867, on Flickr


Reply With Quote
  #3  
Old 03-22-2015, 02:52 PM
lsuguy's Avatar
lsuguy lsuguy is offline
Lateral-g Supporting Member
 
Join Date: May 2008
Location: Baton Rouge, LA
Posts: 146
Thanks: 1
Thanked 17 Times in 8 Posts
Default

So fast forward several months and it was finally delivery day. Luckily the delivery went off without a hitch. Mike really took his time when packing all the parts and pieces to make sure things would arrives safely.

This is just one photo and doesn't show all the boxed up parts that came with the car(Doors, hood, fenders, etc.)

Reply With Quote
  #4  
Old 03-22-2015, 02:56 PM
lsuguy's Avatar
lsuguy lsuguy is offline
Lateral-g Supporting Member
 
Join Date: May 2008
Location: Baton Rouge, LA
Posts: 146
Thanks: 1
Thanked 17 Times in 8 Posts
Default

So I already had several ideas from here on Lat-g and jumped right onto spraying the inside of the car with Upol Raptor Liner. Sprayed really easy and I think that it came it great. This is just the first application and and I intend to also use the same coating in trunk as well.

I taped everything up well, set it at 60 PSI and sprayed.


Reply With Quote
The Following User Says Thank You to lsuguy For This Useful Post:
Roscoe03 (03-24-2020)
  #5  
Old 03-22-2015, 03:02 PM
lsuguy's Avatar
lsuguy lsuguy is offline
Lateral-g Supporting Member
 
Join Date: May 2008
Location: Baton Rouge, LA
Posts: 146
Thanks: 1
Thanked 17 Times in 8 Posts
Default

I had also already ordered up a Year One smooth rear bumper. I mocked it up for first fit and naturally it didn't fit to my liking so out with the Metabo...

I didn't take great photos here but i probably removed around 3/4" on both sides. In the middle of this my welder decided to take a crap so I wasn't able to get the section welded back in. Good thing I bought a Miller and their warranty is easy to deal with!

Scared the crap out of me and reminded me why I keep fire extinguishers on hand in the shop. I already had my hood down when I smelled something strange. Raised my hood and my whole shop was full of smoke. Luckily no harm done.


So after all that I decided to call it a night. They say Camaro's don't like to stay alone...

Reply With Quote
  #6  
Old 03-22-2015, 03:07 PM
lsuguy's Avatar
lsuguy lsuguy is offline
Lateral-g Supporting Member
 
Join Date: May 2008
Location: Baton Rouge, LA
Posts: 146
Thanks: 1
Thanked 17 Times in 8 Posts
Default

Prior to taking delivery I had already ordered up an entire Speedtech setup including a whole new subframe, torque arm suspension and ford 9" rear end.

Also pictured are the Baer front brakes. I haven't had a chance to weld up the brackets (broken machine) for the torque arm but that is on the short list. Once the rear end is mocked up and brackets are welded in I will be spraying the entire underside with Raptor liner as well.


Reply With Quote
  #7  
Old 03-22-2015, 02:48 PM
Intimidator3's Avatar
Intimidator3 Intimidator3 is offline
Member
 
Join Date: Apr 2014
Posts: 88
Thanks: 0
Thanked 3 Times in 3 Posts
Default

Nice! And welcome. Keep 'em coming!
Reply With Quote
  #8  
Old 03-22-2015, 02:51 PM
Intimidator3's Avatar
Intimidator3 Intimidator3 is offline
Member
 
Join Date: Apr 2014
Posts: 88
Thanks: 0
Thanked 3 Times in 3 Posts
Default

Like the shaved drip rails. Not saying, I really "regret" not shaving mine, but I kind of wish I did before mine went to paint.
Reply With Quote
  #9  
Old 03-22-2015, 03:12 PM
lsuguy's Avatar
lsuguy lsuguy is offline
Lateral-g Supporting Member
 
Join Date: May 2008
Location: Baton Rouge, LA
Posts: 146
Thanks: 1
Thanked 17 Times in 8 Posts
Default

Quote:
Originally Posted by Intimidator3 View Post
Like the shaved drip rails. Not saying, I really "regret" not shaving mine, but I kind of wish I did before mine went to paint.
Thanks! I was on the fence but figured better to do it now and get it over with. He did a really good job on them. He already had the top of the car removed so it made sense to spend the money now as opposed to later.
Reply With Quote
  #10  
Old 03-22-2015, 04:21 PM
streetbird's Avatar
streetbird streetbird is offline
Senior Member
 
Join Date: Jun 2013
Location: qc,canada
Posts: 252
Thanks: 55
Thanked 84 Times in 40 Posts
Default

Nice work, I like it
__________________
The French Frog
Reply With Quote
Reply


Posting Rules
You may not post new threads
You may not post replies
You may not post attachments
You may not edit your posts

BB code is On
Smilies are On
[IMG] code is On
HTML code is Off

Forum Jump


All times are GMT -5. The time now is 11:31 PM.


Powered by vBulletin® Version 3.8.11
Copyright ©2000 - 2024, vBulletin Solutions Inc.
Copyright Lateral-g.net