|
|

04-20-2017, 03:25 PM
|
|
Senior Member
|
|
Join Date: Mar 2014
Location: Plano, TX
Posts: 160
Thanks: 6
Thanked 67 Times in 33 Posts
|
|
 Vorshlag BMW E46 M3 CSL - V8 Downforce Monster Track Car ("Chainsaw Massacre")
Project Introduction - April 20th, 2017: Welcome to another of Vorshlag's detailed Build Threads, this time chronicling possibly one of the craziest cars we have ever built. Even though its is 4/20 day, this is no drug induced delusion - what started with more of a dare has grown into a wicked track car build for one of our customers. This car is called the Chainsaw Massacre - and yes, I will try to explain the name (given by the car's owner) in the paragraphs below.
 This E46 chassis getting a custom roll cage in late 2016
The goals on this build are similar to the factory 2003 BMW M3 CSL, just taken to the extreme: start with a BMW, shoot for lower weight, maximum power, maximum tire, maximum downforce, maximum brakes, maximum reliability. To that we are adding full safety gear (cage, halo seats, belts, fuel cell, fire system) and using a plentiful chassis that is easily replaced if damaged in a track event. This "big tire/big engine/big aero" combination is a simple formula which we have built around before, but this time we have a customer that understands the benefits, and very few class rules or budget restraints to hold us back! 
 This shows where this project is in April 2017, after 5 months of work (with a few long delays waiting on parts)
Target weight is 2600 pounds soaking wet, with the ability to add ballast for series that require higher minimum weights. Target horsepower is 750 flywheel (650 whp), using a large displacement naturally aspirated aluminum LSx V8 engine. Tires chosen are "the biggest DOT Hoosiers available": 335F/345R with the ability to use a 200 treadwear tire of similar size when required. We are also using the biggest wing that AJ Hartman builds (72x14"), along with a diffuser (for when the wing isn't allowed) and a mega sized front splitter, canards, and hood venting up front. There are a few minor "street car" concessions like roll up windows, working wipers and lights, to meet the bare minimum "street car" racing series rules. There are virtually no racing class power-to-weight rules that apply to this build, but we're shooting for around a 3.5:1 to 4:1 pounds per horsepower - which is closer to a FAST sport bike than any production sports car. This E46 is built to run with McLarens on track.
 
Is this just empty smack talk? Before the 'Debbie Doubters' chime in, yes, these are all attainable goals using proven components and build practices we have used in the past. Our caged, metal bodied BMW E36 coupe with an LS1/T56 drivetrain and big CCW Classics shown above (the "E36 LS1 Alpha") was 2508 pounds soaking wet.
 
The power numbers used are from a proven 7.7L LS engine combination from HorsePower Research (HPR), an engine shop that I am a part of. We already have the 468" aluminum LS shortblock built, just waiting on the heads. No, we won't be using some "destroked" high revving nonsense, but a big bored, big stroke, standard deck block with sleeves. #MURCA We have proven the effectiveness of this tire package, the aero tricks, and more on our red Mustang as well as other track cars. This BMW will be one BRUTALLY fast car that should go, stop and turn like very few other unibody street legal cars.

We always take pictures to update our customers during their builds anyway, so why not chronicle the builds in detail for the public? Spread the insanity far enough and we hopefully find more like-minded customers. As with most of our build threads from the past 15 years, this one will be cross-posted to a number of forums (which we either sponsor or they like us enough to let us post there), including:
All of the pictures can be clicked for higher rez versions (#watermarked #triggered), so you can see the details. These build threads take a lot of time to put together but people seem to enjoy them, so I'm going to keep writing them up like this. If you don't like the way this is written, I'm not putting a gun to your head and making you read it.
HOW THE HELL DID WE GET HERE?
The path to this balls-out E46 V8 build wasn't a straight line - it took 2 previous cars and several years of work with this customer to get him to trust us enough to build something this crazy for him. Things like the 18x13" front wheels are borderline absurd. And while some of the pictures shown are just shown to make fun of silly fads, like #DollarBillzonDemLips, this is a serious build that will be a bit insane to drive.
 
Not everyone would want a car like this, or could even drive a car this light and powerful without a bunch of electronic nannies. This idea started after Mr. Chainsaw was frustrated with his supercharged track Mustang, which had heat issues on track - just as ALL boosted track cars seem to have. Overheating, heat soaking, unusable power delivery, high weight, low reliability, and high consumable costs.
 
After two years of improvements to the cooling system, packaging things to better vent the hood, and adding ever larger heat exchangers the Mustang was getting a lot better, but the weight was still fairly high and it was making for a frustrating experience on track for the owner. Just like we told him from the beginning, and what we tell everyone who wants to use a blower/turbo on track: power adders are great for making lots of horsepower for very short amounts of time, but they typically make compromised track cars. A power adder also doesn't make an engine MORE reliable... it does the opposite.
 
This highly modified Mustang (which he called the Chainsaw) was run at many HPDE events as well as Optima Ultimate Street Car qualifier, where it was damned fast. The owner enjoyed the variety of contests they do during Optima events - speed stop, autocross, and time trial. So that series became a focus for a "dedicated race car" to be built in the future. Which is now.
continued below
Last edited by Fair; 04-21-2017 at 07:07 AM.
|
04-20-2017, 03:25 PM
|
|
Senior Member
|
|
Join Date: Mar 2014
Location: Plano, TX
Posts: 160
Thanks: 6
Thanked 67 Times in 33 Posts
|
|
continued from above
Mr Chainsaw thought about a McLaren, but wanted something that could be built faster for less, and more unique. Once we had a detailed build plan and estimate for this V8 M3, we then cautioned him that driving this car would be fairly difficult. Jason convinced him to let us build him a "trainer car" to help sharpen his skills on track. The supercharged Mustang making 640 whp and was a just a damn missile on track, using the power to pass anything on the straights.
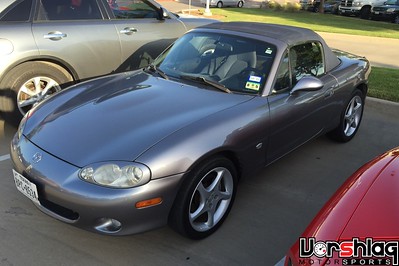
A stock powered 1.8L NB Miata would teach him how to maximize corner speeds, braking, and patience! He set his ego aside and gave us the go in the Summer of 2015. Jason and I found this 2003 Miata and our team turned it into a trainer with full safety (cage, seat, harnesses, fire, remote kill switches), excellent suspension (MCS, Hyperco, Vorshlag + bushings, bars), upgraded brakes (NB Sport brakes, Vorshlag lines, custom cooling, G-LOC pads, Motul fluid) and track worthy wheels/tires (17x8" Enkei & 225mm Rival-S), and lots of cooling (Mishimoto rad, custom oil cooler, new water pump & hoses, etc).

The goal of the track trainer was a super reliable car that he (and others in his family) could use to "beat on like a rented mule" at track events, to improve and refine driving skills. He hired a driving coach/data analyst as well. We built this car in 17 days and it was actually quite a fun little project to be able to do a Miata "right".
 
Jon here at Vorshlag did the graphics (stripes, number boards, etc) on the Miata. Notice the chainsaw wielding mouse wearing a "Texas Chainsaw Massacre" movie-style hockey mask? You guessed it - this car is called Chainsaw Mouse, and the "Texas Chainsaw Massacre" theme carried over into the V8 M3 CSL we are now building. The owner has been running this Miata for two seasons while the build plan for the E46 solidified, we found a good chassis, and carved out time in our shop schedule to dedicate to the build. Our head fabricator Ryan is doing 95% of the work on this project while also juggling the the '69 Camaro track car build, plus does all of our cage fab work.
BMW E46: THE PERFECT DONOR CHASSIS?
Some might not agree with using an E46 M3 Coupe chassis for a wild track build, but let me explain. While we could have started with a C5/C6/C7 Corvette chassis and made something equally as fast, and it might have even been "easier", that wasn't the right car to start with on this project. Why? The customer's wife already had a supercharged C7 Z06, and while its fun and fast, the "Corvette solution" isn't everyone's solution.
While modern Corvettes have plenty of benefits, the also come with a few downsides: a SMALL cockpit, very low seating position, somewhat poor visibility, and extreme difficulties in adding a proper roll cage to the chassis (they don't even have a real floor). We can also make a steel unibody BMW lighter than a full frame/composite bodied C4-C7 Corvette for the same amount of weight removal work ("body on frame" technology is one of the least efficient ways to build a light/rigid chassis). Besides, you can't swing a dead cat at a track event and not hit 30 Corvettes. The roll cage issues are real. Corvettes are easily the most difficult car we build cages for due to the cockpit and greenhouse shape and difficult to access mounting points.
  To build a safe roll cage away from the driver on a C4/5/6/7 Corvette you often have to move bars OUTSIDE of the body
After several discussions we narrowed in on a BMW E46 Coupe to start with, for a number of reasons. We think the modern BMW 1 and 3 series chassis are unique in their ability to become excellent track cars with V8 swaps, and they can take a LOT of power. We've proven that with the E36, E46 and E90 chassis many times.
  Left: The BMW E90 swallows a Coyote 5.0L V8. Right: BMW E36/7 Z3 with LS1. Both built or heavily reworked at Vorshlag
Here's the list of positives with the E46 chassis.
1. Strong, lightweight unibody chassis with "good bones" to build upon. The roof panel is easily replaced with carbon (and the CSL came with carbon from the factory), as are almost all other body panels - and there are good options from the aftermarket. BMW made 4 million E46 chassis globally, which makes them both abundant and cheap.
2. The interior room, ergonomics, seating position and visibility are superior to most low slung "sports cars". These give you an upright seating position that is favored by many drivers. You don't "lay down in a coffin" like in a Corvette since the BMW passenger compartment is fairly large and spacious. This lets us build a roll cage much further away from the driver, which increases safety and comfort and gives us better entrance/egress.

3. These cars have a fairly efficient aerodynamic shape for such an upright greenhouse. It has a sleek coupé styled body with a short trunk, long hood, and generous cabin. The look of the E46 coupe is more modern and timeless than the E36 which is more angular and becoming a bit dated.
4. The E46 engine bay is 2" wider than the E36 and easily swallows an LS V8, and the stock transmission tunnel accommodates a large T56 transmission.
5. The suspension is pretty good (McStrut front, independent rear suspension), it has decent wheel/tire room (especially the M3), and the brakes are not half bad (with excellent upgrade options). Of course we won't leave any of these items stock.
We started hunting for a 2003 BMW E46 M3 coupe chassis (the same year they made the M3 CSL) and found this one locally for a good price in late 2015. Once the project got underway (Winter 2016) we began by cleaning it up and getting the frame checked before real work began. The early build details follow below.
REINFORCING, STRIPPING AND CHECKING THE CHASSIS
This chassis was already partially stripped and had "seem some fun" in it's past, so it needed a good inspection, some squaring up, then a few preventative reinforcement fabrication tasks before major upgrades got underway. First we took the M3 to our friend's bodyshop to put on his chassis table, check the diagonals, and square it up before we began the roll cage installation. Then we reinforced a number of common weak sports on the unibody. After that we began to strip the interior in preparation for the roll cage, even removed the roof to replace it with a replica CSL carbon version.
continued below

|
04-20-2017, 03:30 PM
|
|
Senior Member
|
|
Join Date: Mar 2014
Location: Plano, TX
Posts: 160
Thanks: 6
Thanked 67 Times in 33 Posts
|
|
continued from above
SQUARING UP THE CHASSIS
The two main series that this car will be competing in don't require a roll cage, but its a damned good idea when you are planning something this fast. Before you want to ever put an elaborate, welded roll cage structure into any car you want to make sure the chassis is square and true. Nothing worse than caging a bent chassis - you just wasted a lot of time and ruined the tub.
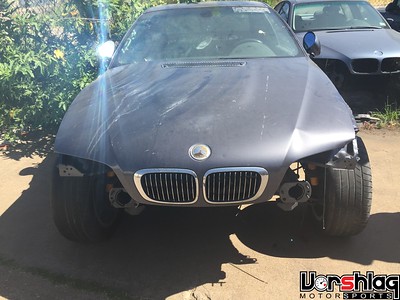
We knew this car had a light front hit at some point, as it was missing most of the front sheet metal that bolted on: bumper, bumper cover, lights, radiator support, plus and the hood & front fenders were a bit munched. Otherwise it looked like a solid, rust free M3 chassis with the M3 specific front spindles, rear subframe and rear fenders.
 
In late summer 2016 I delivered this Coupe chassis to our friends at Heritage Collision Center in Sherman, Texas for an inspection and squaring up. I also brought them a new factory front radiator support to install and align into the "front doghouse" of this car.

They put it on their frame table and measured diagonals on known chassis points against BMW factory data. After a few tugs it was square and ready for the front radiator support, which they installed and trued up as well. I picked it up and brought it back to Vorshlag so we could begin.
REAR SUBFRAME REINFORCEMENT
Once the chassis was trued up we had a bit of a wait while the schedule cleared up and the owner was ready to really begin this project. We did sneak in the rear subframe reinforcement work early on before we "officially" began. This is where we beef up the rear subframe mounts at the chassis, which is a factory approved fix for an issue they acknowledged on the E46 chassis. We did this work when we had a tech "under tasked" for a couple of days, back in the Summer of 2016.

The BMW E46 chassis' primary weakness is in the trunk floor right where the rear subframe mounts. There is a lot of flex in the rubber subframe bushings which allows for constant movement. Over time this slide-hammer like movement can cause fatigue cracks in the sheet metal mounts. If the cracks are ignored long enough it can cause failure of the mounting areas.
 
Donnie put the M3 on a 2-post lift and removed the rear subframe assembly, which holds the differential housing and the rear suspension. Normally when doing this E46 reinforcement job we would remove the sloppy rubber factory mounting bushings for the subframe and diff and replace them with aluminum or polyurethane. We actually procured a second complete E46 M3 subframe for this car, since we had major modifications in mind for those bits. So the stock rubber bushings were untouched at this point.
 
With the subframe assembly removed we can finally inspect the trunk floor mounting points. Then the paint, seam sealer, and undercoating materials are removed from these areas where the plates will be welded - our air powered OBX "Crud Buster" tool makes quick work of these coatings. The reinforcement plates are CNC laser cut and bent pieces we source from CSM. These have a much larger footprint than some other reinforcement plates we have used. The CSM plates cover more area, which better covers some of the larger cracks we have seen in these cars.
 
This time the cracks were visible before removing the paint - they had propagated a good ways. Luckily we only found cracks in one of the four mounting positions, which is pretty good for an E46 of this age. Often we see cracks are all 4 points of contact. In the dozens of E46 cars we have done this work to only once did we find a car without any cracking. Like I said, its the primary weakness of this car, but easily fixed and reinforced.
 
Before the reinforcement plates are welded on we have to "drill stop" the cracks and TIG weld them for a proper repair. The small drilled holes at the end of the cracks removes stress from the sheet metal and keeps the cracks from propagating while they are being welded up.
 
Once all of the cracks were repaired, then all four plates were TIG welded to the chassis, it was time for seam sealer, primer and some paint. Once the paint dried the stock rear subframe assembly was bolted back in place, to allow the car to roll around. In the end it took about 11 hours + $250 in materials to get these areas properly repair and reinforced, but they should be good for life now. We had big upgrade plans for the second M3 subframe we purchased for this car, which I will show in a later post.
continued below
|
04-20-2017, 03:31 PM
|
|
Senior Member
|
|
Join Date: Mar 2014
Location: Plano, TX
Posts: 160
Thanks: 6
Thanked 67 Times in 33 Posts
|
|
continued from above
FRONT STRUT TOWER REINFORCEMENT
The second common weak point on the E46 chassis, as with many McPherson strut cars, is in the actual strut towers. The sheet metal is a bit on the thin side and virtually all of the vertical suspension loads pass through the strut and into the chassis via these two towers. With a big enough impact you can deform or crack the sheet metal here. It's even worse with sticky race tire loads. Sometimes the towers develop cracks simply from fatigue - again, soft bushings allow for a lot of extra squishy movement, which flexes the metal over time.
Below is a common upgrade we do on many BMW chassis, where we reinforce the tops of the strut towers. The damage shown on the silver E46 M3 track car below is a perfect example of why this work is needed.
 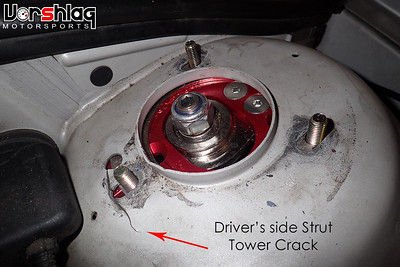
This customer saw the tower reinforcements done on the Chainsaw Massacre E46 M3 CSL-clone and wanted the same thing done to his dedicated M3 track car. Good thing, too - when we pulled the strut tower brace off we found a series of massive cracks hidden from view, which you can see above.
 
The cracks were each "drill-stopped", TIG welded, sanded smooth, then a pair of the BMW E46 reinforcement plates were welded into the towers from underneath - effectively doubling the thickness here. The areas were primed and the car went back on track.
Before the color matched paint arrived to re-shoot the tops of the towers this car was in a track incident. This snapped the right front Bilstein Club Sport inverted strut like a twig, ripped the tie rod out, and broke the control arm and wheel - but the strut tower was fine. I can say with confidence that this reinforcement work saved this strut tower from total annihilation. Doubling the thickness of metal here is key.
 
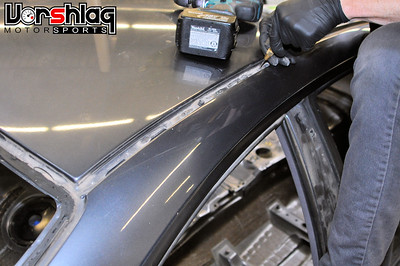
Back to the E46 M3 CSL build - Ryan started by pulling the stock front suspension off and out of the way. Then we ordered these stamped steel E46 strut tower reinforcement plates from BMW (Part # 51717036781 ), which are rounded and match the shape of the E46 strut tower from underneath. These are often just slipped in and bolted between the strut tower and the top mount, but we would weld them on for more strength and longevity.
 
The paint was stripped off the top of the strut towers with our OBX stripper tool. Then the reinforcement plate was bolted in using a fixture and TIG welded around the round opening at the top and along the slotted strut tower holes. There was some prior damage to the lip of the strut tower opening that we repaired and now looks new.
 
The paint was also stripped from the underside of the tower and from the reinforcement plate. Ryan MIG welded the plate to the tower from underneath with 6 stitch welds as shown. These areas were then covered with seam sealer and primer paint.
SEAT TESTING + STRIPPING THE INTERIOR & ENGINE BAY
In preparation for the roll cage and seat mounting we needed to get the chassis completely stripped and ready for welding. Since this was a "complete build" we tackled the additional work of removing all of the body wiring, tar insulation, and even some unnecessary unibody structure. When you are looking for hundreds of pounds of weight loss you have to chase every pound!
 
We had Mr Chainsaw test sit various racing seats in our lobby. He liked the Sparco Circuit II seat, which have an integral halo section to prevent side impact neck injuries and high leg bolstering. I also like this seat and have it in one of our shop cars. After we test fit one in this car, I ordered two new seats from Sparco for this build.

The work of removing the dash, wiring, and plumbing from the car to get it down to a bare rolling chassis takes time. It isn't super exciting work but it is all necessary when you are looking to minimize weight as much as we are here. "Just leave the stock wiring harness" might be appropriate for some builds, but not one this extreme.
continued below
|
04-20-2017, 03:32 PM
|
|
Senior Member
|
|
Join Date: Mar 2014
Location: Plano, TX
Posts: 160
Thanks: 6
Thanked 67 Times in 33 Posts
|
|
continued from above
Between the engine goals and potential cornering loads (Hoosiers + full aero), a dry sump oiling system was decided early on.
 
Ryan test fit an oil settling tank we had from another project under the M3's dash, but it just wasn't the right place for this chassis (it will go in the back seat area instead). Then the tedious job of removing the steering column, HVAC box, and dash assembly was tackled. Its all gotta come out for cage work...
 
This outer dash skin came out cleanly and will be reinstalled after the cage is built. The steel OEM dash bar structure was removed and will be replaced with a horizontal tube, connected under the "skin" of the dash, to joint the front of the roll cage. We will have to replicate a lot of these little hidden brackets to hold the top skin of the dash in place afterwards, but that's how you save more pounds - little bits at a time.
 
The front windshield and back glass came out next. Since we planned to re-use the front windshield (it was un-pitted and perfect) we hired a professional windshield installer to remove these two pieces of glass. This allows more access to build the roll cage as well as roof panel removal (more on that below).
 
After the dash structure and skin came out, this giant rats nest of wires (above left) was left behind. Yes the main body wiring harness was completely removed. We would have to pare this down so far that it makes more sense to replace it with a more streamlined, custom built chassis wiring harness. This harnesses was later weighed and it came to 49.4 pounds of wire, just from behind the firewall. This includes the giant cluster of wires under the dash, under the carpet, and in the trunk area.
 
The engine bay was already partially stripped, as this car had no drivetrain or engine wiring harness when we bought it. But the rest of the underhood clutter had to come out, as nothing OEM was being re-used up there.
 
The brake and clutch master cylinders, brake booster, ABS module, brake hard lines, and all sorts of plastic panels were removed and scrapped. At this point the engine bay was mostly stripped but even more brackets and panels would be removed later.
 
Many of the old parts were stored on a wire shelving unit. This way anything we need to re-use is kept together with the rest of the customer's parts. These can be rolled away and stored when not needed.

At this point the interior looks pretty barren. But we're not stopping here. No, NO! WE NEED MOAR!!!
continued below
|
04-20-2017, 03:33 PM
|
|
Senior Member
|
|
Join Date: Mar 2014
Location: Plano, TX
Posts: 160
Thanks: 6
Thanked 67 Times in 33 Posts
|
|
continued from above
INTERIOR INSULATION REMOVAL
We were looking for every pound, remember? Next up was the heavy asphalt/tar sound insulation panels stuck all over the interior and trunk areas. These materials are a chore to remove, but it adds up.
 
A heat gun + a variety of scrapers + lots of elbow grease are the best way to remove this stuff from a BMW. Trust me, we've tried all of the methods - freezing with dry ice, power tools with wire wheels, and sandblasting - and the heat gun is the cleanest, fastest way for the BMW insulation.
 
17.7 pounds of tar paper came out of the interior and trunk. But it left behind this tacky adhesive goo....
 
The car still rolls at this point so it was shoved outside and the electric pressure washer was used to blast every surface of the chassis, inside and out. 2500 psi gets all the dirt and grease off the chassis, but it won't make a dent in the adhesive residue.

Over the years we have tried numerous degreasers and petroleum products and found that soaking the adhesive with mineral spirits works like a charm. It softens the adhesive enough to wipe it away, but doesn't damage the paint. Of course we're going to paint this entire chassis inside and out later, but having bare metal during the build process might allow it to flash rust. So .... heat gun + mineral spirits works best on this stuff.
ROOF STRUCTURE REMOVAL + CARBON ROOF PANEL
We still weren't ready to start the roll cage, and needed to do something about the power moon roof that was in the way.
  Left: 72.0 pound factory sunroof cassette. Right: AJ Hartman carbon sunroof delete panel at 1.4 pounds
Like most E46 BMWs, this one had a factory retractable sunroof option. The non-M E46 almost always has a sunroof, but a few E46 M3s came without a sunroof - including the CSL.
 
The 72 pound power sunroof assembly (they call it a cassette) is not only a heavy thing but it gobbles up head room in these cars. We had talked early on about a carbon fiber sunroof delete panel, which we have done on a number of E46 chassis to knock weight out of the roof while gaining 2.5+ inches of headroom (like my E46 330Ci above). Another AJ Hartman pieces that is an easy "bolt-in" replacement you can swap in over a couple of hours.
Since this is a 2003 BMW M3 CSL clone of course we have to use the CSL's full carbon fiber roof panel, duh! We had AJ Hartman make an exact replica of this CSL roof panel, which Mr Chainsaw agreed was more appropriate for this build. Ryan started the roof swap by removing the two roof seam covers, then drilled out spot welds with a small spot weld cutter.
 
Ryan received some help from our CNC operator, also named Ryan aka: "R3". The two Ryans then finished removing the 100+ spot welds around the perimeter of the factory steel roof panel, prying the glue loose after these spots were carefully cut through. The front and rear glass removal was crucial in this step; the roof came off in a little under 6.5 hours.
continued below
|
04-20-2017, 03:34 PM
|
|
Senior Member
|
|
Join Date: Mar 2014
Location: Plano, TX
Posts: 160
Thanks: 6
Thanked 67 Times in 33 Posts
|
|
continued from above
 
The OEM roof weighed 96.1 pounds (24.1 for panel + 72.0 for sunroof cassette). The new AJ Hartman carbon fiber roof came in at 6.9 pounds, for a total savings of 89.2 pounds - way up high in the roof! Not only did we lose the equivalent mass of a "young adult" the interior gained about 2.5" of headroom. We also had ample access for building the roll cage.
 
The CSL carbon roof panel went on easily and bolts in place using 4 factory threaded bolt holes, which fit the roof section perfectly. Ryan had to do zero adjustment, custom fitting, or hole enlargement - it just fit.

Once the cage work is finalized and before paint this will be bonded to the body structure just like the factory E46 M3 CSL roof is, plus there are the four back-up bolts as well.
INTERIOR UNIBODY STRUCTURE REMOVAL
The back seat was never going to be used in this build, so to lose some additional weight we looked at the rear seat bulkhead structure and decided to remove it before the cage began. There is a lot of easy weight that can be removed from the back seat, and in our 2001 BMW E46 330Ci we found 63.8 pounds in the back seats + headliner and another 10.4 pounds in rear speakers and a few trunk brackets.
 
Compared to my 330, this M3 needed an even sharper scalpel this time. We weren't looking to "skin" this car and put it down over a tube chassis or anything, but redundant structures that could be removed would be. There was some easy weight loss in the rear seat bulkhead perimeter structure and rear window "speaker deck" panel - which would have their chassis stiffness more than replaced with roll cage structure. We will make lightweight interior panels to separate the trunk from the passenger cabin.
 
There were probably another hundred spot welds that were cut for all of these brackets, panels and sheet metal structures in the back seat area. These were cut into small pieces with a reciprocating saw and pried loose without warping or damaging the surrounding structures.
 
Of course I forgot to weigh all of this before the scrap metal guys came and picked it all up, but it was around 15-20+ pounds of sheet metal in addition to the back seats, interior panels, and trunk brackets that were also removed (with weights noted on our red 330). Now the car was ready for a roll cage!
WHAT'S NEXT?
The intro post in this build thread has already run long, so we better cut it short. Nothing really earth shattering done in this first series of posts, just showing the steps needed to remove weight and add longevity to this E46 chassis. Again, my goal weight guesstimate is 2600 pounds soaking wet with a dry-sumped LS stroker, T56 Magnum, giant wheels and tires, wide body work, full aero, and the required door glass + heater + wipers required for street use.
 
In my next installment in this build thread I will show the roll cage fabrication work. I will also cover seat installation, custom "low profile" door panel construction, subframe reinforcement, the 8.8" Ford IRS diff swap, and more. We will discuss the classes we are building toward in NASA and Optima, and the rules/performance differences between them.

I tend to show details and pictures of this build and more "in real time" on our Facebook page and in our irregular "this week at Vorshlag" videos on our Youtube channel. Look for those and like/subscribe/whatever it is you are supposed to do there if you want to see the progress on this build sooner.
Until next time,
__________________
Terry Fair @ Vorshlag Motorsports
|
04-20-2017, 08:42 PM
|
|
Senior Member
|
|
Join Date: Apr 2014
Location: ATL
Posts: 748
Thanks: 11
Thanked 58 Times in 36 Posts
|
|
It's awesome. Thanks for posting! Continue!
|
04-21-2017, 03:47 AM
|
 |
Member
|
|
Join Date: Dec 2014
Location: Fort Worth, Tx
Posts: 62
Thanks: 0
Thanked 0 Times in 0 Posts
|
|
As usual, great build thread. Can't wait to see this in progress.
Keep up the good work.
__________________
Brad
83 Chevy c10
|
04-21-2017, 07:01 AM
|
 |
Lateral-g Supporting Member
|
|
Join Date: Feb 2008
Location: Eads, TN.
Posts: 1,467
Thanks: 393
Thanked 184 Times in 122 Posts
|
|
Amazing read! Thanks for putting all that together!
__________________
You remind me of the timing on a turbo engine...
|
| Thread Tools |
|
|
| Display Modes |
 Linear Mode Linear Mode
|
 Posting Rules
|
You may not post new threads
You may not post replies
You may not post attachments
You may not edit your posts
HTML code is Off
|
|
|
All times are GMT -7. The time now is 09:10 PM.
|


 Brian Hobaugh SCCA National Tour June 2014
 First Hemi 'Cuda Convertible Ever Built
 Short clips: Goodguys Pleasanton autocross and pit videos


