...

Go Back   Lateral-g Forums > Lateral-G Open Discussions > Project Updates
User Name
Password


Reply
 
Thread Tools Display Modes
  #1  
Old 03-18-2018, 07:02 PM
CTX-SLPR CTX-SLPR is offline
Member
 
Join Date: Mar 2018
Location: Livermore, CA
Posts: 47
Thanks: 0
Thanked 9 Times in 6 Posts
Default

My floor boards and the trunk pan aren't super either. Side effect of the way Buick did the under floor bracing that just collects dirt which promotes rust. The trunk is just a bit weak by the rear body mounts, the floor boards are another story. The outboard seat mounts, which are on top of the stamped channel cross braces are rusted out on both sides of the car. The drivers side rear mount is rusted along the seams to the inner seat mount. I have a passengers side floor pan to splice in but the drivers side I've got to either fab from scratch or buy another chunk. As much as some people on the ROA board haven't treated members of this board very well. There are a lot over there who would be willing to help get a Riv back on the road. I know a guy here in the Livermore area that has something like 27 63-65 Rivieras of various states of repair. I'm going to ask him for a floor pan section for mine.

Really bad new, I've lost my hard drive with all of my pictures so I'll have to recover them from photobucket and other places so it'll be a bit longer before I can put more pictures up from the history.

Here's a recent picture of it's maiden voyage to a cruise in I put on at my church this last 4th of July. You can barely see the turbo behind the polished Al up pipe in there and I'll eventually get the front bumper back on.
Attached Images
 
Reply With Quote
The Following User Says Thank You to CTX-SLPR For This Useful Post:
Ummgawa (03-18-2018)
  #2  
Old 03-20-2018, 07:50 AM
CTX-SLPR CTX-SLPR is offline
Member
 
Join Date: Mar 2018
Location: Livermore, CA
Posts: 47
Thanks: 0
Thanked 9 Times in 6 Posts
Default

Here's some pictures of what the worst of the floor looks like. Since that's the last thing I talked about for the car. It's gotten slightly worse as those pictures are from around 2009 and it's been in the garage virtually all of the time till this last 8 months. That's next months project because I need to mount my new seats, 97-99 Acura CL Premium seats since they have a power "walk through" where you flip the seat forward and it automatically moves to the full front travel then goes back when you flip it back all without involving a BCM.

Not Premiums since it has a manual recline but elsewise the same.
Attached Images
      
Reply With Quote
The Following User Says Thank You to CTX-SLPR For This Useful Post:
Ummgawa (03-20-2018)
  #3  
Old 03-20-2018, 09:41 AM
214Chevy's Avatar
214Chevy 214Chevy is offline
Lateral-g Supporting Member
 
Join Date: Jul 2008
Location: DALLAS, Texas
Posts: 4,692
Thanks: 459
Thanked 695 Times in 425 Posts
Default

Nice body and good choice on the seats.
__________________
'68 C10 swb
'69 Camaro convertible
'72 Chevelle

Reply With Quote
  #4  
Old 03-21-2018, 05:11 AM
gofastwclass gofastwclass is offline
Senior Member
 
Join Date: Feb 2012
Location: Behind the wheel in KCMO
Posts: 363
Thanks: 118
Thanked 40 Times in 37 Posts
Default

Cool project, thanks for sharing.
__________________
I build my own junk...
Reply With Quote
  #5  
Old 03-23-2018, 08:00 PM
CTX-SLPR CTX-SLPR is offline
Member
 
Join Date: Mar 2018
Location: Livermore, CA
Posts: 47
Thanks: 0
Thanked 9 Times in 6 Posts
Default

Not ignoring y'all, just been out of town and I don't travel with my pictures so I'll catch back up sometime after I get enough sleep...

Teaser:
Attached Images
 
Reply With Quote
  #6  
Old 03-24-2018, 09:40 AM
CTX-SLPR CTX-SLPR is offline
Member
 
Join Date: Mar 2018
Location: Livermore, CA
Posts: 47
Thanks: 0
Thanked 9 Times in 6 Posts
Default

So I picked that teaser picture on purpose. It shows that bloody great big R4 compressor in there. Between that and the cut down 300 V8 oil pan I was using I had to locate the engine around 3in further forward than I wanted to for maximum set back to get the compressor to just barely clear the upper control arm cross shaft and the oil pan to fit between the cross member and the rear steer centerlink.

I saved up my money and bought a decent and well equipped RF-31 mill drill and without much planning took a spare accessory bracket and proceeded to modify it for a small Sanden compressor. I've not gotten to the point of fitting the AC again so I have no idea if it's enough compressor for the car with all it's glass but it's something. I did go through the trouble to put the same amount of bracing as factory to support that compressor. You can barely see it in the last picture since I was in the middle of doing the wiring for the L67 EFI system. I had to mill down a boss on the accessory bracket, spot face it for the lower mount on the compressor then I put a front strap like the 'Y' shaped bracket seen on the original compressor. The back of the compressor is supported by something that looks like a tree branch but it supports the outer end of the compressor. This thing shouldn't flex on me.

I'll get more into the engine oiling system since it's kinda trick sometime later today or this weekend.
Attached Images
      
Reply With Quote
  #7  
Old 03-24-2018, 08:11 PM
214Chevy's Avatar
214Chevy 214Chevy is offline
Lateral-g Supporting Member
 
Join Date: Jul 2008
Location: DALLAS, Texas
Posts: 4,692
Thanks: 459
Thanked 695 Times in 425 Posts
Default

Nice work...I see you have some skills there.
__________________
'68 C10 swb
'69 Camaro convertible
'72 Chevelle

Reply With Quote
  #8  
Old 03-25-2018, 09:05 AM
CTX-SLPR CTX-SLPR is offline
Member
 
Join Date: Mar 2018
Location: Livermore, CA
Posts: 47
Thanks: 0
Thanked 9 Times in 6 Posts
Default

Thanks for all the support

One of the big short comings of almost all Buick engines is the oiling system. The stock setup using steel spur gears riding in an aluminum housing with an aluminum thrust plate that tends to wear. The front cover oiling passages also have a lot of right angles in them so it's a torturous path from the pump to where it needs to go.

Quote:
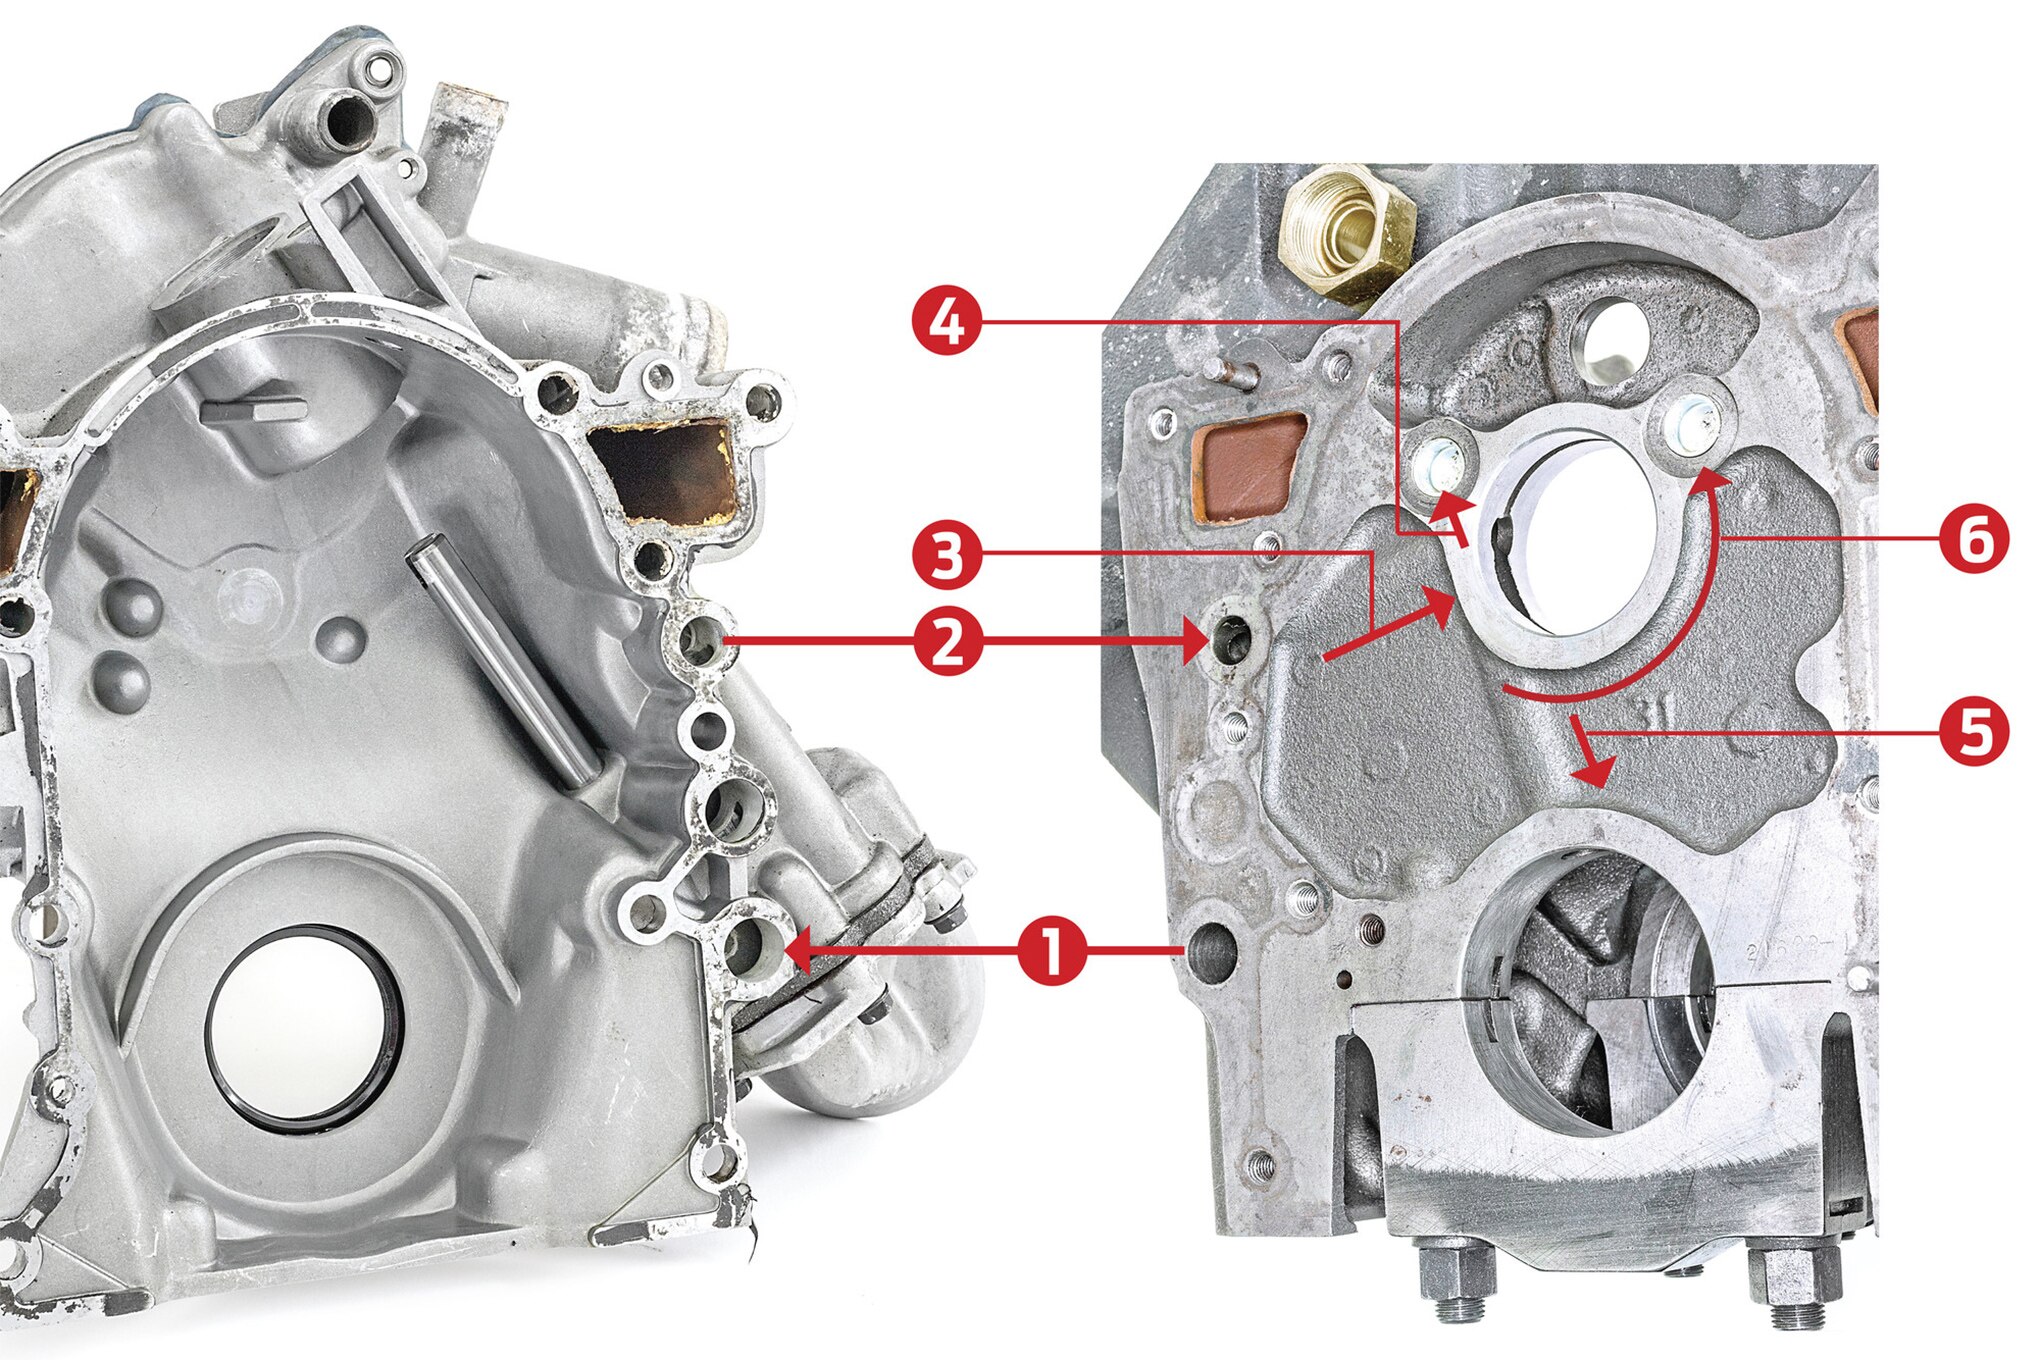
Originally Posted by Hot Rod Pitstop
Seen At Duttweiler Engineering, This Is A Typical 1985 And Later Buick V6 Block And Front Cover. All Buick V6 And V8 Oil Supply Systems Have A Similar Oiling Layout, With The Same Problem: A Tortuous Supply Path With Multiple Right Angle Turns That Make The Engines Hard To Prime And An Undersized, Front Cam Bearing And Journal That Can Fail If It Experiences Oil Starvation—either On A New Start Up, Or If The Car Has Been Sitting For A Long Time. 1] From Pick Up Tube Out To Oil Filter 2] From Oil Pump Into Block Main Oil Feed 3] To Main Oil Distribution Junction 4] To Passenger Side Lifter Gallery 5] To Crank, Main, And Rod Bearing Oil Supply Passages 6] Transfer Groove From Passenger Side To Driver Side Lifter Oil Supply Passage
http://www.hotrod.com/articles/pit-s...t-cam-bearing/
Combine this weakness with the fact that the stock oil pump and filter would run smack into the engine cross member I pretty much set out to fix both of those problems in one feel swoop. Now I'm not the first person to do this general idea, there are two others that took other Buick V6 front covers with a gerotor pump and adapted them but as far as I know I'm the only one that did it with a 3800 Series II/III pump which has the slight advantage of being internally located vs. the older pumps relied on the crank snout for the drive gear. However this is even less of a bolt on than the earlier setups they used since a 3800 has a balance shaft and a slightly different front bolt pattern for the timing cover. While it does use the same oil pickup location, the feed to the block is different so I had to change that. I ended up using the lower section of the 3800 cover and the upper section of an Indy Lites dry sump timing cover. I filled the oil return section of the pump up with marine JB weld and then machined a plate that housed the pressure regulator and allowed me to use an AN-10 fitting to route the oil to the external oil filter and then back into the side the of block where the old oil pressure sensor went.
At this point in my life I was stationed at Wright-Patterson AFB in Dayton, OH and I had Ohio George Montgomery do the machine work. When he enlarged the passage for the oil supply he broke though into the water jacket above the oil gallery so he custom machined an insert that he locktited into place with a copper crush washer at the end and an epoxy blob over the top of the breach. He warned me to never tighten that fitting without a backer wrench less it start leaking.
For the upper section I didn't have my mill yet so I literally burned up (it caught on fire) a dremmel hogging out the underside of that dry sump cover and making a spacer bar to take up the space between the inside of the dry sump cover the and outside of the 3800 cover. I filled the rough spots with JB Weld again and then painted the inside with Gyptol and then used Indian Head Form-a-gasket to seal it up. No leaks believe it or not!

Here's a selection of pictures
Attached Images
        
Reply With Quote
Reply

Thread Tools
Display Modes

Posting Rules
You may not post new threads
You may not post replies
You may not post attachments
You may not edit your posts

BB code is On
Smilies are On
[IMG] code is On
HTML code is Off

Forum Jump


All times are GMT -7. The time now is 01:47 AM.


Powered by vBulletin® Version 3.8.11
Copyright ©2000 - 2025, vBulletin Solutions Inc.
Copyright Lateral-g.net