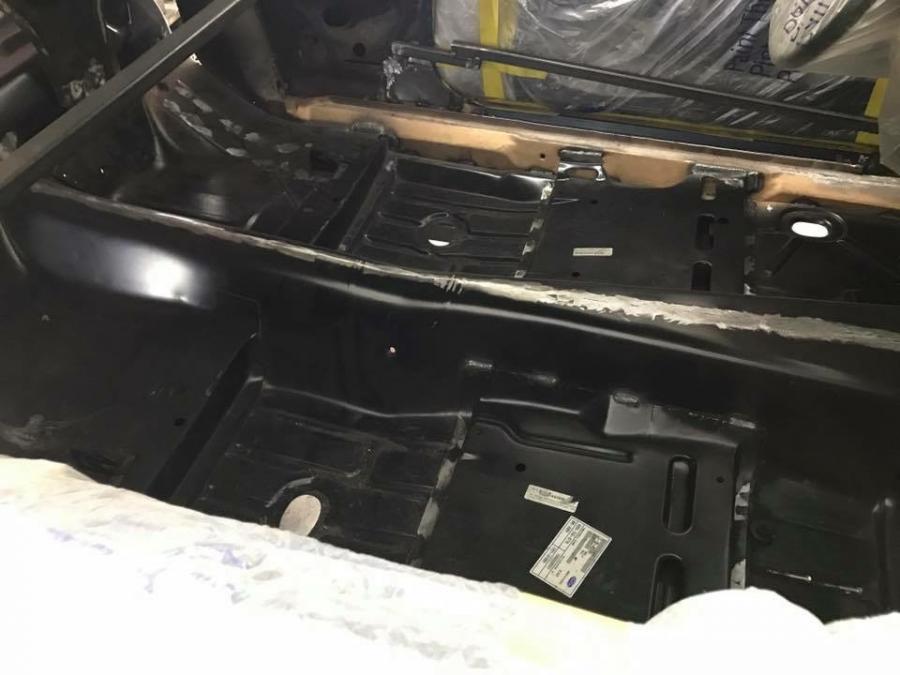
...

Go Back   Lateral-g Forums > Lateral-G Open Discussions > Project Updates
User Name
Password


Reply
 
Thread Tools Display Modes
  #1  
Old 04-17-2018, 06:07 PM
Gmachine1911's Avatar
Gmachine1911 Gmachine1911 is offline
Senior Member
 
Join Date: Oct 2017
Location: Southern IN
Posts: 473
Thanks: 69
Thanked 375 Times in 252 Posts
Default

So, as I mentioned before, one of the goals of this build was to fix some of the issues I could never seem to get lined out on the car and ultimately have a reliable, fun driver that would stop, go fast, corner like a beast, have the perfect stance, etc...overall, I wanted to challenge myself as much as I could, not overstep my abilities and turn out the closest thing to my dreams that my budget would allow.
One of the biggest problems I've fought over the years was simply getting the car to stop. Sounds simple but way back when, I put factory style manual front discs on the car and they worked perfectly. Then, after a time, I wanted to put rear disc brakes (still manual) on the car for both the cool factor and function. That was my biggest mistake ever! Not just the brakes, but the supplier I chose. I won't name names but for ease of reference, I'll just refer to them as a "Small ****ty Brake Company" or SSBC for short. It was hard to determine which was worse, the brake kit or the customer service. Anyway, for years, I battled trying to get the brakes to stop, stop dragging, and everything else...too stubborn to just put the drums back on and eventually it just made it so miserable and frustrating to drive that the car sat almost year around for several years.
With that said, one area I was not going to compromise on was my brake system. I determined that among many great mfg's out there, I would go with Baer and I'd make every effort to use only one supplier's parts to hopefully get the best outcome.
After I ordered the brakes and the Quadralink, the more I thought about it, the more I knew I'd never be completely satisfied with my original subframe and if I was gonna spend money upgrading my subframe, then I might as well just spend the difference and buy what I felt would be a subframe I could grow into that would also check the "handling" and "steering" boxes while simultaneously lending a hand in the "braking" area! That's where this thing of beauty comes in...Name:  image.jpg
Views: 1103
Size:  120.0 KB
Reply With Quote
  #2  
Old 05-13-2018, 04:45 AM
syborg tt's Avatar
syborg tt syborg tt is offline
Lateral-g Supporting Member
 
Join Date: Jun 2005
Posts: 8,405
Thanks: 5,530
Thanked 1,958 Times in 1,059 Posts
Default

Simply Awesome !!!


Sent from my iPhone using Tapatalk
__________________
marty-mj
Is a car ever really done???? It's like a ball of yarn unwinding, that has no end... Author DKz Garage

Projects - Syborg TT 4.3l v6 Mini-Truck, 2nd Chance Camaro & SLP575 Bumble Bee - 4Sale
Reply With Quote
  #3  
Old 05-13-2018, 07:08 AM
Gmachine1911's Avatar
Gmachine1911 Gmachine1911 is offline
Senior Member
 
Join Date: Oct 2017
Location: Southern IN
Posts: 473
Thanks: 69
Thanked 375 Times in 252 Posts
Default

Thank You all, I appreciate the positive feedback! I got my shifter hole cut and my Finch Performance gear shift boot ring mounted. Let me just say, there's nothing like working with quality parts. I ordered a different Finch shifter handle so I can get rid of the ape hanger in the pic. If it was all about function, it'd be one thing as it sits close to the steering wheel but I just can't get over the looks of it...Next to get the engine fuse box and electronic throttle pedal mounted and get the transmission VSS/backup lights, etc. wired up.
Attached Images
 
Reply With Quote
The Following User Says Thank You to Gmachine1911 For This Useful Post:
syborg tt (12-29-2018)
  #4  
Old 05-15-2018, 08:08 PM
Gmachine1911's Avatar
Gmachine1911 Gmachine1911 is offline
Senior Member
 
Join Date: Oct 2017
Location: Southern IN
Posts: 473
Thanks: 69
Thanked 375 Times in 252 Posts
Default

Not a whole lot of progress to report but wanted to see the inner fenders and core support on it. Removed the radiator so I could take it to PRC here locally and have some stuff rearranged for an LS engine.
Attached Images
 
Reply With Quote
The Following User Says Thank You to Gmachine1911 For This Useful Post:
syborg tt (12-29-2018)
  #5  
Old 05-24-2018, 08:03 PM
Gmachine1911's Avatar
Gmachine1911 Gmachine1911 is offline
Senior Member
 
Join Date: Oct 2017
Location: Southern IN
Posts: 473
Thanks: 69
Thanked 375 Times in 252 Posts
Default

So finally got my accessory drive kit in and had a few hours over the last couple of days to whittle away at it. I went with the Holley Mid-Mount system. I liked the fact that it had no spacers and uses the C7 style cartridge water pump; no having to disassemble the whole front end of the motor if you need to change the water pump!
I went with the black version as I like the contrast it offers. With the premium kit, you get an ATI balancer along with all the other accessories. This is a really nice peace of hardware, the fit was perfect and aside from a few minor things like chasing the powder coating from the threads on the AC compressor, it all went together flawlessly.
Once I get my radiator back from being swapped over for LS power, I can wrap up the cooling system plumbing. Also got the Vintage Air components ordered and hope to get the fuel system wrapped up this weekend...I'm dying to hear this thing run!
Attached Images
 
Reply With Quote
The Following User Says Thank You to Gmachine1911 For This Useful Post:
syborg tt (12-29-2018)
  #6  
Old 05-24-2018, 08:08 PM
Gmachine1911's Avatar
Gmachine1911 Gmachine1911 is offline
Senior Member
 
Join Date: Oct 2017
Location: Southern IN
Posts: 473
Thanks: 69
Thanked 375 Times in 252 Posts
Default

Pulley alignment is spot on...
Attached Images
 
Reply With Quote
The Following User Says Thank You to Gmachine1911 For This Useful Post:
syborg tt (12-29-2018)
  #7  
Old 06-08-2018, 06:17 AM
BK70Camaro BK70Camaro is offline
Junior Member
 
Join Date: Feb 2017
Posts: 4
Thanks: 0
Thanked 1 Time in 1 Post
Default

Quote:
Originally Posted by Gmachine1911 View Post
Not a whole lot of progress to report but wanted to see the inner fenders and core support on it. Removed the radiator so I could take it to PRC here locally and have some stuff rearranged for an LS engine.
Is it safe to say that you are close to BoonVegas then? Awesome Build. Hopefully I will be starting on my 73 very soon!
Reply With Quote
The Following User Says Thank You to BK70Camaro For This Useful Post:
syborg tt (12-29-2018)
  #8  
Old 06-28-2018, 12:37 PM
Gmachine1911's Avatar
Gmachine1911 Gmachine1911 is offline
Senior Member
 
Join Date: Oct 2017
Location: Southern IN
Posts: 473
Thanks: 69
Thanked 375 Times in 252 Posts
Default

Quote:
Originally Posted by BK70Camaro View Post
Is it safe to say that you are close to BoonVegas then? Awesome Build. Hopefully I will be starting on my 73 very soon!
Lol! Even worse, I'm from about 30 miles West, in Mt Vegas!
Reply With Quote
  #9  
Old 09-17-2018, 08:52 PM
randy randy is offline
Senior Member
 
Join Date: Jan 2011
Posts: 1,041
Thanks: 3
Thanked 68 Times in 43 Posts
Default

did you use the engine setback mounts? i wondered if the dse headers would clear with the factory location mounts.
Reply With Quote
  #10  
Old 09-18-2018, 08:47 AM
dcracing dcracing is offline
Member
 
Join Date: Apr 2015
Posts: 25
Thanks: 0
Thanked 3 Times in 3 Posts
Default

Great looking build! Cool seeing your progress. Got to drive it yet?
Reply With Quote
Reply

Thread Tools
Display Modes

Posting Rules
You may not post new threads
You may not post replies
You may not post attachments
You may not edit your posts

BB code is On
Smilies are On
[IMG] code is On
HTML code is Off

Forum Jump


All times are GMT -7. The time now is 11:29 PM.


Powered by vBulletin® Version 3.8.11
Copyright ©2000 - 2025, vBulletin Solutions Inc.
Copyright Lateral-g.net