|
|

07-31-2020, 08:23 PM
|
|
Senior Member
|
|
Join Date: Oct 2013
Posts: 165
Thanks: 6
Thanked 140 Times in 83 Posts
|
|
 63 Chevy II Pro-Touring Build
Made a quick run to Eau Claire today to check in on the Nova. Engine and transmission should go in on Monday. Kurt ordered a clutch bleeder from Tick Performance and the fitting was for the wrong slave cylinder, so he had to reorder. New one came in today, so driveline should go in Monday.

Theyre also deep into wiring, which is going to be a big job. Ive got a new American Autowire wiring harness that theyre installing, but theyre adding to that the Holley Dominator ECU harness, the Holley drive by wire harness, the Holley digital dash harness, various input/outputs for the ECU and dash (oil temperature, left/right turn signals, high beam, fuel level sensor, second wideband oxygen sensor, pulse width modulation fan control, etc), Vaporworx PWM fuel module control, Digital Guard Dawg keyless entry, PWM control for the dual Spal fans, etc. Its a maze of wires - glad that Kurt and his team are as conscientious as they are!


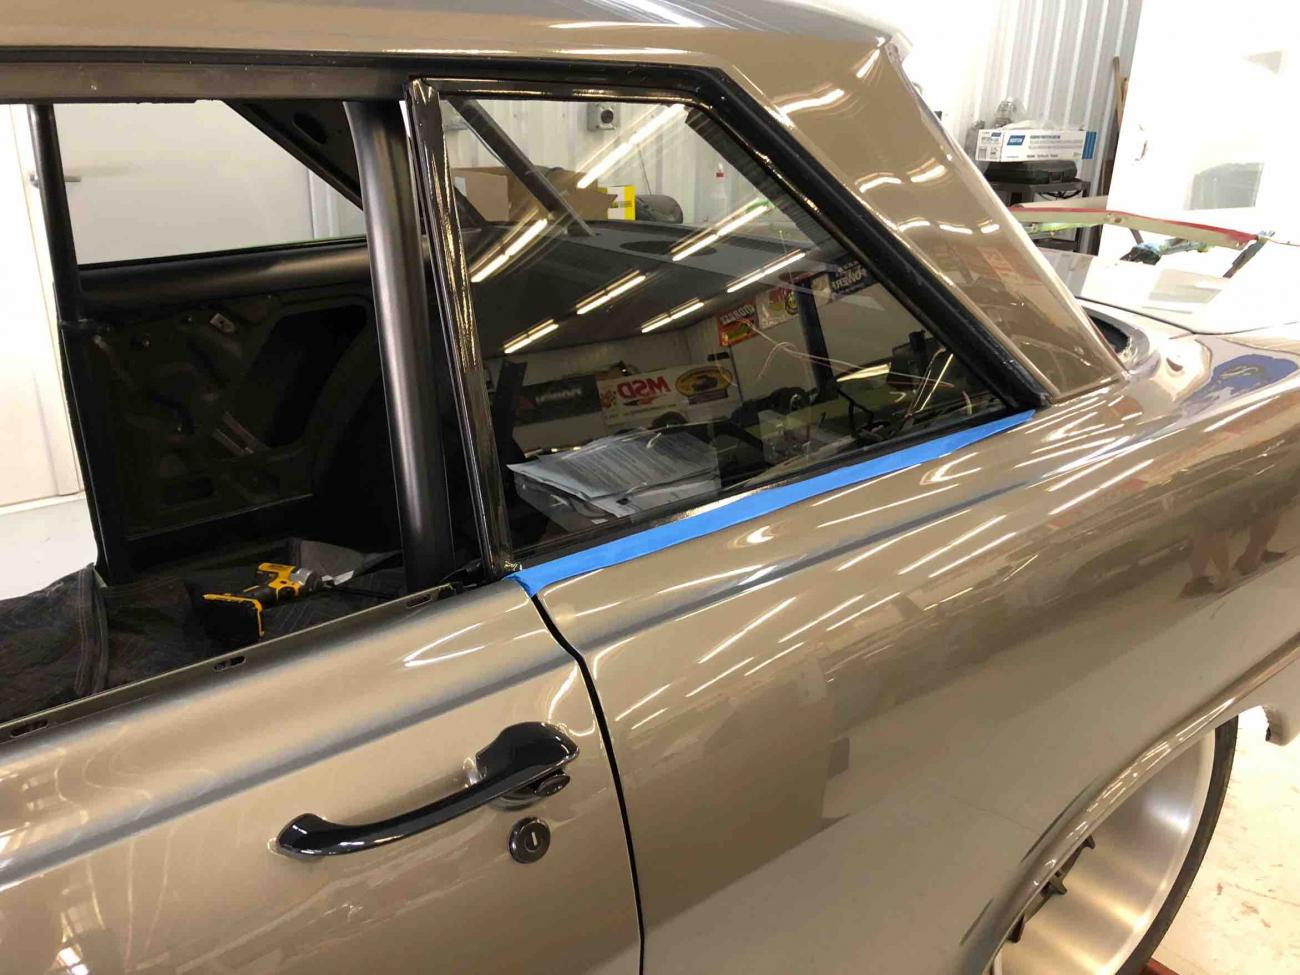
Theyve got the rear windows in, too. Side windows and vent windows will go in next week - just waiting for some vertical rigid channel for the front windows, which should be in sometime next week. Door handles were painted black, as was trim around the windows. Windows have a smoked gray tint - pretty subtle, but, man, does it look great in person with the gray body color and the black trim.


Hope to have some pictures of the motor and transmission in early next week, along with front fenders, core support and grill!
__________________
63 Chevy II - Build in Progress
2017 Camaro ZL1
2010 Mercedes C63 AMG
Last edited by bkswede; 08-01-2020 at 01:05 PM.
|
|
The Following 4 Users Say Thank You to bkswede For This Useful Post:
|
|
08-03-2020, 06:16 PM
|
 |
Lateral-g Supporting Member
|
|
Join Date: Jun 2005
Posts: 8,429
Thanks: 5,580
Thanked 2,010 Times in 1,083 Posts
|
|
Holy **** !!
I just found this thread and all I can say is Im blown away. Looking forward to more progress pictures and cant wait to see this one finished.
Sent from my iPhone using Tapatalk
|
08-04-2020, 08:36 PM
|
|
Senior Member
|
|
Join Date: Oct 2013
Posts: 165
Thanks: 6
Thanked 140 Times in 83 Posts
|
|
Quote:
Originally Posted by syborg tt

Holy **** !!
I just found this thread and all I can say is Im blown away. Looking forward to more progress pictures and cant wait to see this one finished.
Sent from my iPhone using Tapatalk
|
Thanks for the kind words! Will try to keep the updates coming, and I, too, cant wait until it is finished!!
Sent from my iPhone using Tapatalk
__________________
63 Chevy II - Build in Progress
2017 Camaro ZL1
2010 Mercedes C63 AMG
|
|
The Following User Says Thank You to bkswede For This Useful Post:
|
|
08-05-2020, 08:58 PM
|
|
Senior Member
|
|
Join Date: Oct 2013
Posts: 165
Thanks: 6
Thanked 140 Times in 83 Posts
|
|
63 Chevy II Pro-Touring Build
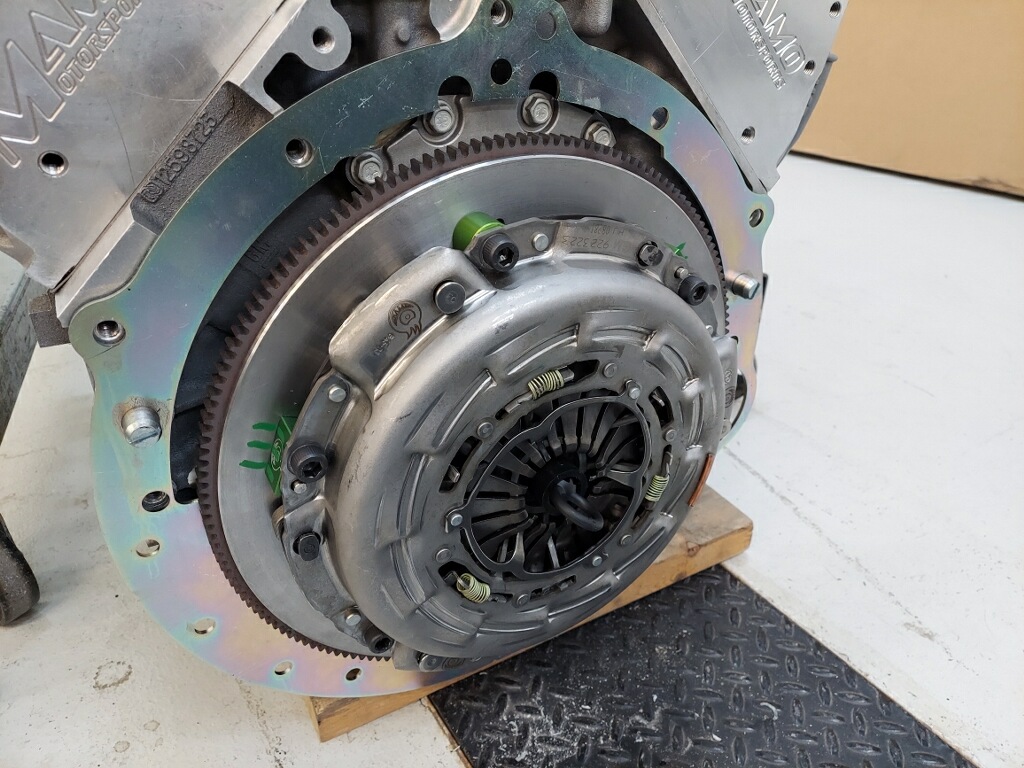
Minor setback... as we attempted to get the driveline in, we had some issues with the Katech LS9X clutch I had planned to use. The LS9X clutch is a package developed by Katech combining the dual disc clutch that was used in the C6 ZR1 Corvette with a flywheel adapted for the 6 bolt crankshaft of most LS engines. As it turns out, the LS9 clutch is a meaningfully thicker clutch and wont fit within a standard LS bellhousing. Im using a standard Quick Time LS bellhousing.
In order to use the LS9X clutch within the Quick Time bell housing, you need a spacer between the transmission and the bellhousing that is approximately .85, which moves the transmission back in the chassis .85. D&D used to sell an aluminum spacer that they CNC machined to provide the appropriate clearance (Stielow used one of the D&D spacers when he put a LS9X clutch in his Mayhem build). Ive already positioned the transmission cross member, transmission tunnel, as well as a custom QA1 carbon fiber driveshaft assuming no spacer. So the D&D spacer was not an option for me.
Based on some quick research and through discussions with the folks at Tick Performance, I ended up purchasing a Monster LT1-S clutch, and will need to sell the Katech LS9-X clutch package. The Monster clutch is similar in concept to the Katech LS9X clutch, but a newer variation. While the Katech LS9X clutch uses the C6 ZR1 factory dual disc clutch with a modified flywheel for 6 bolt crankshafts, the Monster LT1-S clutch uses the GM OEM dual disc set up from the C7 Corvette, again with a flywheel modified to work with LS engines. Importantly, the Monster clutch is physically smaller than the Katech clutch and fits within the standard QuickTime bell housing.
Ive read a lot of great reviews about the Monster clutch; hopefully it works well in my application. Like the Katech LS9X clutch, the Monster clutch is supposed to have a factory feel, with absolutely no rattling or chatter that is common with dual disc clutches.
Back moving in the right direction, but the whole thing has pushed us back a bit. We wont get the clutch until Friday so motor and transmission wont go in until early next week. A little frustrating, but not unusual to have a few bumps in the road along the way...
Sent from my iPhone using Tapatalk
__________________
63 Chevy II - Build in Progress
2017 Camaro ZL1
2010 Mercedes C63 AMG
Last edited by bkswede; 08-06-2020 at 05:41 AM.
|
|
The Following 3 Users Say Thank You to bkswede For This Useful Post:
|
|
08-06-2020, 07:00 AM
|
|
Member
|
|
Join Date: May 2020
Location: Chicago West Burbs
Posts: 76
Thanks: 252
Thanked 12 Times in 12 Posts
|
|
Quote:
Originally Posted by bkswede
Back moving in the right direction, but the whole thing has pushed us back a bit. We wont get the clutch until Friday so motor and transmission wont go in until early next week. A little frustrating, but not unusual to have a few bumps in the road along the way...
|
As you said, while frustrating at least you found a solution and it wasn't too hard like, more fab work or rework. Looking forward to seeing the final results. It's coming out awesome!
Dave
|
08-07-2020, 08:20 PM
|
|
Senior Member
|
|
Join Date: Oct 2013
Posts: 165
Thanks: 6
Thanked 140 Times in 83 Posts
|
|
Quote:
Originally Posted by EVIL SS
As you said, while frustrating at least you found a solution and it wasn't too hard like, more fab work or rework. Looking forward to seeing the final results. It's coming out awesome!
Dave
|
Thanks Dave... definitely lucky that we dont have to do any more fab work! New clutch arrived today, so hopefully we can get engine and trans in next week without further issues...
Sent from my iPad using Tapatalk
__________________
63 Chevy II - Build in Progress
2017 Camaro ZL1
2010 Mercedes C63 AMG
|
|
The Following User Says Thank You to bkswede For This Useful Post:
|
|
08-07-2020, 08:42 PM
|
|
Senior Member
|
|
Join Date: Oct 2013
Posts: 165
Thanks: 6
Thanked 140 Times in 83 Posts
|
|
63 Chevy II Pro-Touring Build
Have been looking all over for the right steering wheel for the Nova. I was looking for something with a flat bottom (but not too crazy) that fit the look of the interior. Looked at a bunch of Momo wheels, Sparco wheels, and NRG wheels. The wheel I like best is a Quark model that Momo makes.
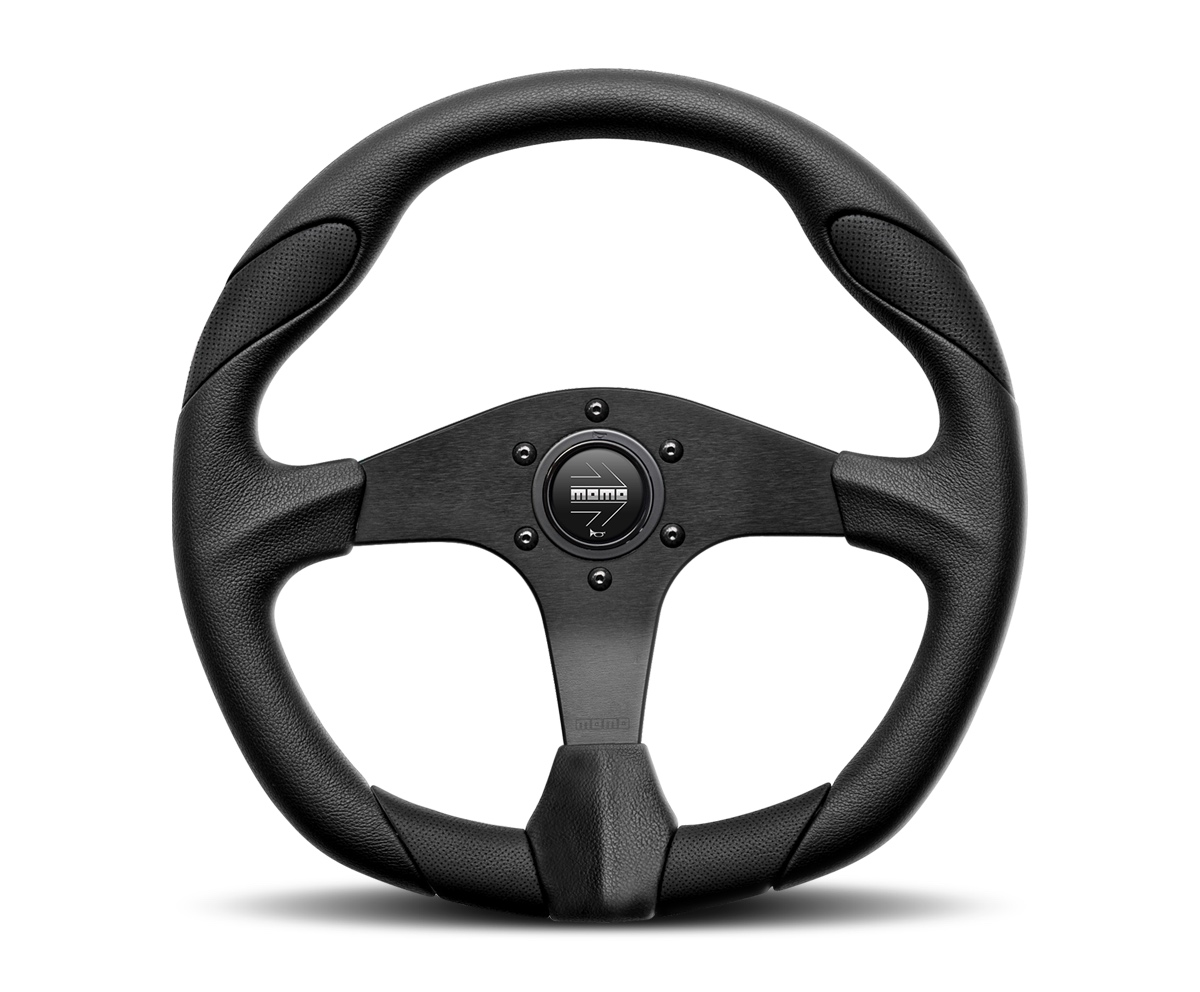
I really like the look of this wheel... pretty stealthy, flat bottom (but not too crazy) and nice thickness. Problem is that the wheel is made out of polyurethane with leather inserts. I wasnt liking the feel of the polyurethane on this wheel, which is a huge deal for me since the steering wheel is your most direct connection to the car that youre constantly in contact with.
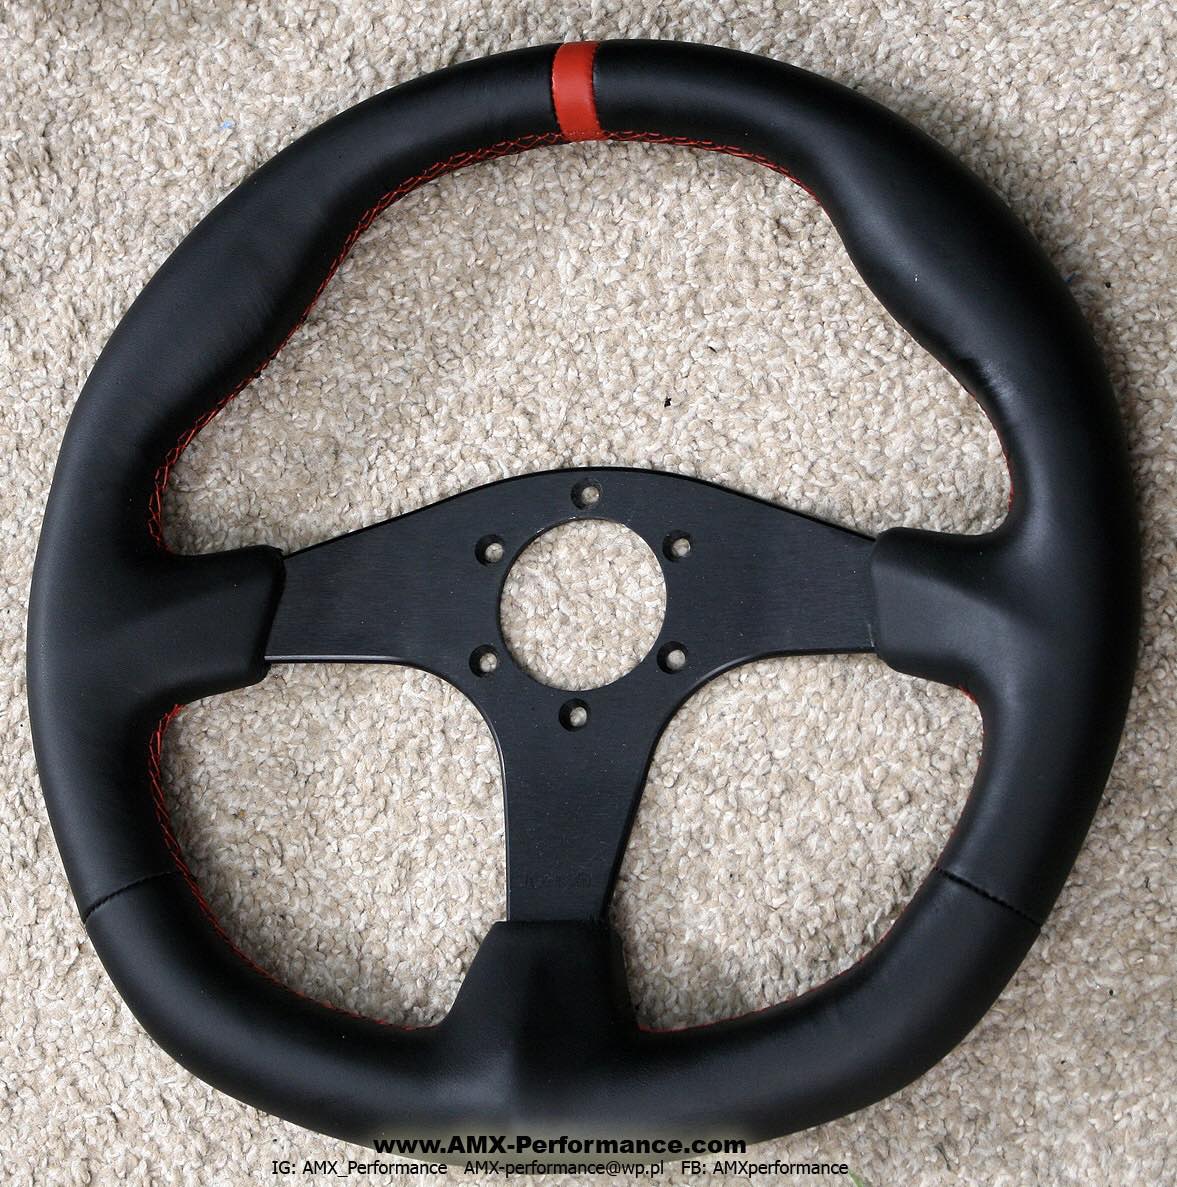
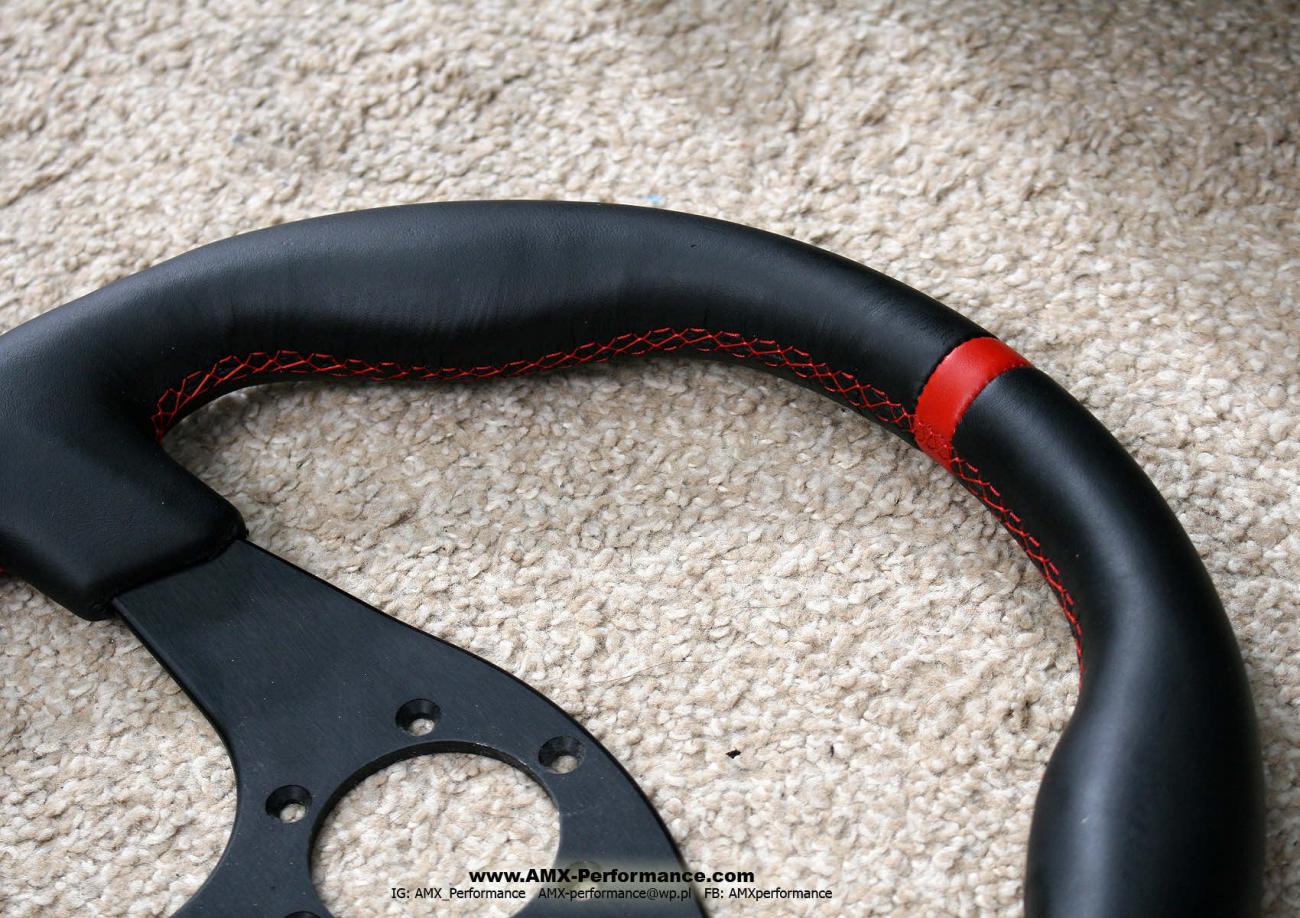
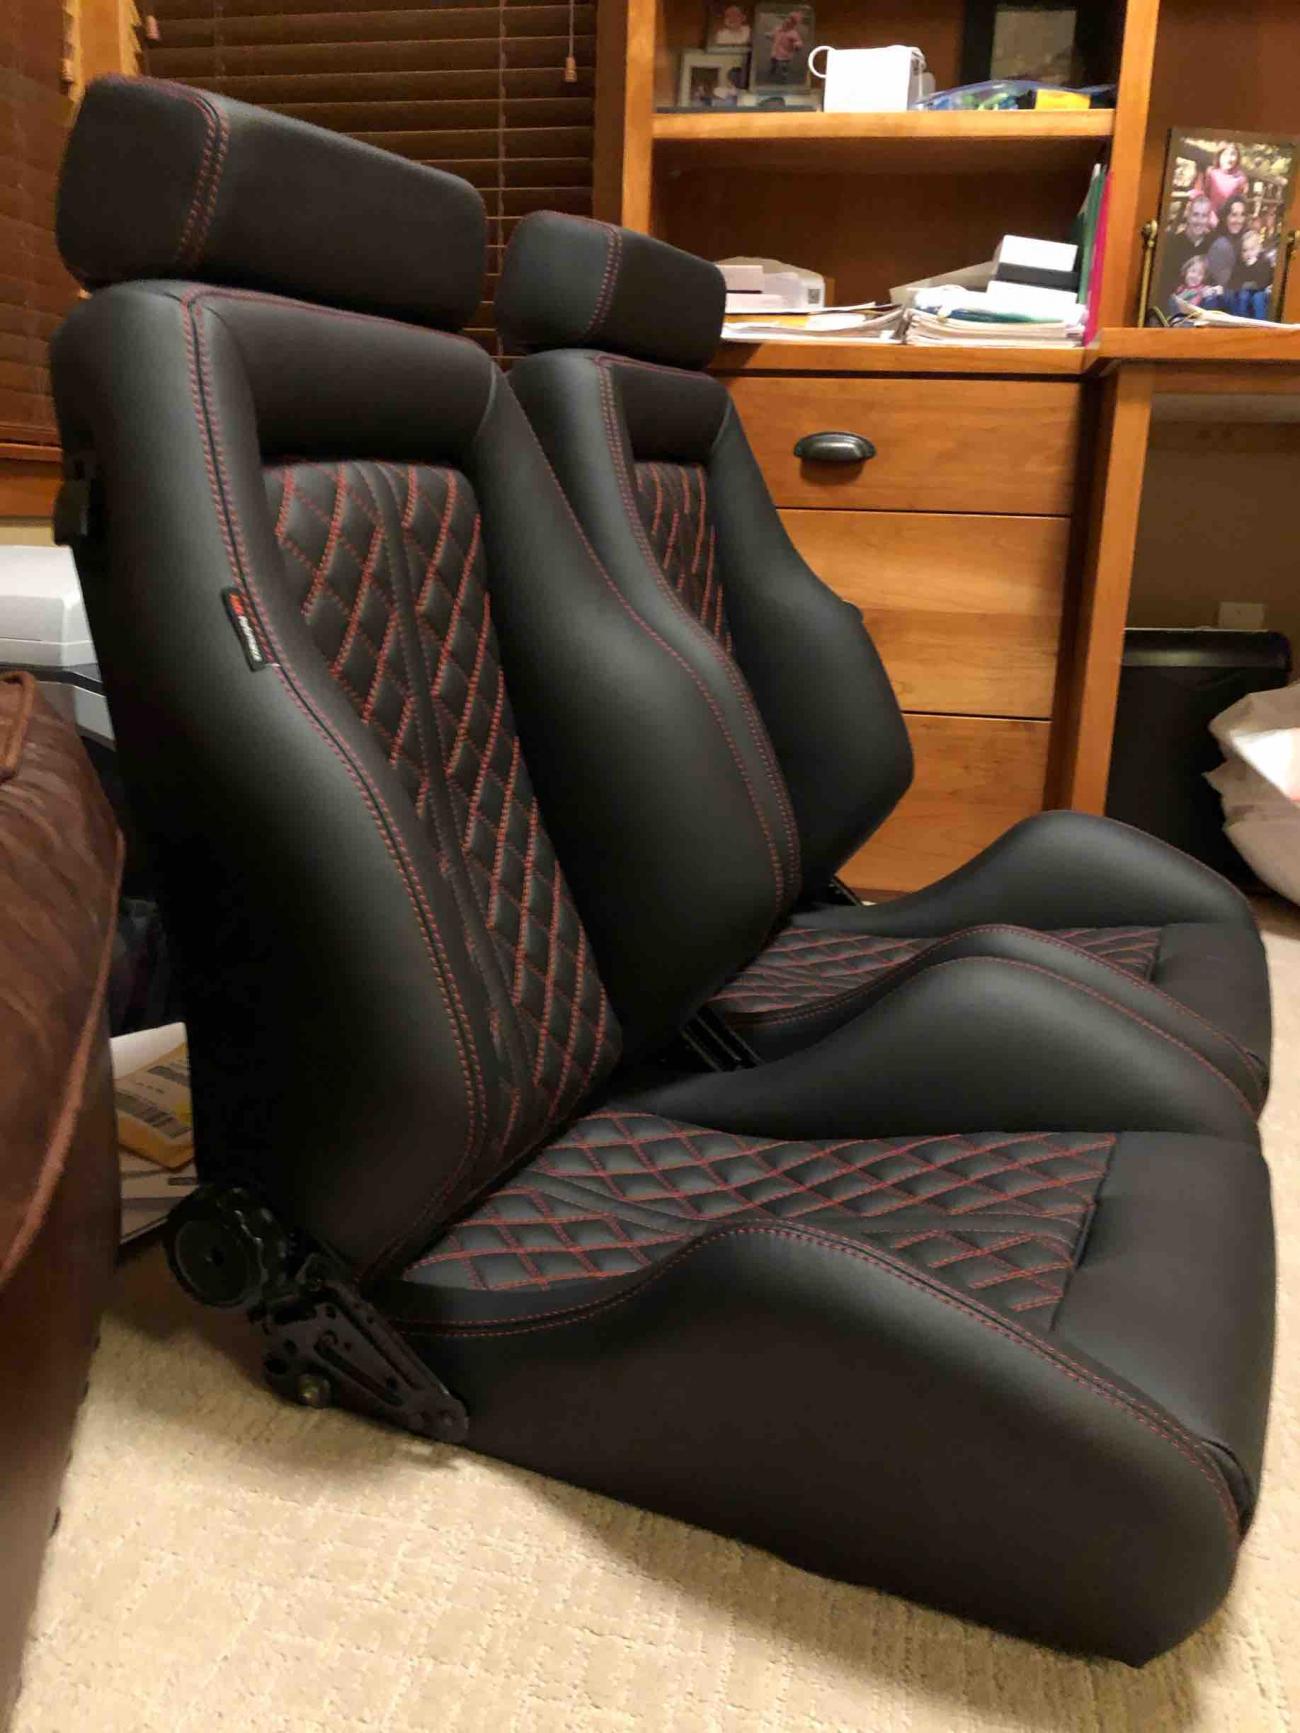
Recently, someone here on the forum asked me about the seats Im using for my Nova. I forwarded the link to the web site for the craftsman (Marek) that did my seats. I noticed that he had a new website that had a gallery of a bunch of his work/projects and I noticed that he recovers steering wheels. So, I reached out to Marek and discussed what I was looking for. Marek suggested we buy the Momo wheel and recover it in the same leather that he used to cover my seats. He also said he could add a stripe at the 12 oclock position, and could stitch it together using the same red thread he used on my seats. He finished the project this week and the wheel is currently in transit to me, but he shared a couple of pictures with me. I cant wait to get it and see/feel it in person. Let me know what you think. Ive also included a picture of my seats as a reminder.
Sent from my iPad using Tapatalk
__________________
63 Chevy II - Build in Progress
2017 Camaro ZL1
2010 Mercedes C63 AMG
Last edited by bkswede; 08-09-2020 at 07:20 PM.
|
|
The Following 3 Users Say Thank You to bkswede For This Useful Post:
|
|
08-09-2020, 08:49 AM
|
 |
Senior Member
|
|
Join Date: Oct 2017
Location: Southern IN
Posts: 473
Thanks: 69
Thanked 375 Times in 252 Posts
|
|
Perfect! Nice stitch-work!
|
08-09-2020, 01:57 PM
|
 |
Lateral-g Supporting Member
|
|
Join Date: Feb 2018
Location: Way East L.I.
Posts: 139
Thanks: 46
Thanked 44 Times in 33 Posts
|
|
that looks great, he does sweet work.
|
08-22-2020, 07:02 AM
|
|
Senior Member
|
|
Join Date: Oct 2013
Posts: 165
Thanks: 6
Thanked 140 Times in 83 Posts
|
|
63 Chevy II Pro-Touring Build
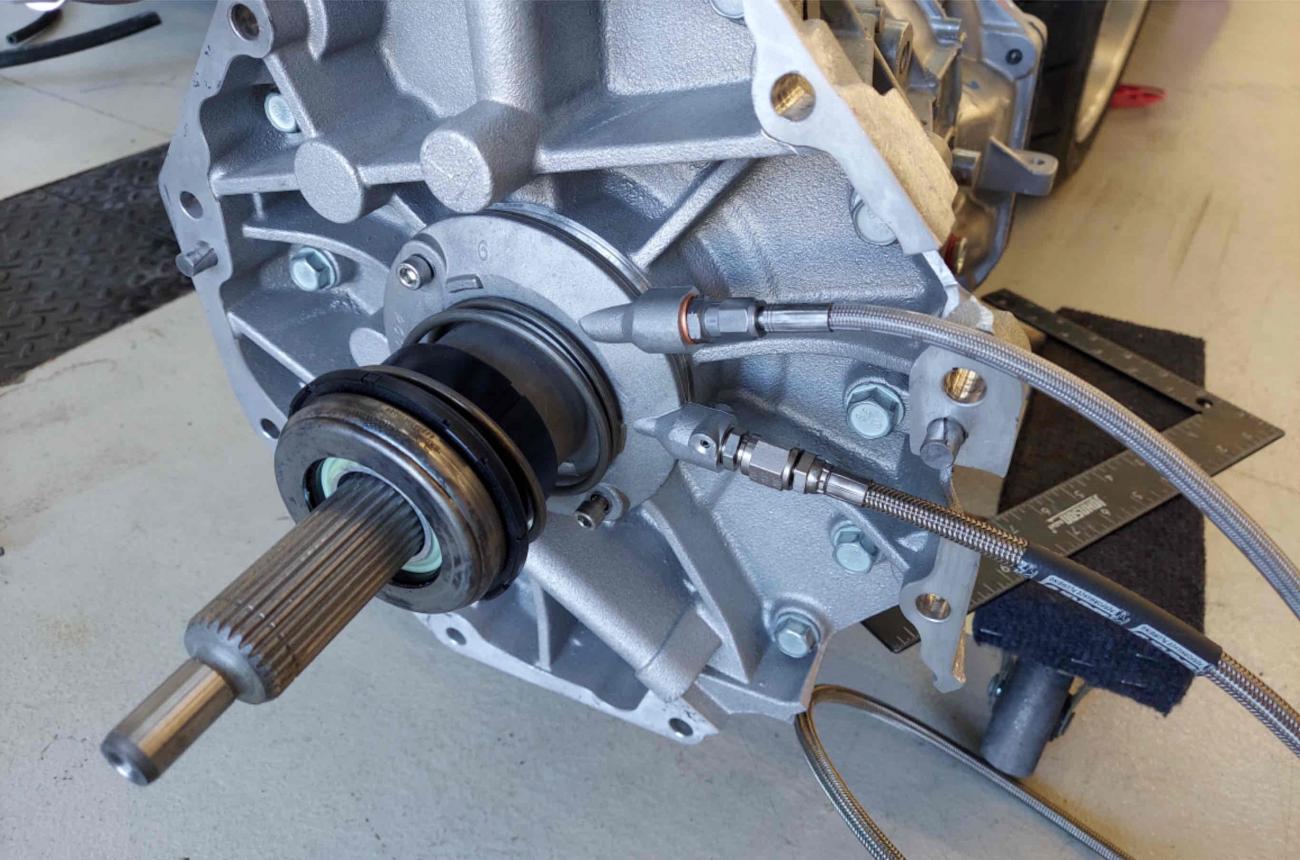
We got the clutch issue resolved - new Monster clutch fit perfectly, shimmed the slave cylinder to Monsters spec, and got the bell housing aligned properly with the help of some offset dowel pins.
Motor and trans installed. Kurt also made a custom bracket to mount the Dominator ECU up under the dash in a location that allows decent access to the various connectors that plug into the ECU.


I provided Kurt with template for additional wires and pin locations for each that needed to be added to the Dominator wiring harness (e.g., output for PWM control for fans, input for A/C compressor turning on, etc) as well as the digital dash wiring harness (turn signals, oil temp, power steering temp, high beam indicator, virtual switch for driving lights, etc.). Guys got most of those patched in as well.


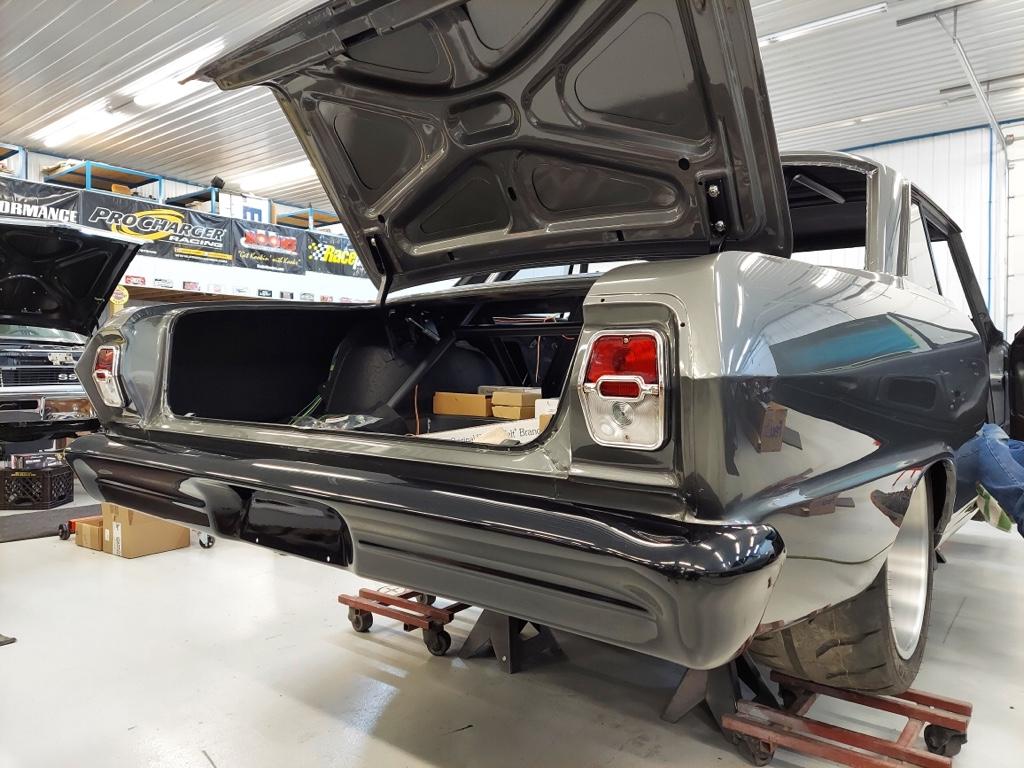
Rear bumper also polished and hung. We welded the mounting brackets to the back side of the bumper so no exposed bumper bolts. Tail lights in this picture are just for test fitting, theyll be pulled out, lenses removed and painted black to match the bumpers and the rest of the trim.
Great to see meaningful progress each week!
Sent from my iPad using Tapatalk
__________________
63 Chevy II - Build in Progress
2017 Camaro ZL1
2010 Mercedes C63 AMG
Last edited by bkswede; 08-22-2020 at 07:21 AM.
|
|
The Following 3 Users Say Thank You to bkswede For This Useful Post:
|
|
| Thread Tools |
|
|
| Display Modes |
 Hybrid Mode Hybrid Mode
|
 Posting Rules
|
You may not post new threads
You may not post replies
You may not post attachments
You may not edit your posts
HTML code is Off
|
|
|
All times are GMT -7. The time now is 04:39 AM.
|


 Brian Hobaugh SCCA National Tour June 2014
 First Hemi 'Cuda Convertible Ever Built
 Short clips: Goodguys Pleasanton autocross and pit videos


 It's like a ball of yarn unwinding, that has no end... Author DKz Garage


