I spent most of the day Saturday at Goodguys and most of today just being lazy doing planning.
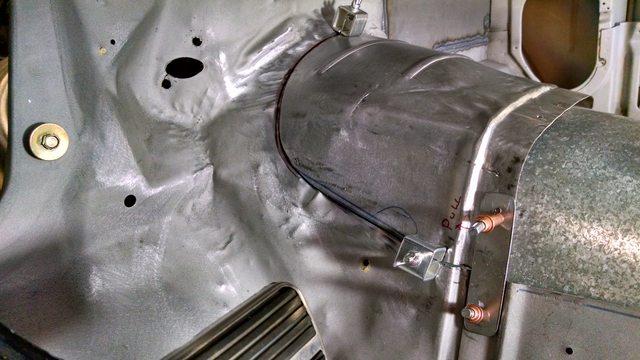
I did pick up the rear anti-roll bar because DSE brought the big truck to Scottsdale. They have three sizes now. I decided to get the 1-1/8 bar, which is right in the middle. I can soften, or stiffen up the bar as needed, when I actually have a running car. Having this in, as well as the gas tank will let me start thinking about the exhaust routing which is not too far down the road. Ok, it is pretty far down the road !!
Last edited by SlowProgress; 01-21-2021 at 11:25 PM.
Well I have been plugging away on the tunnel raising project this week. It was slower than expected (surprise). This is actually one of the harder metal projects I guess because of all the curved surfaces and I find it difficult working up under the dash. I think not being able to reach the backside and hammer/dolly things straight also works against me. I started by finishing the welds on the puzzle piece up front.
I wrestled with keeping it flat or rolling a couple of stiffening beads in it. I have been thinking about buying a Harbor Freight roller just to have around for simple projects. I normally don’t waste money on cheap tools but there are so many people modifying these with motors and stands that I decided to buy it and have it for a future upgrade project. I can always sell it if I ever have room for a proper tool. I rolled two simple beads to make the piece look slightly better. It is not symmetrical but that is just how it wants to fit best !
After that it is just hours of carful trimming and bending to get it all to fit right. I finally did get a pretty good fit. The galvanized sheet is to protect parts from weld spatter.
I need to work on my MIG welding so this was a good practice project. Carpeting and sound deadener will hide it anyway. Here is a little trick I re-discovered. Someone has probably posted it before.
These little rare-earth magnets will hold the little bar in place on your MIG clamps, so you don’t keep dropping them. Works pretty cool !
I finally just decided to quite stalling and start spraying weld everywhere! That is sort of what these photos look like. I still have occasional burn-throughs with MIG. I know it is me and not the welder.
I will post up some more photos after the weekend. Hope to have the tunnel at least tacked in place.
Last edited by SlowProgress; 01-21-2021 at 11:26 PM.
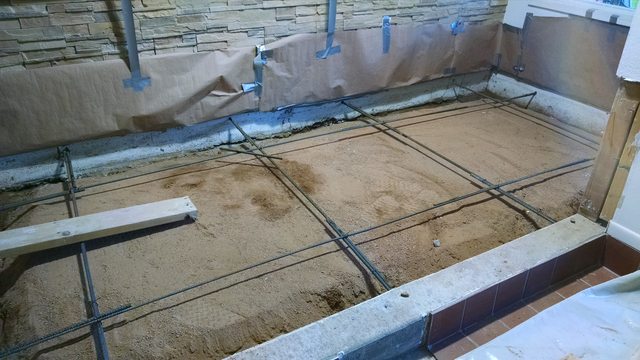
Well it was a good weekend overall but not so productive for the Camaro. I finally got a contractor out to finish some concrete work to replace a dirt atrium in my house. I wasn’t planning to do this work now but he had an opening so I dropped everything to make it happen. This took a lot of late evening preparation and I had to pretty much be there while he was working on it.
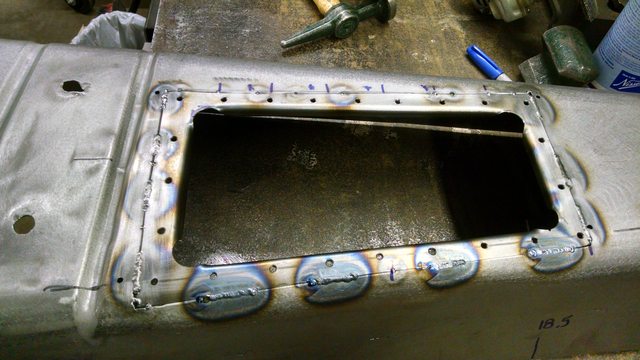
I finally got the front tunnel piece welded in. It was harder than expected due mostly to the dash being in the way. Now I know why so many people remove the dash and then weld it back in at the end. Overall the welds came out pretty poor, mostly due to me burning too many small holes.
I did get them all ground down finally. The clean-up took a long time due to the messy welds.
For those who haven’t done this yet I shot some in-process grinding photos. I am now qualified as a contortionist as a result.
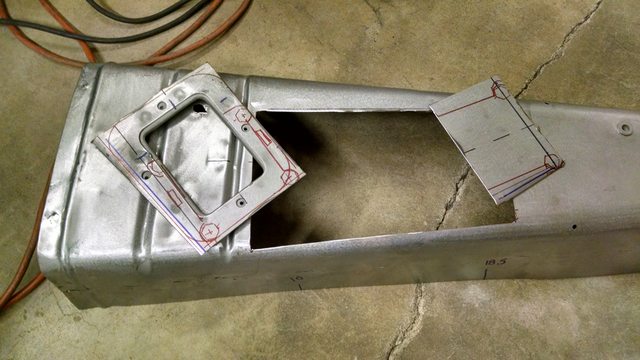
I just got started figuring how I am going to cut the shifter access opening, and also planning the tapered area down at the back.
I think I have it all figured out but that could change as I start making cuts. The plan is to install a large opening so the shifter can come out without removing the transmission. On top of the large cover I am planning to relocate the factor 4-speed opening and try to retain the 4-speed boot for a good weather seal. I still may need a wider console shift plate, but first I need to just get the parts all installed and see how it all falls in place.
Last edited by SlowProgress; 01-21-2021 at 11:26 PM.
Thanks Vince good tip. I will try that on the longer part of the tunnel. I will be able to TIG some parts on the bench, but probably need to MIG the final installation ! I seem to have a better rhythm with TIG. Even when the welds aren't pretty they are smaller, cool slower and grind easier.
It looks like they did a nice finish on the concrete. As far a contortionist I could get in that position...... But I would never get back out! Nice job on the tunnel.
I got a little behind on posts trying to make more progress on the transmission tunnel. Lots of pictures this time in two parts.
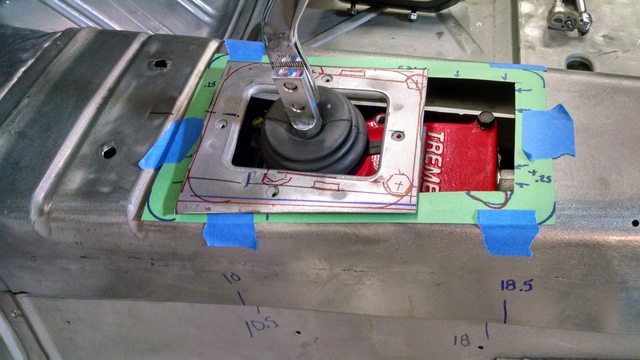
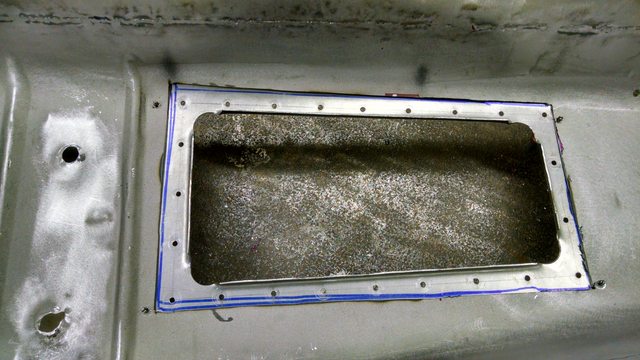
Well, I didn’t get the tunnel in yet!! I decided to get all the shifter boot details worked out on the bench so it would be easier to weld. I had decided to reuse the stock shift boot as a weather seal because you can get that easily from lots of places. First I cut out the stock ring and then laid out the Tremec shift plate dimensions and cut the hole.
Here is the template and all the parts roughly laid out. The shift ring is really close to one side and too low to clear the stock Tremec boot which means it needs a spacer.
I started with the piece that will eventually weld into the tunnel.
It seemed like a good idea to bend the inside edges down to make it stiffer. I cut the sheet metal off the stock shift ring doubler and mocked everything up.
It was pretty easy to grind the edges smooth and make an extension for the stock ring. I used an old piece of pipe and dead-blow hammer to make the radiused corners and started figuring out what the cover will look like.
I used 18 gauge which is pretty thin so I decided to use lot of mounting holes to avoid warping when all the screws are tightened. I also put a small bead in the large flat area to stiffen it up a little. Then the whole assembly was mocked-up and all the pilot holes were match-drilled.
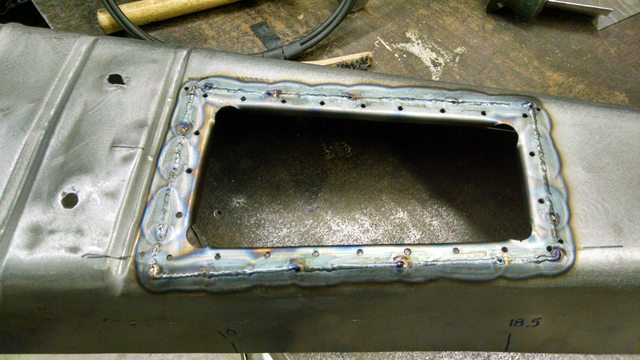
The welding took a while because there are so many small pieces.
Last edited by SlowProgress; 01-21-2021 at 11:27 PM.
At first I was going to just plug weld the lower ring onto the tunnel. That would have been faster. But I decided to trim and butt weld it in to make things a little cleaner. Trimming it nice and close to TIG weld took quite a while.
My welds aren’t the greatest, but I like how soft and easy it is to grind TIG. I can clean it up a lot faster. Also I get tired of the splatter from MIG.
It came out fine and will cover well with a little primer when I get there !
I did the final trimming on the cover and bent the edges down where it was close to the corner of the tunnel. I welded up the Cleco holes that won't be needed for mock-up any more.
I put everything together and it seems to fit fine, or at least good enough that a few well-placed hammer blows can fix it.
Hope to have the tunnel complete this week. I have been saying that for three weeks but it finally seems like it is just over the horizon!!
Last edited by SlowProgress; 01-21-2021 at 11:27 PM.


 Brian Hobaugh SCCA National Tour June 2014
 First Hemi 'Cuda Convertible Ever Built
 Short clips: Goodguys Pleasanton autocross and pit videos


 Linear Mode

