...

Go Back   Lateral-g Forums > Technical Discussions > Interior and Electrical
User Name
Password


Reply
 
Thread Tools Display Modes
  #1  
Old 10-02-2011, 06:27 PM
protour73 protour73 is offline
Senior Member
 
Join Date: Nov 2006
Posts: 494
Thanks: 0
Thanked 0 Times in 0 Posts
Default Garage fabbed Door Panel Build - Part 3

After the front side has been smoothed out of any bubbles or puckers and is nice and flat and you have sprayed the glue for the wrap to the backside of the piece carefully start pulling the material over the edge and smooth out on the back of the panel. Around round edges you will have to pinch the pucker of the extra material to keep the material tight around the edge. After you have gone around the entire perimeter you can go back with sharp scissors and cut off that extra material of those pinched areas so that your panel lays flat. You will see how nice and smooth the flat edges lay.


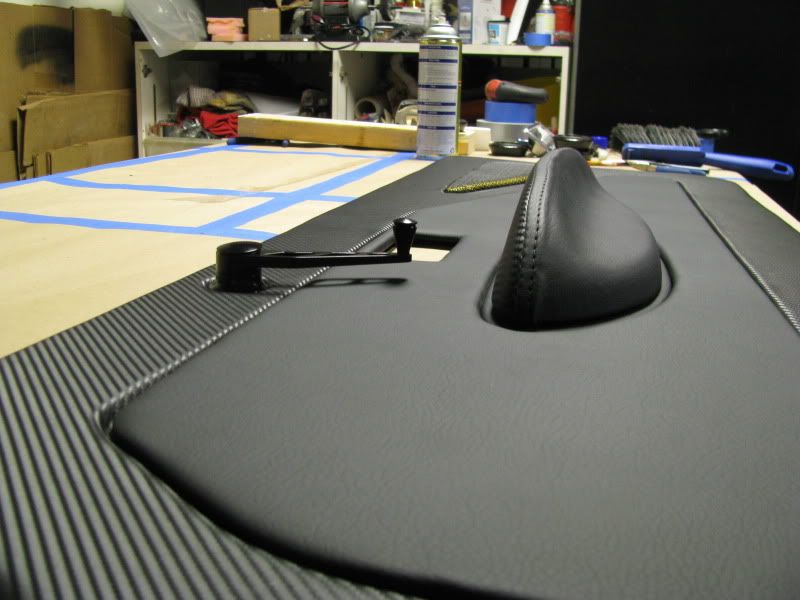
The finished panel.............


After spending a couple hours putting this build thread together, I realized how many gaps I have in my pictures to support more detailed instruction on how I did this. If you have nay questions at all, just post them up and I will be more than happy to answer them or PM me. I will do my best to answer them all.

Hopefully your project turns out well and you are as happy as I am with the finished product. It's fun to try something like this. The best part is, if you screw it up you can just do it over, you'll be out a couple bucks for new material or foam, but it can all be done over again if need be.

Here is a brief list of materials and seller links:

5 cans of Performance Hi-Temp Adhesive $49.75
2 yards of 1/4" regular 2-A VOLARA Closed Cell Foam $19.90
2 yards of 1/8" regular 2-A VOLARA Closed Cell Foam $13.90
Pick your own material, according to your color, texture taste, and cost.
All of the above were from http://www.yourautotrim.com/ (great people to deal with)

The base of the panel material is 1/8" ABS plastic from http://www.e-tplastics.com/
I posted that link for local Chicago people. You are better off sourcing the ABS locally, because shipping costs would kill you!!

The armrests are the " Boattail " Part# S3059 $99.95 pair from http://www.gemstreetrods.com/arm_rests.htm
They have many styles to choose from. They are made from fiberglass and can be covered however you like.
I had mine professionally covered at http://www.riggsbros.com/ in Naperville, IL....I figured this was beyond my lack of skill.


Reply With Quote
  #2  
Old 10-02-2011, 07:15 PM
jocko124 jocko124 is offline
Senior Member
 
Join Date: Dec 2009
Location: Katy, TX
Posts: 164
Thanks: 0
Thanked 0 Times in 0 Posts
Default

Great job, looks absolutely amazing. Thanks for posting.
__________________
Lee
1966 Cutlass


The difference between truth & fiction: fiction has to make sense.

Build Thread:
https://lateral-g.net/forums/showthread.php4?t=31963
Reply With Quote
  #3  
Old 10-02-2011, 09:04 PM
67Ruckus 67Ruckus is offline
Junior Member
 
Join Date: Aug 2010
Location: Las Vegas
Posts: 16
Thanks: 7
Thanked 1 Time in 1 Post
Default Great Job!

Thanks for the build post and pics. They look really good.
Just one question. I read that you have it totally secured with screws instead of those clips. What piece of the door panel goes on last to cover the screws that mount the door panel to the door? And how does that final piece attach to the door panel?

Thanks in advance.
__________________
1967 RS/SS Camaro - LS2/T56, Speedtech Protouring Suspension, Baer Brakes, driveshaft and wheels on order!
2009 G8 GT - Liquid Red, Vararam CAI, Straight axlebacks.
Reply With Quote
  #4  
Old 10-07-2011, 06:30 PM
protour73 protour73 is offline
Senior Member
 
Join Date: Nov 2006
Posts: 494
Thanks: 0
Thanked 0 Times in 0 Posts
Default

Quote:
Originally Posted by 67Ruckus View Post
Thanks for the build post and pics. They look really good.
Just one question. I read that you have it totally secured with screws instead of those clips. What piece of the door panel goes on last to cover the screws that mount the door panel to the door? And how does that final piece attach to the door panel?

Thanks in advance.
Last piece installed is the large insert in the middle of the panel and is secured to the main panel with Industrial Velcro
Reply With Quote
  #5  
Old 10-08-2011, 11:28 PM
snowskater6996's Avatar
snowskater6996 snowskater6996 is offline
Member
 
Join Date: Apr 2006
Location: San Jose, CA
Posts: 66
Thanks: 0
Thanked 0 Times in 0 Posts
Default

what was the black material called that you used in the large insert? I like the look of it.
__________________
"Nightmare"- 1972 Dodge Challenger
Daily Driver- 1994 Trans Am
Reply With Quote
  #6  
Old 10-30-2011, 08:33 PM
aps63's Avatar
aps63 aps63 is offline
Junior Member
 
Join Date: Apr 2011
Posts: 9
Thanks: 0
Thanked 0 Times in 0 Posts
Default

WOW!!!! The door panels look awesome.
I'm in the process of building a center console for my 70 Camaro RS.
Your thread has given me all kinds of great inspiration to continue on to do the door panels too. Great job including all the links needed to try this ourselves.
Again, great job!!!!
__________________
- Paul
Reply With Quote
  #7  
Old 11-08-2011, 05:16 PM
protour73 protour73 is offline
Senior Member
 
Join Date: Nov 2006
Posts: 494
Thanks: 0
Thanked 0 Times in 0 Posts
Default

Quote:
Originally Posted by snowskater6996 View Post
what was the black material called that you used in the large insert? I like the look of it.
http://www.yourautotrim.com/black3.html


Quote:
Originally Posted by aps63 View Post
WOW!!!! The door panels look awesome.
I'm in the process of building a center console for my 70 Camaro RS.
Your thread has given me all kinds of great inspiration to continue on to do the door panels too. Great job including all the links needed to try this ourselves.
Again, great job!!!!
Thanks Paul
Reply With Quote
  #8  
Old 11-08-2011, 05:34 PM
RECOVERY ROOM's Avatar
RECOVERY ROOM RECOVERY ROOM is offline
Supporting Vendor

RecoveryRoomInteriors.com

 
Join Date: Sep 2006
Location: plattsmouth nebr
Posts: 1,834
Thanks: 2
Thanked 2 Times in 2 Posts
Default

You did a very nice job on those
__________________
TRACY WEAVER
www.recoveryroominteriors.com
Reply With Quote
  #9  
Old 11-08-2011, 05:57 PM
Track Junky's Avatar
Track Junky Track Junky is offline
Senior Member
 
Join Date: Apr 2010
Posts: 3,469
Thanks: 2
Thanked 12 Times in 7 Posts
Default

Awesome job and thanks for providing the links for materials!!
__________________
Gaetano Cosentino
Reply With Quote
  #10  
Old 11-13-2011, 02:06 PM
protour73 protour73 is offline
Senior Member
 
Join Date: Nov 2006
Posts: 494
Thanks: 0
Thanked 0 Times in 0 Posts
Default

Quote:
Originally Posted by RECOVERY ROOM View Post
You did a very nice job on those
Thanks Tracy ........ Marty didn't tell you to say that did he?? lol


Quote:
Originally Posted by Track Junky View Post
Awesome job and thanks for providing the links for materials!!
Thanks!! When I get a project to turn out well, I like to share the info so that someone else can try it as well.

Last edited by protour73; 11-13-2011 at 02:08 PM.
Reply With Quote
Reply

Thread Tools
Display Modes

Posting Rules
You may not post new threads
You may not post replies
You may not post attachments
You may not edit your posts

BB code is On
Smilies are On
[IMG] code is On
HTML code is Off

Forum Jump


All times are GMT -7. The time now is 07:58 PM.


Powered by vBulletin® Version 3.8.11
Copyright ©2000 - 2025, vBulletin Solutions Inc.
Copyright Lateral-g.net