...

Go Back   Lateral-g Forums > Lateral-G Open Discussions > Project Updates
User Name
Password


Reply
 
Thread Tools Display Modes
  #1221  
Old 02-27-2013, 05:17 PM
protour73 protour73 is offline
Senior Member
 
Join Date: Nov 2006
Posts: 494
Thanks: 0
Thanked 0 Times in 0 Posts
Default

OK Sieg, "blueprint" the idle screws!! What a great frickin idea!! Excellent attention to detail. I have the carb off for the winter, as is tradition, so that I don't leave the corrosive 10% ethanol fuel in the bowls all winter. I will do the same to my carb. THANKS for the great idea.

Quote:
Originally Posted by Sieg View Post
Pulled idle mixture screws, blew out passages, changed out the 6.5 power valves to 5.0, blueprinted the throttle shaft idle screws relationship to transfer slots so I don't have to pull the carb to know where they're at. 3/4 turn in on primary side puts the bottom side of the butterfly at the bottom of the transfer slot, 1/2 turn exposes .023", secondary uses a different thread pitch, 5/8 turn to bottom and 3/8 turn for .023.

You have to look close to see the transfer slot exposure.


If verified baseline carb settings don't get rid of the off idle stumble it's time to bump initial ignition advance from 14* to 15-16* and see what we get.
Reply With Quote
  #1222  
Old 02-27-2013, 09:05 PM
DaleTx's Avatar
DaleTx DaleTx is offline
Senior Member
 
Join Date: Dec 2012
Location: Pacific NW
Posts: 486
Thanks: 0
Thanked 0 Times in 0 Posts
Default

I had some AFR heads with straight plugs on my gen 1 engine and had the same problem with header clearance on number 5 cylinder. I also had to dimple the header to make clearance to get the plug out. I used one of those cloth type insulating boots over the plug wire and it helped to keep the plug boot from melting.

Keep at that tune... one change at a time and you'll get there. Sounds like your making progress

Are you thinking of getting a wideband AFR system for your car while your at it?
__________________
"If you wait, all that happens is you get older"
Mario Andretti

69 Camaro-Nutter Racing Engines/427CI LS2 sleeved/LS7 CNC ported heads/Custom cam/T&D 1.8 rockers/Manley crank/Manley H-beam rods/Weisco pistons/NRC Pro Series dry sump/Kooks/NA,92 octane,11.5:1- 672HP @ 6,900RPM, 566TQ @ 5,500RPM
Build Thread- http://ls1tech.com/forums/generation...ine-build.html
Reply With Quote
  #1223  
Old 02-27-2013, 09:30 PM
Sieg's Avatar
Sieg Sieg is offline
Moderator
 
Join Date: Dec 2010
Location: Pacific Northwet
Posts: 8,034
Thanks: 33
Thanked 101 Times in 41 Posts
Default

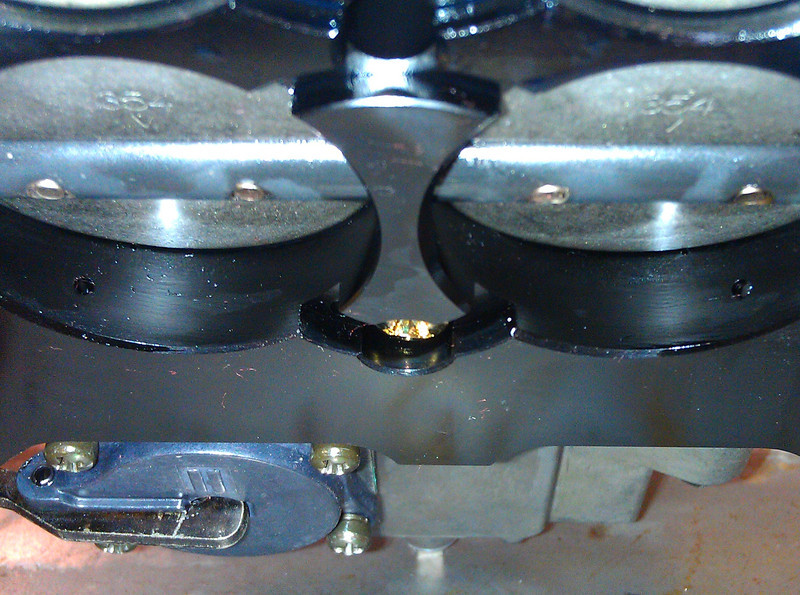
Had a chance to fire it with an absolutely positively proper and documented baseline this afternoon. When the temp was nearing 160* the idle was climbing toward 2K rpm with the pri/sec transfer slots exposed .023 and idle bypass valve at 1.5 turns out.

I said F it and started experimenting to see what it would take to get good off-idle throttle response. First move was reduce secondary butterfly opening 1/4 turn to lower the idle (Set at 5/8 out from closed) which dropped the idle to 1,600, another 1/4 turn dropped it to 1,250, this time I knew the butterflies were an 1/8 turn from closed.

I was checking response in between adjustments and it was still hollow with a stumble but improving. I reduced the primary butterflies a 1/8 turn and the idle went to 1,150, then another 1/8 to 1,050 and finally the hollowness and stumble was minimize. Next was 1/4 turn in on the idle bypass valve which had little effect on idle speed, another 1/4 turn moved the idle to 950 which is about optimum for this cam.

Next was idle mixture screws, keep in mind the transfer slot exposure indicated the butterflies were not equal dimensions from passenger to driver side on primary or secondary bores. The sweet spots ended up being 1.2 to 1.4 turns out and 10.75-11" of vacuum. Throttle response was finally close!

The test drive confirmed the carb was now in the ballpark, still has a very slight stumble but I can roll a 90* residential turn in 2nd gear and not have the motor fall on it's face which tells me the idle signal strength is finally close! I'm guessing it's within a 1/16 of a turn on the butterflies and idle mixture screws.

I also switched power valves from 6.5 hi-flow 2-port to 5.0 hi-flow 4 port and that appears to have created a slight hesitation transitioning into the secondaries that wasn't there before. I'll throw some 5.5's in and see what happens.

So much for the Holley tech telling me that the transfer slot spec on this carb was supposed to be .025". Only thing I can think of is he must have been giving specs for a 4150 without the idle bypass valve. I ended up with the the primary butterflies about one turn open which is about .010" transfer slot exposure and the secondaries are open a 1/16 of a turn so no slot exposure.

I'm guessing closing the primaries a little further and raising the idle with the idle bypass valve will strengthen the signal and get it in the sweet spot.

I know.........it would be way too easy to plug the car into a laptop and push buttons.

But I have a 60's muscle car not a Y2K tuner car.

Last edited by Sieg; 02-28-2013 at 06:45 AM.
Reply With Quote
  #1224  
Old 02-27-2013, 09:40 PM
Sieg's Avatar
Sieg Sieg is offline
Moderator
 
Join Date: Dec 2010
Location: Pacific Northwet
Posts: 8,034
Thanks: 33
Thanked 101 Times in 41 Posts
Default

Quote:
Originally Posted by DaleTx View Post
I had some AFR heads with straight plugs on my gen 1 engine and had the same problem with header clearance on number 5 cylinder. I also had to dimple the header to make clearance to get the plug out. I used one of those cloth type insulating boots over the plug wire and it helped to keep the plug boot from melting.

Keep at that tune... one change at a time and you'll get there. Sounds like your making progress

Are you thinking of getting a wideband AFR system for your car while your at it?
I have Moroso sleeves sitting on the workbench and a spare boot.

Yes, I'm thinking about an AFR system, but I need a job before luxury items.
Reply With Quote
  #1225  
Old 02-28-2013, 07:38 AM
GregWeld's Avatar
GregWeld GregWeld is offline
Lateral-g Supporting Member
 
Join Date: Jul 2005
Location: Scottsdale, AriDzona
Posts: 20,741
Thanks: 504
Thanked 1,080 Times in 388 Posts
Default

When I owned those heads -- I whacked the 3 and 5 tubes and extended them out to the driver side about an 1" or more (can't remember the exact number)... all it cost me was a cermachrome job on the one side header.

This mod entailed a LOT of work -- and lucky for me Stans Headers is not far from me and I'm one of the two people that Stan actually likes (that's a relative term) so they were very helpful making bends etc for me.

I had to cut the tubes to free the flange - mill out the remainder of 3 and 5 from the flange without enlarging the hole... mock stuff up -- get new 3 and 5 tubes... weld it all back up and.... Well -- it was more work than it was worth but it was a challenge and I like a challenge.

There are headers made for STRAIGHT PLUG heads.... but nobody will sell you just the one side.
Reply With Quote
  #1226  
Old 02-28-2013, 07:59 AM
Sieg's Avatar
Sieg Sieg is offline
Moderator
 
Join Date: Dec 2010
Location: Pacific Northwet
Posts: 8,034
Thanks: 33
Thanked 101 Times in 41 Posts
Default

Quote:
Originally Posted by GregWeld View Post
When I owned those heads -- I whacked the 3 and 5 tubes and extended them out to the driver side about an 1" or more (can't remember the exact number)... all it cost me was a cermachrome job on the one side header.

This mod entailed a LOT of work -- and lucky for me Stans Headers is not far from me and I'm one of the two people that Stan actually likes (that's a relative term) so they were very helpful making bends etc for me.

I had to cut the tubes to free the flange - mill out the remainder of 3 and 5 from the flange without enlarging the hole... mock stuff up -- get new 3 and 5 tubes... weld it all back up and.... Well -- it was more work than it was worth but it was a challenge and I like a challenge.

There are headers made for STRAIGHT PLUG heads.... but nobody will sell you just the one side.
The steering box is one limiting factor...........


The limiting factor regarding header choices was the D-port exhaust. Doug's notes for my model 368 are 32, 56, 92, 93. http://www.pertronix.com/search/dougs/notes.asp

If needed the tube can be massaged a little more.
Reply With Quote
  #1227  
Old 02-28-2013, 08:00 AM
GregWeld's Avatar
GregWeld GregWeld is offline
Lateral-g Supporting Member
 
Join Date: Jul 2005
Location: Scottsdale, AriDzona
Posts: 20,741
Thanks: 504
Thanked 1,080 Times in 388 Posts
Default

If you look closely at the header (driver side) now mounted to the wall by the leaking BeCool radiator.... you'll see the welded #1 tube (you can make out several mods on various tubes) - which also was "moved" in order to make room for the extended 3/5 tubes... which -- since I had to cut everything out - to mill the flange for re-use... new tubes were bent and a new collector.... and well -- you get the point.


Reply With Quote
  #1228  
Old 02-28-2013, 08:51 PM
Sieg's Avatar
Sieg Sieg is offline
Moderator
 
Join Date: Dec 2010
Location: Pacific Northwet
Posts: 8,034
Thanks: 33
Thanked 101 Times in 41 Posts
Default

It appears the MSD high-temp "Race" boots won't handle as much temp as their standard grey boots. This Race boot had more clearance and less than an hour run time vs. the standard boot had 200 miles.


Massaged the tube a couple mm, cut down a Moroso sleeve and edge sealed with Permatex Ultra to control fraying, with the tight clearance slipping the sleeve over the plug first made it easy fit the boot.


I know this stuff isn't rocket science but hopefully a few may benefit from it.
Reply With Quote
  #1229  
Old 02-28-2013, 09:11 PM
Vegas69's Avatar
Vegas69 Vegas69 is offline
Senior Member
 
Join Date: Dec 2006
Posts: 8,692
Thanks: 87
Thanked 215 Times in 120 Posts
Default

Try an aluminum shield like you would see on a factory vehicle. Many used a full circumfrance shield the boot would slide into with a semi interference fit.
http://www.taylorvertex.com/Products...ting?id=220066
__________________
Todd
Reply With Quote
  #1230  
Old 02-28-2013, 10:01 PM
Sieg's Avatar
Sieg Sieg is offline
Moderator
 
Join Date: Dec 2010
Location: Pacific Northwet
Posts: 8,034
Thanks: 33
Thanked 101 Times in 41 Posts
Default

Quote:
Originally Posted by Vegas69 View Post
Try an aluminum shield like you would see on a factory vehicle. Many used a full circumfrance shield the boot would slide into with a semi interference fit.
http://www.taylorvertex.com/Products...ting?id=220066
Thanks Todd, haven't seen those on the "open" market.
Reply With Quote
Reply


Posting Rules
You may not post new threads
You may not post replies
You may not post attachments
You may not edit your posts

BB code is On
Smilies are On
[IMG] code is On
HTML code is Off

Forum Jump


All times are GMT -7. The time now is 12:50 PM.


Powered by vBulletin® Version 3.8.11
Copyright ©2000 - 2025, vBulletin Solutions Inc.
Copyright Lateral-g.net