...

Go Back   Lateral-g Forums > Lateral-G Open Discussions > Project Updates
User Name
Password


Reply
 
Thread Tools Display Modes
  #141  
Old 12-29-2010, 07:49 PM
61ragtop 61ragtop is offline
Senior Member
 
Join Date: Sep 2009
Posts: 114
Thanks: 0
Thanked 0 Times in 0 Posts
Default

Quote:
Originally Posted by The WidowMaker View Post
so i got all the bolts together and sent them off to Fabian (1badchevelle) to have them all coated black. i also sent the broken down johhny joints and all the rear brake brackets and everything together totaled 52lbs!!!! there wont be any gold zinc left when its done! i cant wait to get everything back and get it all reassembled. i also cant wait to find a bolt sitting somewhere that i forgot to send :-( ......

Tim

What coating did you get done on your bolts ect? You have convinced me to do mine soon! lol
Reply With Quote
  #142  
Old 12-29-2010, 07:59 PM
coolwelder62's Avatar
coolwelder62 coolwelder62 is offline
Senior Member
 
Join Date: Aug 2005
Location: Vinland Ks.
Posts: 4,315
Thanks: 0
Thanked 3 Times in 3 Posts
Default

Awesome project.69-70 chevelle's don't get enough lovin. Scott
Reply With Quote
  #143  
Old 12-31-2010, 10:06 AM
The WidowMaker's Avatar
The WidowMaker The WidowMaker is offline
Senior Member
 
Join Date: Jan 2008
Location: Huntington Beach, Ca
Posts: 773
Thanks: 0
Thanked 0 Times in 0 Posts
Default

Quote:
What coating did you get done on your bolts ect?
here you go. this is all i really know.

Quote:
Tim at work we use a coating called everlube 6107 gloss or flat black. I had fasteners coated in this for my car.(Link below). I have some bolts I can send you to take a look at. I am sure I can get your bolt coated in this at no charge.

It looks better than zinc and better rust protection.

http://www.metalimprovement.com/coat...cesses.php#cce
btw, just a quick update. its been raining here and i havent been able to roll the car out to work on the rear bumper, so i started on the wiper motor relocation. i wasnt able to come up with a way to make it work with the stock linkage, so im mounting an arm where the old motors arm was and then connecting my new linkage to that to power the wipers. everything is still hidden, but im on my 3rd design. its been fun playing with the mill and the lathe. ive run into a few snags, but i'll have pictures and an explanation when its all done. im not sure how others have done it on the chevelles, but i couldnt come up with any other good ways.

Tim
__________________
"The WidowMaker"
70 Chevelle Pro Touring - Garage Built, Backyard Painted
Custom 4 Link & Watts, Rushforth Wheels, Ats Spindles, McLeod RXT Twin Clutch, T56 Magnum, C6Z Calipers & Ring Bros Hinges
Special Thanks To: Rushforth Wheels ; Kore3 ; SC&C
Build Thread : https://lateral-g.net/forums/show...ght=widowmaker

Last edited by The WidowMaker; 12-31-2010 at 10:51 AM.
Reply With Quote
  #144  
Old 01-02-2011, 05:31 PM
70 chevelle 70 chevelle is offline
Senior Member
 
Join Date: Oct 2006
Location: Chicago
Posts: 217
Thanks: 0
Thanked 0 Times in 0 Posts
Default

Where are you relocating it to. I was considering putting mine under the drivers fender. Using the original plate and welding it into the firewall just under the fender. Then taking an original linkage arm,cutting it in half, and welding in the center section from another arm after cutting off the ends.Was this method one of your attempts?
__________________
Tony L
You can't fix stupid!
Reply With Quote
  #145  
Old 01-03-2011, 04:17 PM
The WidowMaker's Avatar
The WidowMaker The WidowMaker is offline
Senior Member
 
Join Date: Jan 2008
Location: Huntington Beach, Ca
Posts: 773
Thanks: 0
Thanked 0 Times in 0 Posts
Default

Quote:
Where are you relocating it to. I was considering putting mine under the drivers fender. Using the original plate and welding it into the firewall just under the fender. Then taking an original linkage arm,cutting it in half, and welding in the center section from another arm after cutting off the ends.Was this method one of your attempts?
to be honest, im not following your mods of the arm. this is why i hate the internet. we'd be on the same page in 30 seconds if on the phone.

i am moving it to the ds fender. the main problem is that the stock arm travels from the ds towards the center of the car. the easiest fix would have been to extend the arm to the passenger side. but, the arm would need to be really light and very strong and i couldnt figure out a way to do it. plus i want to run the ac lines through that side and didnt want it to all interfere.

i also thought of trying to manipulate the stock arm. but with the severe angles it didnt look possible. the way i have done it doesnt change how the stock arm or wipers function, it just changes how they are powered. it will make more sense with pictures.

Tim
__________________
"The WidowMaker"
70 Chevelle Pro Touring - Garage Built, Backyard Painted
Custom 4 Link & Watts, Rushforth Wheels, Ats Spindles, McLeod RXT Twin Clutch, T56 Magnum, C6Z Calipers & Ring Bros Hinges
Special Thanks To: Rushforth Wheels ; Kore3 ; SC&C
Build Thread : https://lateral-g.net/forums/show...ght=widowmaker
Reply With Quote
  #146  
Old 01-03-2011, 10:18 PM
The WidowMaker's Avatar
The WidowMaker The WidowMaker is offline
Senior Member
 
Join Date: Jan 2008
Location: Huntington Beach, Ca
Posts: 773
Thanks: 0
Thanked 0 Times in 0 Posts
Default

so here are a few pics of the new wiper setup. its still a work in progress, but now all i really need is the linkage from the wiper motor to my new arm and its done. i have an 18" piece of aluminum hex on order from mcmaster and it should be all i need.

so a little vocabulary to keep it all straight. "arm" is the pitman style arm on the motor and the new arm on the firewall. "linkage" is the stock piece from the wipers to the firewall arm and from the motors arm to the firewall arm.

a little background. i originally thought that the motor only spun 180* and then reversed. its the only way my mind could grasp how the motor could "park" the wipers when turned off. i had thought that when turned off the motor just spun backwards a little more sucking them down. i was wrong. using a method still unclear, the motor spins clockwise 360* and then uses a cam action to make the arm longer when turned off. this is how they are sucked down.

so, the original thought was to just rock the new arm back and forth like i thought that the stock arm went. once i found out that it went in circles it posed a slight problem. the new motor would be providing a lateral force, not a rotational one. meaning, if both arms were the same length there would be an issue getting the new arm to pass both 90 and 270 without ripping something apart. since the stock arm was 2.25" and the dse is closer to 2" (still need to call on that), i decided to make my new arm 2.5". this means that my arm will never be forced to make the full circle and instead will just rock as initially intended.

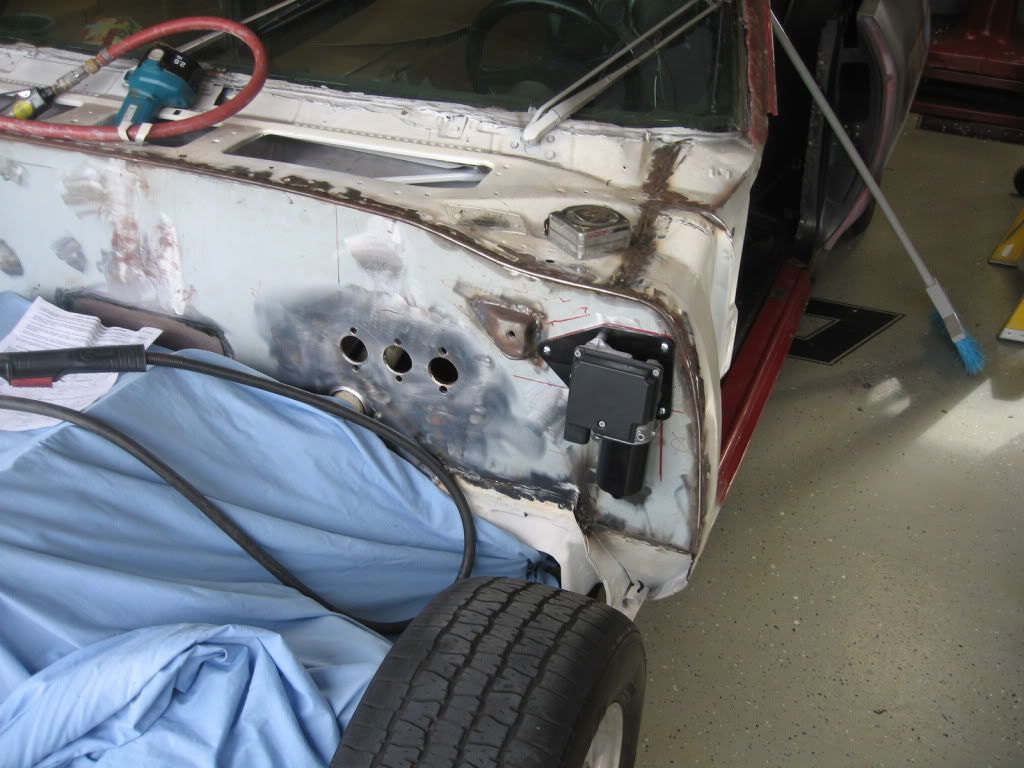
the other issue was the mounting of both linkages on the new arm. i had a few ideas but settled on this one. i had to do some milling to offset the mounting points and to keep the thickness thick enough to tap, but thin enough to keep the stock linkage from pushing too far towards the windshield. the closer to the windshield it gets the more bind that is introduced. this is currently a sweet spot and there is no bind.

here are the pics. like i said, still needs to be cleaned up.


__________________
"The WidowMaker"
70 Chevelle Pro Touring - Garage Built, Backyard Painted
Custom 4 Link & Watts, Rushforth Wheels, Ats Spindles, McLeod RXT Twin Clutch, T56 Magnum, C6Z Calipers & Ring Bros Hinges
Special Thanks To: Rushforth Wheels ; Kore3 ; SC&C
Build Thread : https://lateral-g.net/forums/show...ght=widowmaker
Reply With Quote
  #147  
Old 01-04-2011, 09:13 AM
tones2SS's Avatar
tones2SS tones2SS is offline
Lateral-g Supporting Member
 
Join Date: Sep 2006
Location: Massachusetts
Posts: 8,176
Thanks: 0
Thanked 6 Times in 5 Posts
Thumbs up

Very nice.
Reply With Quote
  #148  
Old 01-07-2011, 10:14 AM
The WidowMaker's Avatar
The WidowMaker The WidowMaker is offline
Senior Member
 
Join Date: Jan 2008
Location: Huntington Beach, Ca
Posts: 773
Thanks: 0
Thanked 0 Times in 0 Posts
Default

i built arm #3 last night but bored .020 too deep for the bearing seat and the snap ring fits too loose. i dont have enough material to bore another .025 and add a second snap ring, so arm #3 is going in the trash after a couple hours work. i changed some things up a little on this one, but most notably i swapped the side being milled which required a smaller relief and it presents with a solid side when viewed instead of the offset notches that you see now. i also overlapped the area around the notches so its full thickness for .188 instead of being much thinner like the one above.

i did however clean up arm #2 above and it looks much better with the newly radiused corners. since arm #3's main difference was appearance, and since you wont friggin see it anyways, i may not build a #4.

i work the next 48 hours, but plan to get the linkage hooked up on sunday after making a few more small parts. i may also do a short video clip to show how it all works.

Tim
__________________
"The WidowMaker"
70 Chevelle Pro Touring - Garage Built, Backyard Painted
Custom 4 Link & Watts, Rushforth Wheels, Ats Spindles, McLeod RXT Twin Clutch, T56 Magnum, C6Z Calipers & Ring Bros Hinges
Special Thanks To: Rushforth Wheels ; Kore3 ; SC&C
Build Thread : https://lateral-g.net/forums/show...ght=widowmaker
Reply With Quote
  #149  
Old 01-16-2011, 07:26 PM
The WidowMaker's Avatar
The WidowMaker The WidowMaker is offline
Senior Member
 
Join Date: Jan 2008
Location: Huntington Beach, Ca
Posts: 773
Thanks: 0
Thanked 0 Times in 0 Posts
Default

here is a little video of the new linkage. i am actually making the 4th arm tonight. this will have a little different ratio to get a full sweep on the window. the first few arms assumed that the starting angle and the finishing angle would be the same. since that didnt actually happen, even though the motor was moving the arm 4", it was only moving the stock linkage about 3.75". that .25 was a few inches of the window.

theres one other issue that im working out with a few phone calls, but i hope to have an answer tomorrow.

__________________
"The WidowMaker"
70 Chevelle Pro Touring - Garage Built, Backyard Painted
Custom 4 Link & Watts, Rushforth Wheels, Ats Spindles, McLeod RXT Twin Clutch, T56 Magnum, C6Z Calipers & Ring Bros Hinges
Special Thanks To: Rushforth Wheels ; Kore3 ; SC&C
Build Thread : https://lateral-g.net/forums/show...ght=widowmaker
Reply With Quote
  #150  
Old 01-17-2011, 09:04 AM
waynieZ's Avatar
waynieZ waynieZ is offline
Lateral-g Supporting Member
 
Join Date: Oct 2006
Location: Ma
Posts: 8,491
Thanks: 939
Thanked 342 Times in 231 Posts
Default

Do you have enough room to open the groove for the clip and put two to take up the extra room?
__________________
_Wayne________

___________________________________
https://lateral-g.net/forums/show...ghlight=FNQUIK
Reply With Quote
Reply


Posting Rules
You may not post new threads
You may not post replies
You may not post attachments
You may not edit your posts

BB code is On
Smilies are On
[IMG] code is On
HTML code is Off

Forum Jump


All times are GMT -7. The time now is 09:41 AM.


Powered by vBulletin® Version 3.8.11
Copyright ©2000 - 2025, vBulletin Solutions Inc.
Copyright Lateral-g.net