...

Go Back   Lateral-g Forums > Lateral-G Open Discussions > Project Updates
User Name
Password


Reply
 
Thread Tools Display Modes
  #141  
Old 04-27-2015, 07:20 PM
SlowProgress's Avatar
SlowProgress SlowProgress is offline
Lateral-g Supporting Member
 
Join Date: Jan 2011
Posts: 402
Thanks: 0
Thanked 27 Times in 10 Posts
Default

Quote:
Originally Posted by Sonar Chief View Post
Looking good there .... did you opt for the upgraded VA controller or you still using the OEM controls? ......
I am going to use the V/A control panel conversion kit with the OE sliding controls for now. Still tying to keep the interior sort of resto !
Reply With Quote
  #142  
Old 05-17-2015, 10:31 PM
SlowProgress's Avatar
SlowProgress SlowProgress is offline
Lateral-g Supporting Member
 
Join Date: Jan 2011
Posts: 402
Thanks: 0
Thanked 27 Times in 10 Posts
Default

Sorry lots of little photos for such a simple project. I spent a few hours this weekend on the A/C evaporator installation. Plan is to use the 69 Camaro DSE bracket in the 67. Without modification, the bracket pushed the evaporator a few inches too far to the left. I mocked up the radio and ashtray and there was interference with the ashtray bracket. I started by cutting off a couple inches and tack-welding the bracket back on and it seemed to fit well.


I used the Vintage Air bracket along with the DSE one to help hold the unit in place while I got everything fitted. The cowl looks like metal termites were there. I will plug all the extra little holes before paint.


On the right side the DSE bracket has an angled tab that picks on something on the 69. I built this little box to pick up that tab,


and used one of the leftover Rivnuts from the sway bar kit. I really like these steps drill for stuff like this. They never grab, or drill triangular holes.


I had to remove the wire harness hook temporarily but I will put it back when I find the best location.


Then just position the little box, plug weld and install the rivnut.


Here it is bolted in. I will repaint the bracket when I finish cutting, hanging and welding other things from it.


Then I moved to the center bracket. The 69 apparently has something for this to bolt to. I just made a simple bracket that welds to the cowl area, bolted it to the DSE bracket, Cleco’d it in place and plug welded it home.


I am pretty happy with the fit.


I made my little box on the right just a little too tall, so a nibbled about 5/16” out of this part of the bracket. You probably wouldn’t need to do this, but it just made it look more level. I spot welded in on the back and you can see two burned paint areas where it was rejoined.


Overall I am pretty happy. I still need to figure out the hose routing and the bulkhead. That will start in a couple of weeks.

Last edited by SlowProgress; 01-21-2021 at 11:31 PM.
Reply With Quote
  #143  
Old 05-18-2015, 09:08 AM
Sonar Chief's Avatar
Sonar Chief Sonar Chief is offline
Senior Member
 
Join Date: Dec 2011
Location: Greater Denver area
Posts: 1,366
Thanks: 245
Thanked 163 Times in 72 Posts
Question

Quote:
Originally Posted by SlowProgress View Post
Sorry lots of little photos for such a simple project. I spent a few hours this weekend on the A/C evaporator installation. Plan is to use the 69 Camaro DSE bracket in the 67. Without modification, the bracket pushed the evaporator a few inches too far to the left. I mocked up the radio and ashtray and there was interference with the ashtray bracket. I started by cutting off a couple inches and tack-welding the bracket back on and it seemed to fit well.


I used the Vintage Air bracket along with the DSE one to help hold the unit in place while I got everything fitted. The cowl looks like metal termites were there. I will plug all the extra little holes before paint.


On the right side the DSE bracket has an angled tab that picks on something on the 69. I built this little box to pick up that tab,


and used one of the leftover Rivnuts from the sway bar kit. I really like these steps drill for stuff like this. They never grab, or drill triangular holes.


I had to remove the wire harness hook temporarily but I will put it back when I find the best location.


Then just position the little box, plug weld and install the rivnut.


Here it is bolted in. I will repaint the bracket when I finish cutting, hanging and welding other things from it.


Then I moved to the center bracket. The 69 apparently has something for this to bolt to. I just made a simple bracket that welds to the cowl area, bolted it to the DSE bracket, Cleco’d it in place and plug welded it home.


I am pretty happy with the fit.


I made my little box on the right just a little too tall, so a nibbled about 5/16” out of this part of the bracket. You probably wouldn’t need to do this, but it just made it look more level. I spot welded in on the back and you can see two burned paint areas where it was rejoined.


Overall I am pretty happy. I still need to figure out the hose routing and the bulkhead. That will start in a couple of weeks.

Nice Hot Rodding .... don't they make the brackets for a 67? I am more inclined to a heater delete on my car, especially after seeing this fitment on a 67.

Looking nice!

Michael
__________________
JUST PICTUREShttps://imageshack.com/user/mcavery


Let the house go .... NEVER give up your car!!!!
Reply With Quote
  #144  
Old 05-18-2015, 03:21 PM
waynieZ's Avatar
waynieZ waynieZ is offline
Lateral-g Supporting Member
 
Join Date: Oct 2006
Location: Ma
Posts: 8,491
Thanks: 939
Thanked 342 Times in 231 Posts
Default

Nice fix it looks good.
__________________
_Wayne________

___________________________________
https://lateral-g.net/forums/show...ghlight=FNQUIK
Reply With Quote
  #145  
Old 05-18-2015, 07:14 PM
SlowProgress's Avatar
SlowProgress SlowProgress is offline
Lateral-g Supporting Member
 
Join Date: Jan 2011
Posts: 402
Thanks: 0
Thanked 27 Times in 10 Posts
Default

Quote:
Originally Posted by Sonar Chief View Post
Nice Hot Rodding .... don't they make the brackets for a 67? I am more inclined to a heater delete on my car, especially after seeing this fitment on a 67.

Looking nice!

Michael
I was told they don't make a 67-68 but maybe that has changed since I bought mine. I don't care about the heater but A/C is a big plus in Phoenix

Scott

Last edited by SlowProgress; 05-18-2015 at 08:32 PM.
Reply With Quote
  #146  
Old 06-01-2015, 01:34 AM
SlowProgress's Avatar
SlowProgress SlowProgress is offline
Lateral-g Supporting Member
 
Join Date: Jan 2011
Posts: 402
Thanks: 0
Thanked 27 Times in 10 Posts
Default Last Mounting Tab Complete on the Evaporator

I was out of town for a week and came back sort of lazy. I spent most of Saturday just catching up on yardwork and not really too motivated to work on the Camaro.

A coworker showed me an online CAD tool called Onshape. I decided to play around and see if I could model my shifter bezel with a wider slot for the 6-speed. I started a couple weeks ago and just about finished. This weeked I worked on making the shifter pattern which turned out harder than I planned. Onshape doesn’t have an engraving feature yet so I could not put the numbers next to the shift pattern, and had to use other tricks to get the nice milled grooves in there also.


The back side is just flat. I haven't decided exactly what I want to do yet.


This should be good enough to get a plastic part 3-D printed to check the fit. Once I am happy with the fit, I will have a local CNC shop hog it out of 6061 aluminum and possibly have it anodized and sealed. I have to admit this was a lot more fun than I thought it would be. I started dreaming of all the things that I could model and have machined. I get distracted too easily sometimes!

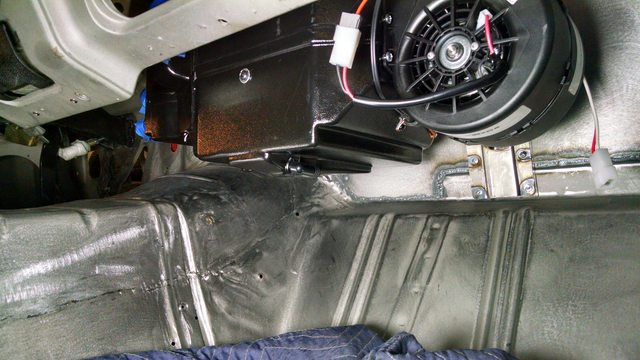
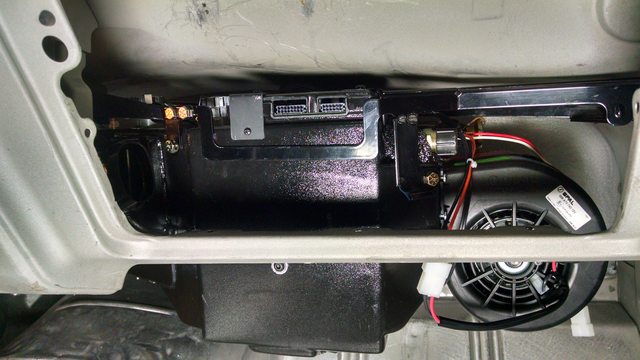
I did finally make it out in the garage to finish the evaporator install.
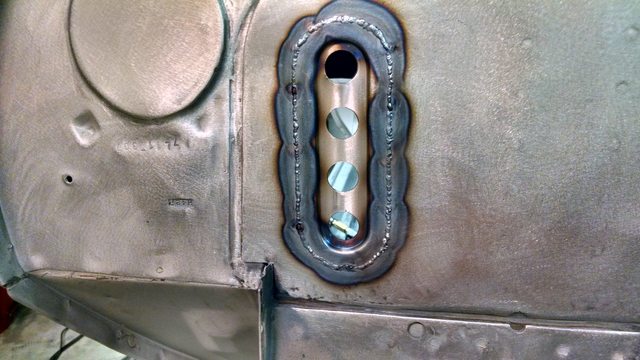
I started by rolling a short stiffener section to mount the last bracket to. It runs all the way across the firewall panel and ties into the cowl area, and the thick doubler at the bottom. This not only mounts the last tab but will also stiffen the large flat filler panel.
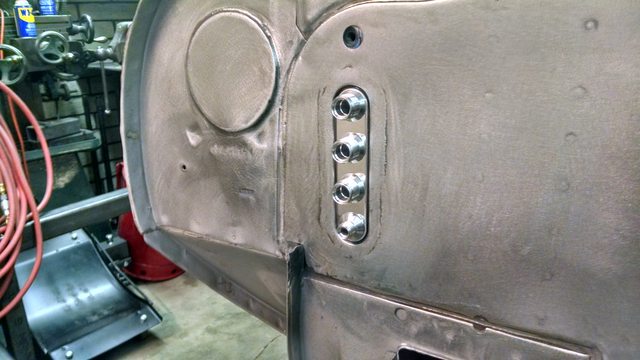
After banging it flat, I just drilled a bunch of holes and plug welded it.


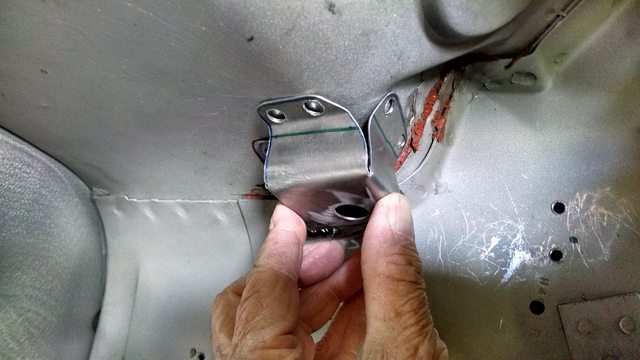
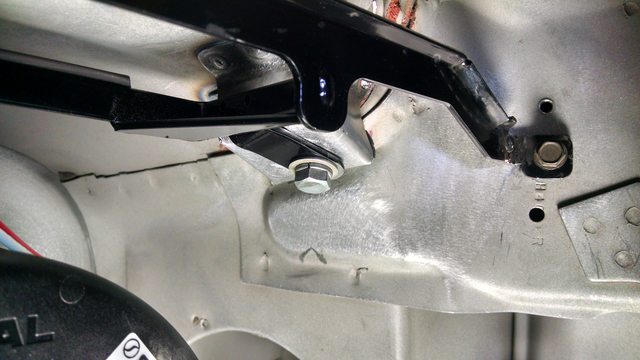
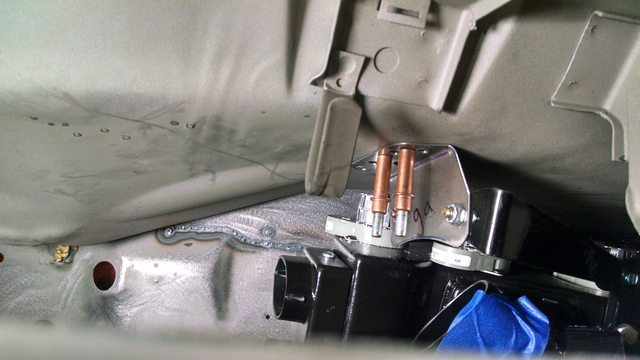
Then I mounted a little tab to pick up the Vintage Air bracket. The photo is not very good but it is just a little “L-shape” tab, bent to match the angle of the Vintage Air bracket (which isn't perpendicular to the firewall). I matched drilled the holes and then plug welded it onto the stiffener.


The evaporator bolts in with 5 different locations and feels really solid, using a combination of lateral, vertical and fore/aft brackets. I am happy with the installation.


Next I need to get a firewall pad and see how that is going to fit. Also quite a bit of work left to mount the Vintage air bulkhead so I will get started on that next as well.

I was just about to order an LS7, but sat down and did some planning over Memorial weekend. There are about a dozen small tasks that need to get done before I have an expensive boat anchor sitting in the frame rails. So, I decided to figure out all the small things that need to be ordered to support those tasks and it is a long list. I need to get all that ordered in the next few weeks. Looking at the plan was a little scary because there is a ton of work left to do before I can seal and prime the body shell!!

Last edited by SlowProgress; 01-21-2021 at 11:32 PM.
Reply With Quote
  #147  
Old 06-01-2015, 08:17 AM
waynieZ's Avatar
waynieZ waynieZ is offline
Lateral-g Supporting Member
 
Join Date: Oct 2006
Location: Ma
Posts: 8,491
Thanks: 939
Thanked 342 Times in 231 Posts
Default

I love your work,your doing an excellent job!
__________________
_Wayne________

___________________________________
https://lateral-g.net/forums/show...ghlight=FNQUIK
Reply With Quote
  #148  
Old 06-07-2015, 11:47 PM
SlowProgress's Avatar
SlowProgress SlowProgress is offline
Lateral-g Supporting Member
 
Join Date: Jan 2011
Posts: 402
Thanks: 0
Thanked 27 Times in 10 Posts
Default A/C Hose Bulkhead Install

Minor update, I got A/C bulkhead installed this weekend. Simple job, but I know they all add up!
I bought this formed plate from user Metalfab on ebay

https://www.ebay.com/sch/metalfab/m....1&_ipg=&_from=

I spent a little time trimming in up,


then laid out a slot so it would sit flush and sprayed the firewall to scrib a cut line.


Finished the rough opening with the grinder.


It took a while to get it tacked it in because it didn't want to sit flush, but once there it only took a short while to finish the welding.


I rough ground it and checked the bulkhead fit.


Pretty easy job, nothing a little filler won't hide!

Last edited by SlowProgress; 01-21-2021 at 11:33 PM.
Reply With Quote
  #149  
Old 06-07-2015, 11:58 PM
Vince@Meanstreets's Avatar
Vince@Meanstreets Vince@Meanstreets is offline
Senior Member
 
Join Date: Nov 2004
Location: Bay Area, California
Posts: 5,532
Thanks: 13
Thanked 20 Times in 13 Posts
Default

nice work.

Thats Dan Holohans ebay store. Good stuff.
__________________
MEANSTREETS PERFORMANCE

Dealer for
ACCUAIR rideheight control systems
ENTROPY RADIATORS XXX radiators for your pro-touring vehicle
FORGELINE MOTORSPORTS Highline custom 3 piece wheels
WEGNER AUTOMOTIVE Custom engines and LSX drive systems
SPEEDTECH PERFORMANCE Bay Area stocking dealer

NEVER FORGET -11
Reply With Quote
  #150  
Old 06-08-2015, 12:17 AM
SlowProgress's Avatar
SlowProgress SlowProgress is offline
Lateral-g Supporting Member
 
Join Date: Jan 2011
Posts: 402
Thanks: 0
Thanked 27 Times in 10 Posts
Default

Yes he has some nice products !
Reply With Quote
Reply


Posting Rules
You may not post new threads
You may not post replies
You may not post attachments
You may not edit your posts

BB code is On
Smilies are On
[IMG] code is On
HTML code is Off

Forum Jump


All times are GMT -7. The time now is 11:28 PM.


Powered by vBulletin® Version 3.8.11
Copyright ©2000 - 2025, vBulletin Solutions Inc.
Copyright Lateral-g.net