...

Go Back   Lateral-g Forums > Lateral-G Open Discussions > Project Updates
User Name
Password


Reply
 
Thread Tools Display Modes
  #161  
Old 04-05-2012, 08:44 AM
daemon2's Avatar
daemon2 daemon2 is offline
Senior Member
 
Join Date: Feb 2011
Posts: 214
Thanks: 0
Thanked 0 Times in 0 Posts
Default

The guage panel is a pretty cool touch. nice!
__________________
Daemon2
Reply With Quote
  #162  
Old 04-05-2012, 08:05 PM
waynieZ's Avatar
waynieZ waynieZ is offline
Lateral-g Supporting Member
 
Join Date: Oct 2006
Location: Ma
Posts: 8,491
Thanks: 939
Thanked 342 Times in 231 Posts
Default

I like it too. It should be sweet!
__________________
_Wayne________

___________________________________
https://lateral-g.net/forums/show...ghlight=FNQUIK
Reply With Quote
  #163  
Old 04-23-2012, 07:35 AM
boostin05blacks boostin05blacks is offline
Senior Member
 
Join Date: Jul 2008
Posts: 260
Thanks: 0
Thanked 0 Times in 0 Posts
Default

Thanks for all the kind words guys. Wiring is not my strong suit and sometimes I step back and look and become overwhelmed at the wiring as a whole. Me and the old man have been tackling it one piece at a time, man it is a lot. I just keep thinking of the time Ill finally get to turn the key.. Last weekend me and the old man got my brother and 3 other guys to come over to really tackle this thing. The good news is that the front headlight harness, the vaporworx harness (w/ the exception of the power feed wire), and the engine/ecu wiring is done (w/ the exception of the 6-7 leads inside, power to the fuel pump, alternator power wire, and a couple sensor that need to be addressed). What is left is what was mentioned above, the Mad electrical stuff, and the AAW engine side of the firewall, finish the battery hook up, wiring to the starter, and finish some dash wiring. So still plenty left..but we are getting there. I’m trying to do it once the correct way instead of rushing and having to go back.

In other news Timmy is making progress on the gauge cluster and has to come back over for one last fit before he can put his final touches on it. It’s coming out great and I'm glad this is the route that we went. I got 4 small led lights from classic dash to have them wired into the stock dash cluster for turn signals, high beams, and brakes or check engine light so that will be soon. Now that the fuel stuff is all wired I plan on having Timmy also make a small panel to hold the pump, fuse..ect. It will be located right near the battery.


Onto some pictures from the past 2 weeks.


and the future car owner testing out his seat...
Reply With Quote
  #164  
Old 04-23-2012, 06:51 PM
INJECTED69's Avatar
INJECTED69 INJECTED69 is offline
Member
 
Join Date: May 2009
Location: SO. CAL
Posts: 36
Thanks: 0
Thanked 0 Times in 0 Posts
Default

Looking good!!!
__________________
Injected69
Reply With Quote
  #165  
Old 04-23-2012, 09:02 PM
Al Moreno Al Moreno is offline
Senior Member
 
Join Date: Dec 2004
Posts: 1,502
Thanks: 3
Thanked 1 Time in 1 Post
Default

Looks like the little guys is practicing holding on for dear life Keep up the great work!
Reply With Quote
  #166  
Old 04-27-2012, 07:38 AM
boostin05blacks boostin05blacks is offline
Senior Member
 
Join Date: Jul 2008
Posts: 260
Thanks: 0
Thanked 0 Times in 0 Posts
Default

Thanks guys...

So last night I took off from working on the car to spend some time with the family. I brought home a little clean project to work on while watching TV before bed. I’m still figuring out how I want the coils /spark plug wires to run. Id really like them to run under the headers and mount the coils to the frame in front of the motor out of sight. With that being said I know that heat is going to be the biggest problem. I bought some DEI heat shield for the wires that is rated to 500 degrees. I also have the end boots that are rated to over 1200 degrees. Between the two I think they should be fine... So I took apart the wires and ran the DEI sleeves over each one. Here are some pictures..


Reply With Quote
  #167  
Old 04-27-2012, 06:01 PM
waynieZ's Avatar
waynieZ waynieZ is offline
Lateral-g Supporting Member
 
Join Date: Oct 2006
Location: Ma
Posts: 8,491
Thanks: 939
Thanked 342 Times in 231 Posts
Default

They look good. I was thinking of the boots for the ends. Nice job.
__________________
_Wayne________

___________________________________
https://lateral-g.net/forums/show...ghlight=FNQUIK
Reply With Quote
  #168  
Old 04-29-2012, 06:29 PM
boostin05blacks boostin05blacks is offline
Senior Member
 
Join Date: Jul 2008
Posts: 260
Thanks: 0
Thanked 0 Times in 0 Posts
Default

Thanks man, Yea they came out really nice. Hopefully I can tuck them under the headers nicely without and problems. Well see..

Got over to the car this weekend for a bit while the baby was napping. Still plugging away at the wiring. Not to much left really. Have to finish the wiring for the tach and water gauge , the 6-7 wires for the ecu, run the power for the fuel pump, put in two more main grounds, wire up the radiator/fans, run a power from the alternator to the main power connection, and run a power for the interior wiring to the main power connection. Actually looking at it wrote out it is enough. Soon enough. Mike and I ran the main power block to the drivers fender so I can get to it but it's out of the way enough that there should be no problems with anything else coming in contact with it. Extended the main power wire for the ecu to that and put the fuseable links in, also finished running the main power wire from the battery to it. Today I had some time so I drilled a hole in the floorboard for the pass thru connector. Mounted that and cut the main 1 gauge to size and finished crimping the ends. Also made the main wire to go from the connector on the engine bay side to the starter. In other news the radiator has been ordered and should be here soon. Also ordered a maf sensor so that should wrap up the ecu potion of wiring.

On Saturday the brake lines came in from inline tube. Seems like a really nice kit. Ordered all stainless and when I opened it I was scratching my head a bit as there was 8 lines. I though there was 7 lines for the brakes. Two smalll lines off the master to a distribution block right under the master cylinder. From the distribution block three lines come off that, one to the front right, one to the front left, and one long one to the rear that stops right before the rear axles which goes to a soft line. From the soft line to a "T" mounted on the rear axle which connects to a rear left and rear right line. 7 total. Anyone wanna guide me or tell me what I'm missing? Onto the pictures...


Reply With Quote
  #169  
Old 05-03-2012, 07:45 AM
boostin05blacks boostin05blacks is offline
Senior Member
 
Join Date: Jul 2008
Posts: 260
Thanks: 0
Thanked 0 Times in 0 Posts
Default

So it’s been a long couple of nights. I ordered and received the map sensor for the motor to complete the engine side of the wiring other than the coil packs. The port on the sensor was to big so I had to drill the hole on the intake to 15/32 and it fits good now. Just have to extend the wiring for the plug.

The brake lines have showed up from inline and I needed a couple more fittings so I’m waiting on the "T" that goes on the rear axle and the hold down clips for the frame. Then I will run the lines and bleed the system. Also waiting on the radiator to show up which should be soon. To complete the motor side of things I've started to piece together the intake with what I'll need and that will be ordered soon. Other than that just have to figure out what I’m going to do for exhaust. I really wanted to have side pipes, 3" ovals is what I was thinking but due to lack of room, expense I may just run dumps before the rear. We’ll see.

The main power source on the drivers firewall is complete. All main power wires have been ran and tightened. I need to finish up the gauge wiring, couple wires on the ecu, run relays for the headlights & fans when they get here and some miscellaneous stuff and that should be the rest of the wiring. I’ll be glad when that day is. Not too much longer before the car actually is able to fire.

Timmy came over last night as I really wanted to try to crank the car and check for leaks and make sure I had oil pressure. The main thing that still needed to be done was the main ground straps needed to be hooked up. One for each side of the frame to body, and one from the engine to frame, one in the rear for the main battery hook up, and a small one under the dash for ecu, gauges..ect. Instead of drilling and using bolts on everything I had him bring the welder and he welded the bolts right to the body/frame. This way there is one less thing to come loose and it’s a much better connection. While he did that I finished up the wiring for the starter and did the temporary wiring for the oil pressure gauge to see what was going on. After all the grounds where hooked up we gave it a go and everything went well, other than a small oil leak at the adapter that screws into the intake. I need to take it off clean it off and put some teflon tape on any pipe treads. It was a relief to finally here it turn over and confirm that the wiring so far is correct. Now it’s time to get the rest of the stuff buttoned up so I can actually fire it. Once I fire it up Ill only let it run for 30-60 seconds as it has to be broken in. I talked to my chevy dealership that I bought the motor off of and he said if I take the car to a certified mechanic and have them go over it and break the motor in I can gain back all the warranty that I have lost while the motor was sitting. So that’s what I'm going to do. I talked to a shop called Injection connection and they are going to go over the whole car once complete, break the motor in per the GM instructions, change the oil and strap her to the dyno. I want to start the car to check for leaks, make sure everything is working so I’m not paying shop rate because I have a leak in a fuel line..ect. Anyway here is a quick video and some pictures from the past few days.

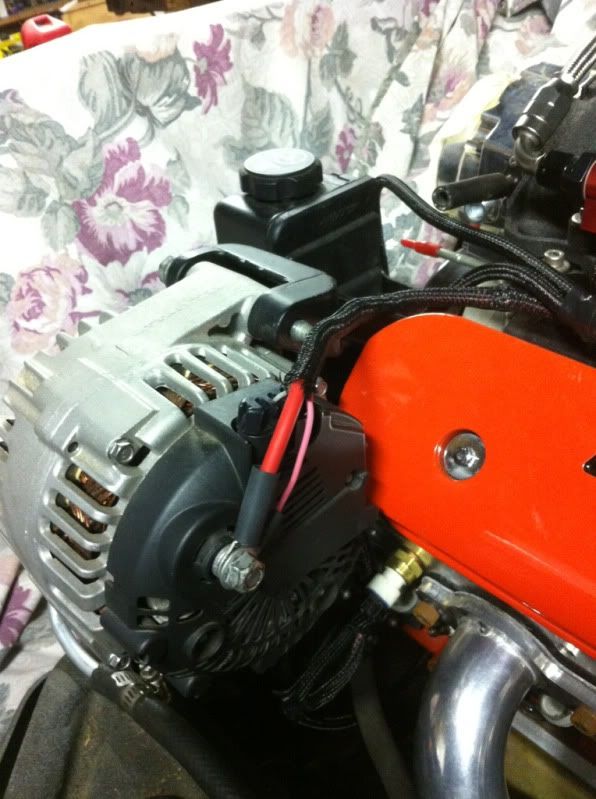
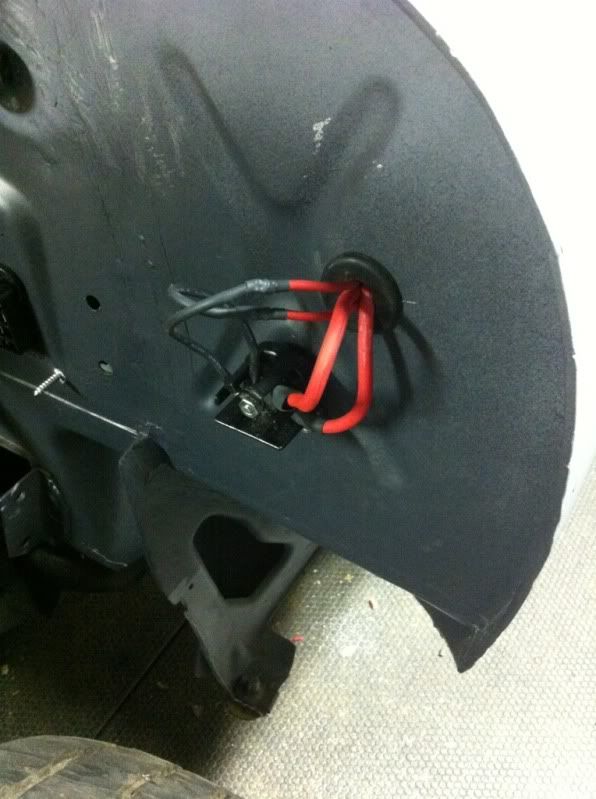






http://s18.photobucket.com/albums/b1...t=d3205b82.mp4
Reply With Quote
  #170  
Old 05-03-2012, 11:13 AM
72Z/28's Avatar
72Z/28 72Z/28 is offline
Senior Member
 
Join Date: Dec 2009
Posts: 374
Thanks: 4
Thanked 13 Times in 11 Posts
Default

Nice Are you going to have a junction block to hook the battery positive terminal, starter and the alternator hot wire? if so could you please post a photo of it where it is going to be mounted?

The reason why I am asking is that I have the battery mounted in the trunk like yours and there is a junction block mounted on the passenger side fender well.
__________________
72 Camaro RS:SOLD
68 Camaro:
LS6 Engine,Tremec TKO 600,5 Speed
Complete Speedtech Subframe Kit,Speedtech Torque Arm, 9" Rearend from Strange, Wilwood Brakes, Minitubbed, Hotchkis Subframe Connectors, FIKSE FM5s
Reply With Quote
Reply


Posting Rules
You may not post new threads
You may not post replies
You may not post attachments
You may not edit your posts

BB code is On
Smilies are On
[IMG] code is On
HTML code is Off

Forum Jump


All times are GMT -7. The time now is 03:47 AM.


Powered by vBulletin® Version 3.8.11
Copyright ©2000 - 2025, vBulletin Solutions Inc.
Copyright Lateral-g.net