...

Go Back   Lateral-g Forums > Lateral-G Open Discussions > Project Updates
User Name
Password


Reply
 
Thread Tools Display Modes
  #161  
Old 11-28-2017, 05:50 PM
glassman's Avatar
glassman glassman is offline
Lateral-g Supporting Member
 
Join Date: Apr 2012
Location: Livermore
Posts: 2,466
Thanks: 111
Thanked 84 Times in 62 Posts
Default

Doz rear bumpers....fit like Isotoner's (LOL, only us "older guys" will get that)

Love the color, workmanship, first class.
__________________
Mike
Reply With Quote
  #162  
Old 11-28-2017, 06:19 PM
gofastwclass gofastwclass is offline
Senior Member
 
Join Date: Feb 2012
Location: Behind the wheel in KCMO
Posts: 363
Thanks: 118
Thanked 40 Times in 37 Posts
Default

The car is looking sharp. By description I wasn't sure about the colour (actually matte clear), but seeing the pictures - it works well.


Quote:
Originally Posted by glassman View Post
Doz rear bumpers....fit like Isotoner's (LOL, only us "older guys" will get that)

Love the color, workmanship, first class.
How much "older" does one need to be to remember that commercial? Let's put it this way, I wasn't driving age but I still remember it.

Some help for the younger guys... or the older guys with CRS.

__________________
I build my own junk...
Reply With Quote
  #163  
Old 11-28-2017, 06:39 PM
Tony V Tony V is offline
Senior Member
 
Join Date: May 2009
Location: Arizona
Posts: 143
Thanks: 0
Thanked 29 Times in 11 Posts
Default

very nice color...great job on getting to the paint cycle.
Reply With Quote
  #164  
Old 11-28-2017, 07:49 PM
AB69Z AB69Z is offline
Member
 
Join Date: Nov 2007
Posts: 81
Thanks: 10
Thanked 0 Times in 0 Posts
Default Rear seat

Quote:
Originally Posted by slenning View Post
Something else I've been working on. I wasn't figuring on a back seat anyway so I figured I'd "borrow" an idea a few others had done. I cut out the back of the seat area to make a full "firewall" and am building a compartment to replace the seat. My plan is to have the battery and maybe the fuse panel, etc. in here.


Think I'm going to put some stainless mesh behind the dimples.

Have the pattern made and plan to cut the top out of 1/8 aluminum on the waterjet. Will cut two doors out at the same time and already have an aluminum continuous hinge to mount them.

I'm doing the rear seat delete in my 69 Camaro. I've got the riser welded in, just kind of stuck on how I'm going to do the access doors (panel)
Waiting to see how your doing yours, I know your going to have a much better way of doing yours.
Reply With Quote
  #165  
Old 12-02-2017, 06:31 PM
slenning's Avatar
slenning slenning is offline
Senior Member
 
Join Date: Aug 2006
Location: South Dakota
Posts: 441
Thanks: 2
Thanked 0 Times in 0 Posts
Default

Quote:
Originally Posted by waynieZ View Post
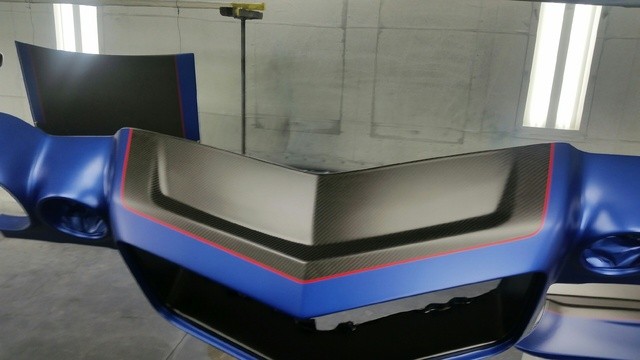
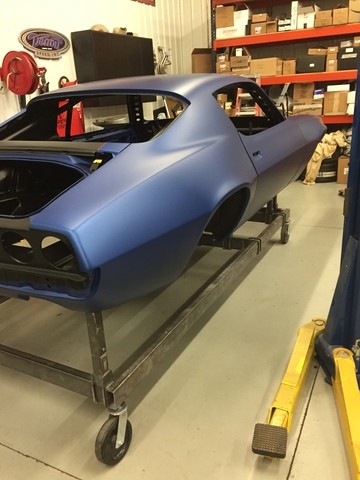
I love the color, especially with the Mat clear. Very Nice.
Thanks Wayne I was originally going to go with a lighter blue but with the matte finish I liked the darker better.

Quote:
Originally Posted by TorqStorm View Post
Looks great! I like the direction you took with the build.
Thanks Torq, Other than changing the color we stayed pretty much as I had planned in the beginning.

Quote:
Originally Posted by WSSix View Post
Love the color choice!
Thanks Trey, as I posted earlier its the 16-17 Camaro Hyper Blue, I originally wanted to do the Vette Laguna Blue but with the matte clear the Hyper blue won out

Quote:
Originally Posted by Spiffav8 View Post
Paint Day is a Great Day!!

Yes it is, Curtis, yes it is. Been a long time coming!!

Quote:
Originally Posted by Flash68 View Post
Wow. Very cool.
Thanks Dave I appreciate it.
__________________
Steve
70 Camaro - in process https://lateral-g.net/forums/showthread.php4?t=50636
69 Camaro LS7/T56 https://lateral-g.net/members/lenning/
69 Camaro SS396/350hp
64 Chevelle - patiently waiting
2014 Z28 Ashen Gray
2010 Camaro 2SS/RS Black w/White stripes (wife's car)
2015 SS (the 4 door one) Wife's other car
Reply With Quote
  #166  
Old 12-02-2017, 06:37 PM
slenning's Avatar
slenning slenning is offline
Senior Member
 
Join Date: Aug 2006
Location: South Dakota
Posts: 441
Thanks: 2
Thanked 0 Times in 0 Posts
Default

Quote:
Originally Posted by glassman View Post
Doz rear bumpers....fit like Isotoner's (LOL, only us "older guys" will get that)

Love the color, workmanship, first class.
I get it, well, because I'm definitely one of the "older" guys. lol Thanks a lot Mike!!

Quote:
Originally Posted by gofastwclass View Post
The car is looking sharp. By description I wasn't sure about the colour (actually matte clear), but seeing the pictures - it works well.
I wasn't too sure either Thanks

Quote:
Originally Posted by Tony V View Post
very nice color...great job on getting to the paint cycle.
Thanks Tony, yeah it is a major hurdle
__________________
Steve
70 Camaro - in process https://lateral-g.net/forums/showthread.php4?t=50636
69 Camaro LS7/T56 https://lateral-g.net/members/lenning/
69 Camaro SS396/350hp
64 Chevelle - patiently waiting
2014 Z28 Ashen Gray
2010 Camaro 2SS/RS Black w/White stripes (wife's car)
2015 SS (the 4 door one) Wife's other car

Last edited by slenning; 12-02-2017 at 07:18 PM.
Reply With Quote
  #167  
Old 12-02-2017, 06:53 PM
slenning's Avatar
slenning slenning is offline
Senior Member
 
Join Date: Aug 2006
Location: South Dakota
Posts: 441
Thanks: 2
Thanked 0 Times in 0 Posts
Default

Quote:
Originally Posted by AB69Z View Post
I'm doing the rear seat delete in my 69 Camaro. I've got the riser welded in, just kind of stuck on how I'm going to do the access doors (panel)
Waiting to see how your doing yours, I know your going to have a much better way of doing yours.

Perfect timing When I saw your post this is what I was working on.


My son Taylor cut all of the parts on his waterjet. The latch is a QuickLatch push button latch. There is a piece underneath the top itself that forms a rest for the door to sit on and bumps out to mount the lower part of the latch to attach to.
I have DXF drawings of most all of the parts we've made, on parts like this I usually cut everything out of wood on one of the CNC's at my cabinet shop first to make sure everything fits before Taylor cuts it.
__________________
Steve
70 Camaro - in process https://lateral-g.net/forums/showthread.php4?t=50636
69 Camaro LS7/T56 https://lateral-g.net/members/lenning/
69 Camaro SS396/350hp
64 Chevelle - patiently waiting
2014 Z28 Ashen Gray
2010 Camaro 2SS/RS Black w/White stripes (wife's car)
2015 SS (the 4 door one) Wife's other car
Reply With Quote
  #168  
Old 12-02-2017, 07:03 PM
slenning's Avatar
slenning slenning is offline
Senior Member
 
Join Date: Aug 2006
Location: South Dakota
Posts: 441
Thanks: 2
Thanked 0 Times in 0 Posts
Default

Here's a few pics of what happened this week


The Camaro is back in my shop!

__________________
Steve
70 Camaro - in process https://lateral-g.net/forums/showthread.php4?t=50636
69 Camaro LS7/T56 https://lateral-g.net/members/lenning/
69 Camaro SS396/350hp
64 Chevelle - patiently waiting
2014 Z28 Ashen Gray
2010 Camaro 2SS/RS Black w/White stripes (wife's car)
2015 SS (the 4 door one) Wife's other car

Last edited by slenning; 12-02-2017 at 07:08 PM.
Reply With Quote
  #169  
Old 12-02-2017, 10:00 PM
camcojb's Avatar
camcojb camcojb is offline
Administrator
 
Join Date: Jul 2004
Location: Wilton, CA.
Posts: 13,276
Thanks: 6,850
Thanked 2,114 Times in 969 Posts
Default

Fantastic job Steve!
__________________
Jody

PAST CAR PROJECTS

Like Lateral-G on Facebook!

Follow Lateral-G on Instagram!

SPECIAL THANKS TO:
Jacob Ehlers and Amsoil for the lubricants and degreasers for my 70 Chevelle project
Shannon at Modo Innovations for the cool billet DBW bracket
Roadster Shop for their Chevelle SPEC Chassis
Dakota Digital for their Chevelle HDX Gauge Package
Painless Performance for their wiring harness

Ron Davis Radiators for their radiator and fan assembly.
Baer Brakes for their front and rear brakes

Texas Speed and Performance for their 427 LS Stroker
American Powertrain for their ProFit Magnum T56 kit
Currie Enterprises for their 9" Third Member
Forgeline for their GF3 Wheels
McLeod Racing for their RXT street twin clutch
Ididit for their steering column
Holley for their EFI and engine parts
Lokar and Clayton Machine for their pedals and door and window handles
Morris Classic Concepts for their 3 point belts and side mirrors
Thermotec for their heat sleeve and sound deadening products
Restomod Air for their Tru Mod A/C kit
Mightymouse Solutions for their catch can
Magnaflow for their 3" exhaust system
Aeromotive for their dual Phantom fuel system
Vintage Air for their new Mid Mount LS front drive
Hydratech Braking for their hydroboost system
Borgeson for their stainless steering shaft and u joints
Eddie Motorsports for their hood and trunk hinges and misc parts
TMI Products for their seats, door panels, and dash pad
Rock Valley Antique Auto Parts for their stainless fuel tank
Reply With Quote
  #170  
Old 12-03-2017, 08:12 AM
glassman's Avatar
glassman glassman is offline
Lateral-g Supporting Member
 
Join Date: Apr 2012
Location: Livermore
Posts: 2,466
Thanks: 111
Thanked 84 Times in 62 Posts
Default

Quote:
Originally Posted by slenning View Post
Perfect timing When I saw your post this is what I was working on.


My son Taylor cut all of the parts on his waterjet. The latch is a QuickLatch push button latch. There is a piece underneath the top itself that forms a rest for the door to sit on and bumps out to mount the lower part of the latch to attach to.
I have DXF drawings of most all of the parts we've made, on parts like this I usually cut everything out of wood on one of the CNC's at my cabinet shop first to make sure everything fits before Taylor cuts it.
I'm doing the same to mine, was going to use wood but seeing this has convinced me to do metal. I do not know how to weld, and do not have any weld connections (that i trust anyways, cept maybe the paint shop i used).
But i can fab aluminum.

I was going to use the corvette rear glove compartments, one for safety equipment, other for the "permanent tools" every car must have. But, i really do like the idea of putting the battery there, however, these cars usually have a 52/48 weight distribution, so keeping it in the trunk area is what i'm going to do. Although, the COG is lower where your mounting it.....
__________________
Mike
Reply With Quote
Reply


Posting Rules
You may not post new threads
You may not post replies
You may not post attachments
You may not edit your posts

BB code is On
Smilies are On
[IMG] code is On
HTML code is Off

Forum Jump


All times are GMT -7. The time now is 09:42 PM.


Powered by vBulletin® Version 3.8.11
Copyright ©2000 - 2025, vBulletin Solutions Inc.
Copyright Lateral-g.net