...

Go Back   Lateral-g Forums > Lateral-G Open Discussions > Project Updates
User Name
Password


Reply
 
Thread Tools Display Modes
  #1771  
Old 02-11-2022, 07:52 PM
syborg tt's Avatar
syborg tt syborg tt is offline
Lateral-g Supporting Member
 
Join Date: Jun 2005
Posts: 8,298
Thanks: 4,988
Thanked 1,782 Times in 961 Posts
Default Aeromotive Part # 15695 Fuel Pressure fitting ( 01-25-22 )

A good friend has been using this fitting on the fuel rail for years so he suggested I buy one.


I like how it keeps it close to the rail.

__________________
marty-mj
Is a car ever really done???? It's like a ball of yarn unwinding, that has no end... Author DKz Garage

Projects - Syborg TT 4.3l v6 Mini-Truck, 2nd Chance Camaro & SLP575 Bumble Bee - 4Sale
Reply With Quote
The Following 4 Users Say Thank You to syborg tt For This Useful Post:
68454RS (02-12-2022), andrewb70 (02-13-2022), Mikael A (02-12-2022), Ricochet (02-25-2022)
  #1772  
Old 02-13-2022, 09:09 PM
ULTM8Z's Avatar
ULTM8Z ULTM8Z is offline
Member
 
Join Date: Feb 2008
Posts: 60
Thanks: 0
Thanked 8 Times in 6 Posts
Default

Quote:
Originally Posted by syborg tt View Post
So way back in February of 2021 I saw this 3D printed honeycomb grille on Taylor's 2nd Gen. I messaged him on Facebook and asked
him where and how do I get one. He told me he 3D printed it and he would be selling them. I was lucky enough to get in line to get one
and the quality is excellent and I can not wait to install it on the car.


Here is the grille that was shipped to me the first week of December. To say I am excited is an understatement.


If you don't mind me asking.... how much did that grill cost? What was the lead time?
Reply With Quote
  #1773  
Old 02-14-2022, 03:57 PM
syborg tt's Avatar
syborg tt syborg tt is offline
Lateral-g Supporting Member
 
Join Date: Jun 2005
Posts: 8,298
Thanks: 4,988
Thanked 1,782 Times in 961 Posts
Default

Quote:
Originally Posted by ULTM8Z View Post
If you don't mind me asking.... how much did that grill cost? What was the lead time?
Not a problem at all.

The cost was $650.00 and it was 3d printed. Lead time was about 4 months as he was backed up. PM me and I can give you his name on facebook and you can message him.


$
__________________
marty-mj
Is a car ever really done???? It's like a ball of yarn unwinding, that has no end... Author DKz Garage

Projects - Syborg TT 4.3l v6 Mini-Truck, 2nd Chance Camaro & SLP575 Bumble Bee - 4Sale
Reply With Quote
  #1774  
Old 02-14-2022, 05:55 PM
Mikael A Mikael A is offline
Senior Member
 
Join Date: Jul 2005
Location: long Island NY
Posts: 502
Thanks: 113
Thanked 101 Times in 49 Posts
Default

That’s really nice,just love how changes the look of the whole front end.
Have something similar in the works for my 68 but have not pulled the trigger yet.
__________________
Mike a
Reply With Quote
The Following User Says Thank You to Mikael A For This Useful Post:
syborg tt (02-14-2022)
  #1775  
Old 02-14-2022, 09:18 PM
syborg tt's Avatar
syborg tt syborg tt is offline
Lateral-g Supporting Member
 
Join Date: Jun 2005
Posts: 8,298
Thanks: 4,988
Thanked 1,782 Times in 961 Posts
Default

Quote:
Originally Posted by Mikael A View Post
That’s really nice,just love how changes the look of the whole front end.
Have something similar in the works for my 68 but have not pulled the trigger yet.
When I saw it months ago I really wanted it and I at one point I wasn't sure if it was going to happen and I messaged the gentleman and he said he had one that was ready to ship. So I quickly sent him money and a couple days late it showed up. I was so excited when it arrived and I am looking forward to seeing what it looks like on the car.
__________________
marty-mj
Is a car ever really done???? It's like a ball of yarn unwinding, that has no end... Author DKz Garage

Projects - Syborg TT 4.3l v6 Mini-Truck, 2nd Chance Camaro & SLP575 Bumble Bee - 4Sale
Reply With Quote
  #1776  
Old 02-14-2022, 09:49 PM
syborg tt's Avatar
syborg tt syborg tt is offline
Lateral-g Supporting Member
 
Join Date: Jun 2005
Posts: 8,298
Thanks: 4,988
Thanked 1,782 Times in 961 Posts
Default Filler Neck & Kicker Sound System ( 01-29-22 )

After searching every I went back to look at pictures to see if I could figure out what and how it was packed. Thankfully, I take
a lot of pictures and I found a picture that I took of the parts and they were in a red bag. So I went on the hunt for a red bag !!!

Found it !!!


Moving on to the Holley Tank Vent


Token Remy picture


Without fear I am going back into the trunk and hopefully I won't get stuck in the trunk this time. The plan is to install weather pack
connectors on the all of the wires for the Kicker system.


Yes, I am in the trunk.


I use twist ties till I know things are permanent.


The speakers wires are all tucked neatly in the trunk and hopefully this will be the last time I have to climb in the trunk.

__________________
marty-mj
Is a car ever really done???? It's like a ball of yarn unwinding, that has no end... Author DKz Garage

Projects - Syborg TT 4.3l v6 Mini-Truck, 2nd Chance Camaro & SLP575 Bumble Bee - 4Sale

Last edited by syborg tt; 02-14-2022 at 09:57 PM.
Reply With Quote
The Following 5 Users Say Thank You to syborg tt For This Useful Post:
camcojb (02-14-2022), fleetus macmullitz (02-15-2022), jarhead (02-19-2022), Roscoe03 (02-15-2022), waynieZ (02-17-2022)
  #1777  
Old 02-20-2022, 12:42 PM
syborg tt's Avatar
syborg tt syborg tt is offline
Lateral-g Supporting Member
 
Join Date: Jun 2005
Posts: 8,298
Thanks: 4,988
Thanked 1,782 Times in 961 Posts
Default A little bit of everything (02-05-22 )

A couple weeks ago I was reading one of the new magazines that are still in print and low and behold they shared a picture of
how Holley wants you to plumb the tank vent.

Now if I could actually figure out the part number for the fuel tank filler neck.


Since I am still using the factory Dimmer switch I ordered the all black version of this one.


It is finally time to bring the Anvil Carbon Inner fenders down from my Attic Office and yes the kitchen table is the perfect place to put them.


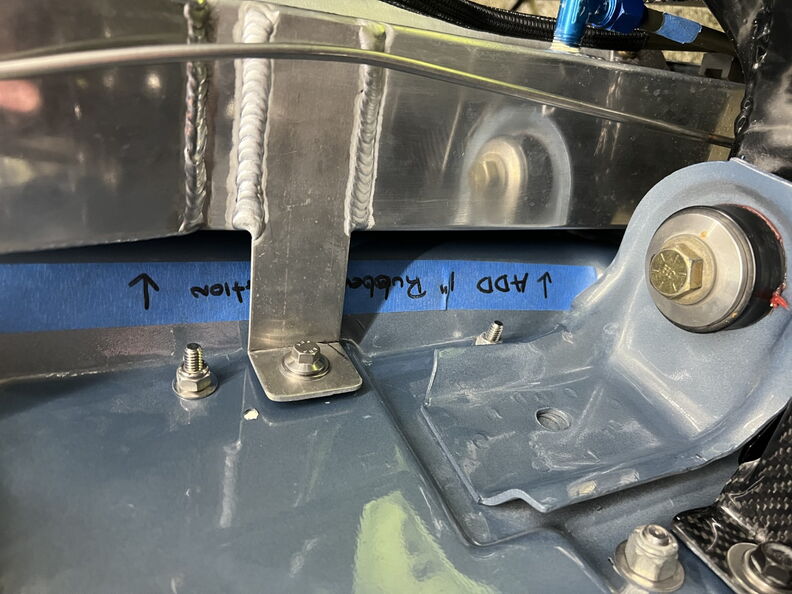
I needed to increase the gap in between the Holley Tank and the floor. So I used the Eastwood Sound deadening to increase the space just a little bit.


It's a good thing these trunk floors are so amenable.


Hopefully this will be the last time the radiator goes in the car.


So I forgot to flush the radiator so off to the spray wash to flush it out. I should mention it was only 6 degree's out and thankfully the spray
wash uses hot water. This of course made this a very tolerable.


I decided to lay the Anvil radiator cover on and it looks really nice. I will have to re-clear the radiator close out panel as it has yellowed.


__________________
marty-mj
Is a car ever really done???? It's like a ball of yarn unwinding, that has no end... Author DKz Garage

Projects - Syborg TT 4.3l v6 Mini-Truck, 2nd Chance Camaro & SLP575 Bumble Bee - 4Sale

Last edited by syborg tt; 02-20-2022 at 12:52 PM.
Reply With Quote
The Following 2 Users Say Thank You to syborg tt For This Useful Post:
fleetus macmullitz (02-23-2022), Roscoe03 (02-23-2022)
  #1778  
Old 02-20-2022, 01:07 PM
syborg tt's Avatar
syborg tt syborg tt is offline
Lateral-g Supporting Member
 
Join Date: Jun 2005
Posts: 8,298
Thanks: 4,988
Thanked 1,782 Times in 961 Posts
Default Anvil Carbon Inner Fenders Going in for the last time. ( 02-06-22 )

Just ONE DAY later and the inner fenders are off the kitchen table.


I placed the towel on the frame to protect the Powder Coating as they only sit about a 1/4' above the frame. I am going
to address this later by trimming some off the inner fender.


In order to install the passenger side the Billet Battery Tray will have to be removed.


I wanted to add a larger fender washer however I didn't have the correct size so I had to drill out the washer. This was my Grandfathers
and I remember using it in his garage when I was a kid. My buddy Ben was kind enough to build me a rolling tool cart and he made a very
cool removable mount.


Yes, The blue tape is back.


__________________
marty-mj
Is a car ever really done???? It's like a ball of yarn unwinding, that has no end... Author DKz Garage

Projects - Syborg TT 4.3l v6 Mini-Truck, 2nd Chance Camaro & SLP575 Bumble Bee - 4Sale

Last edited by syborg tt; 02-20-2022 at 01:11 PM.
Reply With Quote
The Following 4 Users Say Thank You to syborg tt For This Useful Post:
68454RS (02-22-2022), fleetus macmullitz (02-23-2022), jarhead (02-20-2022), Roscoe03 (02-23-2022)
  #1779  
Old 02-23-2022, 05:59 PM
syborg tt's Avatar
syborg tt syborg tt is offline
Lateral-g Supporting Member
 
Join Date: Jun 2005
Posts: 8,298
Thanks: 4,988
Thanked 1,782 Times in 961 Posts
Default Holley Tanks Vent Hose Clamps ( 02-06-22 )

When we mocked up the hoses on the Holley Tank I didn't install line clamps. I picked up a few line clamps from Napa and headed out to the garage.


I really like easy projects.


So do you guys think I should put some sort of foam to close out this area ?


Moving on to the final fan wiring.


Yep, It came back out as I needed to install a bolt & line clamp.


I am still trying to decide if I am going to paint this thing or not.


The line clamp routes the wires safely and securely under the core support.


So I used one of the setting on the iPhone to take this picture. It make it look like my 1 Car stall is 20 feet wide.

__________________
marty-mj
Is a car ever really done???? It's like a ball of yarn unwinding, that has no end... Author DKz Garage

Projects - Syborg TT 4.3l v6 Mini-Truck, 2nd Chance Camaro & SLP575 Bumble Bee - 4Sale
Reply With Quote
The Following 2 Users Say Thank You to syborg tt For This Useful Post:
fleetus macmullitz (02-23-2022), Mikael A (02-25-2022)
  #1780  
Old 02-23-2022, 06:32 PM
Beechy's Avatar
Beechy Beechy is offline
Senior Member
 
Join Date: Nov 2014
Location: Melbourne, Australia
Posts: 260
Thanks: 106
Thanked 97 Times in 70 Posts
Default Radiator mount

So do you guys think I should put some sort of foam to close out this area ?


Yes.....closed cell (wetsuit-like density) to prevent high pressure (fan forced) air under hood going to low pressure area in front of radiator when stationary.
While you're at it......open up the core support rad attach holes and install grommets to prevent twist in the panel from tearing up your tank ends. Existing bolts and washers but need nylon nuts.
Also a ground wire to the rad to prevent internal corrosion from electrical charge in coolant.
__________________
Jim Grant
Melbourne, Australia
(Dual citizen)
Reply With Quote
The Following User Says Thank You to Beechy For This Useful Post:
syborg tt (02-28-2022)
Reply


Posting Rules
You may not post new threads
You may not post replies
You may not post attachments
You may not edit your posts

BB code is On
Smilies are On
[IMG] code is On
HTML code is Off

Forum Jump


All times are GMT -5. The time now is 05:33 PM.


Powered by vBulletin® Version 3.8.11
Copyright ©2000 - 2024, vBulletin Solutions Inc.
Copyright Lateral-g.net