Project Update for May 7th 2020: We have been working during quarantine, and with no racing going on, my weekends opened up - so I have been writing
Forum Build Thread updates. We even have two new builds since the last update here (a
'67 Mustang and a
'04 CTS-V, both dedicated road race cars). These new builds are coming in as we wrap up some long term projects - like this '69 Camaro. Then I took a little time build a new PC, which is why I posted this 10 days later on Lateral-G. Thanks to
camcojb for updating the max pics per post limit!


This tube framed '69 Camaro is one of the most labor intensive projects we have ever undertaken, and it's in the final stretch. I have been taking a more hands on role in this build, and I go out into the shop 20+ times a day to look over all of our customer and shop builds. I now take virtually all of the pictures you see here, write all of the service invoices, send regular, detailed "build update" emails to the customers (that look a lot like these build threads), and help steer every aspect of each project - more than ever before. This prevents any surprises - if they occur, it's on me.

This update will cover work we did to this Camaro in 2019, including a few hurdles that took some time. We have made serious progress and the build is nearing completion. As I write this, the engine runs great, the transmission shifts well, it can move under its own power, and we only lack a few parts purchases and last minute tweaks to get this Camaro onto a road course. The global pandemic shut down some of our suppliers, which has delayed some recent work.

In this round we show work completed such as the wiring, plumbing, lighting, ECM install, and initial tuning. We will also cover the final interior panels and some other fab work.
WIRING
Wiring is boring, tedious work to watch on any build, but I show our clients every step of every work invoice. There are likely 200 pictures of wiring work done on this car. I'm not going to bore you with most of that, but I will talk about some of the options on a build like this - for the chassis harness, connectors, EFI system/engine harness, and more.
CHASSIS WIRING
We decided to keep it simple on this build and chose a 26 circuit Painless wiring harness we have used on previous builds where we had to do a complete re-wire. I'm using the exact same chassis harness on our
Team Vorshlag E46 endurance road race build as well as my personal
2015 Mustang LS swap race car. We have used this harness for several completed race car builds and it works.


Now I'm not advocating for ditching the entire chassis wiring harness on a modern car (less than 20 years old), but if you have nothing to start with or are starting with a car more than 20 years old (where there are likely old / brittle / broken connectors and bad grounds) this isn't a bad idea. Some of you might turn your nose up at Painless Wiring harness being used on this chassis, but know this: we have had FAR fewer problems with these harness kits than some of the $25K+ Wiring jobs I've seen done on high end builds - with Power Distribution Modules to wire and program, Raychem harnesses that can never be serviced, etc.


There is nothing wrong with spending that kind of money on Professional Motorsport level wiring if you have the budget and it suits the purpose - I just think it is unnecessary to go to that extreme expense for the cars we build and that our customers use. We aren't running 24 hour LeMans races with the cars we build here, and we don't have customers with unlimited budgets. These Painless harnesses are color coded using GM schemes, well built, cost effective (sub $250), easy to finish out, and use modern fuses, relays, and connectors. Everything is brand new - no junk yard damage or old age rot.


Finishing out the connections, routing, mounting and such can take dozens of hours, so plan for that. We have mounted the fuse box under the dash and have almost every single system wired and routed now.


We built this car using Deutsch DT series connectors, which are costly but worthwhile. We keep a variety of DT connectors and pins on hand from 2 to 26 pins, which keeps us going on builds like these. These are not inexpensive connectors so we keep track of what was used on any given build in the
My Shop Assist hour tracking system. Keeps us from guessing or under/over charging any customer.


There is a bit of planning and paperwork involved with a proper wiring job as well, and we have to keep records of how we terminated various systems to manage all of the circuits (a copy of which goes with the owner). Soldering, heat shrink, harness covering... it is all tedious but necessary. Evan and Brad do all of the wiring work on projects in our shop and they both do excellent work.


This is still a work in progress, and as systems are completed and tested we go back and make sure the harnesses are wrapped and secured properly. I will show the final wiring on this chassis when everything is wrapped and tucked, which should happen after the first track test and after paint.
BATTERY UPGRADE + KILL SWITCH
For many years my obsession for weight loss on cars drove me to use ultra lightweight motorcycle batteries, like the Odyssey PC680, which weighs 14.7 pounds. But after years of fighting with their lack of battery reserve - and pushing cars that should be driven - I've conceded that a little more mass in a battery is very worthwhile.


This build started off with a PC680 but during some testing we kept killing the battery, then recharging, and it finally died. So I got to "buy" that one back while we upgraded to this PC925, which is a 21 pound battery. It has more reserve, and more girth - which required a new battery tray and enlarged base mount.


With that larger battery in place it was time to mount the CarTek Electronics battery isolator or "kill switch". We chose the
CarTek GT unit for this build, which works with OEM style ECMs. This is an FIA rated, non-sparking, solid state kill switch. It comes with two buttons, and works by dropping the entire ground circuit for the chassis as shown in the animated gif above.

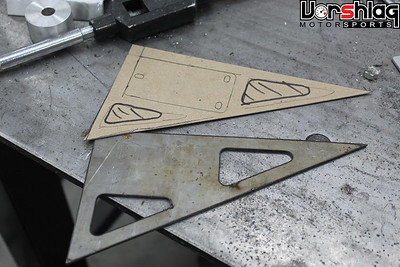
To mount that I wanted to make a new bracket behind the passenger seat, in a tubing junction between a diagonal and the main hoop. I sketched out what I wanted and Myles turned it into a CNC cut piece that Evan then cleaned up and TIG welded to the roll cage.
continued below


 Brian Hobaugh SCCA National Tour June 2014
 First Hemi 'Cuda Convertible Ever Built
 Short clips: Goodguys Pleasanton autocross and pit videos


 Linear Mode

