continued from above
ECM TUNING ISSUE: SOLVED
One of the challenges of building a car from scratch is we have no OEM parts to start with. One mistake I made on this car early on was how I purchased the E38 "LS3" style GM engine computer module or ECM. After learning this and hope to pass along this painful lesson here.


In the last post I talked about us firing up the engine for the first time in late August 2019. Well it would start and run, but it would not stay running for more than a few seconds. Evan managed to get it running by adding a jumper to the fuel relay, but the E38 ECM was not sending a steady signal to run the fuel pump. Why?
Junkyard sourced vs New ECM: When you buy a
used ECM that came out of a running OEM setup, it will already have some "base" programming loaded, including some body module aspects that you cannot load with tuning software like HP Tuners. With a
new ECM (like the two I bought for this project) it is MISSING those other aspects, and you need a specialized GM technicians computer OR a fully functional car like a 2010-15 Camaro to plug the ECM into, THEN it will "talk" to these other modules and THEN you can put it in the actual car you are building for and reprogram it to your custom tuning.


When the first one had an issue, I bought another new one. When both new ECMs had the same issue, we had someone come by who said he could fix it - he didn't. We flashed both new ECMs with HP Tuners software to add a start-up tune and bypass the VATS key security system, but without some of the GM base tune aspects, the fuel pump trigger would go away after a few seconds. A silly mistake that cost me thousands of dollars in wasted man hours and months of wasted time. Luckily a tuner friend found someone with the right hardware to add the GM base tune, we sent one off to be flashed, then loaded the start-up tune, then it ran and drove without any jumper wires or other tricks.
HOOD VENT FINISHED
We had fabricated this crazy hood vent system out of aluminum and it tied into the main radiator, then the engine oil cooler and power steering coolers on the sides. Lots of swooping curves that flowed up to the surface of the hood. It has only been held in with Clecos - it was time to mount that with real nut and bolt hardware ... and finish one glaring pair of errors.

The rear corners of this duct were strangely missing some material on the mounting flanges - and nobody knew why it was left that way. I didn't catch it when the last round of work was done to this, but I couldn't let it go this way. Once Evan had a day to work on this I had him remove the vent and fix this - on my dime - and get the bolts and floating nut plates installed to mount the duct.


Once the assembly was off the car the missing corner of the upper mounting flange is painfully visible. The missing puzzle piece was made from cardboard then transferred and cut from aluminum sheet, with two mirror image parts cut.


Evan TIG welded these corner flanges in place, then smoothed the welds with a sanding roll and orbital sander, and when completed you would never know they weren't in the original flange.


With that detail completed he could add the floating nut plates to the bottom side of the flange, then some stainless button head 10-32 bolts were put in place, holding the upper duct assembly to the hood.
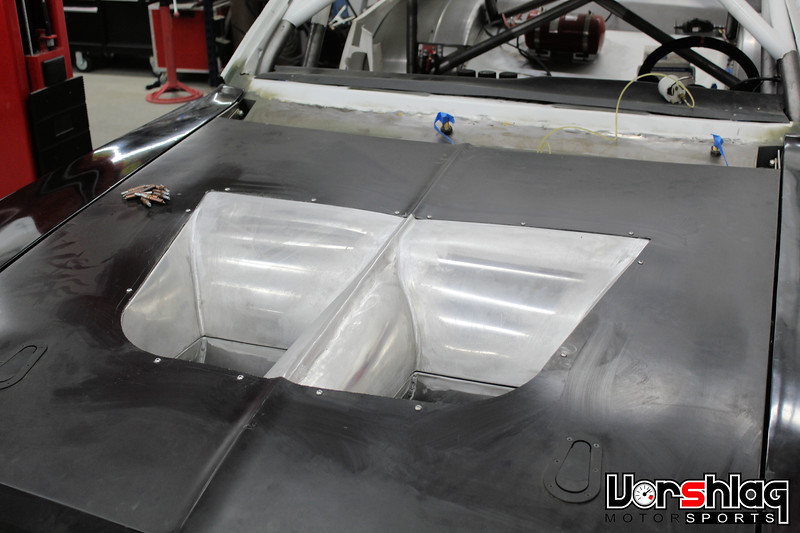
We will likely use 3M panel bod to attach this during paint work, but for now the ducting is complete enough for track testing. The customer might choose to keep visible hardware here, to make it easier to work on down the road if the hood were ever damaged. We will see, but now at least I don't see ANY more damn Clecos on this car, or the two gaps in the corner of this hood duct.
TRANSMISSION ISSUES + FIX
While bleeding the clutch system, Evan found some things that were not completed in the past, which meant we had to remove the transmission (at my expense) to get access to some fittings that were only trial fitted.


I will cover all of that next time, plus some other "fun" things that happened as he was unbolting the shift arms on the side...


Evan was loosening the shift rods at the three shift forks (1-2 / 3-4 / 5-R) on this 5 speed G-Force GF-5R 5 speed manual. And one of the shift cams just... broke. He was shocked as he was using hand tools and was just removing a Nylock nut, but the shaft on the 3-4 shift form cam just sheared clean off. FFFFFFFFFF! A call to G-Force was made, then to the customer.


While we were trying to figure WTF happened to that, the transmission was pulled and some detail work that was missed earlier could finally be completed.


These tunnel details were completed and the shift rods were finish TIG welded (they were only tack welded), so those would be ready to go back in when the replacement parts arrived to fix this G-Force.
continued below


 Brian Hobaugh SCCA National Tour June 2014
 First Hemi 'Cuda Convertible Ever Built
 Short clips: Goodguys Pleasanton autocross and pit videos


 It's like a ball of yarn unwinding, that has no end... Author DKz Garage
 Linear Mode

