...

Go Back   Lateral-g Forums > Lateral-G Open Discussions > Project Updates
User Name
Password


Reply
 
Thread Tools Display Modes
  #41  
Old 10-22-2008, 06:52 PM
syborg tt's Avatar
syborg tt syborg tt is offline
Lateral-g Supporting Member
 
Join Date: Jun 2005
Posts: 8,447
Thanks: 5,658
Thanked 2,040 Times in 1,098 Posts
Default

Looks like an Awesome project.

I have an odd thought (which isn't strange for me). I really think that you should somehow figure out how to incorporate some pink into the graphic / color seperation bar. I think it would cool to way to pay tribute to the car and it's heritage. Plus it's history for your Grandparents.

ps - you've already got the blue know your just need the pink in there

Quote:
Originally Posted by Damn True View Post

In July of 1969 my Grandparents purchased a 1968 Camaro that had been sitting a while on the lot at Courtesy Chevrolet in Santa Clara, CA. They needed a new car to drive to Arizona where I was to be born in a couple of months and since the car had been slow to sell the price was right. The car was a bit different in that it was a special order that wound up not being delivered to the customer it was originally intended for. Playboy had placed an order through COPO for 50 pink 1968 Camaros to be distributed to playmates through the year. They only took delivery of about 30-40 of them. The rest wound up being sent to dealers. This was one of them....and yes, I said it was pink. This was my Grandmothers car for close to 35 years. They drove it all over CA on vacations and fishing trips. In fact, to this day there are bait shops and mountain lodges that I go to and when I mention my Grandparents people say, "Oh the couple with the pink Camaro!" The car was nothing special other than by virtue of it's color. A basic 327 coupe with a powerglide. But it was cool and I knew that eventually this car would be the basis for my Camaro road-racer project.

Fast forward to the year 2000. I was getting out of the Coast Guard after eleven years and moving back home to the Bay Area. My grandparents at that point decided to give me the car. A couple of years earlier some redneck had yelled something vulgar to my Grandfather while he was driving it and it scared him so he had a cheapo Earl Schieb spray-job done on it so it was now blue rather than pink.
__________________
marty-mj
Is a car ever really done???? It's like a ball of yarn unwinding, that has no end... Author DKz Garage

Projects - Syborg TT 4.3l v6 Mini-Truck, 2nd Chance Camaro & SLP575 Bumble Bee - 4Sale
Reply With Quote
  #42  
Old 10-23-2008, 08:40 AM
ArisESQ ArisESQ is offline
Senior Member
 
Join Date: Aug 2005
Location: Los Gatos
Posts: 765
Thanks: 8
Thanked 10 Times in 9 Posts
Default

maybe you could paint the exterior of the car blue, and just do some very slight powder pink accents in the engine bay.. like annodize the fuel rails, or valve covers or something?

OR just paint the car pink! there are some pretty badass pink cars!


Reply With Quote
  #43  
Old 10-23-2008, 04:32 PM
Teetoe_Jones Teetoe_Jones is offline
Senior Member
 
Join Date: Jul 2004
Location: La La Land, CA
Posts: 856
Thanks: 0
Thanked 9 Times in 7 Posts
Default

So we have new goodies at the shop. The guys at LG Motorsports drop shipped a set of their C5/C6 Corvette spindle brake ducts. We will be adding them in place of the wheel speed sensor bracket on our forged aluminum AFX spindles. The only issue we had was that during our engineering process of making the AFX spindle we needed to rotate the forged in brake bracket so we could tie it into a fillet gusset while adding about 50% more material to it to eliminate brake flex. This makes the cut of the duct interfere with the upper brake bracket hole due to our redesign. No big deal, the bolts go in from the back side anyways.

Here are the spindles as we test assembled them with the 1/2"x20x3" long ARP stud upgrade. Hope to have this stuff out to you in the morning True!


Tyler
Reply With Quote
  #44  
Old 10-23-2008, 04:44 PM
Damn True's Avatar
Damn True Damn True is offline
Senior Member
 
Join Date: Sep 2005
Location: San Jose, CA
Posts: 795
Thanks: 0
Thanked 0 Times in 0 Posts
Default

Note to self:

Order axles that are compatible with BIG ASS WHEEL STUDS!
Reply With Quote
  #45  
Old 10-23-2008, 04:47 PM
68protouring454's Avatar
68protouring454 68protouring454 is offline
Senior Member
 
Join Date: Jul 2004
Posts: 1,593
Thanks: 0
Thanked 1 Time in 1 Post
Default

Quote:
Originally Posted by Damn True View Post
Note to self:

Order axles that are compatible with BIG ASS WHEEL STUDS!

?????
__________________
Jake's Rod Shop
Reply With Quote
  #46  
Old 10-23-2008, 04:53 PM
Damn True's Avatar
Damn True Damn True is offline
Senior Member
 
Join Date: Sep 2005
Location: San Jose, CA
Posts: 795
Thanks: 0
Thanked 0 Times in 0 Posts
Default

Different size wheel studs front/rear = no bueno
Reply With Quote
  #47  
Old 10-23-2008, 05:33 PM
68protouring454's Avatar
68protouring454 68protouring454 is offline
Senior Member
 
Join Date: Jul 2004
Posts: 1,593
Thanks: 0
Thanked 1 Time in 1 Post
Default

oh, all axles can be drilled and same studs pressed in, but good point its something easily over looked, and is much easier/cheaper to buy them with them installed
looks great
__________________
Jake's Rod Shop
Reply With Quote
  #48  
Old 11-06-2008, 01:13 AM
Damn True's Avatar
Damn True Damn True is offline
Senior Member
 
Join Date: Sep 2005
Location: San Jose, CA
Posts: 795
Thanks: 0
Thanked 0 Times in 0 Posts
Default

As stated, the next step is to install the ATS double shear coilover bracket. I've gotten the sense from some that this is percieved as a difficult task. I mean, it's one thing for Tyler to install these in his shop with a bunch of quality tools and equipment but perhaps another for someone to do at home. Tyler bills this thing as an easy to install upgrade. Well.....let's see.

Here is the bracket:


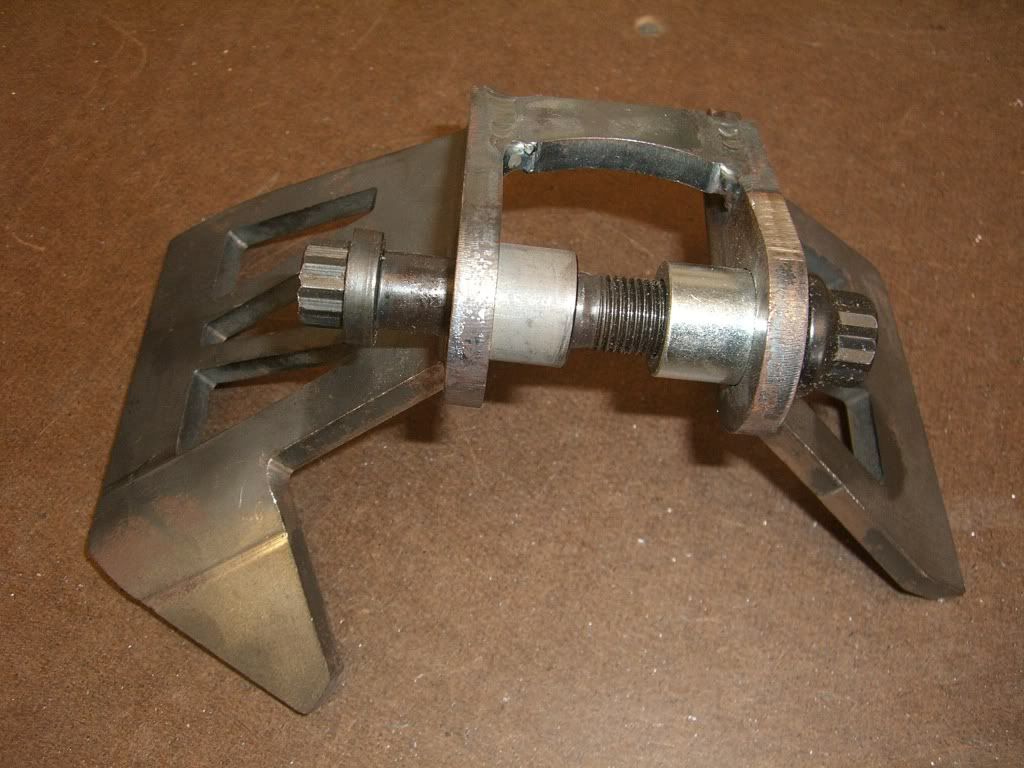
A darned robust little item if I do say so. 1/4" steel plate (how do you bend this stuff?) nicely mig welded into an assembly that I'm pretty sure could support the weight of the car a couple times over.

I have at my disposal a small Kobalt air compressor and cutoff tool. A cheap Sears Craftsman grinder (with cutoff, grinder, wire and flap-disk wheels), a sawzall, a Miller 175 welder and a little something I borrowed from work that we'll get to later. By no means professional quality stuff. IMO your basic homebrew fab tools.

Since this the install is done twice (left side and right) I've decided to examine two different ways of accomplishing the task.

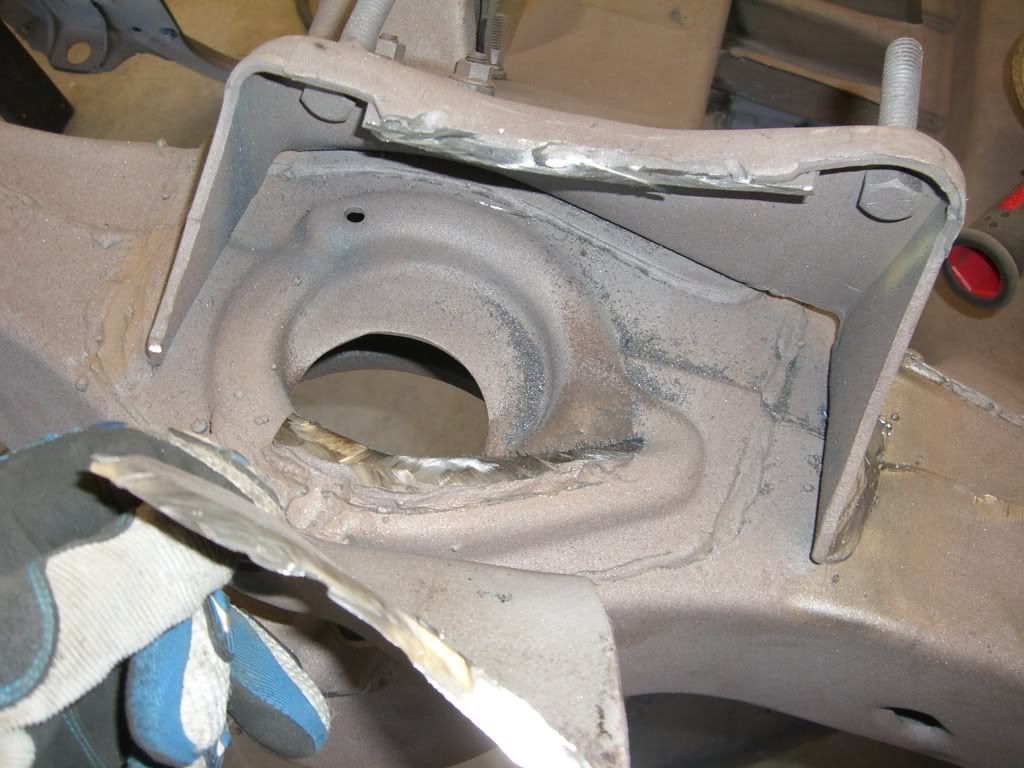
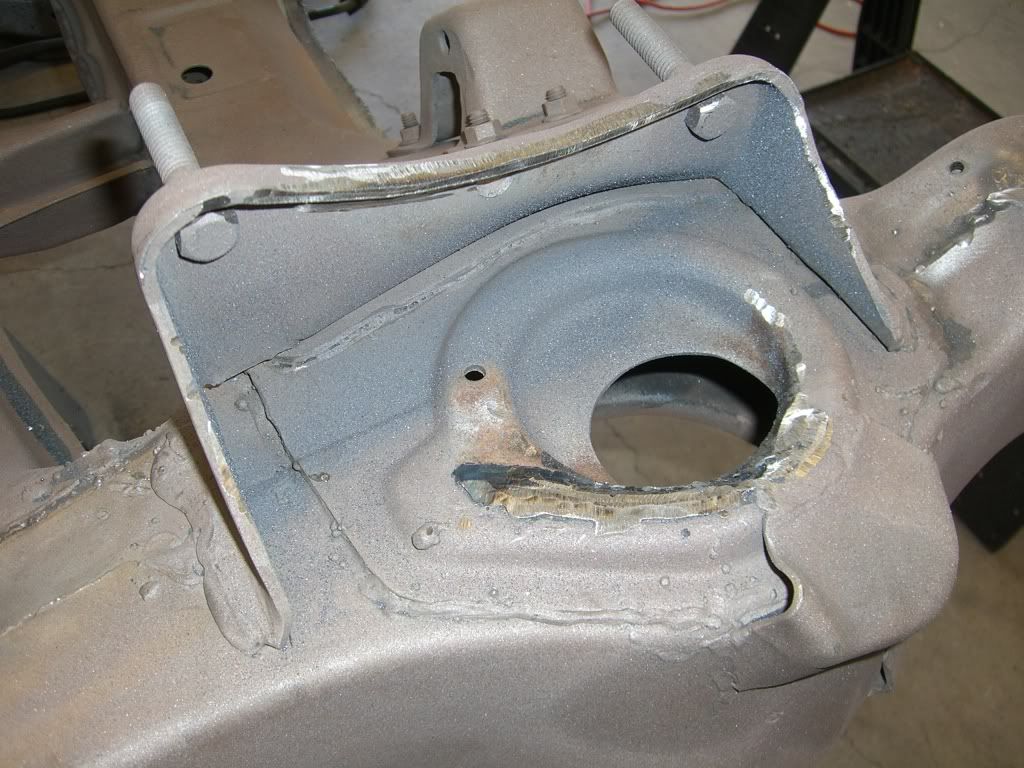
Here is what we start with:


The sandblasted subframe and it's OE single shear shock mount and upper control mount.

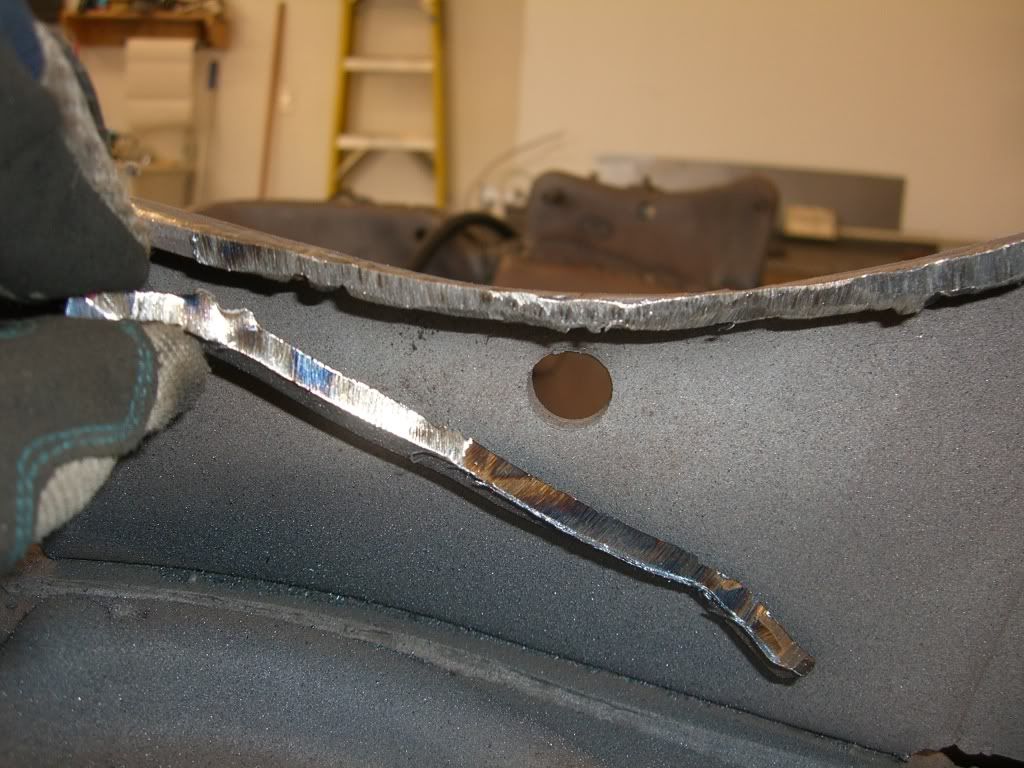
The first step is to remove the single shear shock mount. At first I tried using the pneumatic cutoff tool......lesson learned here. Cheap air compressors and pneumatic tools are just that....cheap. The $200 compressor from Lowes (Kobalt brand) just does not have the ooomph to handle this. It couldn't keep up with the cuttoff tool. So I switched to ol' reliable. Sears.


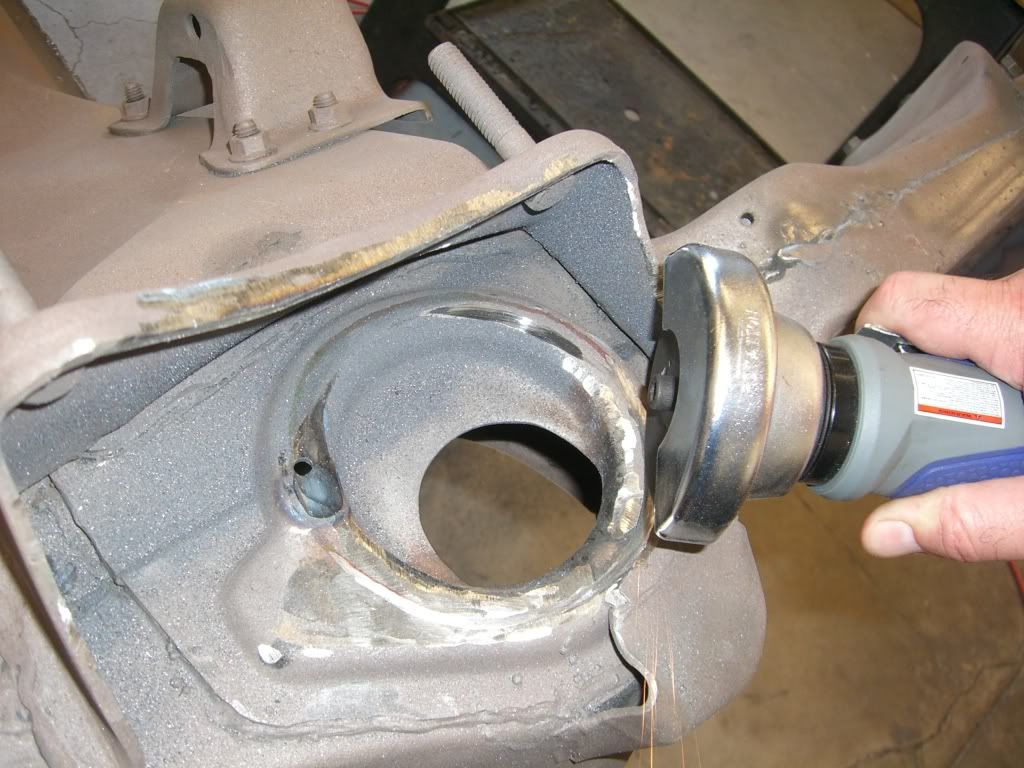
The Craftsman grinder with a 4.5" cuttoff wheel made quick work of the shock mount.


But it does leave a lot of material behind. The lap-welded portion on the subframe arm partially surrounding the spring pocket and the portion still attached to the UCA mount need to be cleaned up.


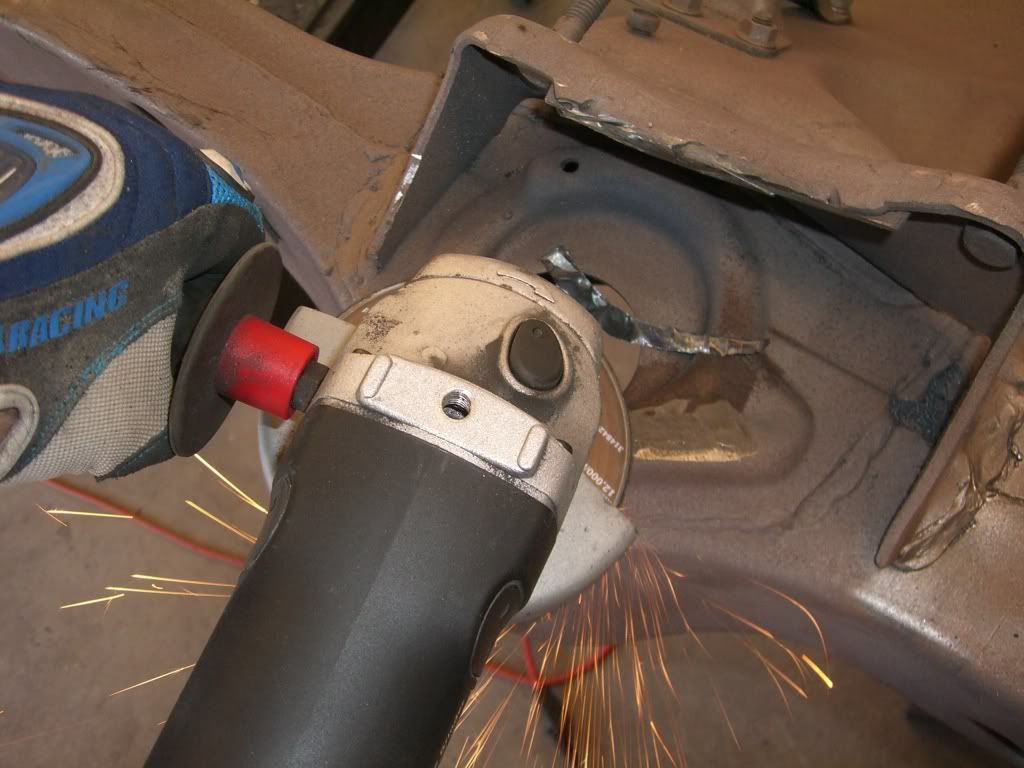
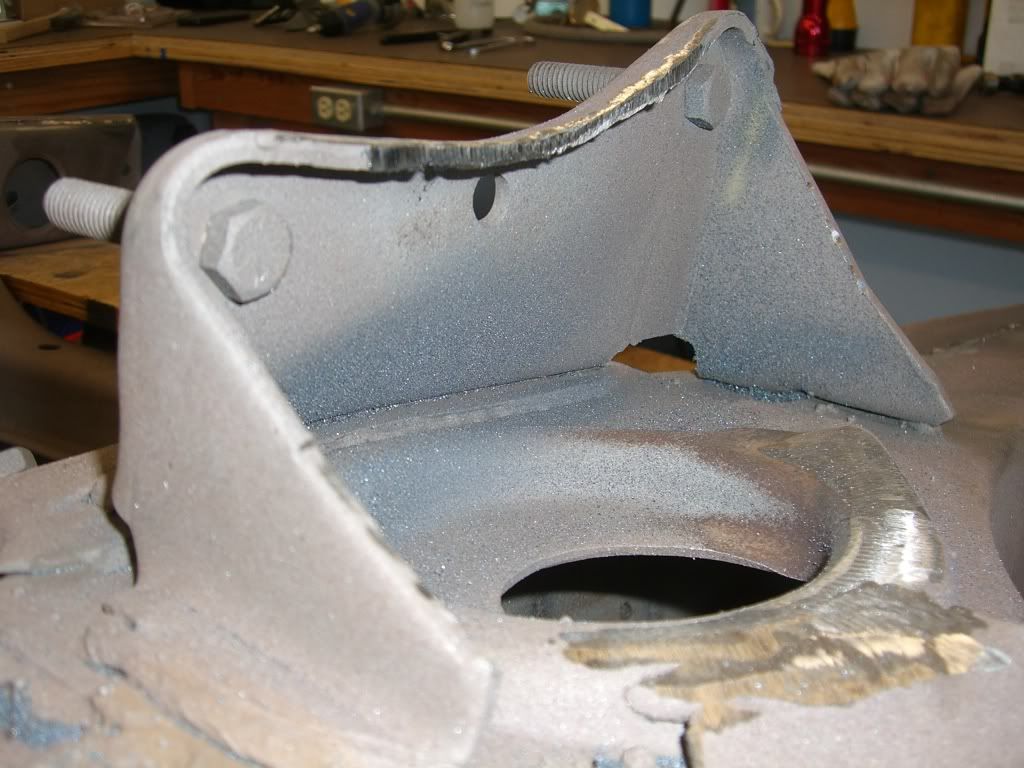
No worries...I am using both hands on the grinder (with eye and ear protection). My wife leaned over my shoulder with the camera to take the photo.

Last edited by Damn True; 11-06-2008 at 01:22 AM.
Reply With Quote
  #49  
Old 11-06-2008, 01:16 AM
Damn True's Avatar
Damn True Damn True is offline
Senior Member
 
Join Date: Sep 2005
Location: San Jose, CA
Posts: 795
Thanks: 0
Thanked 0 Times in 0 Posts
Default

Still grinding away the mess


Getting rid of the last of the junk attached to the UCA mount


.....and finally all cleaned up.


The next step is to remove a portion of the spring pocket. This will open up the top of the subrame and allow enough room for the coilover to pass through to the bracket after we attach it.

You'll need to open this up to roughly 4 inches in diameter. I went a little wider for an extra margin of clearance for the shock/spring. You can see the red line guiding my cut below.


Last edited by Damn True; 11-06-2008 at 01:21 AM.
Reply With Quote
  #50  
Old 11-06-2008, 01:17 AM
Damn True's Avatar
Damn True Damn True is offline
Senior Member
 
Join Date: Sep 2005
Location: San Jose, CA
Posts: 795
Thanks: 0
Thanked 0 Times in 0 Posts
Default

Again I tried the pneumatic cuttoff tool. Again I was dissapointed. So I tried an alternate method. I used the sawzall to take small pie cuts out of the material. Sorta nibbling away at it until the hole was "mostly round" then finished it with a grinder. No pictures of the middle of the process here.......it was ugly. But once cleaned up with the grinder it looks fine.


I also took the time at this point to add a little extra weld to the UCA brackets. Nearly impossible to get that joint in there clean and it's tough to get the torch close enough for good puddle control and see what you are doing. The welds reflect that but they are fully penetrated.....just ugly.

On the other side I decided to try something different to see if the process could be sped up a bit and improve the quality. It involved a slightly more sophisticated tool than the sawzall.


Boy do I like this thing!

Where it took me nearly an hour to cut away the other spring pocket with the sawzall bit by bit, the plasma cutter did the job in about 45 seconds leaving a muuuuuch nicer hole...


Last edited by Damn True; 11-06-2008 at 01:21 AM.
Reply With Quote
Reply


Posting Rules
You may not post new threads
You may not post replies
You may not post attachments
You may not edit your posts

BB code is On
Smilies are On
[IMG] code is On
HTML code is Off

Forum Jump


All times are GMT -7. The time now is 10:33 AM.


Powered by vBulletin® Version 3.8.11
Copyright ©2000 - 2026, vBulletin Solutions Inc.
Copyright Lateral-g.net