...

Go Back   Lateral-g Forums > Lateral-G Open Discussions > Project Updates
User Name
Password


Reply
 
Thread Tools Display Modes
  #41  
Old 10-19-2008, 10:41 AM
fasterpatrick's Avatar
fasterpatrick fasterpatrick is offline
Senior Member
 
Join Date: Oct 2008
Posts: 154
Thanks: 0
Thanked 0 Times in 0 Posts
Default

Well I managed to get a couple more panels finished for the rear of my scratch build, and it's starting to look like something. Now I think I'm getting the hang of this stuff and just to show how and what you have to do sometime.
The mold

The business side is covered with the wounder material ductape.
The layup

Now prying this off the mold was a PITA but it's a weird shape.
Trimmed and refit

It fit back easier after trimming
With friends

Now it looks like progress. I think I will work on the trunk next, until later see ya.
Patrick
Reply With Quote
  #42  
Old 10-19-2008, 10:42 AM
fasterpatrick's Avatar
fasterpatrick fasterpatrick is offline
Senior Member
 
Join Date: Oct 2008
Posts: 154
Thanks: 0
Thanked 0 Times in 0 Posts
Default

Hey, check out my new duct tape trunk!

Naw, It's just the next mold for my glass Odyssey.


Now with a little luck I'll has pieces by Sun. eve;

Patrick
Reply With Quote
  #43  
Old 10-19-2008, 10:43 AM
fasterpatrick's Avatar
fasterpatrick fasterpatrick is offline
Senior Member
 
Join Date: Oct 2008
Posts: 154
Thanks: 0
Thanked 0 Times in 0 Posts
Default

Largest layup to date, today I successfully laid up the trunk for my car and now the shop has to vacated for a while to vent fumes. About 1.5gal of resin and a s*#t-load of mat later this is what I have.


Patrick
Reply With Quote
  #44  
Old 10-19-2008, 10:44 AM
fasterpatrick's Avatar
fasterpatrick fasterpatrick is offline
Senior Member
 
Join Date: Oct 2008
Posts: 154
Thanks: 0
Thanked 0 Times in 0 Posts
Default

Hey, everything worked well and I now have a trunk. pieces all trimmed and refit. now I knew I would have to cut it in half to get it to work but I will fasten them together during final assembly.


Now to move forward. rear cockpit wall, tunnel, and custom dash are left.

Lurkers, I know this thread gets lots of traffic, so speak up good or bad I would love to have your opinions. Plus I don't get out to much so this is as close to contact as I get sometimes.
Patrick
Reply With Quote
  #45  
Old 10-19-2008, 10:45 AM
fasterpatrick's Avatar
fasterpatrick fasterpatrick is offline
Senior Member
 
Join Date: Oct 2008
Posts: 154
Thanks: 0
Thanked 0 Times in 0 Posts
Default

Well one more panel done. Rear cockpit firewall,


Now I have some artistic carving to do, the tunnel and dash are next this is where things are going to slow down a bit.
Patrick
Reply With Quote
  #46  
Old 10-19-2008, 10:46 AM
jst8a5.0's Avatar
jst8a5.0 jst8a5.0 is offline
Senior Member
 
Join Date: Jun 2006
Posts: 276
Thanks: 0
Thanked 0 Times in 0 Posts
Default

You caught me, I was lurking, so now I'll speak up... How did you get the long radius? I saw the tubing bender in the background, but no roller. BTW, what brand is that bender and where did you get it?

Great work, can't wait to see it finished and some vids!

Micah
Reply With Quote
  #47  
Old 10-19-2008, 10:48 AM
fasterpatrick's Avatar
fasterpatrick fasterpatrick is offline
Senior Member
 
Join Date: Oct 2008
Posts: 154
Thanks: 0
Thanked 0 Times in 0 Posts
Default

Hey guys,

I've been busy lately trying out some new things. just a peek at what will be the dash / tunnel cover for the scratch build. now I could never have a stock dash in this car. So as per usual I'm going overboard with a one piece unit that will house all the gauges, switches and whatnot. It is still in it's crude form(lots of sanding required), then I can pull a mold of it to make the final part. I'm still on the fence if I should cover it or paint it to match the car.


Patrick
Reply With Quote
  #48  
Old 10-19-2008, 10:50 AM
fasterpatrick's Avatar
fasterpatrick fasterpatrick is offline
Senior Member
 
Join Date: Oct 2008
Posts: 154
Thanks: 0
Thanked 0 Times in 0 Posts
Default

After a bunch of sanding I am close to final on the dash plug some small holes to fill and edges to finish and I should be able to paint and start waxing the f___ out of it. I just hope that the body isn't this hard to work on.


The rings are for the gauge placement, shifter location, and sanding guides the incomplete ring is where the column goes.
Patrick
Reply With Quote
  #49  
Old 10-19-2008, 10:52 AM
fasterpatrick's Avatar
fasterpatrick fasterpatrick is offline
Senior Member
 
Join Date: Oct 2008
Posts: 154
Thanks: 0
Thanked 0 Times in 0 Posts
Default

Alright I'm only typing this reply once and posting it around, so here's the answers.

Never even thought about the womanly shape, weird. Yes the large gauges are angled slightly toward the driver. Not really a big fan of the carbon fiber look, would love to stretch some fine leather over it. but will probably just cover with something to coordinate with the seats when the are redone. The mold will be three pieces and will have to be done in the car. The plug is built up on the chassis so it will be destroyed after I have molded one from the molds( when I have made the final piece I would like to see if it would fit other cobras as well).

Here's a pic with the fake gauges and seats in the car there is not a lot of space for access so the seats will pop out and the whole piece will lift out and unplug for maintenance.

Patrick
Reply With Quote
  #50  
Old 10-19-2008, 10:55 AM
fasterpatrick's Avatar
fasterpatrick fasterpatrick is offline
Senior Member
 
Join Date: Oct 2008
Posts: 154
Thanks: 0
Thanked 0 Times in 0 Posts
Default

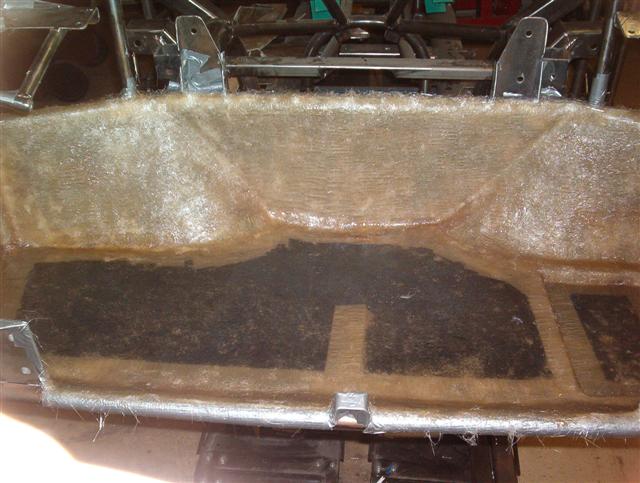
Well, I don't know if it will be worth the effort I put in to it, but I have finally finished that crazy dash of mine. lets see eight weeks, 2 gal. of bondo, six cans of foam, countless hours of sanding, about 1.5 gal of resin, Oh and let's not forget two surgeries and a short hospital stay. but it is done for now, and it fits. Laid up two layers of glass over the plug and pulled it off and the laid three layers from the underside then trimmed.


Well, off to work on something else. Hey any Ideas on what to use to bond the hood, trunk, and doors to the metal frames. I'm thinking that goo they use to bond car panels together what is it called. Patrick
Reply With Quote
Reply


Posting Rules
You may not post new threads
You may not post replies
You may not post attachments
You may not edit your posts

BB code is On
Smilies are On
[IMG] code is On
HTML code is Off

Forum Jump


All times are GMT -7. The time now is 08:02 PM.


Powered by vBulletin® Version 3.8.11
Copyright ©2000 - 2026, vBulletin Solutions Inc.
Copyright Lateral-g.net