...

Go Back   Lateral-g Forums > Lateral-G Open Discussions > Project Updates
User Name
Password


Reply
 
Thread Tools Display Modes
  #71  
Old 01-16-2009, 11:16 AM
rwhite692's Avatar
rwhite692 rwhite692 is offline
Senior Member
 
Join Date: Sep 2004
Location: Tracy, CA
Posts: 1,912
Thanks: 0
Thanked 0 Times in 0 Posts
Default

Looking good! Keep the updates and photos comin'
__________________
______________________________________________
1969 Camaro/ Tom Nelson TT 434 / Wayne Due C5 / DSE QLink / and a bunch of other stuff...

Project update thread here:
https://lateral-g.net/forums/showthread.php4?t=12743

My Lateral-G Page

My Shop Build:

http://www.garagejournal.com/forum/s...ad.php?t=16310
Reply With Quote
  #72  
Old 01-16-2009, 12:43 PM
Damn True's Avatar
Damn True Damn True is offline
Senior Member
 
Join Date: Sep 2005
Location: San Jose, CA
Posts: 795
Thanks: 0
Thanked 0 Times in 0 Posts
Default

Dang....not sure why the images aren't all working.
Reply With Quote
  #73  
Old 01-16-2009, 01:52 PM
mdprovee's Avatar
mdprovee mdprovee is offline
Senior Member
 
Join Date: Jul 2004
Location: Suisun City
Posts: 1,155
Thanks: 0
Thanked 4 Times in 3 Posts
Default

Nice write ups..keep them coming.
__________________
Mike
Reply With Quote
  #74  
Old 01-17-2009, 09:17 AM
awr68's Avatar
awr68 awr68 is offline
Senior Member
 
Join Date: Dec 2004
Location: Oregon
Posts: 6,478
Thanks: 0
Thanked 3 Times in 3 Posts
Default

Awesome progress! Looks like all the hard work and planning is paying off!!
__________________
Tony
'68 Camaro
Reply With Quote
  #75  
Old 01-17-2009, 02:42 PM
Damn True's Avatar
Damn True Damn True is offline
Senior Member
 
Join Date: Sep 2005
Location: San Jose, CA
Posts: 795
Thanks: 0
Thanked 0 Times in 0 Posts
Default

Quote:
Originally Posted by awr68 View Post
Awesome progress! Looks like all the hard work and planning is paying off!!
Thanks. I know the style and the process won't appeal to a lot of people but I'm glad that some folks "get" what I'm doing and have taken interest in the build.
Reply With Quote
  #76  
Old 01-17-2009, 02:46 PM
awr68's Avatar
awr68 awr68 is offline
Senior Member
 
Join Date: Dec 2004
Location: Oregon
Posts: 6,478
Thanks: 0
Thanked 3 Times in 3 Posts
Default

It's also nice to see that you got the ATS pieces while you could as I know you wanted to go with them!

Still sad to hear about ATS!!
__________________
Tony
'68 Camaro
Reply With Quote
  #77  
Old 02-19-2009, 11:07 AM
Damn True's Avatar
Damn True Damn True is offline
Senior Member
 
Join Date: Sep 2005
Location: San Jose, CA
Posts: 795
Thanks: 0
Thanked 0 Times in 0 Posts
Default

Had a couple of requests for progress photos. Again, I am reticent to attempt to fully chronicle the process for installing mini-tubs in a 1st-Gen. It's been done, quite well I might add here: http://www.pro-touring.com/forum/showthread.php?t=46900

That said. This is no easy task. By far the most labor intensive thing I've done thus far. Having the use of a Plasma Cutter is HIGHLY recommended.

Here is the passenger side with the OE tub freshly removed


Getting the decklid hinge bracket out on the pax side was something else. The drivers side was easy with five neat/clean spot welds that were easy to drill out. The Pax side though had a ton of them and they were oddly shaped . Required a fair bit of beating and banging with a chisel to get them out. Some of the welds spaned well over 1/2" and were oblong rather than round. Ugh.


Sneaking up on cutting out the space for the new tub:


I gotta say the instructions for this process are really bad. I mean horrible. DSE really needs to go through this process with someone who is not a member of their staff and rewrite the instructions under the assumption that the person doing the work isn't someone who has done it a dozen times.
Reply With Quote
  #78  
Old 02-19-2009, 11:08 AM
Damn True's Avatar
Damn True Damn True is offline
Senior Member
 
Join Date: Sep 2005
Location: San Jose, CA
Posts: 795
Thanks: 0
Thanked 0 Times in 0 Posts
Default

I really needed to get the plasma cutter back to the guy I borrowed it from (our technical rep from Intel loaned his to me - Thanks Anthony!) so Vince and Allen came by on a Sunday to help me get everything that needed cutting...cut.


Thanks for the help guys!!!

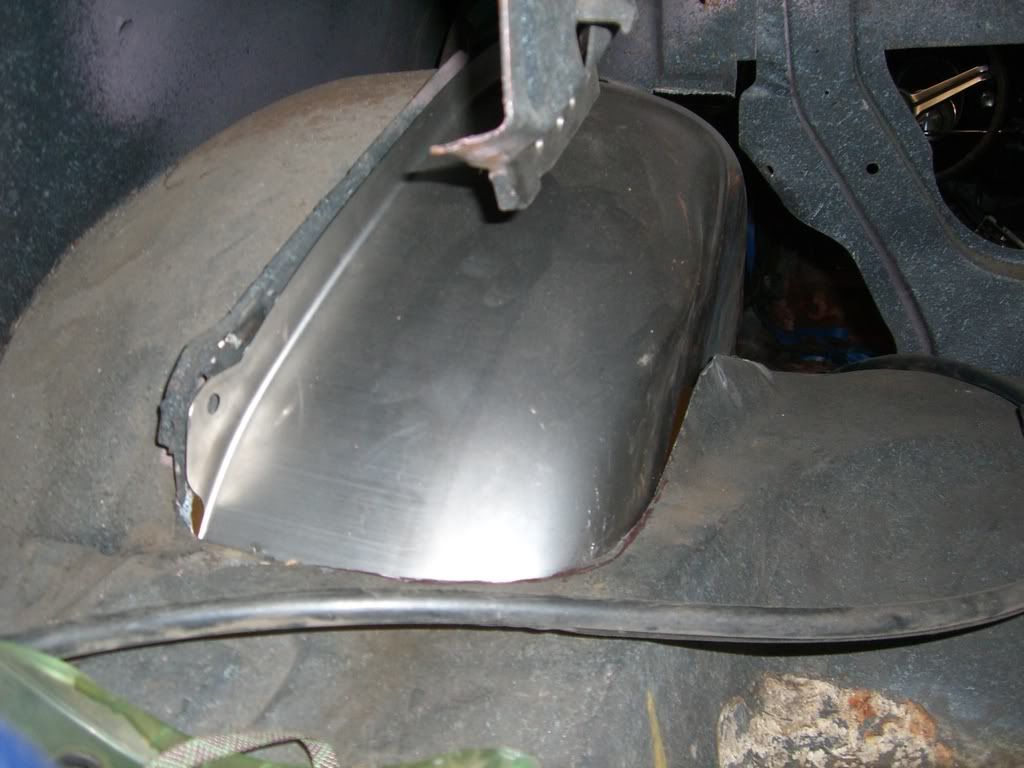
Here is the drivers side tub being "test fit". In this photo I have yet to weld in the fill plate so the gap is a bit wide and the tub is still sitting a little crooked because I've yet to fully grind flush the flange:


Welding in the fwd fill plate on the drivers side:


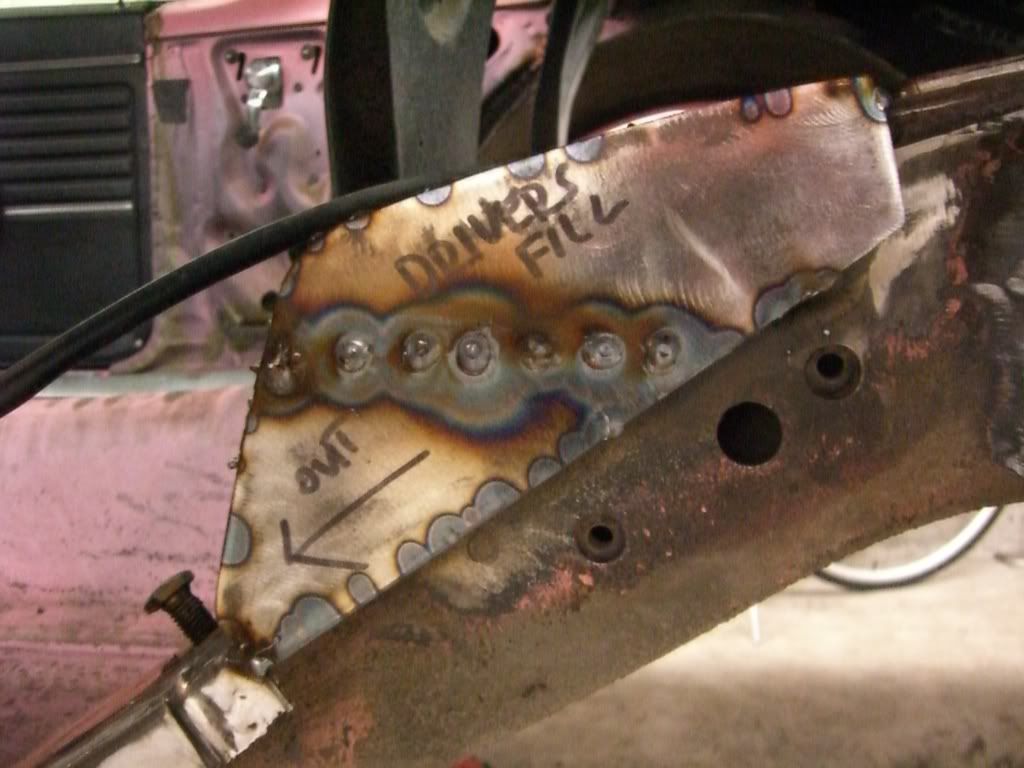
....and the aft plate on the drivers side clamped in place and about 1/2 tacked in:


I've made a bit of progress since these photos were taken. I'll snap a few more tonight. Progress has been a bit slow of late. Work has been busy (beats the alternative) and my wife and I have had a lot going on as well. I hope to be able to wrap the tubs up within the next couple of weeks and then move on to cleaning all the undercoating off the bottom of the car in preparation for starting on the 3-link install. Though I may re-hang the front sheetmetal first. Not sure...
Reply With Quote
  #79  
Old 02-19-2009, 12:15 PM
Damn True's Avatar
Damn True Damn True is offline
Senior Member
 
Join Date: Sep 2005
Location: San Jose, CA
Posts: 795
Thanks: 0
Thanked 0 Times in 0 Posts
Default

Well now....this is a really fun surprise:


Reply With Quote
  #80  
Old 02-19-2009, 02:57 PM
mdprovee's Avatar
mdprovee mdprovee is offline
Senior Member
 
Join Date: Jul 2004
Location: Suisun City
Posts: 1,155
Thanks: 0
Thanked 4 Times in 3 Posts
Default

Pretty cool!!
__________________
Mike
Reply With Quote
Reply


Posting Rules
You may not post new threads
You may not post replies
You may not post attachments
You may not edit your posts

BB code is On
Smilies are On
[IMG] code is On
HTML code is Off

Forum Jump


All times are GMT -7. The time now is 09:25 AM.


Powered by vBulletin® Version 3.8.11
Copyright ©2000 - 2026, vBulletin Solutions Inc.
Copyright Lateral-g.net