...

Go Back   Lateral-g Forums > Lateral-G Open Discussions > Project Updates
User Name
Password


Reply
 
Thread Tools Display Modes
  #1  
Old 06-04-2014, 11:35 PM
WSSix WSSix is offline
Lateral-g Supporting Member
 
Join Date: Nov 2008
Location: Dunwoody, GA
Posts: 6,473
Thanks: 1,016
Thanked 706 Times in 551 Posts
Default The panty dropper

And now that I have your attention, I'd like to finally make my official Lat-G project thread for my TA. I honestly don't have a name for the car. I thought about Fuc king Fantastic Flying Fireturd but figured that was too much alliteration. Feel free to come up with a name if you feel so inclined. I'm terrible about coming up with names. Just ask my cat. Her name is Mouse. Who does that?

For a little back ground on the car and the previous work I've already done, like swapping in the LT1/T56 combo, you'll need to go here http://www.pro-touring.com/threads/5...d-so-it-begins .

Since then, I haven't done much of anything other than bring the car out to Kansas from Georgia. I finally decided to go ahead and start working on the car again. I decided I would focus on the suspension since the drive train was basically sorted out and the car could move under its own power. I'll get back to the engine and making more power later one.

With that in mind, I decided I would take incremental steps with the suspension build instead of jumping right in feet first. I realize this may ultimately take more time and money but, seriously, who's counting? In being completely honest with myself, I realize the need for me to go all out on a DSE or SpeedTech set up at this point would be overkill. Maybe I'll be able to utilize the Qlink or TA suspension one day but it won't be anytime soon I don't think. I also have other goals in my life that require money. So anyway, I called Keith at Custom Works and decided to go with composite leaf springs and HD shackles in the rear. Upfront, I went with Keith's coil over kit and SpeedTech UCAs. I decided on the coil overs because I figure I'll be making changes throughout the build that could affect ride height so I might as well do these now and they will surely work for me in the future also. I have no plans to ever change the front subframe on this car. I also went with Keith's 2G frame brace that welds to the frame in front of the sway bar. A must for these cars are front engine bar bars. I chose Pro-Touring F-Body's Pro-G braces and cowl brace. I wanted the adjustability these offered over the fixed design. Here's everything as it arrived along with the Hobart Handler 140 I bought to do all the work with.


I knew I was going to need the car up off the ground to do all the work safely. I decided to build cribbing/DSE stands. I need to get a better higher rise and lower profile jack to get the car all the way up. I still have one more level I could add to the cribbing with the wood I already have cut. Suggestions welcome on a quality jack that doesn't cost a ridiculous amount. For now, this will have to do


I didn't take any pictures of the installation of the frame brace or Pro-G braces. It's pretty straight forward though. I went ahead and cut the fender mount point at the firewall a little so that the brace would bolt directly to the fender and firewall. I didn't want to stack up a bunch of washers to make it work. Here's the front end bracing all in place. I didn't take a picture of the 2G frame bar. My welds on it are terrible looking. It'll hold but it's not pretty.


I originally bought subframe connectors from Keith with every intention of using them because I didn't want to cut the floor up. However, after looking at it and thinking about it, I said to hell with it and decided to just go with DSE style connectors. Keith's connectors are perfectly fine. I just always planned on going through the floor originally and decided to stay with that plan. So I got under the car and started really looking and planning out my moves. It's taken me a long time to get these done. The first one, driver's side, took me weeks of planning and building. I'd never done anything like this before so I wasn't going to just through caution to the wind and start cutting. Admittedly, my attitude was I can always replace the floors if I manage to really screw this up. Either that or Mike's in OKC and Scott's in NE Kansas. I can always call them to save the car if needed, lol.

First thing I had to do though was square up the driver's side subframe end. In order to allow the foot brake cable to pass, a crease was put in the end from the factory. I had to cut that out and build a new end so I could build the SFC brackets off of it properly. Here's what it looked like cut and after the end was tacked on.


During the cutting process, I found that the rear frame rail wasn't welded to the floor properly. DSE mentions this in their installation instructions even. I went ahead and put a C-clamp in there, squeezed the floor back, and tacked it in place. Gotta love that 70s American build quality. If I ever get this car on a rotisserie, I'm going to fully weld the rear frame rail to the floor on the inside of the rail. There appears to be plenty of places it's not together completely. It's that way on both side of the car.


Here's a short interlude to a picture I find cool. My ground wire caused the metal shavings to align along the magnetic field that's created due to the current running through the wire while welding.


Ok, back to the build. Here's the driver's side subframe connector all done.
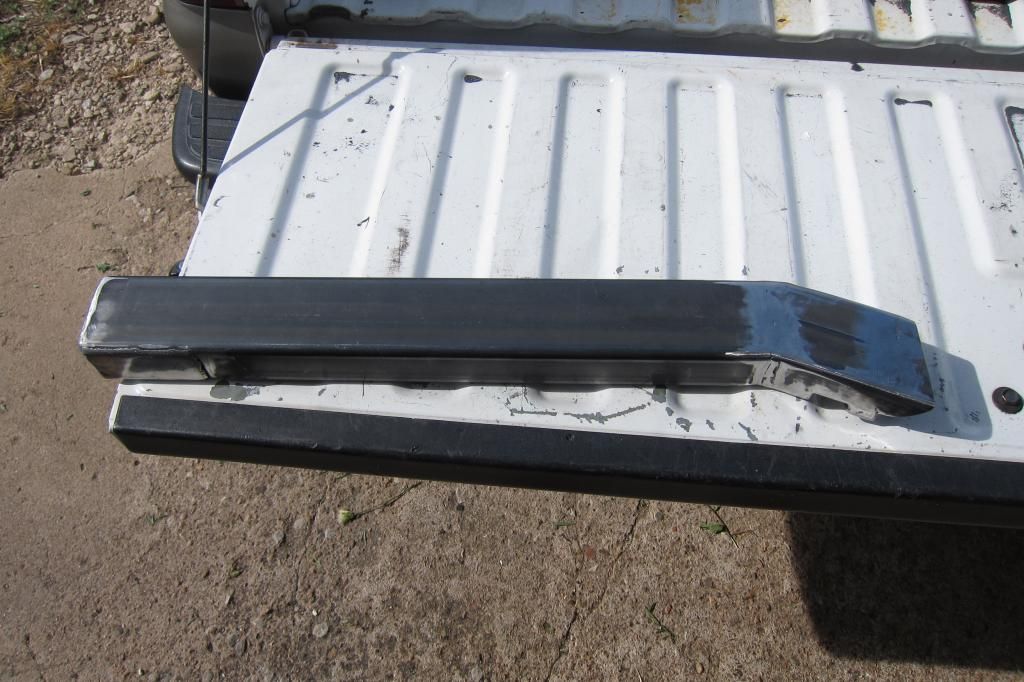


Vince showed me what he had done to a car using DSE SFC's and routing the fuel and brake lines in the factory manner. I decided that was a great idea so I copied it. Thanks, Vince!


Here's the SFC tacked in place. It angles up slightly as it goes from front to rear. I'm not sure if DSE has their design do the same thing. I wanted the connector to meet the rear rail and be flush across the bottom. I thought this would be a clean way to connect everything together.


It does cause the connector to come way up into the floor but I'll most likely never have someone sitting in the back of the car. I'm seriously thinking about mot even putting the rear seats back in the car.
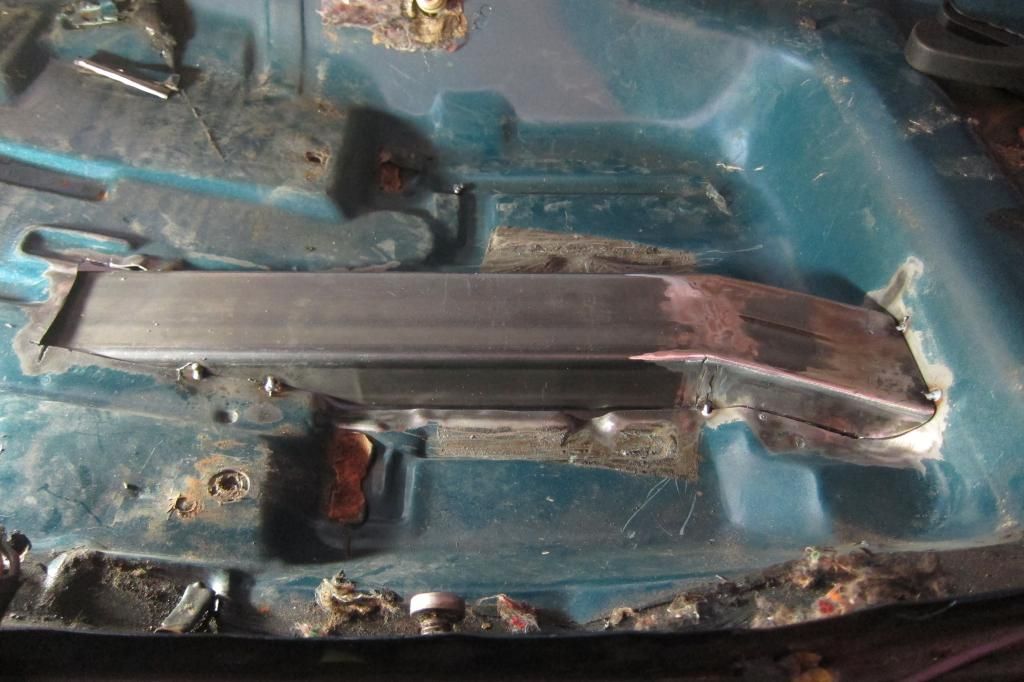


Here's the pass through for the brake and fuel line. This worked out really well.


Like I said, it took me weeks to get the one to that point. I still have to finish welding it in place fully. I've got some bigger than I had hoped for gaps that I need to weld up too. I've got some ideas on how to accomplish that though. It'll just take time and practice. I already have the brackets that join the front subframe and connector together done also. I left everything simply tacked until I could verify I did it correctly by getting the passenger side one done in the same manner.

At this point, I have the passenger side one completed. It only took me a fraction of the time since I knew how I wanted to do it. It's tacked in place and awaiting the front brackets yet. I'll get to it and get pictures taken soon. If I had to do it again, I'd just buy the DSE connectors. Sure, I only spent $40 on a 8 foot section of steel tubing but I spent a lot of time building these. It's given me a chance to really work on my welding skills which have greatly improved though. I've got a long way to go until I really like my welds, but I'm getting there. Luckily, this isn't a show car.

That's it for now. Progress will be slow but it'll occur. Maybe.

Thanks
__________________
Trey

Current rides: 2000 BMW 540i/6 and 86 C10.

Former ride: 1979 Trans Am WS6: LT1/T56, Kore 3 C5/6 brakes, BMW 18in rims

Last edited by WSSix; 12-30-2014 at 11:49 PM.
Reply With Quote
The Following User Says Thank You to WSSix For This Useful Post:
syborg tt (12-27-2020)
  #2  
Old 06-04-2014, 11:43 PM
glassman's Avatar
glassman glassman is offline
Lateral-g Supporting Member
 
Join Date: Apr 2012
Location: Livermore
Posts: 2,466
Thanks: 111
Thanked 84 Times in 62 Posts
Default

Dude, finally!!! Not on the work your doing, but getting the build over here lol.
I'd say call it "4F".....4 for the win?

Nice to see you tearing that beotch up. you'll be tearing it up before ya know it.....

Seriously though, good luck with it all and i'll be watchin ya
__________________
Mike
Reply With Quote
  #3  
Old 06-05-2014, 12:39 AM
intocarss's Avatar
intocarss intocarss is offline
Senior Member
 
Join Date: Aug 2011
Location: So Cal in the Sfv
Posts: 4,257
Thanks: 0
Thanked 0 Times in 0 Posts
Default

Fooled again
__________________
If it ain't buckin, chirpin & makin all kinds of bad noises, then I ain't happy

Accelerating is optional...........stopping is mandatory. Your car WILL stop one way or another.
Reply With Quote
  #4  
Old 06-05-2014, 12:46 AM
Vince@Meanstreets's Avatar
Vince@Meanstreets Vince@Meanstreets is offline
Senior Member
 
Join Date: Nov 2004
Location: Bay Area, California
Posts: 5,532
Thanks: 13
Thanked 18 Times in 12 Posts
Default

Looking good Trey!!!!

On the floor pan sheet metal to connectors, weld the top and seam seal the bottom....looks much cleaner.
__________________
MEANSTREETS PERFORMANCE

Dealer for
ACCUAIR rideheight control systems
ENTROPY RADIATORS XXX radiators for your pro-touring vehicle
FORGELINE MOTORSPORTS Highline custom 3 piece wheels
WEGNER AUTOMOTIVE Custom engines and LSX drive systems
SPEEDTECH PERFORMANCE Bay Area stocking dealer

NEVER FORGET -11
Reply With Quote
  #5  
Old 06-05-2014, 08:26 AM
WSSix WSSix is offline
Lateral-g Supporting Member
 
Join Date: Nov 2008
Location: Dunwoody, GA
Posts: 6,473
Thanks: 1,016
Thanked 706 Times in 551 Posts
Default

That's a good idea, Vince. I'll look into it. Thanks.

Last night while laying in bed, I remembered I had the parking brake cables here. I need to figure out how I want to route them before I weld the driver's connector in fully in case I need to pass through it as well. I should have time to take a look at it today.
__________________
Trey

Current rides: 2000 BMW 540i/6 and 86 C10.

Former ride: 1979 Trans Am WS6: LT1/T56, Kore 3 C5/6 brakes, BMW 18in rims
Reply With Quote
  #6  
Old 06-05-2014, 10:37 AM
Che70velle's Avatar
Che70velle Che70velle is offline
Senior Member
 
Join Date: Aug 2012
Location: Dawsonville Georgia
Posts: 2,243
Thanks: 628
Thanked 169 Times in 114 Posts
Default

That looks great Trey. Keep at it!
__________________
Scott
---------------------------------------------------------------
70 velle' on custom chassis w/custom RideTech coilovers, RED sleeved 434” with Mamo 265’s, F-body Magnum, 12 bolt 3:73, wilwood 6/4's, bla, bla, bla...build. thread https://lateral-g.net/forums/showthread.php4?t=39631
New 434” engine build here https://ls1tech.com/forums/generatio...ved-block.html

Thanks Dad!!

My Chevelle is old school... It has a belt driven power steering pump.
They're 17's, but I keep em clean!
Reply With Quote
  #7  
Old 06-05-2014, 11:51 AM
NOT A TA's Avatar
NOT A TA NOT A TA is offline
Senior Member
 
Join Date: Mar 2007
Location: South Florida
Posts: 671
Thanks: 6
Thanked 25 Times in 23 Posts
Default

I knew I was going to need the car up off the ground to do all the work safely. I decided to build cribbing/DSE stands. I need to get a better higher rise and lower profile jack to get the car all the way up. I still have one more level I could add to the cribbing with the wood I already have cut. Suggestions welcome on a quality jack that doesn't cost a ridiculous amount. For now, this will have to do

Looks like you're moving along! Here's how I get the car up high enough to get it on tall crib stacks.

__________________
John Paige

70 Firebird Esprit, 400 TA clone type "The 14 car"
lab-14.com
Reply With Quote
  #8  
Old 06-05-2014, 01:45 PM
WSSix WSSix is offline
Lateral-g Supporting Member
 
Join Date: Nov 2008
Location: Dunwoody, GA
Posts: 6,473
Thanks: 1,016
Thanked 706 Times in 551 Posts
Default

Thanks Scott.

Thanks John. How do you like that Craftsman jack? It's pretty low profile like it'll fit under our front subframes fine. Does it?
__________________
Trey

Current rides: 2000 BMW 540i/6 and 86 C10.

Former ride: 1979 Trans Am WS6: LT1/T56, Kore 3 C5/6 brakes, BMW 18in rims
Reply With Quote
  #9  
Old 06-05-2014, 02:22 PM
jarhead's Avatar
jarhead jarhead is offline
Senior Member
 
Join Date: Dec 2011
Location: Colorado, in a van down by the river
Posts: 1,251
Thanks: 828
Thanked 272 Times in 163 Posts
Default

I too am glad you brought your build over here to share, I am on way too many forums as it is to sign up for one more, lol.

Man I am going to steal this some day

__________________
joe
Semper Fi

My 68 Torino
Reply With Quote
The Following User Says Thank You to jarhead For This Useful Post:
syborg tt (12-27-2020)
  #10  
Old 06-05-2014, 02:39 PM
Vince@Meanstreets's Avatar
Vince@Meanstreets Vince@Meanstreets is offline
Senior Member
 
Join Date: Nov 2004
Location: Bay Area, California
Posts: 5,532
Thanks: 13
Thanked 18 Times in 12 Posts
Default

Quote:
Originally Posted by WSSix View Post
That's a good idea, Vince. I'll look into it. Thanks.

Last night while laying in bed, I remembered I had the parking brake cables here. I need to figure out how I want to route them before I weld the driver's connector in fully in case I need to pass through it as well. I should have time to take a look at it today.
You can still use the factory pass through...just have to remember not to weld it closed.
I picked this Jack up last year to replace my broken Snap-on. My $430 Snap-on Jack mind you. I could have bought 3 and just toss when they break. When I was shopping I found most affordable where made over seas anyways. No way I am paying more than 300 for a jack with the spec I need.

http://www.harborfreight.com/3-ton-l...ump-61253.html
__________________
MEANSTREETS PERFORMANCE

Dealer for
ACCUAIR rideheight control systems
ENTROPY RADIATORS XXX radiators for your pro-touring vehicle
FORGELINE MOTORSPORTS Highline custom 3 piece wheels
WEGNER AUTOMOTIVE Custom engines and LSX drive systems
SPEEDTECH PERFORMANCE Bay Area stocking dealer

NEVER FORGET -11
Reply With Quote
Reply


Posting Rules
You may not post new threads
You may not post replies
You may not post attachments
You may not edit your posts

BB code is On
Smilies are On
[IMG] code is On
HTML code is Off

Forum Jump


All times are GMT -5. The time now is 07:59 AM.


Powered by vBulletin® Version 3.8.11
Copyright ©2000 - 2024, vBulletin Solutions Inc.
Copyright Lateral-g.net