...

Go Back   Lateral-g Forums > Lateral-G Open Discussions > Project Updates
User Name
Password


Reply
 
Thread Tools Display Modes
  #1  
Old 04-25-2020, 09:44 PM
CanyonRider CanyonRider is offline
Junior Member
 
Join Date: Sep 2014
Location: Wake Forest, NC
Posts: 17
Thanks: 3
Thanked 15 Times in 8 Posts
Default 67 Firebird - Project start date 1981

Yes, it was May 1981. I was 16yrs old - car shopping with $500 in my pocket. I found a early 70s Torino with a 351, 4-spd that had been hit in the front and needed a grill and fender. The guy wanted $500 – I passed – I would live to regret that decision. Then I found a 67 Firebird that a father/son team had started restoring. They got as far as taking it apart. It didn’t run, the interior was in boxes, it was multi-color primer. They assured me it was all there, the engine ran and it was a solid car – they wanted $300 – delivered. I bought it. I have been known to say MANY times since that fateful day that I had over paid for the car. Haha!

It took me most of that summer to put it back together and get it running, but by the first day of my senior year of HS, here it was!


Notice the sheepskin on the rear package tray and the black euro side mirror my girlfriend bought for me.

After 20 years of use, abuse, autocrossing, breaking and fixing, I parked it where it sat another 20yrs – until last week. I dragged it out of the barn and pushed it up onto the lift. So here she is – needing A LOT of attention.


I don’t have a long build sheet that I’ve been dreaming up for years. I don’t really have much of a plan nor a set budget. Almost certainly the worst possible way to start a project - but have built a few cars and I know myself pretty well and I know what keeps me motivated. I like to get a car running, drive it, maybe track it, then work on it for a couple months, then drive it some more – rinse and repeat. This is clearly not the most efficient way to get to the final destination, but I know I can’t spend years working on a project without driving and enjoying it. Driving the car and taking it to the track motivates me to keep working on it and inspires me with new ideas. So I’ll preface this build with – You probably shouldn’t do it this way, but we’re gonna have a good time!

The first order of business is to drop the tank, rearend and rear suspension. We have some structural issues to address.


Stay tuned!
CR
__________________
My intuition nearly makes up for my lack of judgement.
Reply With Quote
The Following User Says Thank You to CanyonRider For This Useful Post:
WILWAXU (04-26-2020)
  #2  
Old 04-26-2020, 05:16 PM
CanyonRider CanyonRider is offline
Junior Member
 
Join Date: Sep 2014
Location: Wake Forest, NC
Posts: 17
Thanks: 3
Thanked 15 Times in 8 Posts
Default

It was a perfect day to work in the shop with the doors open! I removed the fuel tank. I believe this is about the only thing I have never removed before on this car. A look inside yielded a pleasant surprise – there was only about a quart of old gas in it and most of the tank looks pretty shiny and clean. I had assumed I’d be replacing it but looks like it will clean up nicely!
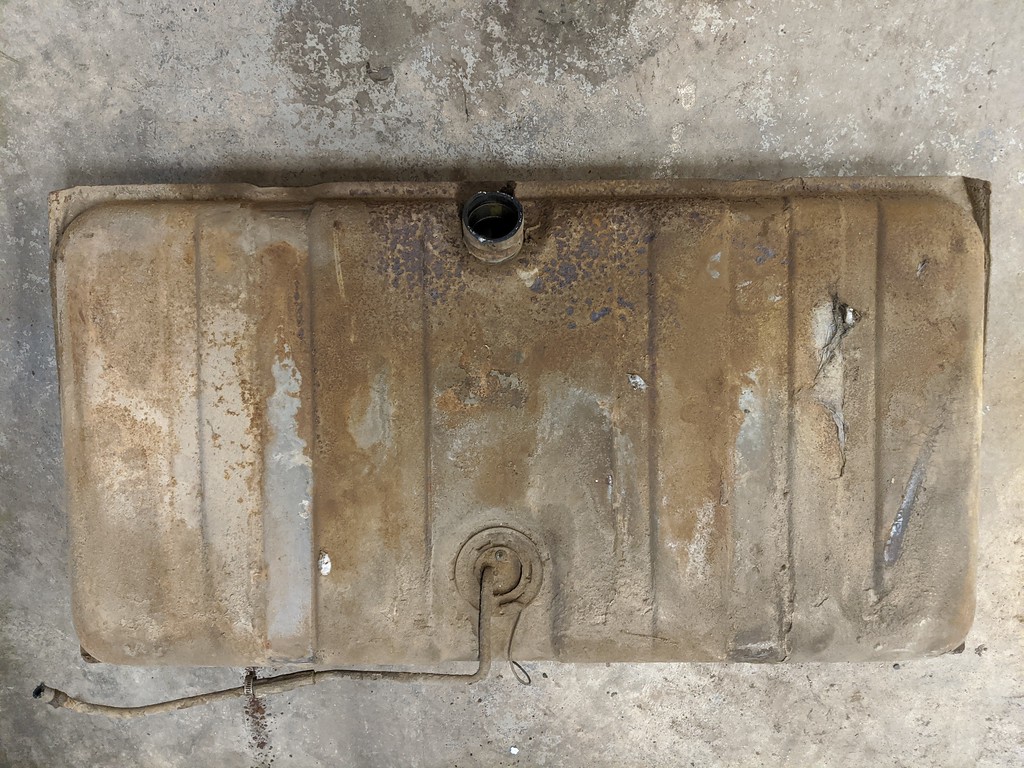


The trunk floor appears to be quite solid.


Next was dropping the rearend. It’s an original Pontiac unit with a worn out posi and factory dual traction bars – I always thought this was very cool! It also has a VSE, Herb Adams, rear swaybar that I installed back in the 90s. Everything came apart pretty well – only one clip-on captive nut that I had to cut off.
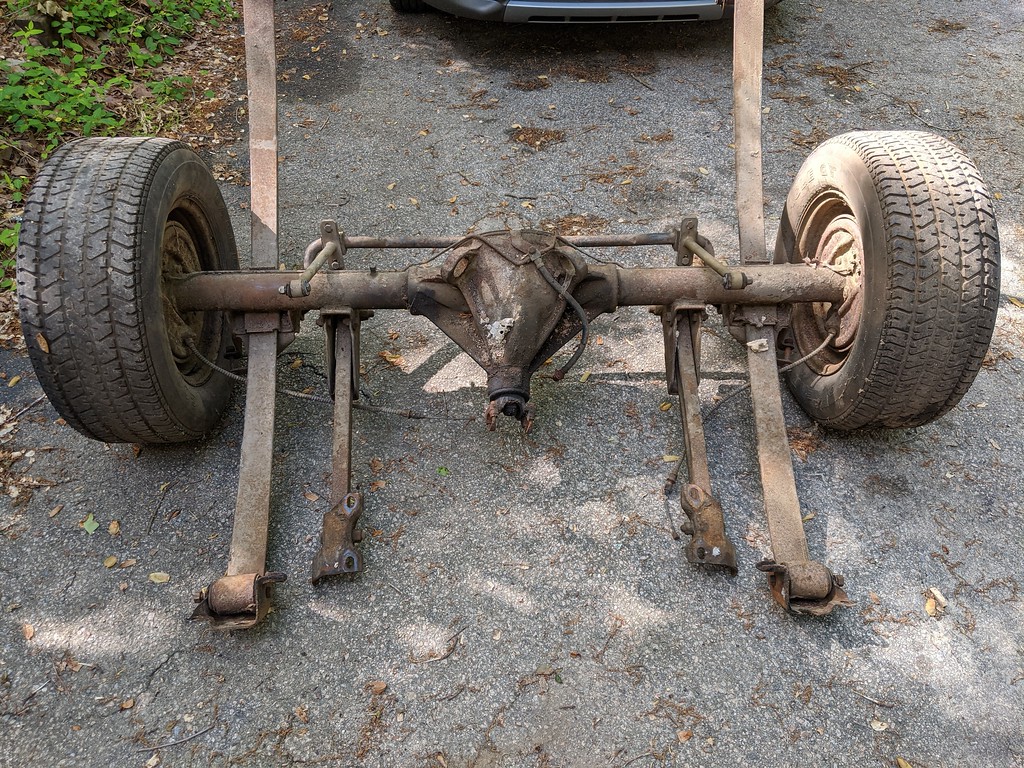


I mentioned structural issues. Back in 1981, being a youngster, I didn’t know what to look for when buying a 12yr old muscle car and there was no Carfax or Internet back then, so it wasn’t long after I owned it that I discovered it had been hit pretty hard in the rear. The rear valance had a ˝ inch of bondo on it, the rear frame rails were kinked and cracked and as I learned today, the fuel tank support structure is pretty F’ed up too.


Passenger side frame rail


You can see when I installed the swaybar brackets, it took a stack of washers because the frame rail was so deformed.

Driver side


Passenger side tank support - notice it is pulled down from the trunk floor.


Driver side - notice the deformation of the floor.


So yeah, we got that going for us!

Next steps will be to remove the shocks and swaybar brackets and begin the fun known as – wait for it – cleaning and degreasing!

More to come!
CR
__________________
My intuition nearly makes up for my lack of judgement.
Reply With Quote
The Following 2 Users Say Thank You to CanyonRider For This Useful Post:
Roscoe03 (04-26-2020), WILWAXU (04-26-2020)
  #3  
Old 04-26-2020, 11:06 PM
Spiffav8's Avatar
Spiffav8 Spiffav8 is offline
Lateral-g Moderator
 
Join Date: Apr 2007
Location: Las Vegas, NV
Posts: 4,736
Thanks: 567
Thanked 451 Times in 215 Posts
Default

Oh this is going to be epic.
__________________
Curtis
Pilots: We're not better than you, just way cooler.

NO ONE IS COMING. IT'S UP TO US.

http://www.navysealfoundation.org/
Reply With Quote
  #4  
Old 04-26-2020, 11:56 PM
andrewb70's Avatar
andrewb70 andrewb70 is offline
Lateral-g Supporting Vendor
 
Join Date: Jul 2005
Posts: 904
Thanks: 242
Thanked 561 Times in 237 Posts
Default

In for updates!

Andrew
__________________
Instagram @dr__efi
I offer remote Holley EFI tuning.
I deliver what EFI promises.
Please get in touch if I can be of service.
My YouTube Channel
Reply With Quote
  #5  
Old 04-27-2020, 10:13 AM
shelteredV's Avatar
shelteredV shelteredV is offline
Lateral-g Supporting Member
 
Join Date: Feb 2018
Location: Way East L.I.
Posts: 139
Thanks: 46
Thanked 44 Times in 33 Posts
Default

I smirked at the can-do attitude of shimming the sway bar mounts out away from the crumpled frame. You are certainly going to have some fun with this and have a sweet ride when you're done! Keep it coming-
Reply With Quote
  #6  
Old 04-28-2020, 08:12 PM
CanyonRider CanyonRider is offline
Junior Member
 
Join Date: Sep 2014
Location: Wake Forest, NC
Posts: 17
Thanks: 3
Thanked 15 Times in 8 Posts
Default

Spent an hour making a tram gauge and studying the Fisher Body manual.


Don't look at my welds! I was like, "WTF!?" Then realized I forgot to turn on the gas. Dooh!! Look away - it's hideous! Haha!


Did a few calcs to setup the gauge and a quick measurement looks like H, I and f are about a half inch off. I have more measuring to do after I get it cleaned up and ready for some tugging.

Stay tuned!
CR
__________________
My intuition nearly makes up for my lack of judgement.
Reply With Quote
The Following 2 Users Say Thank You to CanyonRider For This Useful Post:
dhutton (04-28-2020), Roscoe03 (04-29-2020)
  #7  
Old 04-29-2020, 02:42 PM
CanyonRider CanyonRider is offline
Junior Member
 
Join Date: Sep 2014
Location: Wake Forest, NC
Posts: 17
Thanks: 3
Thanked 15 Times in 8 Posts
Default

If you're going to degrease and pressure wash your car inside the garage, it's best to wait until the wife is out of the house. Haha!


After:


The frame rail damage really isn't that bad - I've definitely seen worse.


Still some cleaning to do. Then we'll be putting the porta-power to it.

More to come!
CR
__________________
My intuition nearly makes up for my lack of judgement.
Reply With Quote
  #8  
Old 05-03-2020, 11:05 AM
CanyonRider CanyonRider is offline
Junior Member
 
Join Date: Sep 2014
Location: Wake Forest, NC
Posts: 17
Thanks: 3
Thanked 15 Times in 8 Posts
Default

So we got the laser level setup so we could take some accurate measurements.


Clearly my lift is not level. Haha! I shimmed the jack stands so the car IS level. Then started taking measurements.
The elevation difference f-d is dead on at 8-3/4"
The width J at the back of the rails is 42-5/8" about a 1/4" too narrow
The width G at the front of the rails is dead on at 33-1/2"
The diagonals I match at 66-5/8" about 1/16" short
The length H from the front of the rails to back is 55" about 1/4" short on both sides

Not as bad as I thought. My plan it to slice the rails where the kink damage is and stretch them back a 1/4".

More to come!
CR
__________________
My intuition nearly makes up for my lack of judgement.

Last edited by CanyonRider; 05-03-2020 at 12:46 PM.
Reply With Quote
The Following 2 Users Say Thank You to CanyonRider For This Useful Post:
dhutton (05-03-2020), WILWAXU (05-04-2020)
  #9  
Old 05-03-2020, 12:27 PM
rustomatic rustomatic is offline
Senior Member
 
Join Date: Apr 2014
Location: ATL
Posts: 748
Thanks: 11
Thanked 58 Times in 36 Posts
Default

Cool project! I had a '68 back in the early '90s, with a 400. It really could have used those traction bars, but then again, tires back then offered much less grip . . .

Here's to continued progress!
Reply With Quote
  #10  
Old 05-07-2020, 09:52 AM
CanyonRider CanyonRider is offline
Junior Member
 
Join Date: Sep 2014
Location: Wake Forest, NC
Posts: 17
Thanks: 3
Thanked 15 Times in 8 Posts
Default

So I'm debating what to do about the rear axle. The stock unit is a 10-bolt, 8.2", BOP, UW-axle code meaning 3.55 & LSD. Not exactly a desirable unit. At one point, I had a Chevy 10-bolt I thought I might build for it but I ended up selling that unit. I have a 9" Ford with a Detroit Truetrac that I built for another project, but it is 1-1/4" wider and has no brakes setup on it - I don't recall the gear ratio - 3.55 or 3.70 something like that. I have an extra pair of monoleaf spring perches. I also have a set of adjustable Koni shocks (NIB) for the stock suspension.


The primary use of this car will be Autocross, HPDE and some daily driving. I have no expectations that the car will be remotely competitive - just fun to drive.

Option 1:
Rebuild the stock unit, install a new LSD, buy new springs, use the Konis and call it a day. $

Option 2:
Weld perches on the 9", buy new springs, use the Konis, have a driveshaft made, buy a brake setup, figure out the proper wheel offset and what will fit, deal with different bolt patterns front vs rear, etc. $$

I'm trying not to overspend on this project which is very easy to do - although I haven't defined what overspend means. I just know this is not a premium example of a desirable car - translation: it will never be worth what is spent on it.

Leaning towards Option 1. Thoughts?
CR
__________________
My intuition nearly makes up for my lack of judgement.
Reply With Quote
Reply


Posting Rules
You may not post new threads
You may not post replies
You may not post attachments
You may not edit your posts

BB code is On
Smilies are On
[IMG] code is On
HTML code is Off

Forum Jump


All times are GMT -5. The time now is 08:29 PM.


Powered by vBulletin® Version 3.8.11
Copyright ©2000 - 2024, vBulletin Solutions Inc.
Copyright Lateral-g.net