...

Go Back   Lateral-g Forums > Lateral-G Open Discussions > Project Updates
User Name
Password


Reply
 
Thread Tools Display Modes
  #81  
Old 01-03-2015, 07:34 AM
wiedemab's Avatar
wiedemab wiedemab is offline
Senior Member
 
Join Date: Oct 2005
Location: Batesville, IN
Posts: 1,475
Thanks: 0
Thanked 7 Times in 3 Posts
Default

Quote:
Originally Posted by Ketzer View Post
I was doing my minitub install on a finished paint car. Here's a tip, If you are tapping down the flanges as you weld with a body hammer.... don't let it glance off and smack the inside of the quarter... I just put everything down, climbed out of the trunk, turned off the lights, didn't go back for two days.


Jeff-
Yeah - -that would ruin your day............
__________________
__________________
Brandon Wiedeman
'72 Suburban
'67 Chevy II -
https://lateral-g.net/forums/showthread.php4?t=46846

I have about 3 lifetimes worth of projects planned out in my head!
Reply With Quote
  #82  
Old 01-28-2015, 10:07 AM
tommycomfort's Avatar
tommycomfort tommycomfort is offline
Senior Member
 
Join Date: Oct 2009
Location: Mooresville, Indiana
Posts: 229
Thanks: 4
Thanked 0 Times in 0 Posts
Default

Can't believe that I haven't been subscribed to this from the start! Am now!
__________________
Tom Farrington
66 Chevelle hardtop (ours) http://www.pro-touring.com/showthrea...PT-build-(ours)
64 Chevelle 4-dr wagon (wife's) http://www.pro-touring.com/showthrea...HAUL-LONG-ROOF
The new shop build https://lateral-g.net/forums/showthread.php4?t=42857
Reply With Quote
  #83  
Old 01-28-2015, 11:36 AM
wiedemab's Avatar
wiedemab wiedemab is offline
Senior Member
 
Join Date: Oct 2005
Location: Batesville, IN
Posts: 1,475
Thanks: 0
Thanked 7 Times in 3 Posts
Default

Tom - now that I know you're watching...I'll get back to work on it!!

I have a few more update pics to get posted - I'll try to do so this week. Nothing major, but little bits of progress.

I also bought a big pile of 4130. I may try to build some components of the cage prior to putting sheet metal back on to allow for easier access for welding.
__________________
__________________
Brandon Wiedeman
'72 Suburban
'67 Chevy II -
https://lateral-g.net/forums/showthread.php4?t=46846

I have about 3 lifetimes worth of projects planned out in my head!
Reply With Quote
  #84  
Old 02-15-2015, 08:55 PM
wiedemab's Avatar
wiedemab wiedemab is offline
Senior Member
 
Join Date: Oct 2005
Location: Batesville, IN
Posts: 1,475
Thanks: 0
Thanked 7 Times in 3 Posts
Default Finally and update!

Got the tubs all final welded and then put them in SPI epoxy. I taped off the areas that will be welded and used weld-thru (I missed a few though and had to grind the primer back off later before welding the quarters on!


Measured the off the centerline and used my laser to locate from. Kind of neat when it all lined up with a factory hole in the firewall! The laser works really well because is projects a line all the way to the back.


__________________
__________________
Brandon Wiedeman
'72 Suburban
'67 Chevy II -
https://lateral-g.net/forums/showthread.php4?t=46846

I have about 3 lifetimes worth of projects planned out in my head!

Last edited by wiedemab; 02-16-2015 at 05:55 AM.
Reply With Quote
  #85  
Old 02-15-2015, 09:03 PM
wiedemab's Avatar
wiedemab wiedemab is offline
Senior Member
 
Join Date: Oct 2005
Location: Batesville, IN
Posts: 1,475
Thanks: 0
Thanked 7 Times in 3 Posts
Default

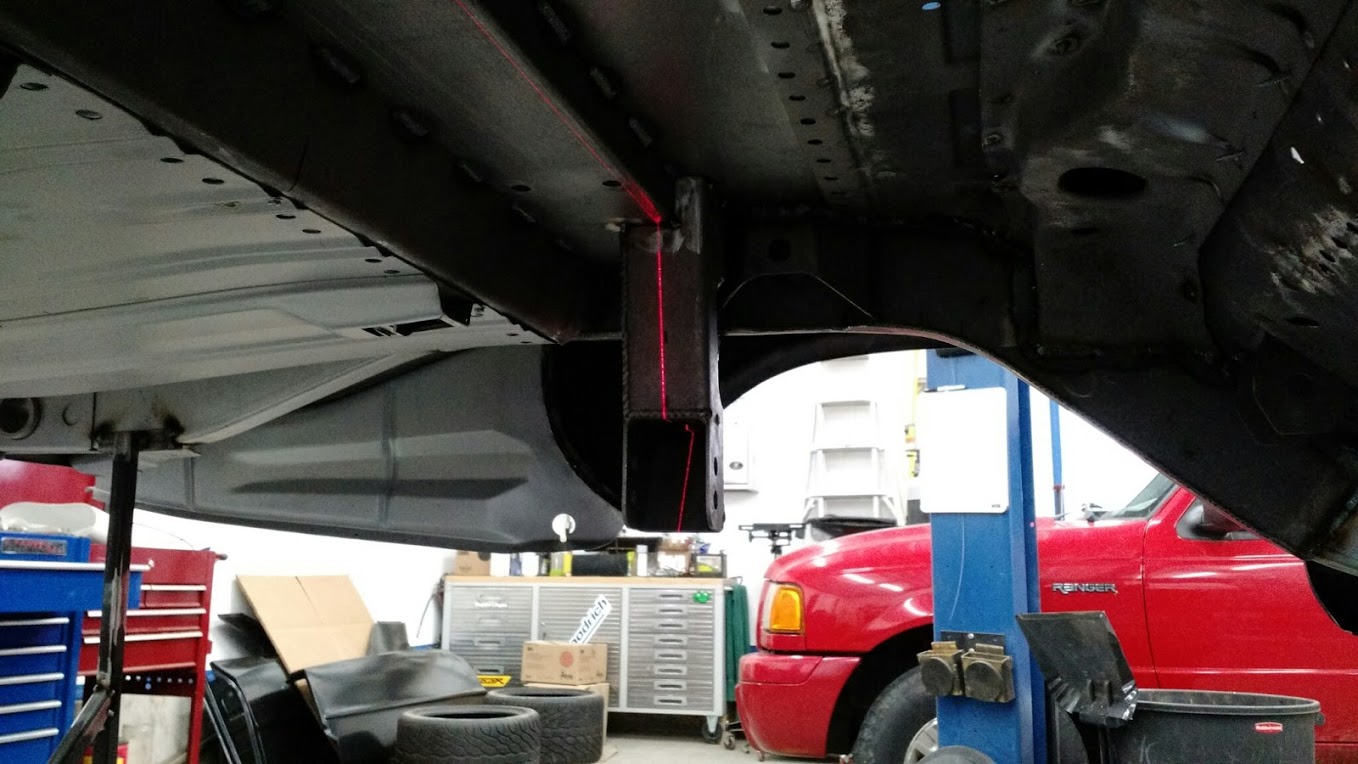
Again - using the laser to locate brackets. Some of the stuff that you may noticed needs to be final welded in the pics is because I'm going to wait and final weld it when it's upside down on the rotisserie (call me lazy!)


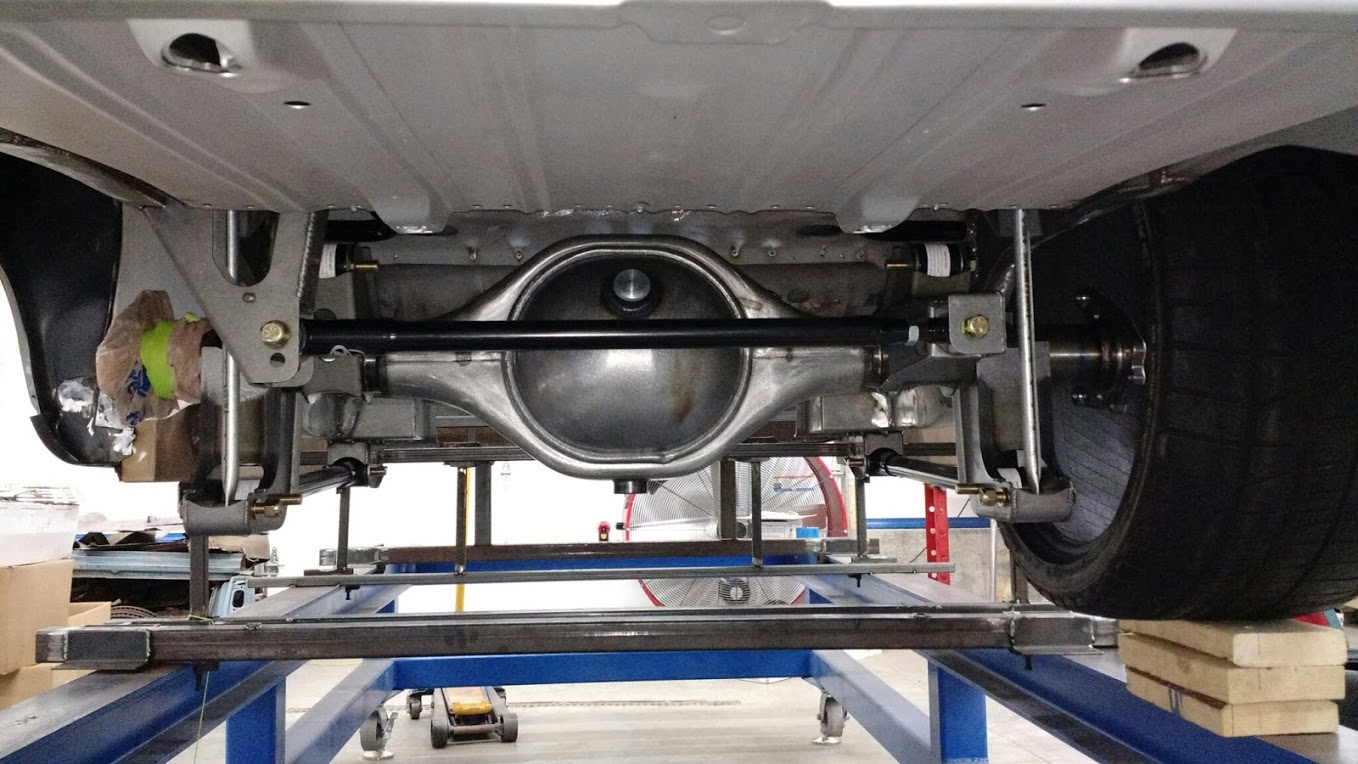
A lot of times, I'm working by myself and I also don't have the factory front leaf spring perches to locate the front link bracket from, I decided to fixture them up at the correct width and weld them to a piece of tubing (easier for me to hold in place. I also used the frame spec dimensions to measure from the rear spring shackle location to where the front mount should be. Just for good measure, Dad and I checked dimension on his stock '67. (yeah, that has been handy from time to time)


Once everything was tacked into place, I wanted to bolt the rear housing in to satisfy my worries that everything was located properly. It was almost dead square and if I remember correctly within a 1/4 side to side (minor panhard adjustment) with the links set right out of the box. I was happy enough with that and proceeded to weld everything in solid. I moved around a lot and kept checking measurements to make sure nothing moved.


__________________
__________________
Brandon Wiedeman
'72 Suburban
'67 Chevy II -
https://lateral-g.net/forums/showthread.php4?t=46846

I have about 3 lifetimes worth of projects planned out in my head!

Last edited by wiedemab; 02-18-2015 at 08:22 AM.
Reply With Quote
  #86  
Old 02-15-2015, 09:06 PM
kevin_l's Avatar
kevin_l kevin_l is offline
Senior Member
 
Join Date: Mar 2014
Posts: 365
Thanks: 4
Thanked 17 Times in 13 Posts
Default

Progress is looking good, You'll sleep better knowing all the rust is gone and you have clean primer sealing all the unseen areas. If you're really quiet you can hear the rust behind my quarters plotting against me.

Link mounts look good, I've seen 2 builds now where people welded them directly half way over the frame rail and torque box.

Last edited by kevin_l; 02-15-2015 at 09:10 PM.
Reply With Quote
  #87  
Old 02-15-2015, 09:07 PM
wiedemab's Avatar
wiedemab wiedemab is offline
Senior Member
 
Join Date: Oct 2005
Location: Batesville, IN
Posts: 1,475
Thanks: 0
Thanked 7 Times in 3 Posts
Default

Rear filler panel removed and inner structures being cleaned up.

Quick test fit to mark off the areas to be welded. This panel had been fit with the quarters and had screws place to locate it back in the correct spot.


Crappy pictures, but it's primed on the inside...


__________________
__________________
Brandon Wiedeman
'72 Suburban
'67 Chevy II -
https://lateral-g.net/forums/showthread.php4?t=46846

I have about 3 lifetimes worth of projects planned out in my head!

Last edited by wiedemab; 02-16-2015 at 05:59 AM.
Reply With Quote
  #88  
Old 02-15-2015, 09:12 PM
wiedemab's Avatar
wiedemab wiedemab is offline
Senior Member
 
Join Date: Oct 2005
Location: Batesville, IN
Posts: 1,475
Thanks: 0
Thanked 7 Times in 3 Posts
Default

Driver's side quarter fitted and mostly welded.


Porta-Power to push the wheelhouse out to make the quarter fit properly. As I've mentioned earlier in the thread the passenger's side outer wheelwell didn't fit very well.


Not always using fancy tools!!!! Block of wood along with the Porta-power.


Notes - - because I'm forgetful!


There is a little wave in the quarter and using a long straight edge the lower rear of the quarter needs to go in slightly. We'll jack out with a little pressure where I have "Hold" and using body clamps to pull in on the lower until it's where it needs to be. Finishing some of the welds all while holding it.

__________________
__________________
Brandon Wiedeman
'72 Suburban
'67 Chevy II -
https://lateral-g.net/forums/showthread.php4?t=46846

I have about 3 lifetimes worth of projects planned out in my head!
Reply With Quote
  #89  
Old 02-15-2015, 09:18 PM
wiedemab's Avatar
wiedemab wiedemab is offline
Senior Member
 
Join Date: Oct 2005
Location: Batesville, IN
Posts: 1,475
Thanks: 0
Thanked 7 Times in 3 Posts
Default

I also picked up the firewall bracket and master cylinder for my hydraulic clutch setup. I talked quite a bit to Walt from Classic Nova about it. I believe he did some of, if not most of the development and fitup on the part and DSE appears to be making it. Nice piece that reinforces the firewall and locates things properly.

__________________
__________________
Brandon Wiedeman
'72 Suburban
'67 Chevy II -
https://lateral-g.net/forums/showthread.php4?t=46846

I have about 3 lifetimes worth of projects planned out in my head!
Reply With Quote
  #90  
Old 02-15-2015, 09:32 PM
camcojb's Avatar
camcojb camcojb is offline
Administrator
 
Join Date: Jul 2004
Location: Wilton, CA.
Posts: 13,276
Thanks: 6,850
Thanked 2,114 Times in 969 Posts
Default

Nice work Brandon!
__________________
Jody

PAST CAR PROJECTS

Like Lateral-G on Facebook!

Follow Lateral-G on Instagram!

SPECIAL THANKS TO:
Jacob Ehlers and Amsoil for the lubricants and degreasers for my 70 Chevelle project
Shannon at Modo Innovations for the cool billet DBW bracket
Roadster Shop for their Chevelle SPEC Chassis
Dakota Digital for their Chevelle HDX Gauge Package
Painless Performance for their wiring harness

Ron Davis Radiators for their radiator and fan assembly.
Baer Brakes for their front and rear brakes

Texas Speed and Performance for their 427 LS Stroker
American Powertrain for their ProFit Magnum T56 kit
Currie Enterprises for their 9" Third Member
Forgeline for their GF3 Wheels
McLeod Racing for their RXT street twin clutch
Ididit for their steering column
Holley for their EFI and engine parts
Lokar and Clayton Machine for their pedals and door and window handles
Morris Classic Concepts for their 3 point belts and side mirrors
Thermotec for their heat sleeve and sound deadening products
Restomod Air for their Tru Mod A/C kit
Mightymouse Solutions for their catch can
Magnaflow for their 3" exhaust system
Aeromotive for their dual Phantom fuel system
Vintage Air for their new Mid Mount LS front drive
Hydratech Braking for their hydroboost system
Borgeson for their stainless steering shaft and u joints
Eddie Motorsports for their hood and trunk hinges and misc parts
TMI Products for their seats, door panels, and dash pad
Rock Valley Antique Auto Parts for their stainless fuel tank
Reply With Quote
Reply


Posting Rules
You may not post new threads
You may not post replies
You may not post attachments
You may not edit your posts

BB code is On
Smilies are On
[IMG] code is On
HTML code is Off

Forum Jump


All times are GMT -7. The time now is 07:16 AM.


Powered by vBulletin® Version 3.8.11
Copyright ©2000 - 2025, vBulletin Solutions Inc.
Copyright Lateral-g.net