...

Go Back   Lateral-g Forums > Lateral-G Open Discussions > Project Updates
User Name
Password


Reply
 
Thread Tools Display Modes
  #61  
Old 09-30-2010, 09:34 PM
70TWO NOVA's Avatar
70TWO NOVA 70TWO NOVA is offline
Senior Member
 
Join Date: Dec 2006
Location: Peoria, AZ
Posts: 1,083
Thanks: 0
Thanked 0 Times in 0 Posts
Default

WOW that is some good progress, the paint looks amazing!
this definitely gives me motivation to work on my late 2nd gen project!
__________________
Brian Miller
-1972 Nova
-1968 Camaro
-1967 C-10 step side 4x4
-2000 Dodge Dakota

it'll buff out........
Reply With Quote
  #62  
Old 10-01-2010, 02:12 PM
Josh69 Josh69 is offline
Senior Member
 
Join Date: May 2007
Location: Minnesota
Posts: 404
Thanks: 0
Thanked 1 Time in 1 Post
Default

Nice work! Love the color, I hope your airbrush guy knows what he's doing. Are you still going with two-tone?
__________________
1969 Firebird, Black w/Parchment Arizen interior, 383 Pontiac Stroker (350/428 crank), TKO600, Moser 12 bolt, 18" TTII's, Hotchkis, GW, DSE, Speed Tech, Vintage A/C, etc.

Last edited by Josh69; 10-01-2010 at 02:15 PM.
Reply With Quote
  #63  
Old 10-02-2010, 07:14 PM
takid455 takid455 is offline
Senior Member
 
Join Date: Feb 2007
Posts: 252
Thanks: 0
Thanked 5 Times in 5 Posts
Default

2 tone has been shelved. couldn't get it to look right. Going with solid at the moment. The 2 tone kept making the car appear tall and not low to the ground.
Reply With Quote
  #64  
Old 10-27-2010, 09:43 PM
takid455 takid455 is offline
Senior Member
 
Join Date: Feb 2007
Posts: 252
Thanks: 0
Thanked 5 Times in 5 Posts
Default

It is rather amazing how ‘rough’ clear lays. While it look nice, there is room for improvement. It is just a matter of what one is willing to accept as a finished product. Been enjoying the fun of wet sanding the clear for around 30 hours so far. I have the body, trunk lid, hinge cover, and doors done. I start with 1000 grit and see how ‘rough’ it is afterwards. If it is rough, I go to 800 then back to 1000, go over that with 1500 and then finish with 2000. It is better to go to a courser grit than to press hard with a finer grit. 1500 will buff out, but with some effort. The 2000 allows for easier buffing. You can actually see the color increase in depth the finer you go. The doors have been buffed as well an they look very nice and deep. Tough to do on a metallic color.

Body and parts done up to 2000 grit.


Buffed door


Reply With Quote
  #65  
Old 10-27-2010, 09:45 PM
70TWO NOVA's Avatar
70TWO NOVA 70TWO NOVA is offline
Senior Member
 
Join Date: Dec 2006
Location: Peoria, AZ
Posts: 1,083
Thanks: 0
Thanked 0 Times in 0 Posts
Default

Wow, that is looking really great!
__________________
Brian Miller
-1972 Nova
-1968 Camaro
-1967 C-10 step side 4x4
-2000 Dodge Dakota

it'll buff out........
Reply With Quote
  #66  
Old 01-13-2011, 09:49 PM
takid455 takid455 is offline
Senior Member
 
Join Date: Feb 2007
Posts: 252
Thanks: 0
Thanked 5 Times in 5 Posts
Default

Body, bumpers and some small parts are buffed. Some of the smalls had to be resprayed, but all good now. Waiting for the air brush artist to get his design together so I can finish the hood & fenders. Paint has an incredible shine and depth to it considering the color. cleaning will start next week. That ought to be fun. Hopefully I may begin assembly.

Interior is in the works, I will have to redye the interior again to match. The original Camel Tan does not jive well with this color. May even wrap that plastics in leather. I’d use distressed pieces I have laying around than cover nice originals.


I see a 1st gen


Reply With Quote
  #67  
Old 01-14-2011, 11:13 AM
tones2SS's Avatar
tones2SS tones2SS is offline
Lateral-g Supporting Member
 
Join Date: Sep 2006
Location: Massachusetts
Posts: 8,176
Thanks: 0
Thanked 6 Times in 5 Posts
Thumbs up

Very nice. Paint looks killer.
Reply With Quote
  #68  
Old 02-13-2011, 06:12 PM
takid455 takid455 is offline
Senior Member
 
Join Date: Feb 2007
Posts: 252
Thanks: 0
Thanked 5 Times in 5 Posts
Default

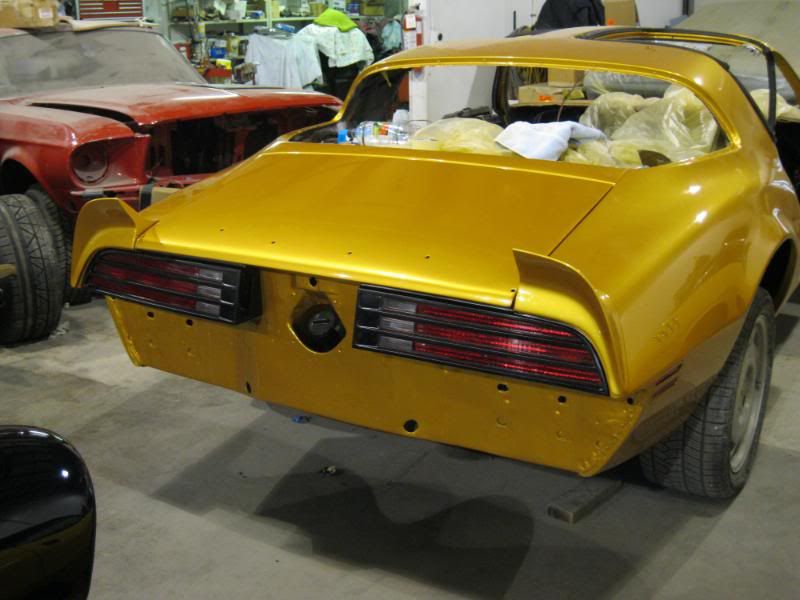
Moving along on assembly. Trunk lid and doors are installed and aligned. Spending extra time during the earlier body work stages paid off as both doors were aligned and installed in less than 1 hour. Use the guide holes I drilled to assist and confirm. Dissembled, cleaned, painted and polished the tail lights. Most of the electrical is installed sans the main interior harness which attaches to the dash. Not sure if I’ll run speakers in the doors, so I ran wiring to the doors just incase. Began installation of the window mechanisms. All tracks and motors were cleaned and lubed. New door lock actuators will be installed along with new glass. Leaning towards the smoke tint glass vs the green tint. Just need to see if I can get the rear window tinted to match. Picked up key fob door and trunk remote popper. That will get wired once the mechanicals are done as I have some minor electrical work to finish anyway.

Debating on which T top weather stripping to use. The original GM are in decent condition and fit well, but show their age in some areas. I know there from the late 80’s vintage. Tried a set of Metro seals and while the look nice, fit is so-so. Being that is not critical at the moment, I’ll work with them before gluing them.

Working on adapting a 3rd gen steering column and a modern wiper motor. The wiper motor will fit w/ an adaptor plate, however, getting the variable speeds to work with the stock switch is an issue w/ adding a resistor block. I am hoping the 3rd gen switch resistances are favorable to the new motor. Working with an old model kit to design the interior color scheme. Seats will be ordered soon. I want to retain a tan interior, but will most likely have some black accents to mesh with the exterior color. The stock Camel tan looks like puke against the Goldmine Pearl.

Next on the list:
1) finish installing window mechanisms, power locks and door moldings
2) Install new leaf springs. Original ones arched too much during sitting uninstalled and powdercoating. New ones have a stiffer spring rate to match the front springs and overall suspension design.
3) Remove ‘roller’ wheels and install good wheels along with brakes.
Plan to have this done this week.
4) Get airbrush artist to finish up design and paint bird and lettering. Cant hang fenders, hood or rear spoiler until that is done. I like his work and hate to change artist. Luckily no money has been spent. He gets paid once it is finished.

Lights
Before and after blasting


Painted & polished


Staring to look like a car


Hinges do not actually reveal any grey sealer, but the camera picks it up. Most likely, while there is color there, it is thin and the characteristics of HOK paints. It will be touched up if needed before the fenders are installed.

Last edited by takid455; 02-13-2011 at 06:16 PM.
Reply With Quote
  #69  
Old 02-13-2011, 06:29 PM
waynieZ's Avatar
waynieZ waynieZ is offline
Lateral-g Supporting Member
 
Join Date: Oct 2006
Location: Ma
Posts: 8,491
Thanks: 939
Thanked 342 Times in 231 Posts
Default

The paint looks beautiful. Don't you love it when your hard work pays you back ten fold. Nice work.
__________________
_Wayne________

___________________________________
https://lateral-g.net/forums/show...ghlight=FNQUIK
Reply With Quote
  #70  
Old 02-13-2011, 09:25 PM
moparnate's Avatar
moparnate moparnate is offline
Member
 
Join Date: Oct 2008
Posts: 60
Thanks: 0
Thanked 0 Times in 0 Posts
Default

looking good!!
Reply With Quote
Reply


Posting Rules
You may not post new threads
You may not post replies
You may not post attachments
You may not edit your posts

BB code is On
Smilies are On
[IMG] code is On
HTML code is Off

Forum Jump


All times are GMT -7. The time now is 12:02 AM.


Powered by vBulletin® Version 3.8.11
Copyright ©2000 - 2026, vBulletin Solutions Inc.
Copyright Lateral-g.net