...

Go Back   Lateral-g Forums > Lateral-G Open Discussions > Project Updates
User Name
Password


Reply
 
Thread Tools Display Modes
  #21  
Old 02-14-2011, 07:58 PM
waynieZ's Avatar
waynieZ waynieZ is offline
Lateral-g Supporting Member
 
Join Date: Oct 2006
Location: Ma
Posts: 8,491
Thanks: 939
Thanked 342 Times in 231 Posts
Default

Sweet looking front clip.
__________________
_Wayne________

___________________________________
https://lateral-g.net/forums/show...ghlight=FNQUIK
Reply With Quote
  #22  
Old 02-16-2011, 08:46 PM
eddiek eddiek is offline
Junior Member
 
Join Date: Oct 2007
Posts: 17
Thanks: 0
Thanked 0 Times in 0 Posts
Default

So with the front clip built we needed to get it bolted onto the shell and set the ride height. For that we used a really cool tool that Chris Alston Chassisworks makes. This set-up is very simple but very affective. It goes on the bolts that hold the shock on and basically makes it a strut for setting it up. We just put a little tape to hold ours for a little trial fit and bolted front clip on.


We all know how the wheels can make or break the whole look of a car so when choosing them you really need to do your research. The wheels that caught my eye were the ID311's made by Intro Wheels and they are part of their line called I.D Luxury. They are a true 3 piece wheel and I just think they have the right look for a G-Machine type of car. The front is a 19 x 8 1/2 and the rear are 20 x 12. For the tires I used the Nitto Invo. I spent a lot of time making sure the aspect ratio of them were not to far off to make sure they have a smiler sidewall to them and look proportionate on the car. The front size ended up being a 245-35-19 and the rear is 342-25-20. Thanks to the guys at Jerry Noonan's Auto Center in Monroe NJ for getting them all mounted without getting a spec on the wheel.


Now that I had some parts it was time to get them all onto the shell and make this thing start looking like a car.


Reply With Quote
  #23  
Old 02-17-2011, 06:01 PM
tones2SS's Avatar
tones2SS tones2SS is offline
Lateral-g Supporting Member
 
Join Date: Sep 2006
Location: Massachusetts
Posts: 8,176
Thanks: 0
Thanked 6 Times in 5 Posts
Thumbs up

Very nice. Good work.
Reply With Quote
  #24  
Old 02-17-2011, 07:32 PM
waynieZ's Avatar
waynieZ waynieZ is offline
Lateral-g Supporting Member
 
Join Date: Oct 2006
Location: Ma
Posts: 8,491
Thanks: 939
Thanked 342 Times in 231 Posts
Default

Sweet looking wheels.
__________________
_Wayne________

___________________________________
https://lateral-g.net/forums/show...ghlight=FNQUIK
Reply With Quote
  #25  
Old 02-18-2011, 09:49 PM
eddiek eddiek is offline
Junior Member
 
Join Date: Oct 2007
Posts: 17
Thanks: 0
Thanked 0 Times in 0 Posts
Default

Well I mentioned in the first thread that I was going to talk about and show things that we didn't show in the Super Chevy Magazine article. Well this is one thing that I fell was a key move for the build. So please read on and I hope this helps some guys that battle the same thoughts and images I do.

Before you start your build you have image in your mind on how the car should look. It is something you imagine and know that is what you are shooting for as the end result. We had the car on the lift set to the ride height it would end up at with the wheels on it and took a few steps back. Just looking at it something just didn't look right to me on how it was going to sit. Now we all know how important the stance of the car can really be and on a Pro Touring car it is the stance that makes the car. So now that we have a idea on how the car will look it was time to get some rough measurements.

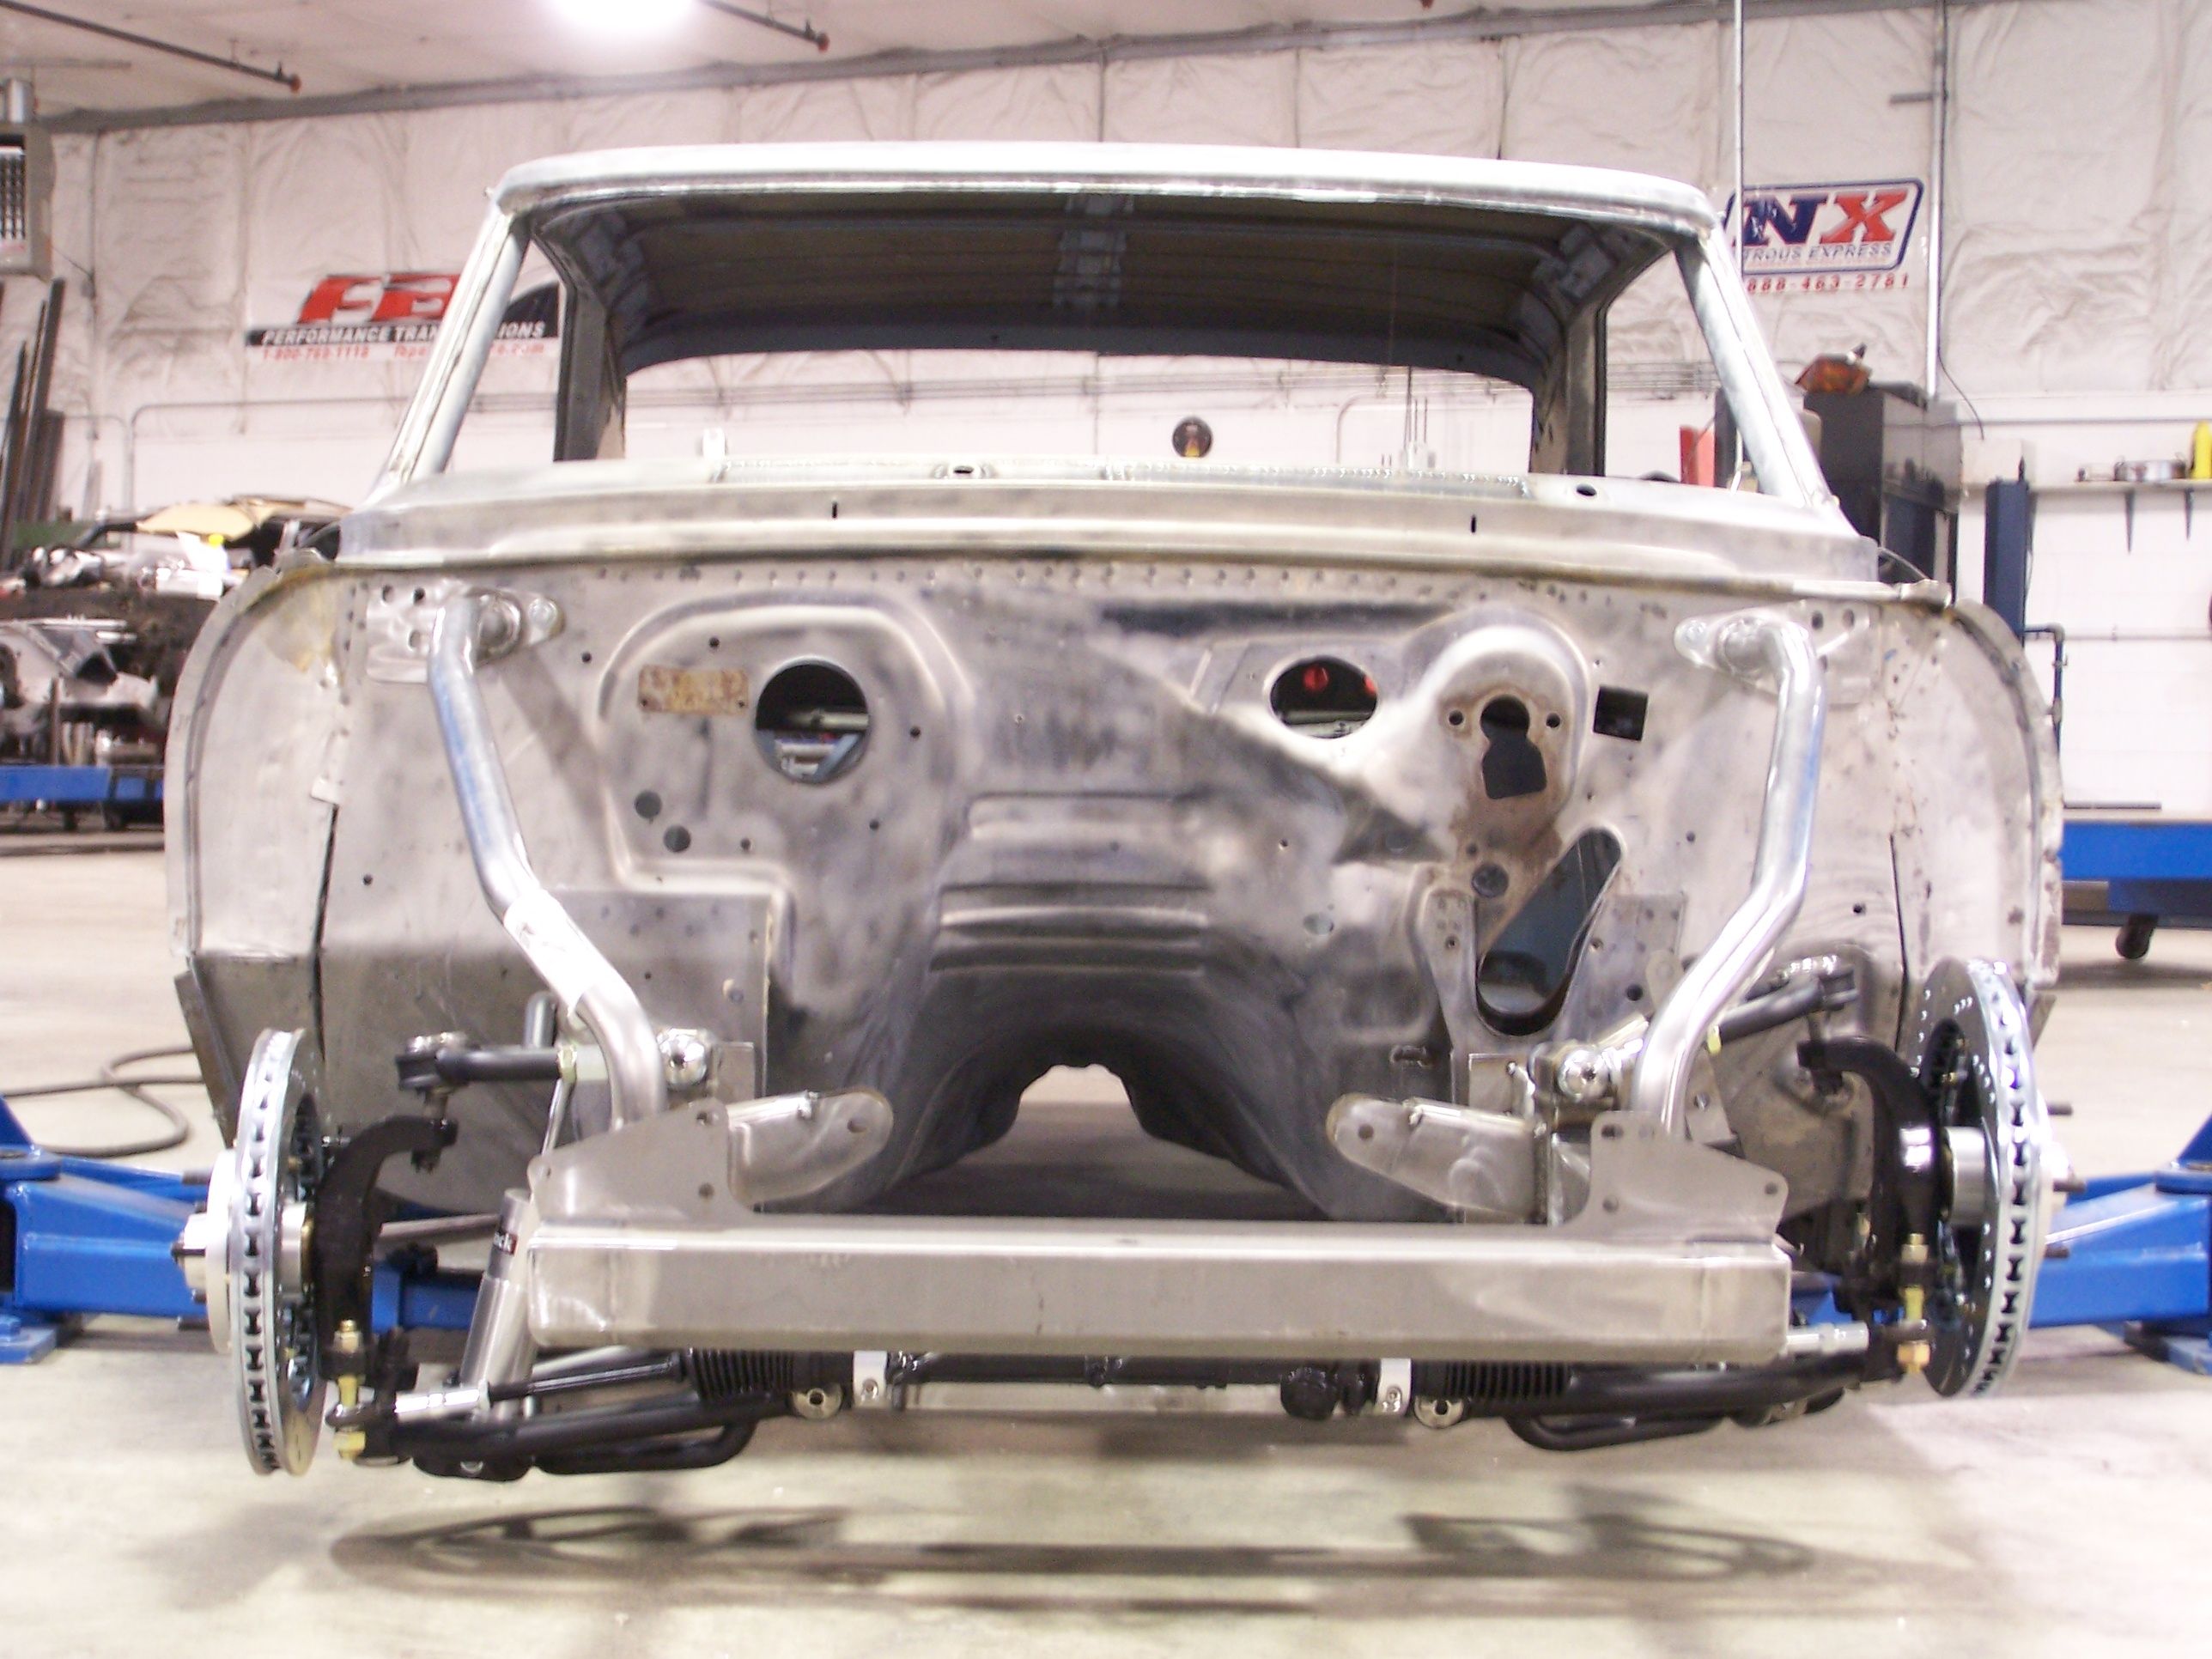
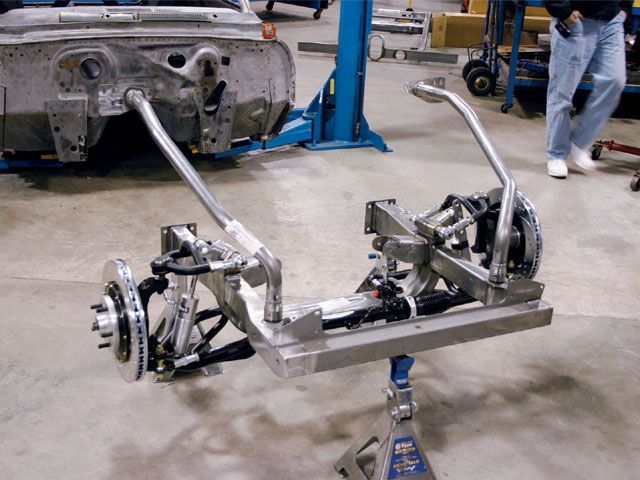
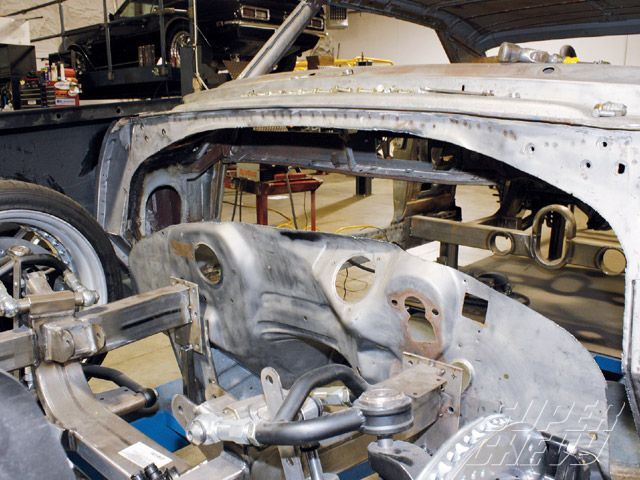
The first thing we noticed was that the front end was a little to high. With the Chris Alston Chassisworks front clip the car at ride height will have close to 7 3/8 rocker height and that was to high for what we wanted. So what you will see here is the whole process of how we made the front clip work for us. It is a rather easy process and can make a huge impact on the way your car turns out. Now keep in mind that sometimes one change like this will affect 10 more changes down the road but who do you know just ever bolts something on and is really happy.

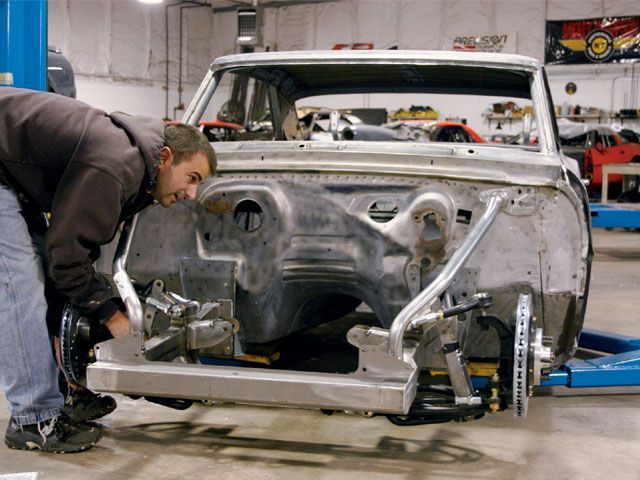
First we looked at the car on the lift at ride height.


Next I cut into the welds on the lower mounting plates being carefull not to remove and legnth from the lower frame rails.


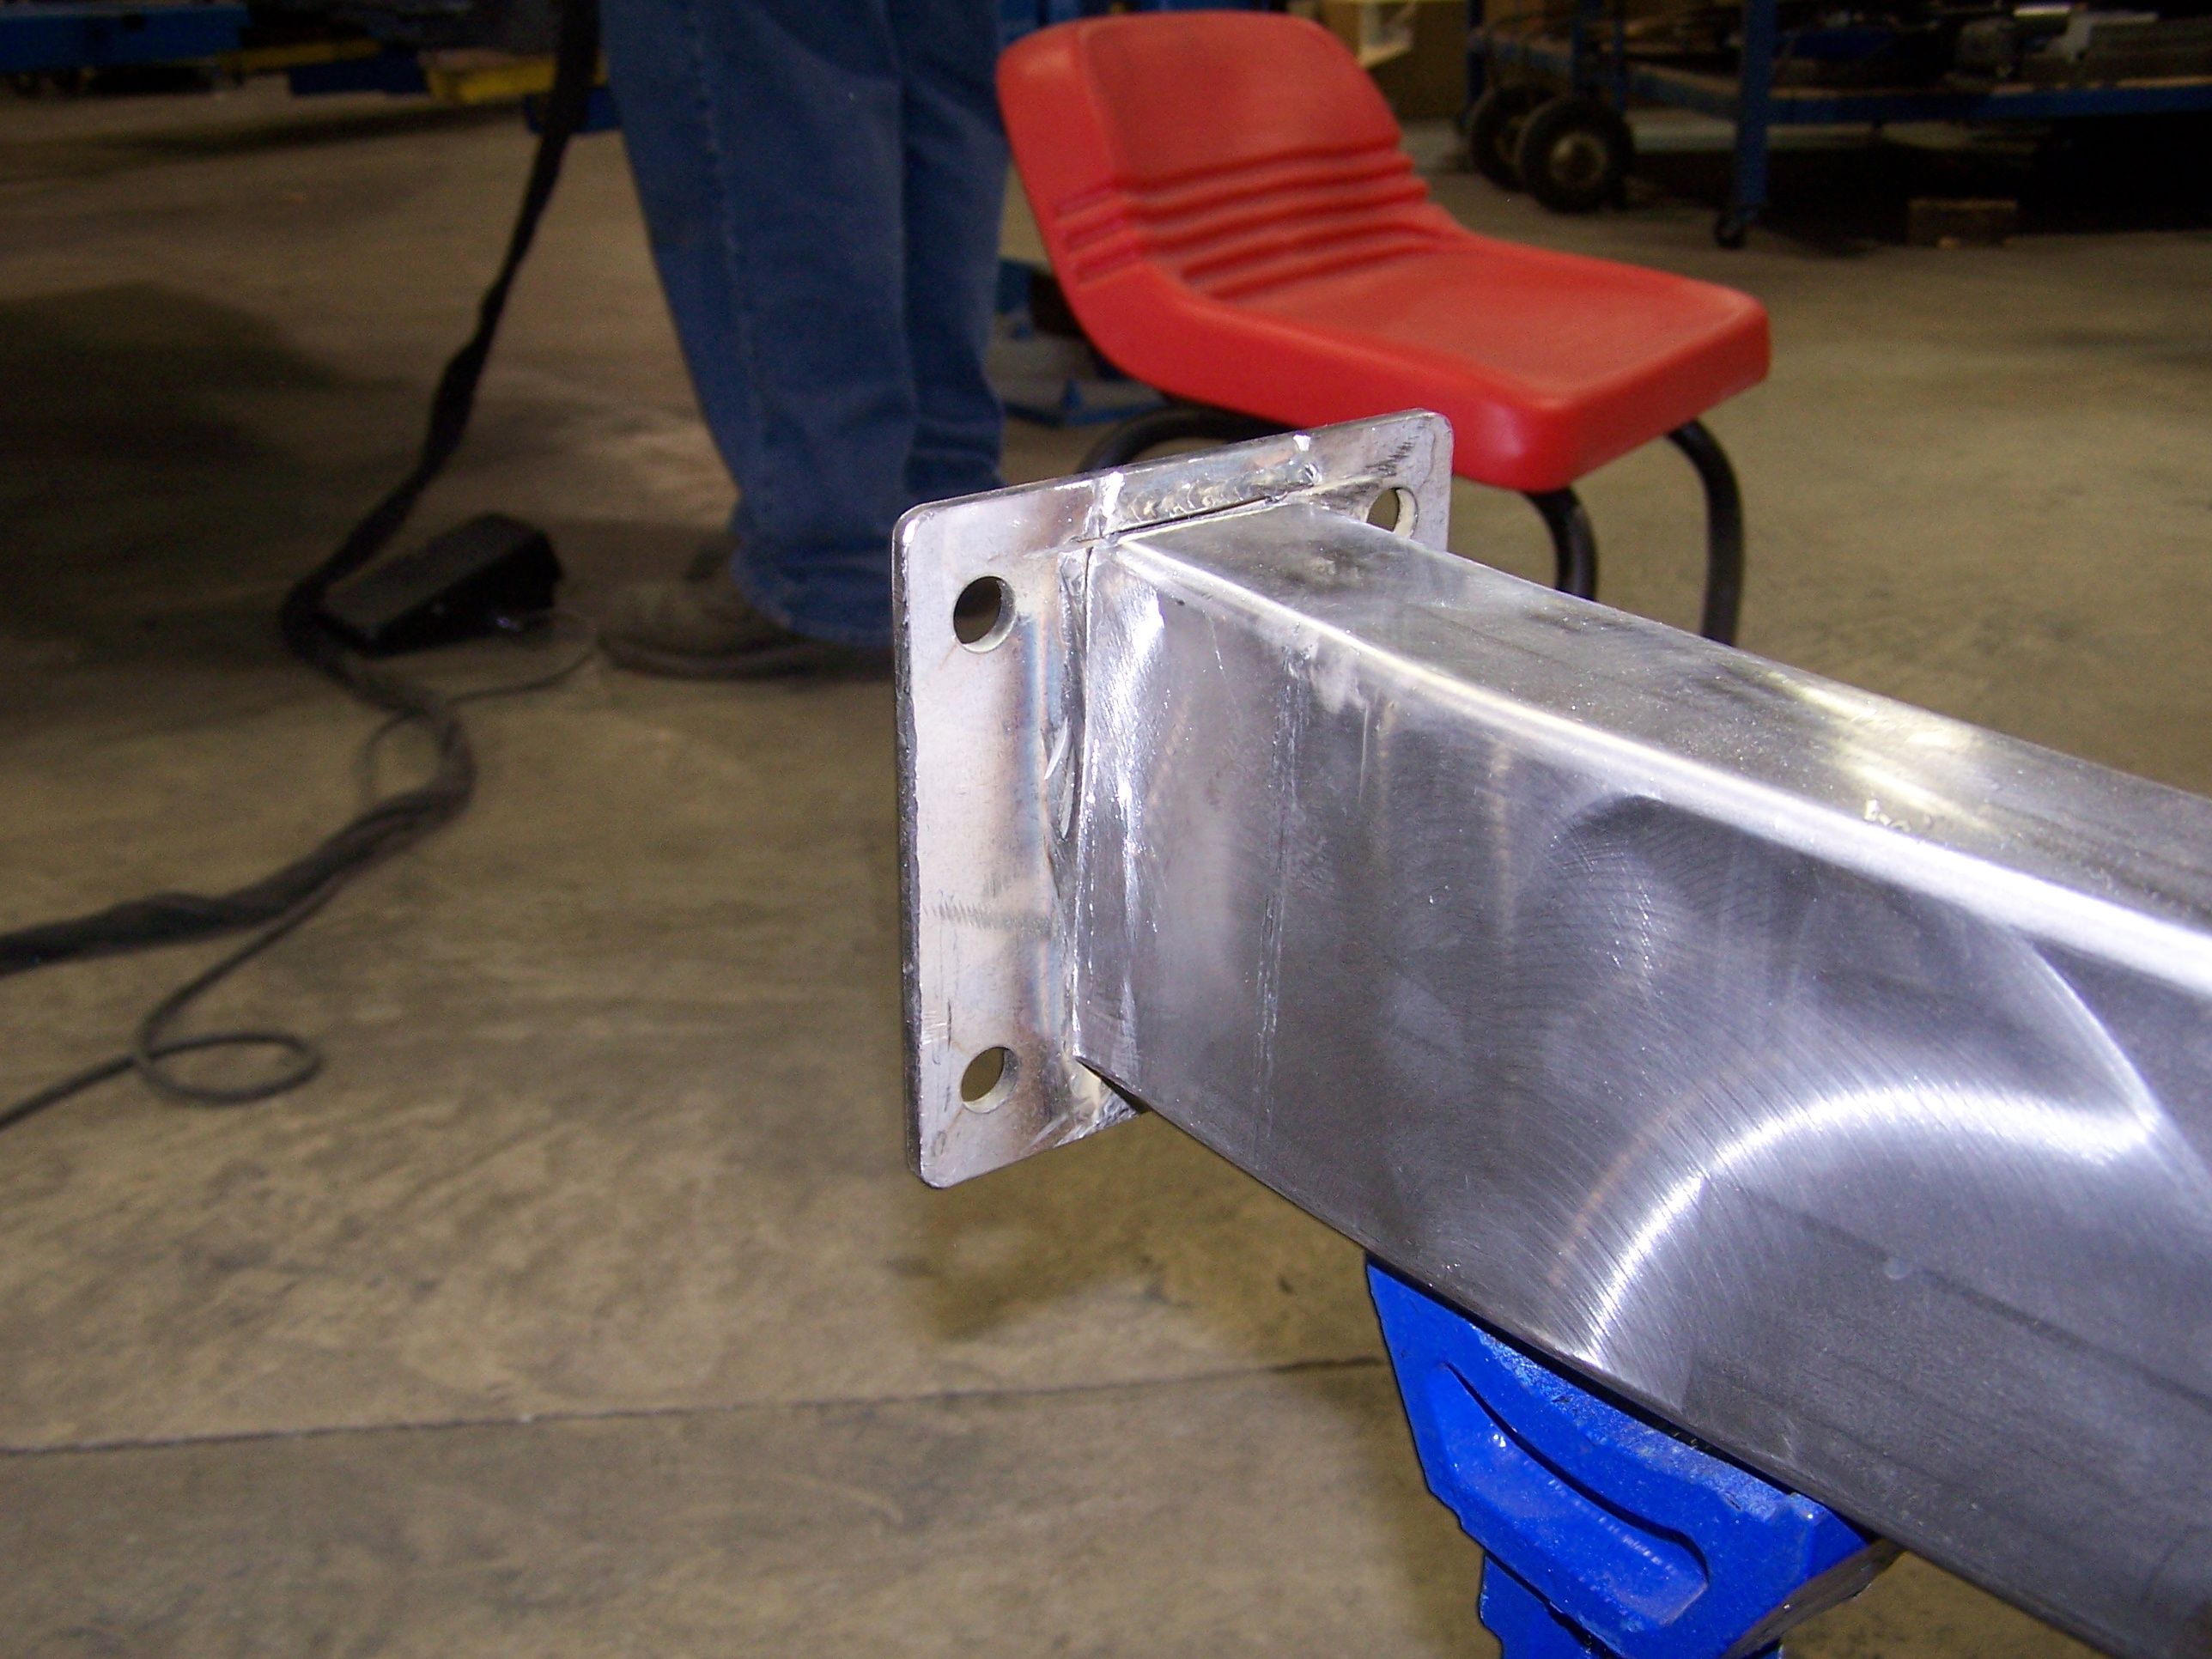
Now with the plate gone I had the lower frame rail with no end.


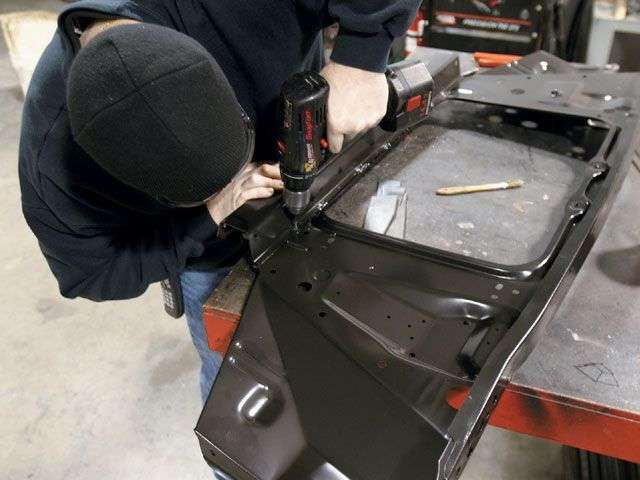
Next was to make a new plate for how much we wanted to raise up the front clip. For us we wanted to have a rough height of 5 inches. So I made a plate that was a extra 2 3/8 since that was the amount needed to get where we wanted.


Next I tacked it right where it was when we removed the stock one and just had the new mounting holes 2 3/8 lower.

Just do the same process for the other side and that will be it.


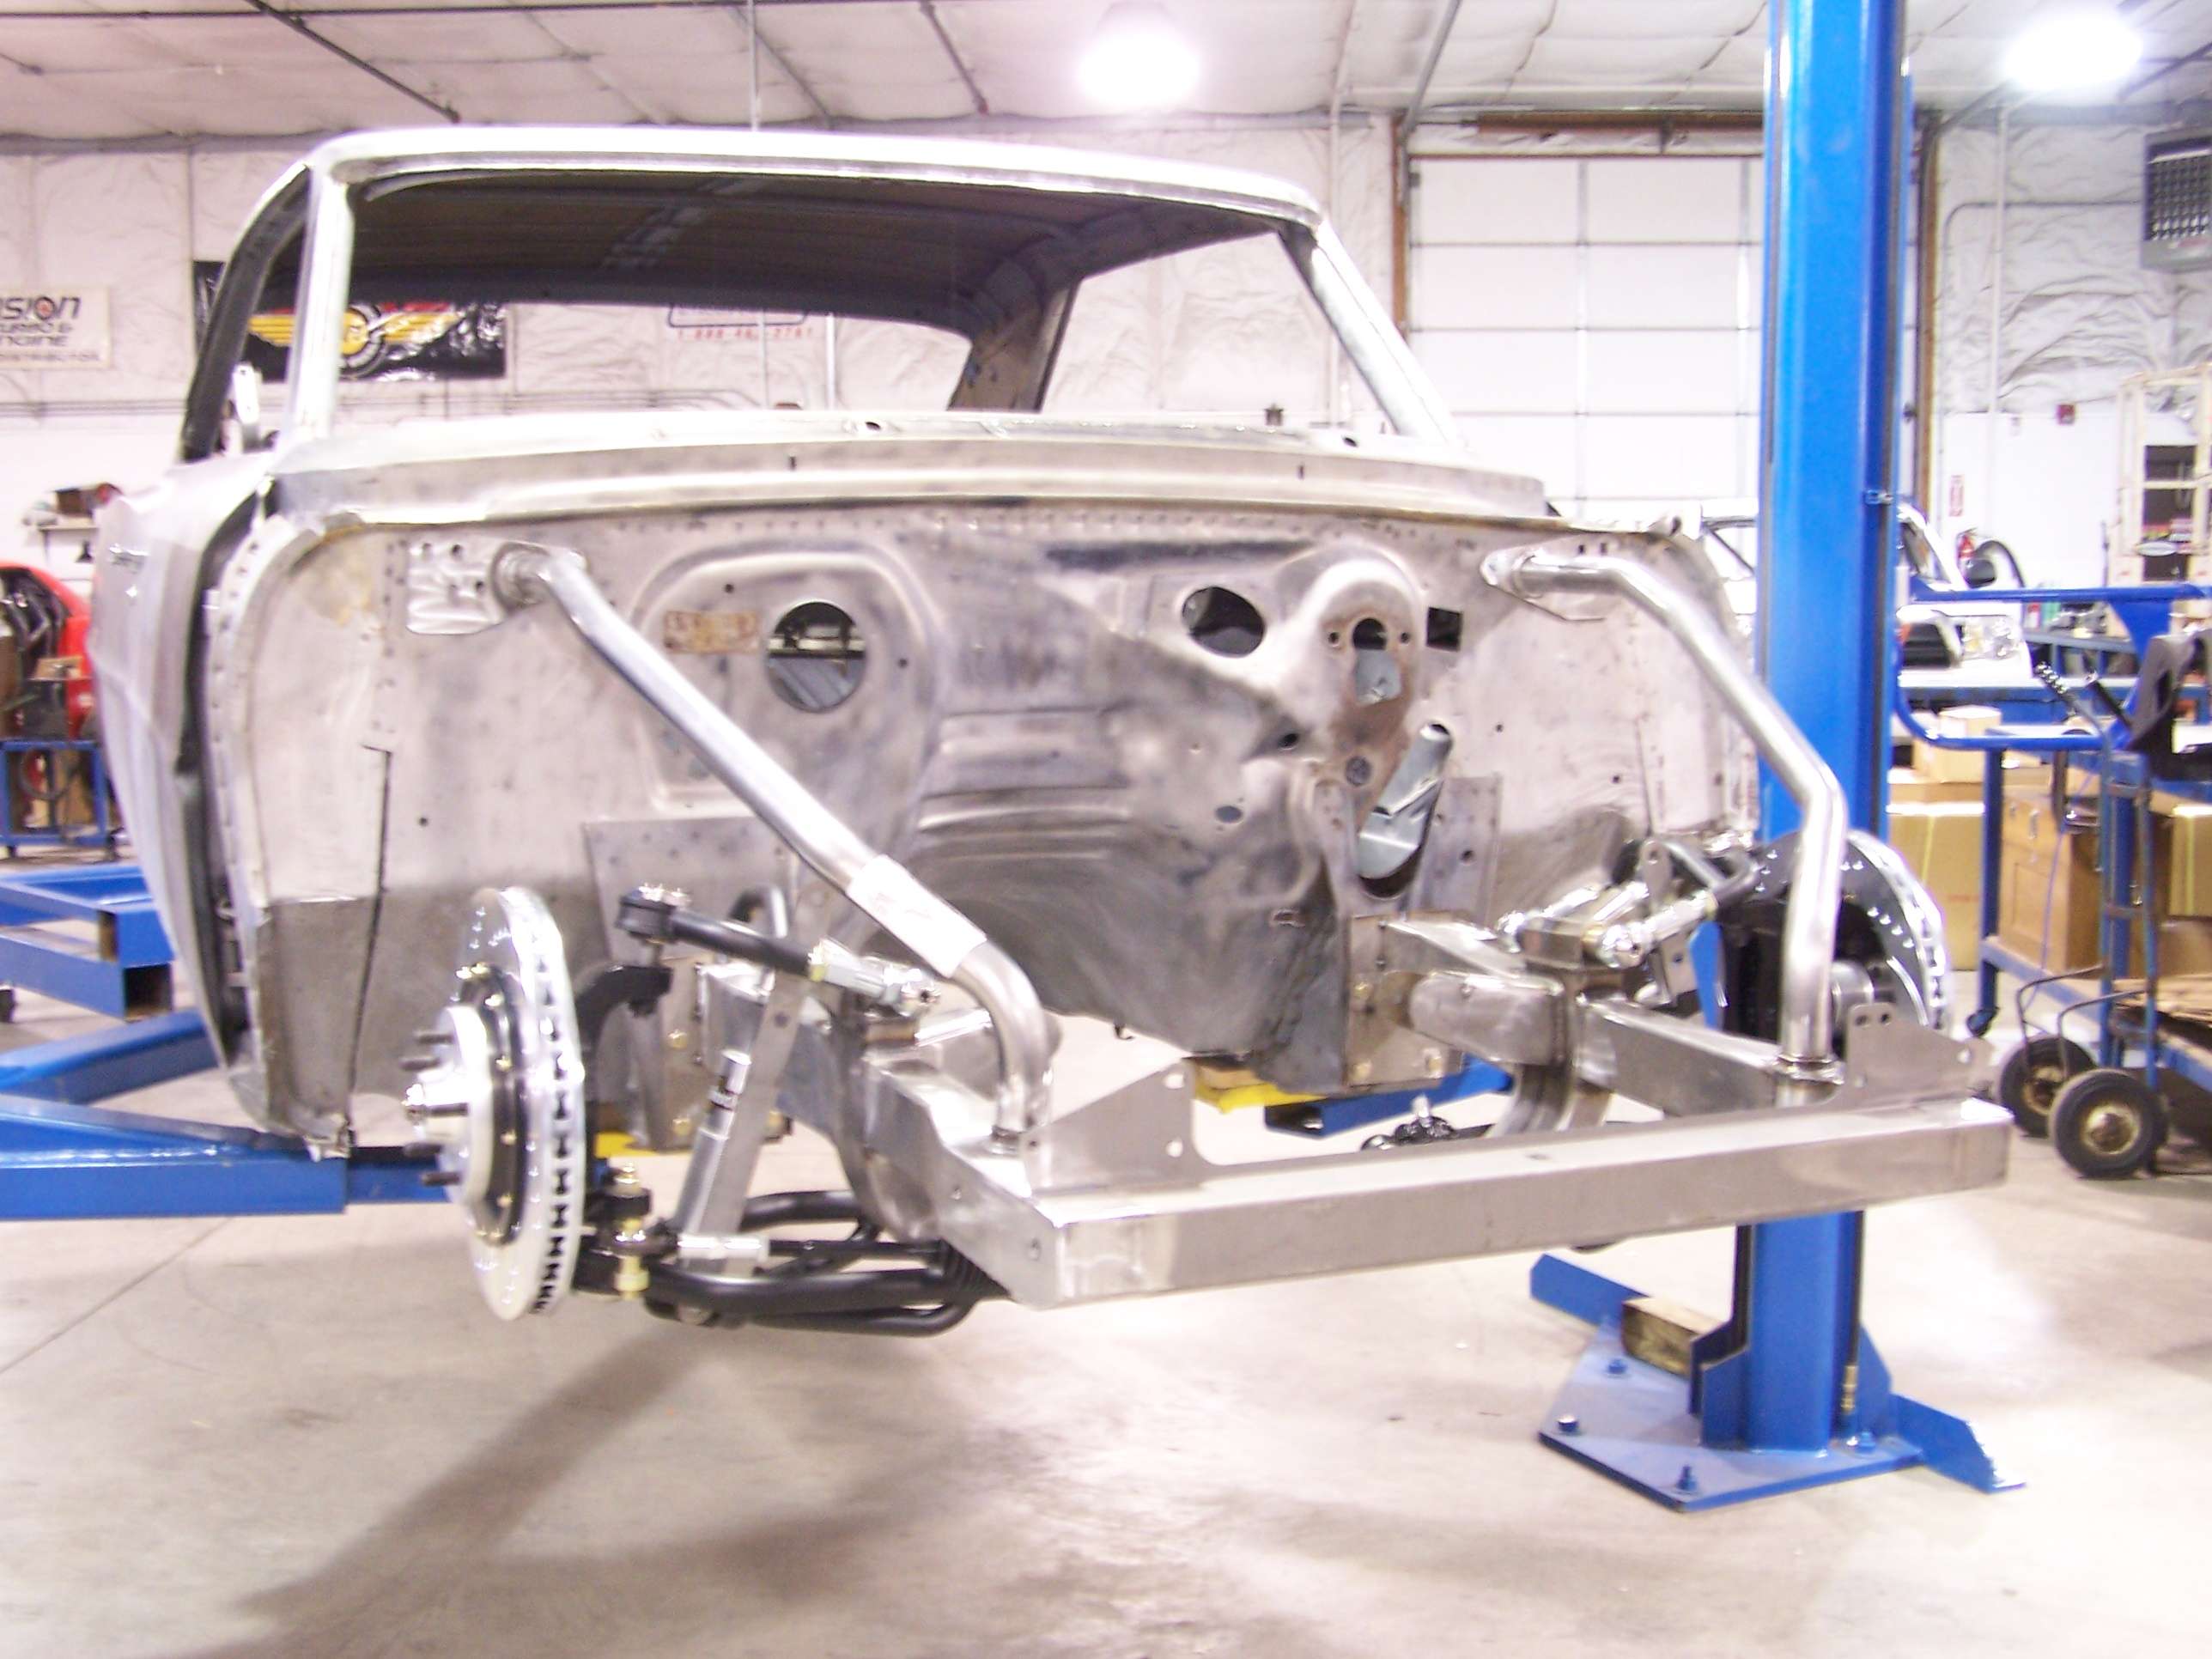
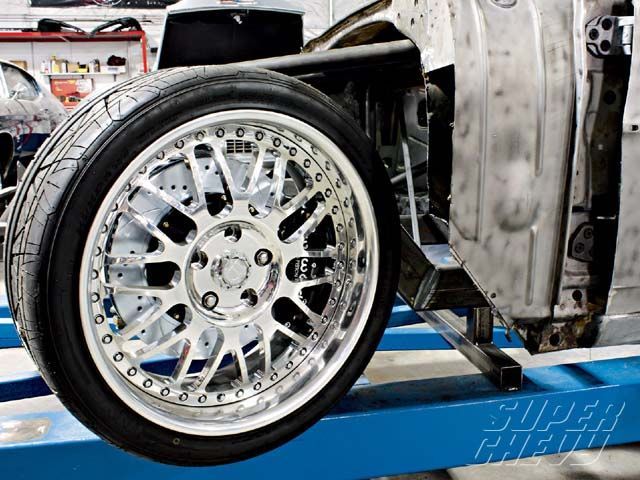
Next we bolted the front clip back on the car and it ended up right where we wanted it 2 3/8 higher in the chassis and with a rocker height of 5 inches. The front tubes also fit on with very little changes. The tube has a really nice bilt on flange to it that we removed and the tube slipped right onto the nub that was on the frame already. Now just remove a section of tube and re-weld the bolt on flange part and your ready to go.


Now like I said early on one change like this will impact 10 others and when I get a few minutes in the next few days I will show what they all were. But in the end it wasn't that hard to fix and I feel will be well worth the effort. EK
Reply With Quote
  #26  
Old 03-04-2011, 02:34 PM
69c4x11's Avatar
69c4x11 69c4x11 is offline
Senior Member
 
Join Date: Oct 2005
Posts: 252
Thanks: 0
Thanked 1 Time in 1 Post
Default

We're waiting on some new pics !!! come on Eddie !!
Reply With Quote
  #27  
Old 04-28-2011, 08:02 PM
jh99 jh99 is offline
Senior Member
 
Join Date: Dec 2004
Posts: 143
Thanks: 4
Thanked 5 Times in 5 Posts
Default

That is an awesome build so far! Let's see more pics and info about moving the front clip and what else goes with it!
Reply With Quote
  #28  
Old 05-07-2011, 07:32 AM
69c4x11's Avatar
69c4x11 69c4x11 is offline
Senior Member
 
Join Date: Oct 2005
Posts: 252
Thanks: 0
Thanked 1 Time in 1 Post
Default

Eddie ,,waiting for you to lower area ,at rad/bumper ,core support so it will be at the original hgt,???? catch my thought's ??It will have to be lowered ,what the front chassis was raised for ride -HGT ,,,
Reply With Quote
  #29  
Old 05-11-2011, 07:37 PM
eddiek eddiek is offline
Junior Member
 
Join Date: Oct 2007
Posts: 17
Thanks: 0
Thanked 0 Times in 0 Posts
Default

Sorry for the delay guys. As you can tell I have been slacking on updates. This time of the year is tough since my Racing gets really busy and I'm on the road a lot. When I do get a chance to do things it is mostly with my little girl that just turned one 2 weeks ago.

Since the last post a lot of things have went on with the build. One of the most exciting things is the support from Fesler Built Products. All I can can say is Chris builds some of the nicest billet products I have seen. The quality is second to none and the best way I can put it is the parts they make are just BAD ASS. I will throw some pictures of that stuff up at a later date.

Well anyway, I have gotten a lot of emails in the past few weeks of people wanting to know what else had to be done with the front clip. Well here it is.

The first thing is since we raised the front clip 2 3/8 everything that bolts to the clip and uses holes to locate it will be that amount high. So it really wasn't very hard to make that correction. What we was take the center of the 6 main holes in the front radiator support and move them up the 2 3/8 to get the location point. We also moved the support to the back side of the mounting tabs. This made the fenders now move back .125 since that is the thickness of the mounting plate. The fenders allowed us to correct that with ease since the factory slots we wide enough. Here is the picture process of that.


Drilling out the welds on the support


Now the support will bolt to the back of the front clip.


The fender is all mounted up and lines up dead on.


We then mounted the front wheel to the hub and now have the look that we were after.


But it didn't turn out as easy as we thought. They say if you make one change it will take 5 others to make it work. Well whoever said that was right. Since I was using a really wide 19 inch deep dish wheel that was the next area we had to address. The wheel would now hit the inner side of the fender when we turned it. But wait that was not it. It now also hit the firewall bump out under compression of the shock. So we now had to address those 2 issues.

Last edited by eddiek; 05-11-2011 at 07:40 PM.
Reply With Quote
  #30  
Old 05-11-2011, 08:02 PM
eddiek eddiek is offline
Junior Member
 
Join Date: Oct 2007
Posts: 17
Thanks: 0
Thanked 0 Times in 0 Posts
Default

So the wheel hitting the inner fender was easy. All we did their is have to narrow up the width from center to center of the front wheels 1 inch. So we removed that in the control arms. The top was easy since it had a turnbuckle and the bottom we cut off the eye loops and shortened the arm up.

He is a car at ride height. In the long run I feel it will be well worth it and the extra effort will be justified.


Upper Arms getting shortened


So since the wheel hit the firewall and we were going to smooth out the wall are we just removed it.


You can now see where and how the wheel hit


We just removed the tab to a spot we felt will clear and the wheel fit 100%. We even took the shock out and ran it through the travel range to make sure of that.


Well guys. That is all I have time for right this minute. I will try to get something up next week showing how we cut the firewall back to the best spot and get the new one all fitted in. Thanks EK
Reply With Quote
Reply


Posting Rules
You may not post new threads
You may not post replies
You may not post attachments
You may not edit your posts

BB code is On
Smilies are On
[IMG] code is On
HTML code is Off

Forum Jump


All times are GMT -7. The time now is 04:00 PM.


Powered by vBulletin® Version 3.8.11
Copyright ©2000 - 2025, vBulletin Solutions Inc.
Copyright Lateral-g.net