...

Go Back   Lateral-g Forums > Lateral-G Open Discussions > Project Updates
User Name
Password


Reply
 
Thread Tools Display Modes
  #1  
Old 05-24-2013, 02:25 PM
DaleTx's Avatar
DaleTx DaleTx is offline
Senior Member
 
Join Date: Dec 2012
Location: Pacific NW
Posts: 486
Thanks: 0
Thanked 0 Times in 0 Posts
Default

Looking good Sieg

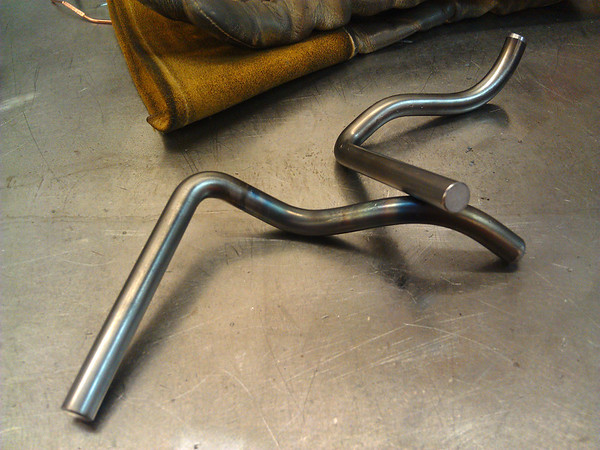
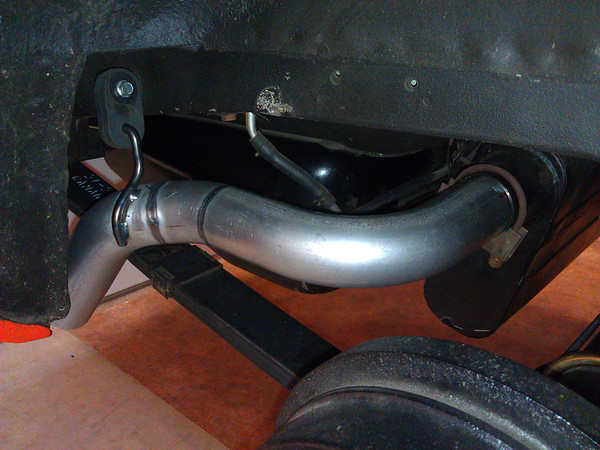
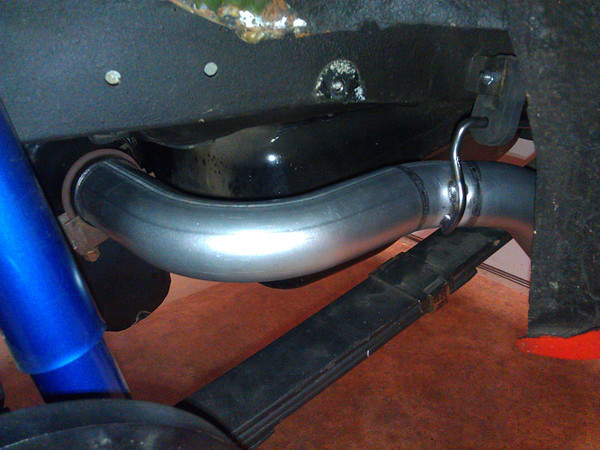
When you do it yourself you can get everything just right. I did the mufflers and tailpipes on my car a few weeks ago.... one thing I learned was that when the exhaust heats up, the tailpipes move around a bit. I ran my tailpipes between the leaf springs and rear fender like yours, and had to relocate the tail pipe mounts several times before I found the best position to keep the tailpipes from rubbing on the fender when the exhaust heated up.

Don’t make the same mistake I did by welding the mounts up solid right away... tack the mounts on and then do a test drive to make sure nothing rubs when its up to temp before finishing.

Just trying to save you from doing extra work!

__________________
"If you wait, all that happens is you get older"
Mario Andretti

69 Camaro-Nutter Racing Engines/427CI LS2 sleeved/LS7 CNC ported heads/Custom cam/T&D 1.8 rockers/Manley crank/Manley H-beam rods/Weisco pistons/NRC Pro Series dry sump/Kooks/NA,92 octane,11.5:1- 672HP @ 6,900RPM, 566TQ @ 5,500RPM
Build Thread- http://ls1tech.com/forums/generation...ine-build.html
Reply With Quote
  #2  
Old 05-24-2013, 03:56 PM
Sieg's Avatar
Sieg Sieg is offline
Moderator
 
Join Date: Dec 2010
Location: Pacific Northwet
Posts: 8,034
Thanks: 33
Thanked 101 Times in 41 Posts
Default

Thanks Dale - I had planned on just clamping the tailpipes to the transverse muffler before final tacking. As is the guys that put the exhaust back together after the fire restoration weren't very meticulous and the muffler is pushed back and out 15mm off from perpendicular so I'm also factoring squaring the muffler in the future when I replace the rest of the tubing they butchered.

Did you use stainless or mild steel for your exhaust?
Reply With Quote
  #3  
Old 05-24-2013, 05:34 PM
Sieg's Avatar
Sieg Sieg is offline
Moderator
 
Join Date: Dec 2010
Location: Pacific Northwet
Posts: 8,034
Thanks: 33
Thanked 101 Times in 41 Posts
Default

Test welds for the exhaust. Fuse welded 16 ga. at 45 amps. They look decent to me, critique please.


FWIW - The aluminized finish didn't pose any contamination issues like I thought it would.

I'll be running a fan while welding the sections to clear fumes away from my helmet.
Reply With Quote
  #4  
Old 05-24-2013, 05:40 PM
intocarss's Avatar
intocarss intocarss is offline
Senior Member
 
Join Date: Aug 2011
Location: So Cal in the Sfv
Posts: 4,257
Thanks: 0
Thanked 0 Times in 0 Posts
Default

Like i said, you have talent
__________________
If it ain't buckin, chirpin & makin all kinds of bad noises, then I ain't happy

Accelerating is optional...........stopping is mandatory. Your car WILL stop one way or another.
Reply With Quote
  #5  
Old 05-24-2013, 08:17 PM
DaleTx's Avatar
DaleTx DaleTx is offline
Senior Member
 
Join Date: Dec 2012
Location: Pacific NW
Posts: 486
Thanks: 0
Thanked 0 Times in 0 Posts
Default

Quote:
Originally Posted by Sieg View Post
Thanks Dale - I had planned on just clamping the tailpipes to the transverse muffler before final tacking. As is the guys that put the exhaust back together after the fire restoration weren't very meticulous and the muffler is pushed back and out 15mm off from perpendicular so I'm also factoring squaring the muffler in the future when I replace the rest of the tubing they butchered.

Did you use stainless or mild steel for your exhaust?
I went with stainless headers, stainless mufflers, and 3" diameter aluminized steel tubing for the rest. I also put in a couple of the Dynatech V-Band clamps between the X-pipe and the mufflers so I can unbolt and remove the exhaust when working under the car.

You need to get your car back together for a Lat-g beaches get together out at PIR... coming up soon.

__________________
"If you wait, all that happens is you get older"
Mario Andretti

69 Camaro-Nutter Racing Engines/427CI LS2 sleeved/LS7 CNC ported heads/Custom cam/T&D 1.8 rockers/Manley crank/Manley H-beam rods/Weisco pistons/NRC Pro Series dry sump/Kooks/NA,92 octane,11.5:1- 672HP @ 6,900RPM, 566TQ @ 5,500RPM
Build Thread- http://ls1tech.com/forums/generation...ine-build.html
Reply With Quote
  #6  
Old 05-24-2013, 09:40 PM
Sieg's Avatar
Sieg Sieg is offline
Moderator
 
Join Date: Dec 2010
Location: Pacific Northwet
Posts: 8,034
Thanks: 33
Thanked 101 Times in 41 Posts
Default

Quote:
Originally Posted by DaleTx View Post
I went with stainless headers, stainless mufflers, and 3" diameter aluminized steel tubing for the rest. I also put in a couple of the Dynatech V-Band clamps between the X-pipe and the mufflers so I can unbolt and remove the exhaust when working under the car.

You need to get your car back together for a Lat-g beaches get together out at PIR... coming up soon.

Thanks! I definitely plan on V-Band clamps when I replace the main runs.

I'm pro tinkering Norwood as fast as I can!


Just need to fab hangers and weld them in place and install tomorrow............assuming they fit.

Last edited by Sieg; 05-24-2013 at 09:43 PM.
Reply With Quote
  #7  
Old 05-24-2013, 09:47 PM
fleetus macmullitz's Avatar
fleetus macmullitz fleetus macmullitz is offline
Lateral-g Supporting Member
 
Join Date: Oct 2007
Location: On Lake Ontario in NY
Posts: 11,063
Thanks: 3,284
Thanked 3,418 Times in 2,038 Posts
Default

Quote:
Originally Posted by Sieg View Post
Thanks! I definitely plan on V-Band clamps when I replace the main runs.

I'm pro tinkering Norwood as fast as I can!


Just need to fab hangers and weld them in place and install tomorrow............assuming they fit.
Looks killer.

__________________
Skip
Reply With Quote
  #8  
Old 05-26-2013, 12:05 AM
Sieg's Avatar
Sieg Sieg is offline
Moderator
 
Join Date: Dec 2010
Location: Pacific Northwet
Posts: 8,034
Thanks: 33
Thanked 101 Times in 41 Posts
Default

Well..........they almost fit.

Had to cut a weld on the passenger side and rotate it about .25" then bent some rod for the hangers and hopefully they're done!


Top center of this pic shows the original Fathom Green color.
Reply With Quote
  #9  
Old 05-26-2013, 12:08 AM
Vince@Meanstreets's Avatar
Vince@Meanstreets Vince@Meanstreets is offline
Senior Member
 
Join Date: Nov 2004
Location: Bay Area, California
Posts: 5,532
Thanks: 13
Thanked 18 Times in 12 Posts
Default

nice work man, what filler are you using?
__________________
MEANSTREETS PERFORMANCE

Dealer for
ACCUAIR rideheight control systems
ENTROPY RADIATORS XXX radiators for your pro-touring vehicle
FORGELINE MOTORSPORTS Highline custom 3 piece wheels
WEGNER AUTOMOTIVE Custom engines and LSX drive systems
SPEEDTECH PERFORMANCE Bay Area stocking dealer

NEVER FORGET -11
Reply With Quote
Reply


Posting Rules
You may not post new threads
You may not post replies
You may not post attachments
You may not edit your posts

BB code is On
Smilies are On
[IMG] code is On
HTML code is Off

Forum Jump


All times are GMT -7. The time now is 06:53 PM.


Powered by vBulletin® Version 3.8.11
Copyright ©2000 - 2025, vBulletin Solutions Inc.
Copyright Lateral-g.net