...

Go Back   Lateral-g Forums > Technical Discussions > Chassis and Suspension
User Name
Password


Reply
 
Thread Tools Display Modes
  #1  
Old 06-05-2006, 08:08 PM
Nutsy Nutsy is offline
Senior Member
 
Join Date: Oct 2004
Location: Vancouver, BC
Posts: 179
Thanks: 0
Thanked 0 Times in 0 Posts
Default Body Jigs

Are there any do-it-yourself body jig instructions anywhere? I would like to make a body jig for my Camaro for the chassis fab phase (suspension, tubs, roll cage, FC's, etc.) simular to the one that they use for the Challenger on Muscle Car TV show or ones that Rad Rides use for their restorations.

When you put a car on the jig, what part of the car should be level?
Do you take level measurement on the rockers or where?
Does the jig itself have to be perfectly level? is there a way to make it adjustable so that depending on how level the floor is, the jig can be made to be level?

Also how high typically do you situate the car on the jig (ie. ground clearance of the car)? Where is this measurement taken from on the car? Lower rockers, or lowest point on the car (oil pan i guess?)?

Does anyone have pics of any body jigs?
Reply With Quote
  #2  
Old 06-06-2006, 02:26 AM
hiwayman hiwayman is offline
Senior Member
 
Join Date: Jan 2006
Location: new zealand
Posts: 121
Thanks: 0
Thanked 0 Times in 0 Posts
Default

hey man yea i jiged my 69 heres a shot how i did it the car is level with the beams in the pic i tacked the sills to the uprights give me a holler if you need more info
Attached Images
  
Reply With Quote
  #3  
Old 06-06-2006, 08:27 PM
Leadfoot1's Avatar
Leadfoot1 Leadfoot1 is offline
Senior Member
 
Join Date: Dec 2005
Location: MONTREAL- CANADA
Posts: 705
Thanks: 0
Thanked 0 Times in 0 Posts
Default

Hey Nutsy,

Take a look at mine too....Cost a 100$ to build and its definetely the way to go!!! So much more pleasant to work on.

http://www.racingjunkrides.com/view_ride/319/

...Sorry, can't seem to post pics directly. You have to click under the main picture "VIEW IMAGES" and then flip them over to get to the latest ones...

Hope it helps!

Lead
__________________
LEADFOOT1

New for summer '13. My latest find!!

48k miles, 100% original, 1969 Camaro coupe. Untouched, never apart and squeaky clean!!! 327/th350, A/C car. Gold on black w/vinyl top. Only add ons; Fast ratio box and SS396 wheels.

FINALLY!!! A car without rust repairs ever!!! None before, none coming!!! Cant come to modifying it tough....

...So, '67 Camaro project with my laying around stuff out of my black 'vert. 468 BB and YSI blower, braked th400, 12 bolt/spool, 35 splines etc. Complete Calvert suspension front and rear. 30x13.5 ET Streets, caged, lightened, slammed and running low 9's "Street car"
Reply With Quote
  #4  
Old 06-06-2006, 08:33 PM
Leadfoot1's Avatar
Leadfoot1 Leadfoot1 is offline
Senior Member
 
Join Date: Dec 2005
Location: MONTREAL- CANADA
Posts: 705
Thanks: 0
Thanked 0 Times in 0 Posts
Default

Nutsy!

I Just noticed your from Canada! Thats Cool. I'm in Montreal.

That last 100$ figure was Canadian money....

Lead.
__________________
LEADFOOT1

New for summer '13. My latest find!!

48k miles, 100% original, 1969 Camaro coupe. Untouched, never apart and squeaky clean!!! 327/th350, A/C car. Gold on black w/vinyl top. Only add ons; Fast ratio box and SS396 wheels.

FINALLY!!! A car without rust repairs ever!!! None before, none coming!!! Cant come to modifying it tough....

...So, '67 Camaro project with my laying around stuff out of my black 'vert. 468 BB and YSI blower, braked th400, 12 bolt/spool, 35 splines etc. Complete Calvert suspension front and rear. 30x13.5 ET Streets, caged, lightened, slammed and running low 9's "Street car"
Reply With Quote
  #5  
Old 06-06-2006, 10:05 PM
hiwayman hiwayman is offline
Senior Member
 
Join Date: Jan 2006
Location: new zealand
Posts: 121
Thanks: 0
Thanked 0 Times in 0 Posts
Default

nutsy yea iagree with the lead his would be heaps easyer to work on mine is like that because i removed the entire floor and the car would have flexed too much
Reply With Quote
  #6  
Old 06-07-2006, 05:45 AM
Leadfoot1's Avatar
Leadfoot1 Leadfoot1 is offline
Senior Member
 
Join Date: Dec 2005
Location: MONTREAL- CANADA
Posts: 705
Thanks: 0
Thanked 0 Times in 0 Posts
Exclamation

Highwayman,

Did not mean to put your model down by any means or even compare them.
Just wanted to share mine. 'Hoping it was not understood that way!!!

Yours looks more like the ones the pro's use. H beam and all.

At the point i am....I have no floors in my car either and the car is only clamped down to the jig, but it works!

I also have the same questions in relation to frame building and reference points that nutsy has. I'm looking to buy some fabbing books to help me out here. Other tnan that i should use prefabbed rails so its gonna help some.

I've been following your build with great interest and you made me think of many mods i might apply on my own ride.

Lead.
__________________
LEADFOOT1

New for summer '13. My latest find!!

48k miles, 100% original, 1969 Camaro coupe. Untouched, never apart and squeaky clean!!! 327/th350, A/C car. Gold on black w/vinyl top. Only add ons; Fast ratio box and SS396 wheels.

FINALLY!!! A car without rust repairs ever!!! None before, none coming!!! Cant come to modifying it tough....

...So, '67 Camaro project with my laying around stuff out of my black 'vert. 468 BB and YSI blower, braked th400, 12 bolt/spool, 35 splines etc. Complete Calvert suspension front and rear. 30x13.5 ET Streets, caged, lightened, slammed and running low 9's "Street car"
Reply With Quote
  #7  
Old 06-07-2006, 06:46 AM
astroracer astroracer is offline
Member
 
Join Date: Dec 2004
Location: Mid-Michigan
Posts: 76
Thanks: 0
Thanked 0 Times in 0 Posts
Default

Hey guys, Simple is better. I will be building a body cart for my project and I think lead's idea will work great!
Here is a jig table I built last year for setting up suspensions.


The "H" beams are fully adjustable width wise and I have found them very versatile as fabrication and assembly tables also. I can clamp or bolt just about any tool I own onto them and the casters make them fully mobile. You can also see the 3/4" bolts I use to level them when necessary.

This last pic shows the melamine top I put on to jig up a front cradle. It is very stable and thick enough (two pieces screwed and glued together) to bolt to

Just some more ideas...
Mark
__________________
"Bad Ast" Astro Van Pro-Touring Project.... Heat, beat, file to fit, paint to match...
Reply With Quote
  #8  
Old 06-07-2006, 09:50 AM
Nutsy Nutsy is offline
Senior Member
 
Join Date: Oct 2004
Location: Vancouver, BC
Posts: 179
Thanks: 0
Thanked 0 Times in 0 Posts
Default

Thanks for the great info guys! I love this place!
Reply With Quote
  #9  
Old 06-18-2006, 09:11 PM
ohcbird's Avatar
ohcbird ohcbird is offline
Senior Member
 
Join Date: Mar 2005
Location: NE FL
Posts: 345
Thanks: 0
Thanked 0 Times in 0 Posts
Exclamation

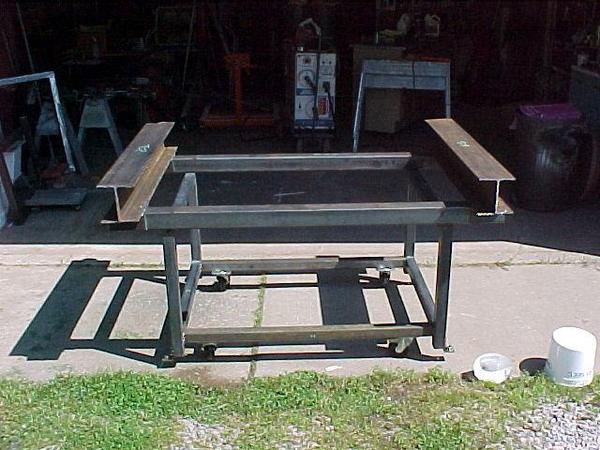
While I wouldn't call this a 'jig' by any means, I did do my mini-tubs, the Qudra-link install, and the rear crossmember install while my Firebird was installed. We used 2" .125" wall square tube (a stick & a half or so). The wheels are the Harbor freight cheapies (use the bigger wheels next time). The axles are just 5/8" galv rod with a cotter pin hole drilled into the end. I used very basic dimensions (outside dimension of the rectangle): 36" x 72", which creates a 'bed frame' for the front & rear frames to sit on). I then took some scrap 1" and made some stubs that would allow me to bolt this sucker to the frame. We did have to cut a section out of the x-member that is under the engine / trans, but that was pinned back in.

Yeah- it doesn't steer, but I can pick the front frame up and manuever it like a wheelbarrow. The fact that it doesn't steer means that it doesn't move around on me while working on it (unless I bought some expensive locking casters). It has supported the weight of what you see plus my engine and trans, but the tires won't look like they like it!

So, $70 US worth of 2", $20 worth of wheels (4.99 ea), $10 5/8" galvanized rod (2' section), 8ea 5/8" fender washers (.12 each), and a case of beer for my buddy that finished the welding. Took us about an hour start to finish. For next time, I'd buy some bigger wheels, or put another wheel on each side of the stubs.

Reply With Quote
Reply


Posting Rules
You may not post new threads
You may not post replies
You may not post attachments
You may not edit your posts

BB code is On
Smilies are On
[IMG] code is On
HTML code is Off

Forum Jump


All times are GMT -7. The time now is 02:09 PM.


Powered by vBulletin® Version 3.8.11
Copyright ©2000 - 2026, vBulletin Solutions Inc.
Copyright Lateral-g.net