...

Go Back   Lateral-g Forums > Lateral-G Open Discussions > Project Updates
User Name
Password


Reply
 
Thread Tools Display Modes
  #491  
Old 06-28-2013, 04:15 PM
Bryce Bryce is offline
Senior Member
 
Join Date: Apr 2009
Posts: 873
Thanks: 0
Thanked 0 Times in 0 Posts
Default

you can hit the cones but avoid the metal things.
Reply With Quote
  #492  
Old 08-20-2013, 10:40 PM
Matt@BOS's Avatar
Matt@BOS Matt@BOS is offline
Lateral-g Supporting Vendor
 
Join Date: Oct 2008
Posts: 2,042
Thanks: 2
Thanked 37 Times in 30 Posts
Default

Quote:
Originally Posted by Vegas69 View Post
Nice driving ACE.
Ok, since the professionals have been doing the majority of the work getting the front end of my Camaro painted, I broke out the filler and body worked the hood and engine compartment on the little fastback. I thought I would fill a few holes, hammer out some dents and and it would be ready for primer. WRONG. I sanded and sanded and Jesus, BOS's painter had to clean up after me. I was going for a factory look, nothing overtly custom, and I think we pulled that off.

It might not look like much without and engine, but it was a ton of work.
Reply With Quote
  #493  
Old 08-21-2013, 07:18 AM
DOOM's Avatar
DOOM DOOM is offline
Lateral-g Supporting Member
 
Join Date: Jan 2007
Location: South Side Chicago
Posts: 2,912
Thanks: 7
Thanked 64 Times in 40 Posts
Default

Matt I'm tired just looking at it!
__________________
Mario
USCOLLISION
Reply With Quote
  #494  
Old 08-21-2013, 07:25 AM
ironworks's Avatar
ironworks ironworks is offline
Senior Member
 
Join Date: Oct 2005
Location: Bakersfield, Ca
Posts: 5,156
Thanks: 4
Thanked 35 Times in 21 Posts
Default

Quote:
Originally Posted by Matt.A View Post
Ok, since the professionals have been doing the majority of the work getting the front end of my Camaro painted, I broke out the filler and body worked the hood and engine compartment on the little fastback. I thought I would fill a few holes, hammer out some dents and and it would be ready for primer. WRONG. I sanded and sanded and Jesus, BOS's painter had to clean up after me. I was going for a factory look, nothing overtly custom, and I think we pulled that off.

It might not look like much without and engine, but it was a ton of work.
So what you have learned is that this car building thing is hard work.
__________________
www.ironworksspeedandkustom.com
Reply With Quote
  #495  
Old 08-21-2013, 07:46 AM
Matt@BOS's Avatar
Matt@BOS Matt@BOS is offline
Lateral-g Supporting Vendor
 
Join Date: Oct 2008
Posts: 2,042
Thanks: 2
Thanked 37 Times in 30 Posts
Default

Quote:
Originally Posted by ironworks View Post
So what you have learned is that this car building thing is hard work.
I knew it was hard work. I always thought things took twice as long as you thought they were going to take, but then if I realized that applies to skilled and experienced people, and if I added my hours up I realized most things take me four times as long as I thought.
Reply With Quote
  #496  
Old 08-21-2013, 07:59 AM
chr2002ca's Avatar
chr2002ca chr2002ca is offline
Senior Member
 
Join Date: Jul 2008
Location: San Diego, CA
Posts: 775
Thanks: 0
Thanked 0 Times in 0 Posts
Default

Yep, bodywork takes friggin forever. My family put me on suicide watch while I was doing mine on my car. Never again! Congrats on the continued progress Matt.
__________________
Chris Robinson
1969 Camaro SS/RS, 489 ZL-1 MPFI, T-56 Mag
Reply With Quote
  #497  
Old 08-21-2013, 09:49 AM
waynieZ's Avatar
waynieZ waynieZ is offline
Lateral-g Supporting Member
 
Join Date: Oct 2006
Location: Ma
Posts: 8,491
Thanks: 939
Thanked 342 Times in 231 Posts
Default

It looks nice Matt, atleast you can say you did it.
__________________
_Wayne________

___________________________________
https://lateral-g.net/forums/show...ghlight=FNQUIK
Reply With Quote
  #498  
Old 08-21-2013, 06:05 PM
Matt@BOS's Avatar
Matt@BOS Matt@BOS is offline
Lateral-g Supporting Vendor
 
Join Date: Oct 2008
Posts: 2,042
Thanks: 2
Thanked 37 Times in 30 Posts
Default

Quote:
Originally Posted by chr2002ca View Post
Yep, bodywork takes friggin forever. My family put me on suicide watch while I was doing mine on my car. Never again! Congrats on the continued progress Matt.
I'm lucky i have someone to clean up after me, because getting it perfect would probably kill me. I don't know how you did with little to no background. By the way Chris, how is the car running I want to check it out and hear it sometime!
Reply With Quote
  #499  
Old 08-21-2013, 07:12 PM
Flash68's Avatar
Flash68 Flash68 is offline
Moderator
 
Join Date: Sep 2005
Location: NorCal
Posts: 9,180
Thanks: 58
Thanked 158 Times in 104 Posts
Default

Not too shabby for a Camaro guy.
__________________
2004 NASA AIX Mustang LS2 #14
1964 Lincoln Continental
2014 4 tap Keezer
Reply With Quote
  #500  
Old 10-05-2013, 02:15 PM
Matt@BOS's Avatar
Matt@BOS Matt@BOS is offline
Lateral-g Supporting Vendor
 
Join Date: Oct 2008
Posts: 2,042
Thanks: 2
Thanked 37 Times in 30 Posts
Default

Hey guys, I have pictures to post, and they're not old recycled ones like Rob has, they're new ones, and they aren't of hubs with yellow lug nuts or aluminum blocks with iron heads either.

After doing all of the body work on the engine compartment I started mocking everything up so that I could start fabricating some bracing/tubing that will be used to attach stuff to. Part of the idea behind the car has been to draw on some of the cool original design elements of the early Mustangs and Shelbys and change and or update them without creating a contemporary looking custom build that feels "new." I hope that makes some sense. In keeping with that theme I wanted to add engine bay bracing that was reminiscent of the old shock tower - to - firewall and "monte carlo" bars that the original cars had. And yes, before anyone says it, I clearly sacrificed some function with that huge bend in the monte carlo bar, but the air for the engine has to come from somewhere.


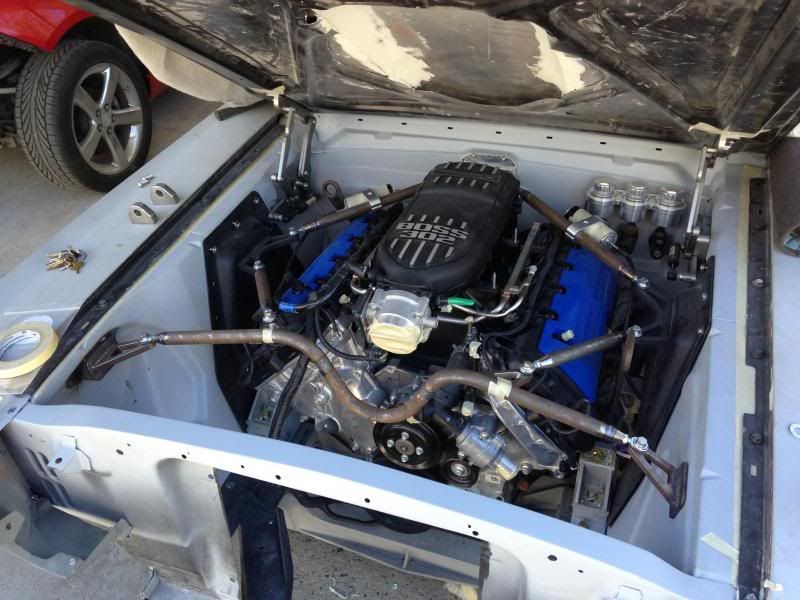
After building all of the bracing I was hoping to move away from more little body and fab projects, it is really easy to come up with simple little ideas that turn into small but time consuming projects.

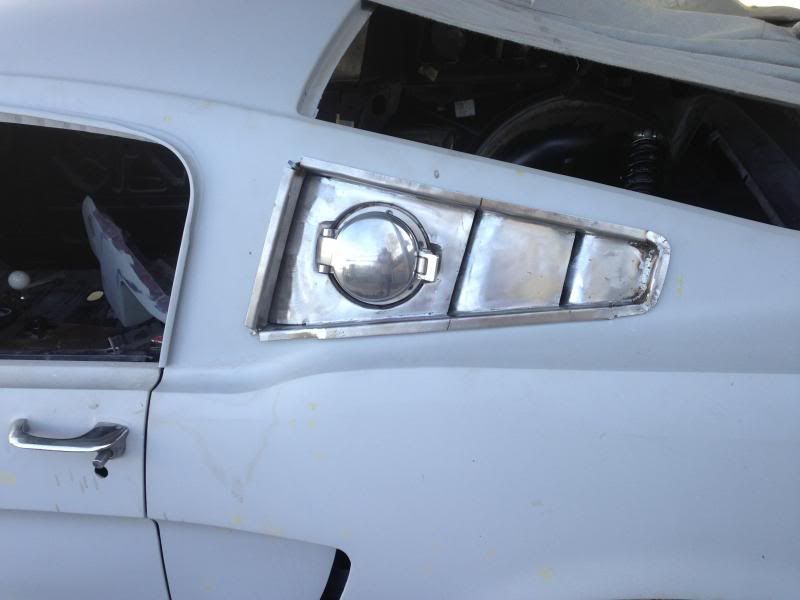
One of the projects at BOS right now is a twin turbo 67 Mustang that arrived with the typical Eleanor body kit. It has been undergoing a transformation of sorts, and one of my ideas was to get rid of the quarter window scoops and replace them with fuel and oil fillers since the car is running a dry sump in the back and a 35 gallon fuel cell that is so tall it can only be fed from the sail panel. The owner wanted to retain the original Shelby quarter scoops though, so I started playing around with the idea on my car.

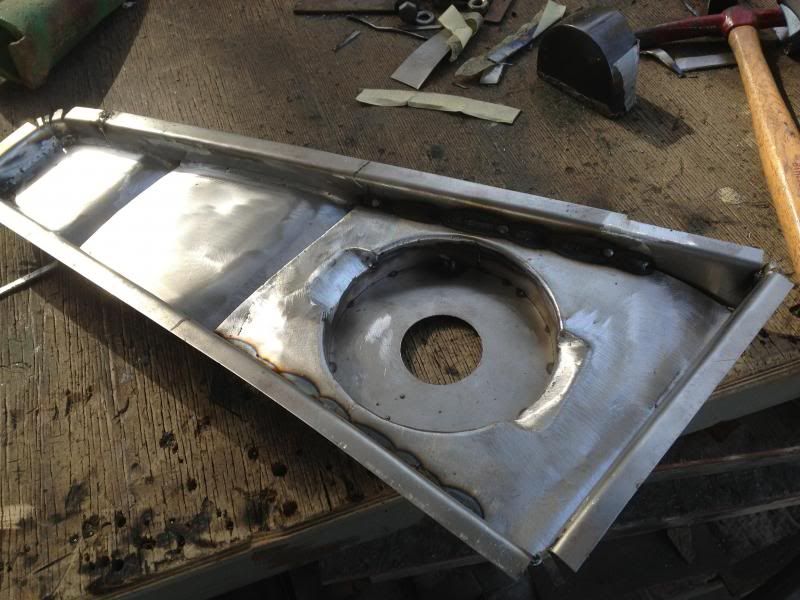
Here is what unfolded. The initial version was the most simplistic and was a straight recessed panel, but that left too much empty space that needed to be filled with something. Since I've always one of the more iconic features on the fastback were its louvers I decided to try and add some. After playing with spacing, and the inclusion of the racing style filler that appeared on the Cobra, this is what I ended up with.

http://s366.photobucket.com/user/69M...tml?sort=3&o=6

I still wasn't quite happy with it though because the filler still looked tacked on so I decided to recess it with notches around the hinges so it looked more like it belonged.


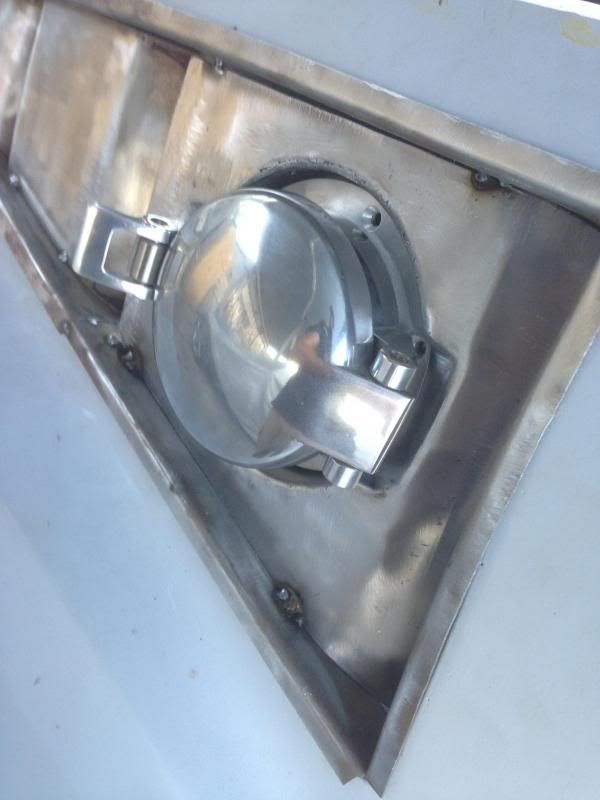
Now to figure out how to make a little stainless trim ring that matches with drip rail moldings...
Reply With Quote
Reply


Posting Rules
You may not post new threads
You may not post replies
You may not post attachments
You may not edit your posts

BB code is On
Smilies are On
[IMG] code is On
HTML code is Off

Forum Jump


All times are GMT -7. The time now is 06:34 PM.


Powered by vBulletin® Version 3.8.11
Copyright ©2000 - 2026, vBulletin Solutions Inc.
Copyright Lateral-g.net