...

Go Back   Lateral-g Forums > Lateral-G Open Discussions > Project Updates
User Name
Password


Reply
 
Thread Tools Display Modes
  #171  
Old 09-21-2013, 07:58 PM
aany001's Avatar
aany001 aany001 is offline
Senior Member
 
Join Date: Oct 2005
Location: Pickering Canada
Posts: 994
Thanks: 1
Thanked 46 Times in 25 Posts
Default


Last edited by aany001; 10-06-2013 at 06:32 PM.
Reply With Quote
  #172  
Old 09-21-2013, 09:19 PM
tubbed69's Avatar
tubbed69 tubbed69 is offline
Lateral-g Supporting Member
 
Join Date: May 2010
Posts: 2,133
Thanks: 8
Thanked 42 Times in 36 Posts
Default

looking good Steve,almost there
Reply With Quote
  #173  
Old 09-22-2013, 05:56 AM
Rick D's Avatar
Rick D Rick D is offline
Senior Member
 
Join Date: Jun 2005
Location: Third Rock From the Sun!! 😃
Posts: 3,437
Thanks: 0
Thanked 2 Times in 2 Posts
Default

Nice Steve!!! So what color is it going to be?
__________________
Rick

[SIGPIC]https://neversaynever0304.files.wordpress.com/2014/07/you-didnt-see-anything.gif[/SIGPIC]
Reply With Quote
  #174  
Old 09-22-2013, 06:38 AM
aany001's Avatar
aany001 aany001 is offline
Senior Member
 
Join Date: Oct 2005
Location: Pickering Canada
Posts: 994
Thanks: 1
Thanked 46 Times in 25 Posts
Default

Thanks guys. Rick its going the traditional hugger orange with white stripes.
Reply With Quote
  #175  
Old 10-02-2013, 07:46 PM
aany001's Avatar
aany001 aany001 is offline
Senior Member
 
Join Date: Oct 2005
Location: Pickering Canada
Posts: 994
Thanks: 1
Thanked 46 Times in 25 Posts
Default A little more progress!!!!


Reply With Quote
  #176  
Old 10-02-2013, 07:49 PM
aany001's Avatar
aany001 aany001 is offline
Senior Member
 
Join Date: Oct 2005
Location: Pickering Canada
Posts: 994
Thanks: 1
Thanked 46 Times in 25 Posts
Default

Getting really motivated now!!! Hoping to get the front end all edged by the weekend and then assemble it for paint!!!!
Reply With Quote
  #177  
Old 10-03-2013, 07:24 AM
tubbed69's Avatar
tubbed69 tubbed69 is offline
Lateral-g Supporting Member
 
Join Date: May 2010
Posts: 2,133
Thanks: 8
Thanked 42 Times in 36 Posts
Default

showing real progress now Steve,orange looks good
Reply With Quote
  #178  
Old 10-03-2013, 10:43 AM
Leadfoot1's Avatar
Leadfoot1 Leadfoot1 is offline
Senior Member
 
Join Date: Dec 2005
Location: MONTREAL- CANADA
Posts: 705
Thanks: 0
Thanked 0 Times in 0 Posts
Default

Quote:
Originally Posted by aany001 View Post


I know its a long time ago post wise but i just started from the beginning...

I was wondering why you kept the old torque boxes when yo replaced the floor?
They come with the new floor and you replaced it so what did you do? Remove the new ones off the new floor to keep the old ones attached to the rails? Maybe because of them beeing already welded you preferred keeping these rather than risking to damage the frame rails when removing them?

Im just wondering as im jumping into this big job myself (once again!) and have always used the new ones that are on the replacement floor. Just asking as i might have missed on something or a reason to do it that way.... Always looking for a better way to do things!

Keep the work up, your getting there!!

Lead.
__________________
LEADFOOT1

New for summer '13. My latest find!!

48k miles, 100% original, 1969 Camaro coupe. Untouched, never apart and squeaky clean!!! 327/th350, A/C car. Gold on black w/vinyl top. Only add ons; Fast ratio box and SS396 wheels.

FINALLY!!! A car without rust repairs ever!!! None before, none coming!!! Cant come to modifying it tough....

...So, '67 Camaro project with my laying around stuff out of my black 'vert. 468 BB and YSI blower, braked th400, 12 bolt/spool, 35 splines etc. Complete Calvert suspension front and rear. 30x13.5 ET Streets, caged, lightened, slammed and running low 9's "Street car"
Reply With Quote
  #179  
Old 10-03-2013, 02:03 PM
streetbird's Avatar
streetbird streetbird is offline
Senior Member
 
Join Date: Jun 2013
Location: qc,canada
Posts: 252
Thanks: 55
Thanked 84 Times in 40 Posts
Default

Quote:
Originally Posted by Leadfoot1 View Post
I know its a long time ago post wise but i just started from the beginning...

I was wondering why you kept the old torque boxes when yo replaced the floor?
They come with the new floor and you replaced it so what did you do? Remove the new ones off the new floor to keep the old ones attached to the rails? Maybe because of them beeing already welded you preferred keeping these rather than risking to damage the frame rails when removing them?

Im just wondering as im jumping into this big job myself (once again!) and have always used the new ones that are on the replacement floor. Just asking as i might have missed on something or a reason to do it that way.... Always looking for a better way to do things!

Keep the work up, your getting there!!

Lead.
He didnt keep it, the car is minitubbed and the shock location is relocated in the crossmember that you see. No more torque box
__________________
The French Frog
Reply With Quote
  #180  
Old 10-04-2013, 07:37 AM
Leadfoot1's Avatar
Leadfoot1 Leadfoot1 is offline
Senior Member
 
Join Date: Dec 2005
Location: MONTREAL- CANADA
Posts: 705
Thanks: 0
Thanked 0 Times in 0 Posts
Default

I dont think you are talking about the same thing as i am....

Torque boxes stay on cars no matter what you use suspension wise.

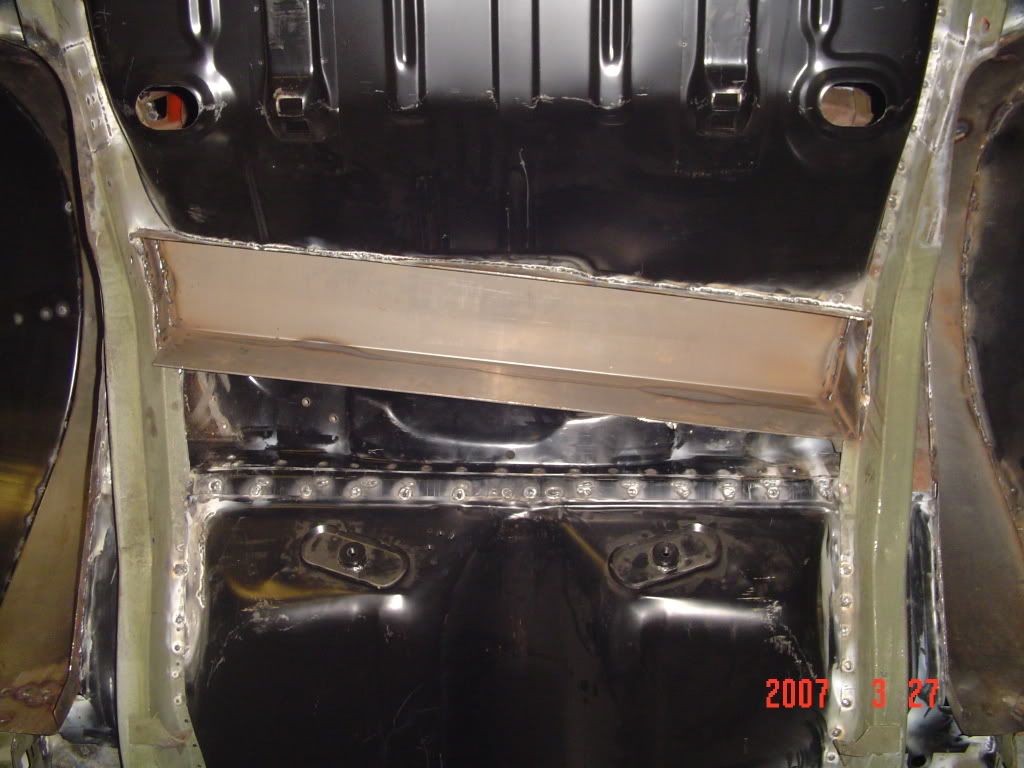
I'm talking about the "torque box" not a "shock mount" the part where the front leaf spring supporting "cage" bolts to after beeing attached to the leaf, and now where the front lower tubes of the Quadra link bolts onto.

You can see them in a few pics when looking at the front of the frame rails when he was replaceing the floor. They stayed on and there are no pics of them afterwards showing if he kept them or not.... Wondering? And why also?


Lead.

Ps; Hey, its nice to see a fellow Quebecker on here, where in Qc are you located? Province or Town of Quebec? Maybe we know eachother.
__________________
LEADFOOT1

New for summer '13. My latest find!!

48k miles, 100% original, 1969 Camaro coupe. Untouched, never apart and squeaky clean!!! 327/th350, A/C car. Gold on black w/vinyl top. Only add ons; Fast ratio box and SS396 wheels.

FINALLY!!! A car without rust repairs ever!!! None before, none coming!!! Cant come to modifying it tough....

...So, '67 Camaro project with my laying around stuff out of my black 'vert. 468 BB and YSI blower, braked th400, 12 bolt/spool, 35 splines etc. Complete Calvert suspension front and rear. 30x13.5 ET Streets, caged, lightened, slammed and running low 9's "Street car"
Reply With Quote
Reply


Posting Rules
You may not post new threads
You may not post replies
You may not post attachments
You may not edit your posts

BB code is On
Smilies are On
[IMG] code is On
HTML code is Off

Forum Jump


All times are GMT -7. The time now is 08:11 PM.


Powered by vBulletin® Version 3.8.11
Copyright ©2000 - 2025, vBulletin Solutions Inc.
Copyright Lateral-g.net