...

Go Back   Lateral-g Forums > Lateral-G Open Discussions > Project Updates
User Name
Password


Reply
 
Thread Tools Display Modes
  #1  
Old 11-10-2014, 11:39 AM
Roger Poirier's Avatar
Roger Poirier Roger Poirier is offline
Senior Member
 
Join Date: Sep 2005
Posts: 664
Thanks: 0
Thanked 0 Times in 0 Posts
Default Any thing new on the GOAT?

I'm sure you are getting ready for a paint job or are in paint jail already. Any new updates? Have you bought tires and rims yet? What white color did you end up with for painting the body?

Details and update appreciated. Thanks Roger
__________________
official car name - DELIVERANCE
Reply With Quote
  #2  
Old 11-10-2014, 02:29 PM
Al Moreno Al Moreno is offline
Senior Member
 
Join Date: Dec 2004
Posts: 1,502
Thanks: 3
Thanked 1 Time in 1 Post
Default

Nice project, just went through the entire thread. Great story! Can't wait to see her done.
Reply With Quote
  #3  
Old 11-12-2014, 05:28 PM
1968 GTO Resto-Mod's Avatar
1968 GTO Resto-Mod 1968 GTO Resto-Mod is offline
Senior Member
 
Join Date: Dec 2013
Posts: 184
Thanks: 0
Thanked 0 Times in 0 Posts
Default update as requested

Quote:
Originally Posted by Roger Poirier View Post
I'm sure you are getting ready for a paint job or are in paint jail already. Any new updates? Have you bought tires and rims yet? What white color did you end up with for painting the body?

Details and update appreciated. Thanks Roger
Quote:
Originally Posted by Al Moreno View Post
Nice project, just went through the entire thread. Great story! Can't wait to see her done.
thanks so much for checking in!
and thanks as well for your interest in this project!!!

as far as i can tell i'm still a ways out from paint.
am i missing something here?
i have seen that many other frame-off projects apply paint before mounting autobody back to the frame, but i was unable to do this... is it a mistake?
i can still unbolt and raise the autobody then remove the rolling chassis if necessary.
i don't plan to make final measurements for wheel/tire package until the full weight of the ride is sitting on the properly adjusted suspension system.
the idea is to settle for the momo setup with falken rubber until then.

i'm very excited about how far this car has come and i have been thinking a lot lately about how to continue the project.

one of the most important lessons i've had to learn throughout this entire process is something most of you gentlemen are probably already familiar with: restoring a car is one project and finding a way to pay for it is something completely different.
consequently, i have been very busy with work this season and have had precious little time to devote to the goat.

as far as recent progress is concerned, i do have a few pieces of good news to report...

i believe i've solved the tensioner pulley puzzle.
after countless hours of sorting through pulleys at parts stores and salvage yards, i finally found a general motors manufactured tensioner pulley that might work for the serpentine accessory drive.

Name:  idlerpulley.jpg
Views: 501
Size:  285.0 KB

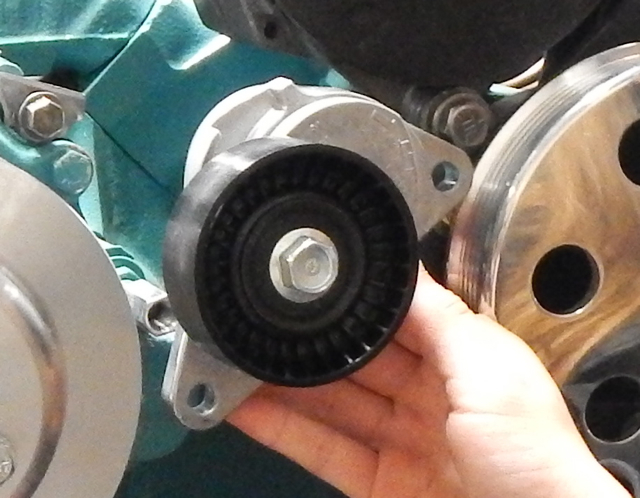
at 4.00" the dimension between the two mounting holes in the tensioner is exactly the same as the dimension between the threaded stud on the timing cover and the lower alternator mount!

also, after months of screening ebay and other online sources i finally found a spread bore, four barrel, rochester quadrajet carburetor for 1968 pontiac manual transmission application.

Name:  quadrajet1.jpg
Views: 478
Size:  302.3 KB

huge credit to cliff ruggles and his team at cliff's high performance for their effort in remanufacturing and refinishing this quadrajet.
many sources claim no one has more skill and knowledge with the rochester quadrajet than cliff ruggles, so i am very fortunate i was able to coordinate with him on this project.
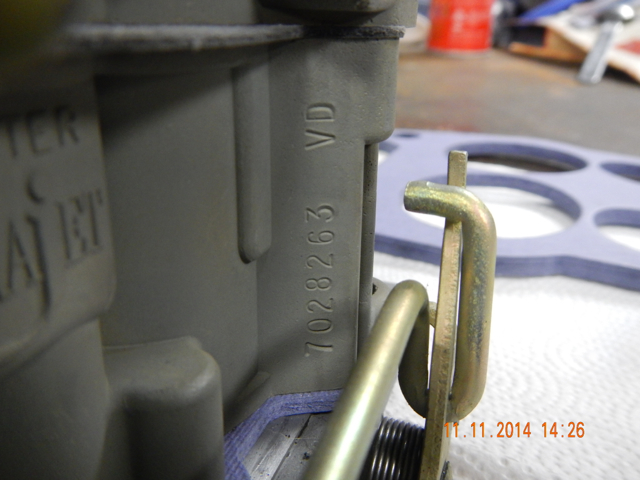
Name:  quadrajet2.jpg
Views: 486
Size:  274.1 KB

702 => 1960's
8 => 1968
2 => quadrajet (4 bbl) federal standards
6 => pontiac
3 => manual transmission

thanks again for your interest in this project.
i will update with further developments as progress continues.
danny

Reply With Quote
  #4  
Old 11-13-2014, 01:02 PM
Roger Poirier's Avatar
Roger Poirier Roger Poirier is offline
Senior Member
 
Join Date: Sep 2005
Posts: 664
Thanks: 0
Thanked 0 Times in 0 Posts
Default

The small details of the build is what makes the post worth while. That Rochester carb. coding is a nice touch. Conversation piece!

As far as I'am concerned you want to paint the body on the car and mask off accordingly. My painter did paint the doors, hood and trunk, along with the the front bumper separate once everything was fitted and blocked. However they did follow each other into the paint booth.

I give you great kudo's for your patience taking your time in the build. As far as money goes you just get the fever and keep moving forward.

Please keep us informed on the build...
__________________
official car name - DELIVERANCE

Last edited by Roger Poirier; 11-13-2014 at 07:03 PM.
Reply With Quote
  #5  
Old 12-15-2014, 06:11 PM
1968 GTO Resto-Mod's Avatar
1968 GTO Resto-Mod 1968 GTO Resto-Mod is offline
Senior Member
 
Join Date: Dec 2013
Posts: 184
Thanks: 0
Thanked 0 Times in 0 Posts
Default serpentine conversion

recently made some progress getting the serpentine accessory drive assembled.


Name:  assembly1.jpg
Views: 638
Size:  328.7 KB Name:  assembly2.jpg
Views: 650
Size:  347.0 KB


the tensioner was pulled off a shelf at my local NAPA parts store.
getting everything to line up properly didn't happen without a little cutting and grinding.
the threaded stud at timing cover was shortened 0.75" then a 1.00" long coupling nut threaded onto it allowed thru-bolt for the lower mounting point of tensioner.


Name:  blockstud1.jpg
Views: 637
Size:  334.2 KB

upper mounting point of tensioner at upper power steering bracket thru-bolt.
at this location i had to push the tensioner back into the alternator bracket to line up with the other pulleys.

Name:  altbracket1.jpg
Views: 645
Size:  263.6 KB


Name:  altbracket2.jpg
Views: 641
Size:  282.8 KB


underside of lower alternator mount needed to be slotted to align mounting points.


Name:  altmount.jpg
Views: 647
Size:  282.1 KB


power steering bracket was shaved to fit tensioner housing.


Name:  p:sbracket1.jpg
Views: 642
Size:  341.0 KB


thanks for your interest!
danny

Reply With Quote
  #6  
Old 12-16-2014, 07:49 AM
captainofiron's Avatar
captainofiron captainofiron is offline
Senior Member
 
Join Date: Apr 2007
Location: Austin, TX
Posts: 206
Thanks: 29
Thanked 4 Times in 4 Posts
Default

good work!
Reply With Quote
  #7  
Old 12-22-2014, 04:58 PM
1968 GTO Resto-Mod's Avatar
1968 GTO Resto-Mod 1968 GTO Resto-Mod is offline
Senior Member
 
Join Date: Dec 2013
Posts: 184
Thanks: 0
Thanked 0 Times in 0 Posts
Default

it seems like i can spiff-up the steering column with replacement bearings, bushings, etc. from inline tube and ames.
i'll just remove the column shift handle, clean it all up, replace worn or un-useable equipment as necessary, paint it and re-install.
and yes, as you can tell from the original paint on the steering column, the stock interior color of this vehicle was turquoise. someone painted black over it before my parents got the car.

Name:  steeringcolumn1.jpg
Views: 566
Size:  356.7 KB

the blower motor box cleaned up pretty nice and i found a replacement blower motor in town.
the heater box which mounts to the inside of the firewall will need to be replaced because at some point my father modified it to install a larger heater core.

Name:  blowermotor.jpg
Views: 575
Size:  304.7 KB

i knew i was going to have to cut a hole in the floor at some point... and the other day i finally got down to figuring it out.
also, i got all the shifting rods and the speedo cable installed with no major headaches.
from here i plan to order a shifter porch, console mounting bracket kit and console kit from ames/inline tube/opgi/etc.

Name:  hurstshifter5.jpg
Views: 573
Size:  276.4 KB

thankfully the firewall was equipped for stock clutch linkage so i plan to mount the mcleod/wilwood clutch master cylinder at this location.

Name:  clutchmaster1.jpg
Views: 573
Size:  235.3 KB

i also recently began installation of the msd pro billet distributor and the rest of the ignition system.

Name:  distributor1.jpg
Views: 532
Size:  322.9 KB

i placed an order last week for ron davis dual electric fan radiator, master grounding kit, wiring harnesses and some other bits and pieces.
i will update again as progress continues.

thanks for having a look at my work, and please- if anything looks or sounds screwy please feel free to comment.
i'm lucky to share this project with this community and i am always thankful for any input members here might have to offer.
thanks again!

danny


Last edited by 1968 GTO Resto-Mod; 12-23-2014 at 05:41 PM.
Reply With Quote
Reply


Posting Rules
You may not post new threads
You may not post replies
You may not post attachments
You may not edit your posts

BB code is On
Smilies are On
[IMG] code is On
HTML code is Off

Forum Jump


All times are GMT -7. The time now is 01:49 AM.


Powered by vBulletin® Version 3.8.11
Copyright ©2000 - 2025, vBulletin Solutions Inc.
Copyright Lateral-g.net