...

Go Back   Lateral-g Forums > Lateral-G Open Discussions > Project Updates
User Name
Password


Reply
 
Thread Tools Display Modes
  #1  
Old 08-08-2016, 05:50 PM
SSLance's Avatar
SSLance SSLance is offline
Senior Member
 
Join Date: Oct 2013
Location: Peoria, AZ
Posts: 2,683
Thanks: 72
Thanked 338 Times in 212 Posts
Default

Nice to finally meet you as well Dave, good to see you are a member here too.

Would have liked to watch you run in the dry for sure.
__________________
Lance
1985 Monte Carlo SS Street Car
Reply With Quote
  #2  
Old 08-10-2016, 12:09 PM
z28cp z28cp is offline
Member
 
Join Date: Aug 2009
Location: Bellevue, NE
Posts: 52
Thanks: 30
Thanked 4 Times in 4 Posts
Default

Quote:
Originally Posted by SSLance View Post
Would have liked to watch you run in the dry for sure.
Me too
Reply With Quote
  #3  
Old 08-10-2016, 03:02 PM
Air-bender Air-bender is offline
Member
 
Join Date: Dec 2013
Location: Richmond, VA
Posts: 44
Thanks: 0
Thanked 0 Times in 0 Posts
Default

Lance,
I have the same 40# springs from Sutton going into my locker. Did you install springs and if so how difficult were they and what special tools did you use?
Thanks
Reply With Quote
  #4  
Old 08-10-2016, 09:16 PM
SSLance's Avatar
SSLance SSLance is offline
Senior Member
 
Join Date: Oct 2013
Location: Peoria, AZ
Posts: 2,683
Thanks: 72
Thanked 338 Times in 212 Posts
Default

I had the shop that set my third member up for me swap the springs out as well. It doesn't look like rocket science though. Take things apart, swap the springs...put things back together again.

The shop found parts inside the brand new Eaton locker that weren't installed correctly though...and fixed that while they were in there. The pucks the springs push against, one of them was installed inside out from the factory...
__________________
Lance
1985 Monte Carlo SS Street Car
Reply With Quote
  #5  
Old 08-14-2016, 03:52 PM
SSLance's Avatar
SSLance SSLance is offline
Senior Member
 
Join Date: Oct 2013
Location: Peoria, AZ
Posts: 2,683
Thanks: 72
Thanked 338 Times in 212 Posts
Default

I spent some quality time under Barney again this weekend, race one weekend, chase issues and make improvements the next...the repeat...

I started out by lowering the ride height, over the years for some reason the rear had crept up about a half inch. Ron originally spec'd the rear to be a half inch higher than the front and when I measured it Sat morning it was right at an inch higher. I lowered the rear 7/8s of an inch and lowered the front 3/8s". Hopefully this will help tame down the rear body roll some and overall body roll. As I've increased grip, pictures show the body is rolling quite a bit once again...never ending battle, hopefully this helps.

Then Sunday I tackled installing an adjustable proportioning valve in the rear brake line. First I disconnected the hard line from the distribution block and put a plug in the hole.


This let me pull the front half of the line away from the frame once I had all the clips loose. This extra room let me get my pipe cutter on the line near about the B pillar, or right behind the rear footwell.


I slid a fitting on the line (yeah me for not forgetting it) then flared the end of the line. I had picked up some 3/8s to 1/8" flare adapters which went into each end of the prop valve then I marked the front half of the line and cut about 2.5" off the end of it. Once that half was flared, I installed it all again, tweaked the line a bit here and there, fixed a leak or three...and here' show it sits now.


It's tucked up behind the footwell so I think it'll be safe and I can reach it easily from outside the car, just kneel down, reach under and twist the knob. Once I'm certain it's all good I'll probably fab up a bracket to make sure the valve stays in place and maybe protect it a bit as well.

Now just need to clean on it a bit, do some parking lot test n tuning and then head to HPT to race it again next weekend to see if the changes helped...
__________________
Lance
1985 Monte Carlo SS Street Car
Reply With Quote
  #6  
Old 08-19-2016, 09:13 AM
SSLance's Avatar
SSLance SSLance is offline
Senior Member
 
Join Date: Oct 2013
Location: Peoria, AZ
Posts: 2,683
Thanks: 72
Thanked 338 Times in 212 Posts
Default

So, here is a pretty good illustration of how my Ron Sutton Optimized front suspension geometry works...and why this car turns so much better than a stock geometry G body.

I recently lowered the front ride height 3/8" and the rear 7/8" and it had been at least 2 years since I've had Barney on an alignment rack. The jigs I built to do my own alignments at home...don't fit the new wheels...so I figured this was as good of a time as any to do it right and get some real accurate readings on things at the same time.

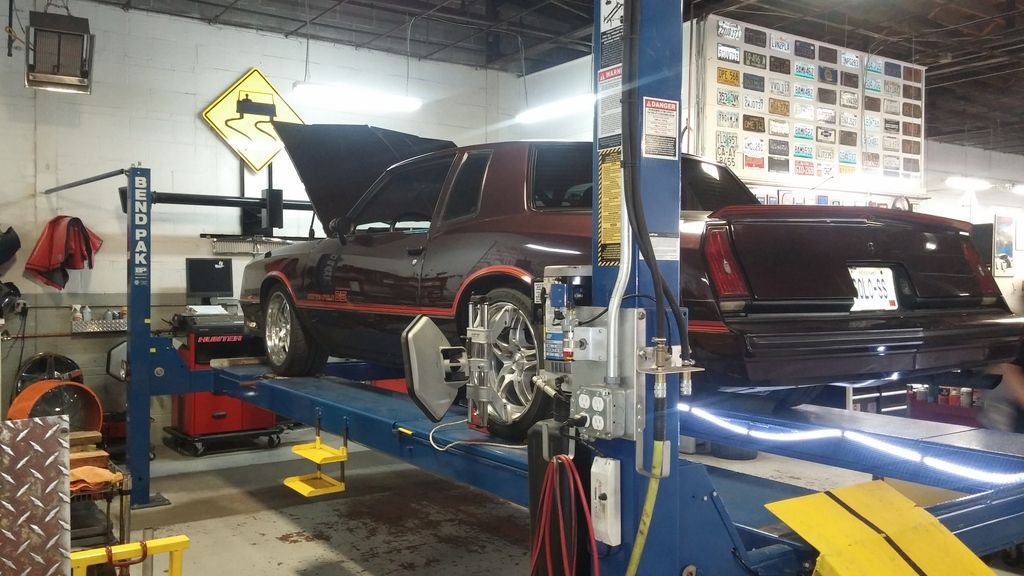
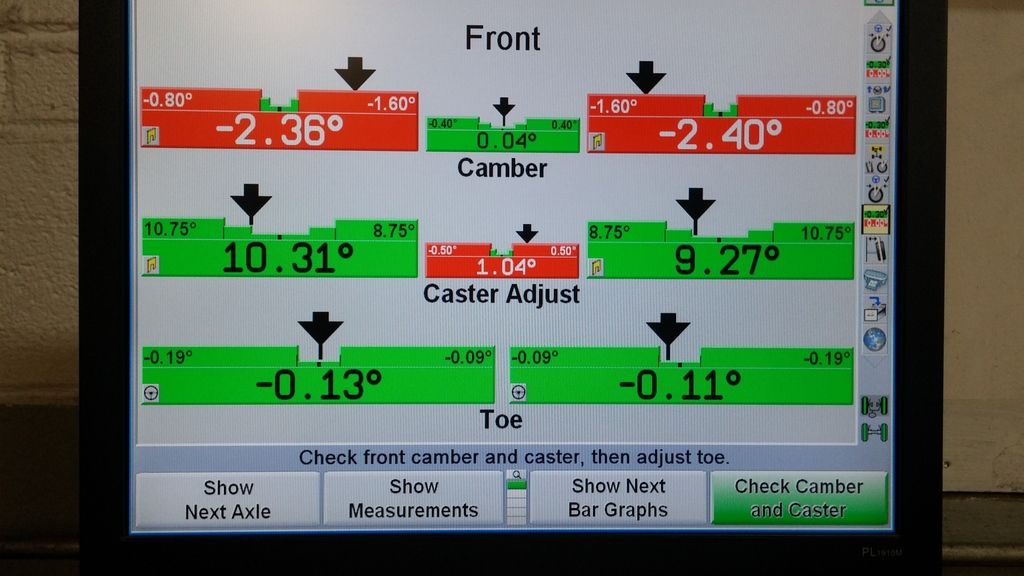
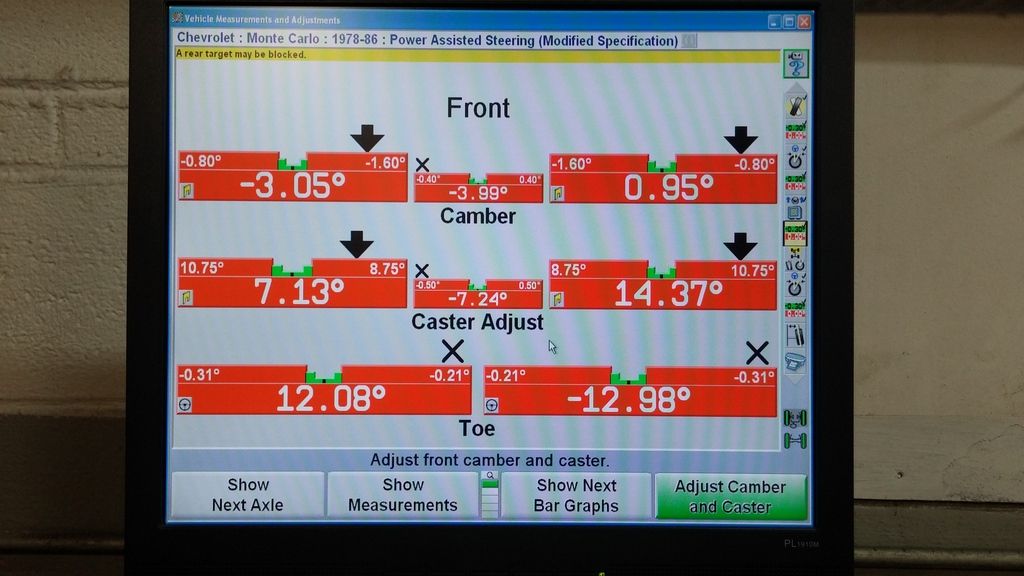
Here's what she looked like when I first rolled it up on rack.


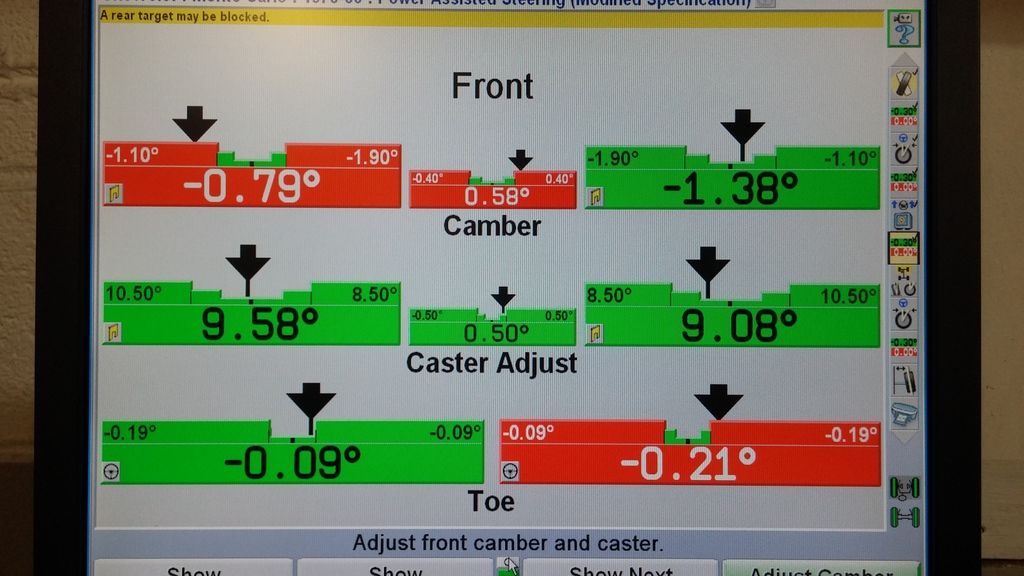
Previously I had set the camber at -0.75 and caster at +9.75. Changing the ride height added camber, but not enough to the driver side for some reason. Caster on the right front was also off.


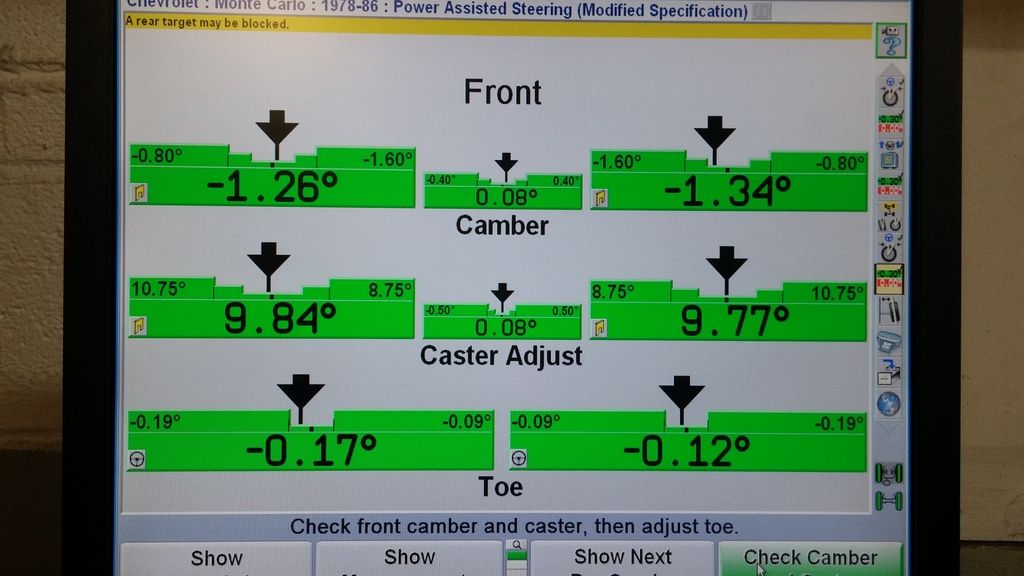
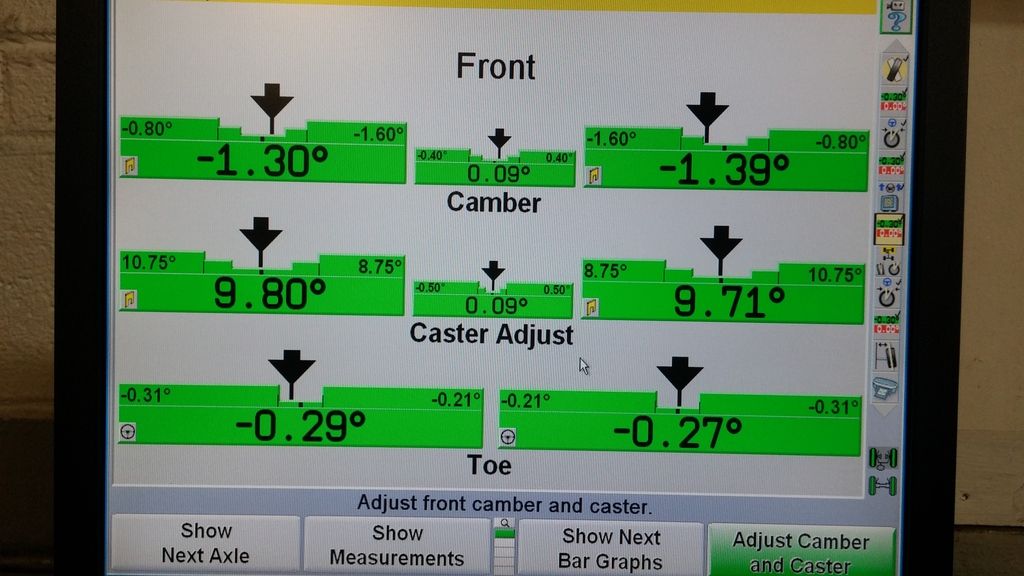
We decided to shoot for -1.20 Camber, +9.75 Caster at ride height and an 1/8" toe out (more on this later). We got it pretty close with two small adjustments.


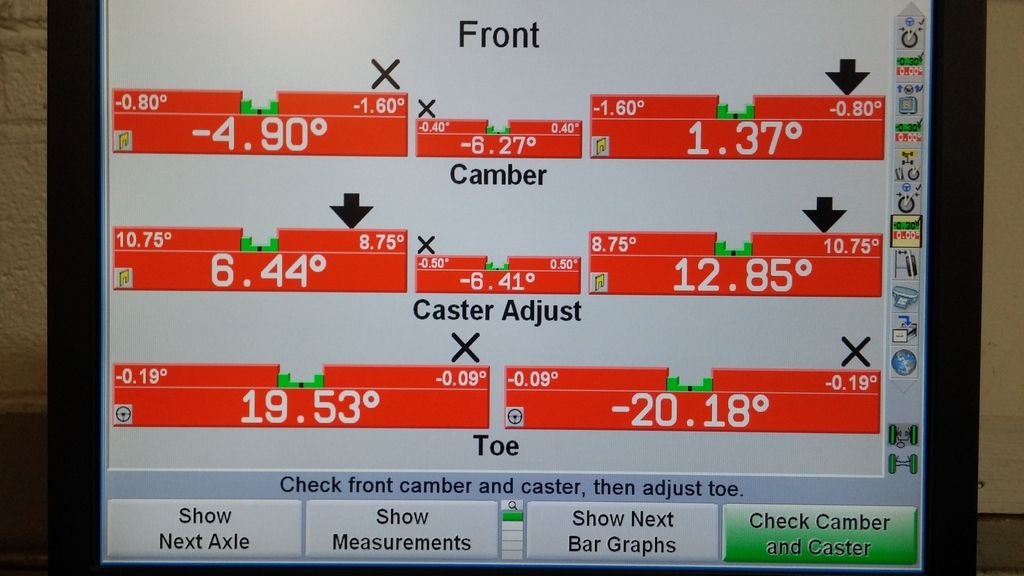
We then put a pull down jig on the rack and pulled the cross member down 1". This shows what the geometry is doing under braking, like on corner entry.


Cross member 1" down, wheels straight ahead.


Notice it gained right at 1 degree of camber under bump.

We then turned the wheels 20 degrees to the right.


Then left


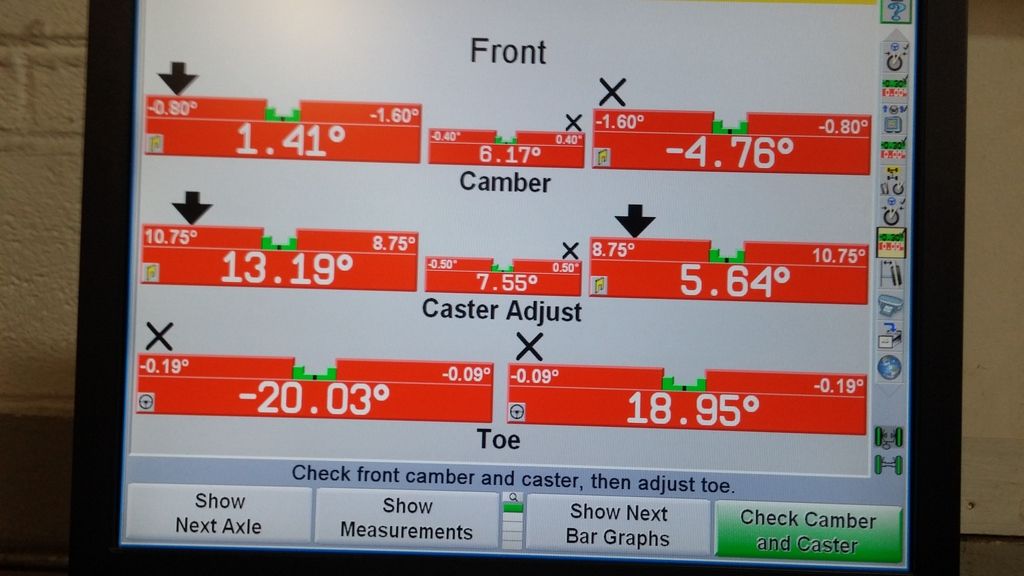
Check out the camber gain now! 1" dive and 20 degrees input puts the outside front at almost 5 degrees camber PLUS the caster puts the inside front at + 1.3ish...exactly what one wants to get both front tires digging.

Ron then explained to me clearer that he wanted 0.26 degrees toe out ON EACH TIRE...so we made some further toe adjustments.

Ride height, wheels straight ahead.


We figured out that about one half turn on the steering wheel is close to 13 degrees of steering input...which is about all I typically use on an autocross course. So we took one more reading, 13 degrees right at ride height.


Notice the toe is now 0.90 degrees and it was 0.56 with the steering wheel straight. This shows it is picking up almost a 1/4" of toe out with 13 degrees of steering input. It also shows 3 degrees negative camber on outside front and +1.00 camber on the inside front...at ride height.

I'm sure if I'm interpreting any of this incorrectly, Ron will swing by to correct me...

To say I'm stoked to get this thing back out on track and see what it does...would be an understatement. I had a little taste of the improvements made a couple of weeks ago in Lincoln but I think these latest changes are going to make an even larger impact on performance. Being able to dial back the rear brake force to stop the inside rear tire from locking up, the much lowered rear ride height, and the dialed in alignment should make it be like a new racecar all over again.

I'm heading to Heartland Park Topeka Sunday for a Kansas City Region SCCA Solo event which should be a fun fast course and the weather looks to be absolutely perfect for racing... I can't wait!!!
__________________
Lance
1985 Monte Carlo SS Street Car
Reply With Quote
  #7  
Old 08-22-2016, 02:17 PM
SSLance's Avatar
SSLance SSLance is offline
Senior Member
 
Join Date: Oct 2013
Location: Peoria, AZ
Posts: 2,683
Thanks: 72
Thanked 338 Times in 212 Posts
Default

So I spent the day Sunday racing at the SCCA Kansas City and Kansas Region joint event at Heartland Park Topeka. It was a good day to put all of the recent changes to Barney to the test. I enlisted a friend Jeremy as a co-driver to help shake the car down...and we did just that. Two drivers in the same heat at an SCCA event gives little time for any tuning so all we did between runs was bleed tire pressures and later in the runs watered the tires down to cool them off. Otherwise we just drove the wheels off it.

The car did great, the new tires are super sticky and the suspension changes really helped tame the excessive body roll it gained with the grip back down again.

A friend manned my good camera from the sidelines during a run and it always good to see what it looks like from the outside.


Here is my co-driver Jeremy's best run finishing 2nd just to a 2011 Camaro with 335 Rivals


Here is my best run we got on video (a 64.598) we had camera issues with my fastest run of the day (64.386) which was the first of the day.


This is Jeremy in the top frame with a 64.186, me in the bottom frame with a 64.598.


It looks like he got me in that last turn of the last slalom and the finish. Sure wish I could have done this with the 64.386 I ran on my first run.

Speaking of times, you can see in that video above just how slight a 4/10s of a second difference is on a 64 second run...imagine this. We ended up with 2/10s of a second separating 2nd place from 5th place!! Jeremy finished 2nd with a 64.168 and I finished 5th with a 64.386... It's crazy how close we all were given the differences in our cars and driver experience.


Super fun day racing with the KC guys again, glad I got ot go out, hang out in the camper for Sat evening then spend all day Sun racing and hangin gout with them.

The CAM Invitational Sept 2-4 in Lincoln will be the next time Jeremy and I roll Barney out onto the track again.
__________________
Lance
1985 Monte Carlo SS Street Car

Last edited by SSLance; 08-22-2016 at 02:28 PM.
Reply With Quote
Reply


Posting Rules
You may not post new threads
You may not post replies
You may not post attachments
You may not edit your posts

BB code is On
Smilies are On
[IMG] code is On
HTML code is Off

Forum Jump


All times are GMT -7. The time now is 11:41 AM.


Powered by vBulletin® Version 3.8.11
Copyright ©2000 - 2025, vBulletin Solutions Inc.
Copyright Lateral-g.net