...

Go Back   Lateral-g Forums > Lateral-G Open Discussions > Project Updates
User Name
Password


Reply
 
Thread Tools Display Modes
  #101  
Old 12-03-2016, 01:01 PM
Fair Fair is offline
Senior Member
 
Join Date: Mar 2014
Location: Plano, TX
Posts: 160
Thanks: 6
Thanked 67 Times in 33 Posts
Default

continued from above


After blasting it was worse than we had feared, and both the front and rear window header sections (the structure in the roof under the outer roof skin, which helps hold the shape of the opening) were rotten. They had been slathered in big globs of body filler, which was all that was holding them together. Blasting exposed this cheap trick done by a previous shop. Heritage said the roof was toast - but they they would find a new roof panel and replace it before the next time we stopped by with the chassis.


Having the rolling chassis together was handy in that it allowed us to transport it to a nearby shop who has a 4 wheel laser alignment rack - which we borrow/rent often. Alignment racks are expensive and are a "net money loser" unless you can keep it loaded up with dozens of "regular alignments" every week. We just don't have the space, manpower, or customers for that. With the rolling chassis on the rack, Ryan and Brad were able to check the gross camber & caster up front, and axle squareness out back before everything on the front suspension was burned in.


The rolling chassis came right back to Vorshlag. With the laser alignment numbers matching our digitally measured settings and calculations, Ryan then got to work and final welded the front suspension mount sections.


In case the caster or camber settings were way off, we could have more easily moved the front-to-back placements of the control arm mounts. Now that the numbers were proven to be where we planned, the double-shear mounting plates were added to the Lower Control Arms and final welded in place. A bolt-in rear crossmember brace will be added at a later date, to bridge the opening at the rear - making that brace removable allows for easy oil pan access with the engine still in the car.


Heritage had a new OEM roof panel sourced, added tubing to the unibody to keep it square, cut out the rotten roof, and welded the new structure in place. To keep the blasted raw metal of much of the unibody from flash rusting, Heritage sprayed the entire unibody with a white sealer/primer, inside and out. The underside of the roof was sanded and smoothed, primed, blocked, then painted with the glossy base & clear finish coats in GM Arctic White - which is a pure white with no pigment.


We had Heritage bodywork our 1992 Corvette race car (which is for sale!) and paint it with this same GM Arctic White base/clear over the summer. Like we plan to do on the 1969 Camaro, they shot our C4 inside and out with this paint, and it looks great. Its brighter than any other hue - its brighter than the sun! - well, almost.


The partially painted unibody waited back at the shop while Heritage sprayed some sections of the chassis. At this point the chassis was final welded and 95% of the cage was in place, including all sections near the roof, A-pillar, or C-pillars. Basically everything except the door bars and harness bar. The harness bar will be added to the cage once the final seating position is in place and we measure the owner's shoulder heights in those seats (more on that below). The door bars in place make it tough to get into and out of the cabin, so even though those have been built they will be final welded in towards the end of the build - to make the next phases of construction easier.

continued below
Reply With Quote
  #102  
Old 12-03-2016, 01:01 PM
Fair Fair is offline
Senior Member
 
Join Date: Mar 2014
Location: Plano, TX
Posts: 160
Thanks: 6
Thanked 67 Times in 33 Posts
Default

continued from above


Ryan marked the chassis with tape and arrows showing which areas of the cage were close to the body and that we wanted finish sanded, painted and clear coated. The top of the cage and anything that comes close to the unibody skin.


They did exactly as we asked and painted just the sections of the cage and chassis that we marked. As you can see the lower, outer frame sections were also primed and painted. These will be hidden inside of the outer skin of the rockers on the unibody. The lower rockers were "pocketed" to fit around the frame rails earlier, and those pockets on the unibody were finish painted as well. Nobody will ever see those areas, but they won't be bare metal dripping rust later, either.


At this point I had picked up the semi-painted rolling chassis and it and the unibody were ready to go back together for the last time. Once these were joined they wouldn't be coming apart again. I will wait and show that chassis-to-body merge next time.

NEW SEAT ORDERED

Choosing an appropriate, safe, and good fitting racing seat is one of the most critical choices in a race car build. This is where 90% of your tactile feedback with the car comes from - when you are strapped into a form fitting, fixed back racing seat. A good seat reduces driver fatigue greatly - after doing a hard track session in any car with OEM seats and 3-point belts I'm always tired just from holding on. You have to use your arms, legs, back, and shoulders to support your body in a flat seat with no harnesses. Even the best sports cars with OEM seats are a poor substitute for proper racing seats. Fixed back race seats even MAKE YOU FASTER on track. Allow me to explain.


On a track test day in September I drove 3 separate cars over 3 twenty minute sessions. One was the 5th Gen Camaro above, which had Cobra Suzuka racing seats and Scroth harnesses. They held me in easily and it made driving this 3800 pound Pony Car around track a breeze. I got out after that session with a blisteringly fast lap time, which shocked all of us. The car was quick but more importantly, the seats and harnesses let me push the car more easily, so I could wring out more potential from the car. I had more fast laps within a tighter range of time, and exited the car with little wear and tear on my body. Granted this Camaro is not stock, but it is still much heavier and on narrower (305mm Hankook RS3) tires than the two "super cars" below.


On that same day I also drove these two Corvettes above, both on similar compound but wider tires (285F/335R MPSS) than the Camaro. All three cars made 1.2 to 1.25 g lateral and 1.0 to 1.1 g under braking. The C6 Z06 was a nightmare to drive compared to the Camaro, and I was flailing around in the cockpit like a rag doll. It has one of the worst stock seats I can remember, and my lap times suffered (even 600 pounds lighter and with an LS7 under hood, my Z06 lap times were almost a second slower than the Camaro) with inconsistency. The C7 Grand Sport had optional factory seats that were "better" than the C6 bits, and even has proper shoulder harness holes, but still a 3-point belt. I once again was flopping around and left a lot on the table (according to predictive lap timer), and only had a few laps quicker than the Camaro.

Why? I think it was all in the seats. Good racing seats and harnesses make driving more consistent and easier. I was exhausted after both Corvette stints, and pretty sore the next day. Try putting in "time trial" laps in cars that pull 1.25 g with crap seats and belts, and you'll know what I'm talking about.

continued below
Reply With Quote
  #103  
Old 12-03-2016, 01:02 PM
Fair Fair is offline
Senior Member
 
Join Date: Mar 2014
Location: Plano, TX
Posts: 160
Thanks: 6
Thanked 67 Times in 33 Posts
Default

continued from above

Seat mounting to the chassis is also critical to safety. The positioning of the seat determines your sight lines, comfort, and safety. We can handle all of that, but what about the seat itself?


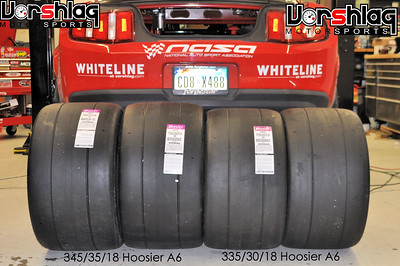
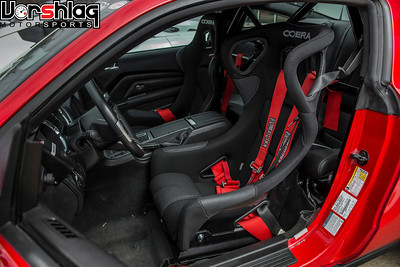
If you have the grip levels of massive Hoosiers (left), you better have appropriate seats to deal with that (right)

I wouldn't think about running a car with big Hoosiers (1.3 to 1.5 g) on a stock seat. We needed to pick a better seat for this Camaro, as the capabilities and grip levels would likely be higher than any modern super car and even most race cars. 345mm Hoosiers make a boat load of grip, and I know from running these in the past, you better be strapped into a GOOD seat if you want to be in complete control. High leg bolsters, shoulder support, and a halo around your helmet.


This LaJoie seat was one of 3 seats provided by the customer when he brought the car to us. It is an aluminum, 2-piece seat marketed largely to the circle track crowd. We all felt that while the better versions of these look beautiful, works of art, they fell short. As an aside, it just didn't fit the theme the customer requested, a serious track car using modern sports racing components, drivetrain, tires and aero. There's very little circle track influence here. Also, this car had to have a second seat in it that was somewhat similar to the driver's seat - and buying another LaJoie was not in the cards.


The build also came with a pair of brand new Sparco EVO II and EVO III seats. The EVO III is huge, and was too big for the owner. The EVO II fit him well, and we sell and install a lot of these (and just put one in my NASA TTD prepped BMW E46), but this project needed something more serious. The lack of lateral shoulder and head support was a deal breaker on this level of build.

Yes, we sell all manner of racing seats, and I keep about a dozen in my showroom for "test sitting". Nothing beats sitting in a seat to see how you fit. One of the most respected names in racing seats is Racetech, but we had never bought a seat from them before. They do some of the best tests and their "crash test" share videos like this side impact test rig video. That seat back movement in a side impact made us look at their 119 series of seats.


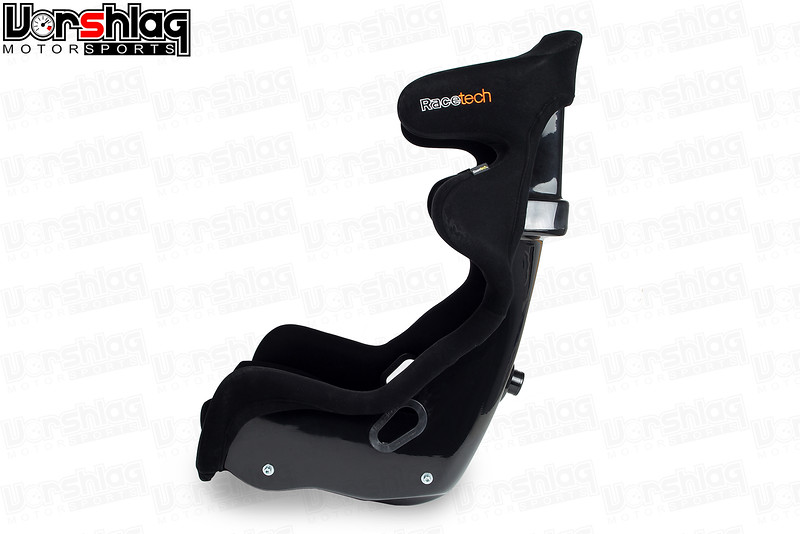
I'm trying not to be sales-y here, and if you look on our website you won't even see Racetech listed, but the features are hard to ignore. They make an unprecedented FOUR sizes of the 119 seat - combining normal and tall heights, plus normal and wider widths.


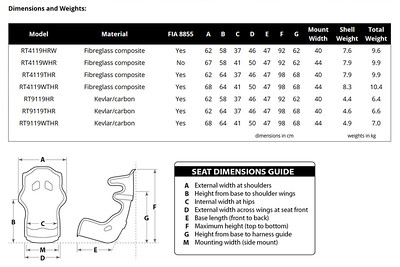
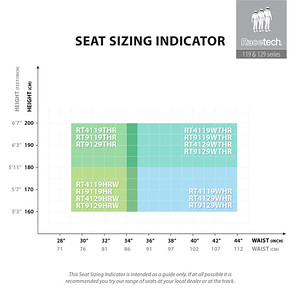
For the owner of this car we had him test sit in some seats, send in several body measurements as dictated by Racetech, and then looked at the sizing chart and determined he needed the normal width in the tall height - the 4119THR.


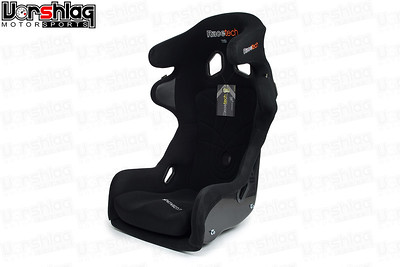
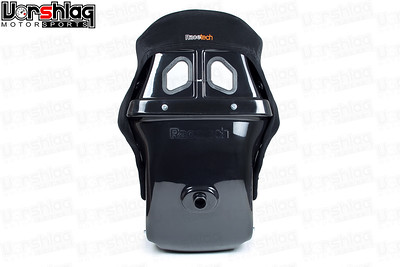
These 119 series seats are a bit pricey, and the carbon fiber versions (9119) are extremely expensive, so we went with the 4119 composite seat range for the driver's side seat. The passenger will get one of the Sparco EVO seats, but there won't likely be too many laps with a right seat filled at 10/10ths pace.

WHAT'S NEXT?

This 2-part write-up took us from January through April. A lot of time was spent with the chassis or body at the painters, and any of you that have built a project like this would understand how long paint work takes - even partial paint or priming work.


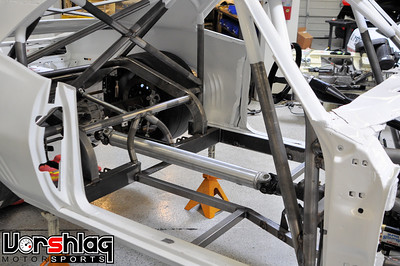
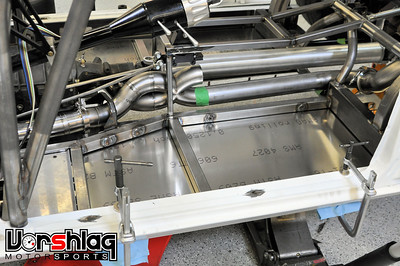
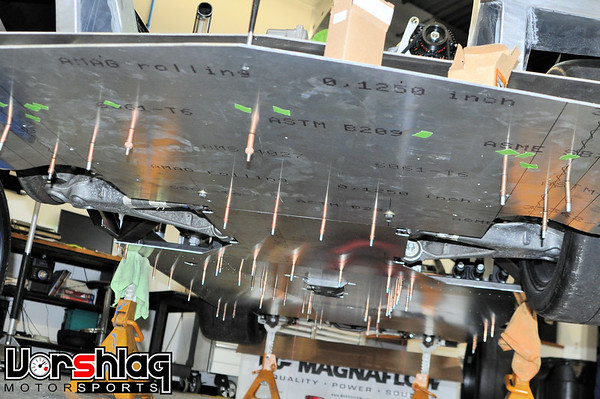
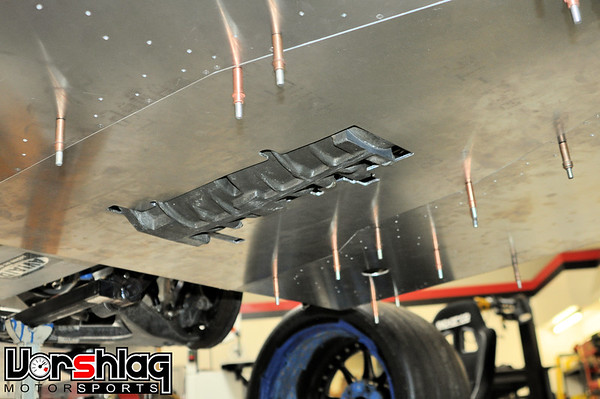
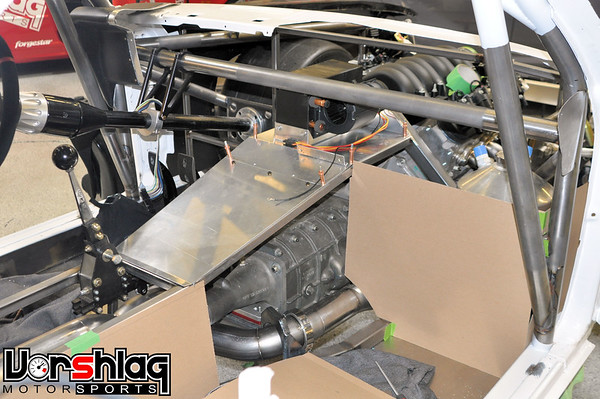
Next time I will show the body going back into the frame, then the aluminum flat bottom undertray panels and floors being built, the exhaust routing through the tunnel, the dash and cowl work, then firewall and sheet metal fab up front. Lots to cover, hopefully I'll have time this weekend to write another segment to catch us up closer to real time.

Cheers,
__________________
Terry Fair @ Vorshlag Motorsports
Reply With Quote
  #104  
Old 12-03-2016, 05:39 PM
MtotheIKEo MtotheIKEo is offline
Senior Member
 
Join Date: Jan 2008
Location: Reno,NV
Posts: 292
Thanks: 0
Thanked 22 Times in 18 Posts
Default

Quote:
Originally Posted by Fair View Post
continued from above

Cheers,
Always love your project updates, full of great information. Can't wait to see this car finished, I'm sure it will be a blast.
Reply With Quote
  #105  
Old 12-03-2016, 07:25 PM
scottysimp7's Avatar
scottysimp7 scottysimp7 is offline
Senior Member
 
Join Date: Dec 2010
Location: Santa Cruz, Ca
Posts: 196
Thanks: 0
Thanked 0 Times in 0 Posts
Default

This thing is amazing! Great work
__________________

68 Camaro
DSE sub
Quadralink Rear
Ford 9inch
Baer Brakes
Skip White Racing 421sbc
Tremec TKO600
Reply With Quote
  #106  
Old 12-03-2016, 07:40 PM
Jr's Avatar
Jr Jr is offline
Senior Member
 
Join Date: Sep 2005
Location: so cal
Posts: 1,772
Thanks: 0
Thanked 0 Times in 0 Posts
Default

Best thread updates ever!
Reply With Quote
  #107  
Old 12-04-2016, 12:44 PM
rustomatic rustomatic is offline
Senior Member
 
Join Date: Apr 2014
Location: ATL
Posts: 748
Thanks: 11
Thanked 58 Times in 36 Posts
Default

Excellent work! Will there be a tin floor in addition to the aluminum under-body stuff? Sorry for the dose of ignorance here . . .
Reply With Quote
  #108  
Old 12-05-2016, 11:52 AM
Fair Fair is offline
Senior Member
 
Join Date: Mar 2014
Location: Plano, TX
Posts: 160
Thanks: 6
Thanked 67 Times in 33 Posts
Default

Quote:
Originally Posted by rustomatic View Post
Excellent work! Will there be a tin floor in addition to the aluminum under-body stuff? Sorry for the dose of ignorance here . . .
No, that's actually a good question. We have cut away all of the factory floor panels so there's a two part answer here.


There are two "floors" being built here. First is the flat bottom undertray, shown here. This series of panels goes from the tip of the lower splitter plane to the rear axle section, where the diffuser will begin. Lowers under car drag, helps create downforce at the rear with the diffuser.


These undertray panels are semi-structural in nature, and being built like how a Daytona Prototype would be. Some sections are bonded and riveted in place (outers) and other panels (centers and splitter) are removable for service.


The transmission sits a hair under the bottom plane, but that was unavoidable with the way it was ordered. Most race transmissions like this (straight cut gear G-Force) can be ordered with a 90° rotation, which lowers the CG. Requires some different internal oiling tricks, a different bellhousing, and a different shifter. What we have to work with needs to be installed in the traditional manner, with the shifter linkage connecting on the driver's side.


As you can see the square tubing that makes up the floor structure has the undertray panels mounted underneath. The driver and passenger's feet will sit on another set of partial panels called a "false floor". There is one section already built on the driver's side near the pedal box. The open span behind that needs to be filled, but the next one back will have the seat mounted between the square tubes, lower than otherwise possible. No false floor is needed from there back.


There are lots and lots of aluminum panels throughout the rest of the interior. The tunnel (which will be double walled in some areas, for insulation), the engine firewall, the firewall around the massive dry sump oil tank, and the rear panels.


I'll cover more of this in my next update, which will likely be after the PRI show which is later this week. Jason is already on his way there now and 3 more of us fly out in 2 days. Gonna be cold in Indy, but we always see some cool new bits there. As usual I am live posting hundreds of product images from the show floor, which you can see on my personal facebook page (which can be "followed", or friended if you are an obvious car person). Otherwise you can see my photo gallery for the show in my next post here.


If anyone is going to be at PRI and gets an invite to the FM3 Marketing kart shootout, Vorshlag will have a team there as well. I'll probably break my hip...

Cheers,
__________________
Terry Fair @ Vorshlag Motorsports

Last edited by Fair; 12-05-2016 at 12:03 PM.
Reply With Quote
  #109  
Old 12-05-2016, 04:29 PM
Mikael A Mikael A is offline
Senior Member
 
Join Date: Jul 2005
Location: long Island NY
Posts: 502
Thanks: 113
Thanked 101 Times in 49 Posts
Default

Wow that is just sick.
__________________
Mike a
Reply With Quote
  #110  
Old 12-05-2016, 04:59 PM
rustomatic rustomatic is offline
Senior Member
 
Join Date: Apr 2014
Location: ATL
Posts: 748
Thanks: 11
Thanked 58 Times in 36 Posts
Default

Thanks for the awesome detail, Terry and Co! I, probably like many others here, study these pics like a kid does his first (and second, and third) girly mag. The detailed explanations make it all that much better. I'll continue to use the Vorshlag work as an ongoing directive example (if not obsession) for the mess in my own garage (to no one's profit but the people I buy parts from) . . .
Reply With Quote
Reply


Posting Rules
You may not post new threads
You may not post replies
You may not post attachments
You may not edit your posts

BB code is On
Smilies are On
[IMG] code is On
HTML code is Off

Forum Jump


All times are GMT -7. The time now is 08:36 AM.


Powered by vBulletin® Version 3.8.11
Copyright ©2000 - 2025, vBulletin Solutions Inc.
Copyright Lateral-g.net