...

Go Back   Lateral-g Forums > Lateral-G Open Discussions > Project Updates
User Name
Password


Reply
 
Thread Tools Display Modes
  #81  
Old 10-16-2012, 08:05 AM
Karl Buchka Karl Buchka is offline
Senior Member
 
Join Date: Jul 2009
Location: Cape Cod, MA
Posts: 116
Thanks: 0
Thanked 0 Times in 0 Posts
Default

Quote:
Originally Posted by krptonite View Post
any progress?? also, are there any aftermarket harnesses for that v8? or would it be easy to make it run with original harness? i would love this motor in a p1800!
Damn, I could have sworn I was keeping this updated. Sorry guys!

In terms of aftermarket for this engine, there might be cold air intakes and catback exhausts out there. That's it. There is nothing else. We're probably going to salvage the connectors from the harness and make everything else from scratch. The aftermarket ECU connectors are different anyway, so the stock harness is really of limited use.

There has actually been some progress. My brother and I have spent most of the last couple of summers renovating a workshop with our dad. We put in all the labor in exchange for keeping the car in the shop once the reno was finished.

The previous owner was a carpenter and he had very little in the way of dust collection equipment. This, coupled with a raised wooden floor, water creeping in under the roll-up door, and some dubious cleaning practices over the years resulted in hundreds of pounds of putrid sawdust on the floor and an equal amount of sawdust covering every horizontal surface in the entire shop.

The shop is about 1000sqf with a mezzanine and a small office. A small half bath is tucked into the corner of the ground level:


We started by tearing out the raised floor to uncover the concrete and let it dry out properly


Painted the walls:


Installed studs under the beams supporting the mezzanine:


Built a small closet under the stairs to house the compressor:


Drywall:


All new wiring pulled through EMT with 220v outlets for hooking up welders:


Replaced all the outdated T12 fixtures with T8's and electronic ballasts. They're a little more expensive than magnetic ballasts but they raise the efficiency of the bulbs and don't have any annoying hum. All in all, ended up being about 4kw of lighting, it's really bright in there now and it's awesome.


Got a used, dealer trade-in two post lift:


Swapped a set of wheels for a lot of industrial shelving. The mezzanine is now geared for parts and junk storage:

__________________
'82 Volvo
Reply With Quote
  #82  
Old 10-16-2012, 08:05 AM
Karl Buchka Karl Buchka is offline
Senior Member
 
Join Date: Jul 2009
Location: Cape Cod, MA
Posts: 116
Thanks: 0
Thanked 0 Times in 0 Posts
Default

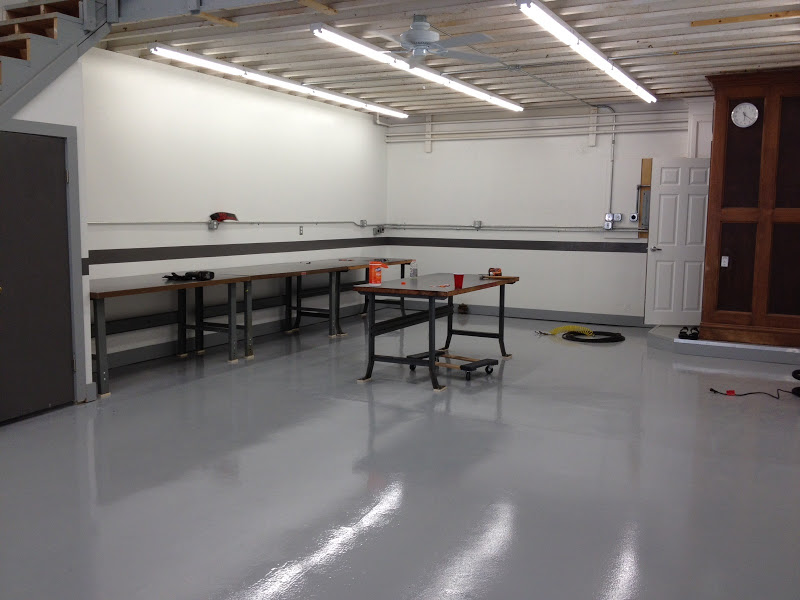
Ground the floor and laid down epoxy coat. Thought about spreading those flake things to pretty it up but if you drop a small bolt or washer on there it becomes impossible to find:


Ran copper pipe for compressed air outlets around the shop, along with a 50ft hose reel mounted on the lift.

Completely gutted the bathroom and installed hex mosaic tile flooring, recessed lights, new fixtures, and a utility sink.

We picked up a Miller Syncrowave 250 TIG at the start of this summer.


Moved in some workbenches that I put steel tops on, along with some storage cabinets.


There's always tons of fiddly stuff to take care of but all in all, I'd say the shop is nearing completion. Before we dragged the 242 over from hibernation, my brother put together a makeshift chassis table for it. Building one out of steel was outside the budget so it ended up being 2x6 framing with 3/4" poplar ply on both sides, standing on 4x4 legs with adjustable feet. Final size is 4'x10' so it covers the wheelbase of the car with some room to spare on both ends. It's not perfectly flat by any stretch, but much better than the old concrete floor, and it gets the car off the ground for a more comfortable working height.


The car was dusted off and loaded up.


Raised up on the table at ride height.


The old wheel wells were made with smaller wheels in mind so we had to hack the rear frame rails out completely. Got one of the rear wheels jammed up in there to get an idea of how the car will sit. It was a real motivation booster to see the wheel in there, and it finally dawned on me how dumped the car is really going to be, but still with usable suspension travel.


Hacked the trans tunnel out and got the driveline temporarily mocked up to see where it should go. Because of the V8 having some extra crap hanging off the back the firewall will need to be moved back just a smidge more than it already is. The parts have all been measured and positioned in CAD.


Pulled the intake manifold off the engine. The intake ports look pretty good, but the tight packaging of the engine leaves a little to be desired on the exhaust side.


Scored some good stuff on ebay too. Got a Nascar reverse mount starter, a ring gear for that, and a hydraulic release bearing. The ring gear is known as reverse mount style and bolts to the top of the Tilton 7.25" clutch cover. Since the clutch and starter package is so small the bellhousing can be brought down in diameter quite a bit. The bellhousing and other driveline parts are nearing finished design in CAD.


__________________
'82 Volvo
Reply With Quote
  #83  
Old 10-16-2012, 08:06 AM
Karl Buchka Karl Buchka is offline
Senior Member
 
Join Date: Jul 2009
Location: Cape Cod, MA
Posts: 116
Thanks: 0
Thanked 0 Times in 0 Posts
Default

Put in some time on the clutch/flywheel assembly as well:


Unfortunately I wasn't around to snap any pics of the turning operations, but the basic procedure was the following: Rough cut a circle out of 20mm plate with the oxy/acetylene torch, weld a scrap slug to the center of the plate for the chuck jaws to grab, then turn the front and the back profiles.

After the turning and drilling the bolt patterns, he milled recess slots for the clutch cover bolts:


Adding some chamfers:


Final weight:


The reverse mount ring gear we're using is intended for a newer 7.25" cover than what we have, so the cover needed a small amount of material removed from the OD.

Alex started by mounting the cover on the flywheel and clamping the flywheel in the soft jaws:


Checking for runout:


Turning down the OD:


Fits like a glove now. You can just barely glimpse them, but there are small alignment tabs on the bottom of the ring gear that keep it concentric with the clutch cover.


Next up: trigger wheel. It's going to be a 60-2 mounted on the starter ring gear

Found a perfect steel pipe on the material rack. Unfortunately it was pushing the limits of what fit in the horizontal band saw, so we had to get a little creative.


Almost through. We didn't trust the clamp completely, so we kept the feed low. I think it took about 15 minutes to make this one cut.


This is the part after the first setup:


Re-setting the soft jaws:


This is as far as Alex got last night. The clock struck midnight and the lathe turned back in to a pumpkin. The trigger teeth are getting cut out of that standing ring section and the other ring with the tapered step will get reduced to a few mounting ears that will bolt to the starter ring gear. Projected weight of the trigger wheel is about 150 grams.


__________________
'82 Volvo
Reply With Quote
  #84  
Old 10-16-2012, 02:28 PM
krptonite's Avatar
krptonite krptonite is offline
Senior Member
 
Join Date: Aug 2007
Location: ontario canada
Posts: 149
Thanks: 0
Thanked 0 Times in 0 Posts
Default

nice job on the shop guys!! bet that sawdust smelled ripe! good to see its moving along again
Reply With Quote
  #85  
Old 10-16-2012, 06:40 PM
WSSix WSSix is offline
Lateral-g Supporting Member
 
Join Date: Nov 2008
Location: Dunwoody, GA
Posts: 6,555
Thanks: 1,436
Thanked 828 Times in 626 Posts
Default

New shop looks great!
__________________
Trey

Current rides: 2000 BMW 540i/6 and 86 C10.

Former ride: 1979 Trans Am WS6: LT1/T56, Kore 3 C5/6 brakes, BMW 18in rims
Reply With Quote
  #86  
Old 10-16-2012, 09:21 PM
JayR JayR is offline
Lateral-G Supporting Vendor
 
Join Date: Oct 2005
Location: Tacoma, WA
Posts: 1,198
Thanks: 1
Thanked 4 Times in 3 Posts
Default

Pretty funny looking back at your first post with you saying this isn't a pro-build. The scope and tech of this car eclipses many if not most pro-builds and you guys are an inspiration to everyone who has ever turned a wrench at home in the name of performance. My new favorite Project thread.

Subscribed.
Reply With Quote
  #87  
Old 10-18-2012, 05:02 PM
Karl Buchka Karl Buchka is offline
Senior Member
 
Join Date: Jul 2009
Location: Cape Cod, MA
Posts: 116
Thanks: 0
Thanked 0 Times in 0 Posts
Default

Quote:
Originally Posted by krptonite View Post
nice job on the shop guys!! bet that sawdust smelled ripe! good to see its moving along again
Thanks! Yeah, that sawdust was absolutely disgusting. The concrete was so slick and slimy that I almost broke my ass more than once.

Quote:
Originally Posted by WSSix View Post
New shop looks great!
Thanks!

Quote:
Originally Posted by JayR View Post
Pretty funny looking back at your first post with you saying this isn't a pro-build. The scope and tech of this car eclipses many if not most pro-builds and you guys are an inspiration to everyone who has ever turned a wrench at home in the name of performance. My new favorite Project thread.

Subscribed.
I'm not sure what to say. Thank you! That really means a lot. We're doing the best with what we have and trying to have fun doing it. I'm glad other people are enjoying it as well! We'll try not to let anyone down.

On to the evening's update!

Ran the (soon to be) trigger wheel through the CNC to carve out the mounting feet:


Hopefully the final result is becoming clearer. The trigger teeth will get cut out of the remaining solid ring. The step on the feet centers on the ID of the starter ring gear.

Weight so far (300 grams, ~10.5oz):
__________________
'82 Volvo
Reply With Quote
  #88  
Old 10-19-2012, 06:46 AM
muggz's Avatar
muggz muggz is offline
Junior Member
 
Join Date: Jun 2008
Location: Australia
Posts: 7
Thanks: 0
Thanked 0 Times in 0 Posts
Default

Love it! awesome workshop and intense machine work!
Reply With Quote
  #89  
Old 10-19-2012, 06:25 PM
Karl Buchka Karl Buchka is offline
Senior Member
 
Join Date: Jul 2009
Location: Cape Cod, MA
Posts: 116
Thanks: 0
Thanked 0 Times in 0 Posts
Default

Quote:
Originally Posted by muggz View Post
Love it! awesome workshop and intense machine work!
Thanks!

Got some more work on the trigger wheel today.

Hoisted the dividing head off the shelf and set to cutting the trigger pattern in the manual mill.


Unfortunately, the above picture is about as far as we got before things went pear shaped. We fought a few different issues for a while, and when we finally made it to the last slot, it became apparent that the teeth were not evenly divided. I think the trigger wheel had been slipping imperceptibly, so by the time we got to the end, it was too late. Definitely a drag, but such is life. Gentlemen, we can rebuild it. We have the technology. Better than it was before. Better...stronger...faster.
__________________
'82 Volvo

Last edited by Karl Buchka; 10-19-2012 at 06:28 PM.
Reply With Quote
  #90  
Old 10-20-2012, 07:37 AM
krptonite's Avatar
krptonite krptonite is offline
Senior Member
 
Join Date: Aug 2007
Location: ontario canada
Posts: 149
Thanks: 0
Thanked 0 Times in 0 Posts
Default

wow that sucks after all that machining! i think you underestimate yourselves in what you are acheiving here, this build goes way beyond what most guys are capable of including some "pro" shops,! all credit to you and keep up the good work , you are a great inspiration to us all when we are having a downer over whatever issue we have in our builds!
Reply With Quote
Reply


Posting Rules
You may not post new threads
You may not post replies
You may not post attachments
You may not edit your posts

BB code is On
Smilies are On
[IMG] code is On
HTML code is Off

Forum Jump


All times are GMT -7. The time now is 12:23 PM.


Powered by vBulletin® Version 3.8.11
Copyright ©2000 - 2025, vBulletin Solutions Inc.
Copyright Lateral-g.net