...

Go Back   Lateral-g Forums > Lateral-G Open Discussions > Project Updates
User Name
Password


Reply
 
Thread Tools Display Modes
  #1  
Old 04-15-2015, 06:00 PM
GPR's Avatar
GPR GPR is offline
Senior Member
 
Join Date: Jan 2010
Location: Port Richey Fl
Posts: 660
Thanks: 0
Thanked 12 Times in 11 Posts
Default 1966 Mustang Coupe Restomod

This is what we are starting with. There is not a lot of rust but since Ford did not prime a lot of the inner structure we will be removing all the sheetmetal do any needed rust repair and epoxy priming. The plans are to install Rod & Custom front and rear suspension, Wilwood brakes, Currie 9", AOD and a 347. The body mods will be fender flares, drip rails removed, cowl vents filled in and maybe a few other things as we go.


One of the first things we did after bracing the body was to remove the cowl


The quarter panels were removed


The roof was also removed and there was only surface rust but in a few years it will get worse if it is not cleaned up now

__________________
Rusty Gillis
Gillis Performance Restorations
Port Richey Fl
www.gillisrestorations.com
Reply With Quote
  #2  
Old 04-16-2015, 09:21 AM
GPR's Avatar
GPR GPR is offline
Senior Member
 
Join Date: Jan 2010
Location: Port Richey Fl
Posts: 660
Thanks: 0
Thanked 12 Times in 11 Posts
Default

I'm sure a lot of you are wondering why do we remove all the sheetmetal. The quarters were replaced at one time and we did not trust the workmanship and once they were removed we found rust in the outer wheelhouse. The roof was removed because Mustangs are known to rust in the inner structure in the front by the top of the A pillar. In this case we were lucky and only had surface rust but over time would became holes. The other area on coupes is the sail panel inner structure and we did find rust. A little rust on the left side but the right side had a few small rust holes starting.

__________________
Rusty Gillis
Gillis Performance Restorations
Port Richey Fl
www.gillisrestorations.com
Reply With Quote
  #3  
Old 04-16-2015, 07:42 PM
tones2SS's Avatar
tones2SS tones2SS is offline
Lateral-g Supporting Member
 
Join Date: Sep 2006
Location: Massachusetts
Posts: 8,176
Thanks: 0
Thanked 6 Times in 5 Posts
Default

Will be following.
Keep us posted.
Reply With Quote
  #4  
Old 04-17-2015, 10:56 AM
Justin@EntropyRad Justin@EntropyRad is offline
Senior Member
 
Join Date: Jan 2015
Location: Charlotte, NC
Posts: 282
Thanks: 0
Thanked 0 Times in 0 Posts
Default Gutted much?

That's a lot of cut and paste work, but I bet will be killer when done
Reply With Quote
  #5  
Old 04-17-2015, 05:59 PM
GPR's Avatar
GPR GPR is offline
Senior Member
 
Join Date: Jan 2010
Location: Port Richey Fl
Posts: 660
Thanks: 0
Thanked 12 Times in 11 Posts
Default

New firewall and cowl was sanded and epoxy primed


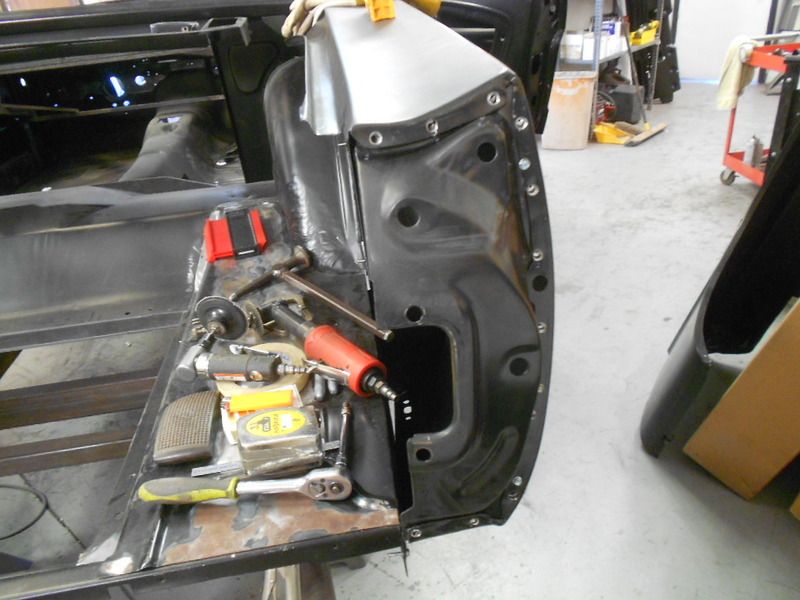
The cowl side panels and A pillars needed to be replaced


Test fitting

__________________
Rusty Gillis
Gillis Performance Restorations
Port Richey Fl
www.gillisrestorations.com
Reply With Quote
  #6  
Old 05-03-2015, 11:30 AM
GPR's Avatar
GPR GPR is offline
Senior Member
 
Join Date: Jan 2010
Location: Port Richey Fl
Posts: 660
Thanks: 0
Thanked 12 Times in 11 Posts
Default

Ready for epoxy primer


Two coats of SPI black epoxy primer


__________________
Rusty Gillis
Gillis Performance Restorations
Port Richey Fl
www.gillisrestorations.com
Reply With Quote
  #7  
Old 05-03-2015, 11:54 AM
GPR's Avatar
GPR GPR is offline
Senior Member
 
Join Date: Jan 2010
Location: Port Richey Fl
Posts: 660
Thanks: 0
Thanked 12 Times in 11 Posts
Default

Lower cowl welded in place


The welds were ground down and epoxy was brushed on


Upper cowl fit and welded


Fender apron to cowl extensions welded in place and started to test fit the roof after it was sanded and the back side epoxy primed

__________________
Rusty Gillis
Gillis Performance Restorations
Port Richey Fl
www.gillisrestorations.com
Reply With Quote
  #8  
Old 05-03-2015, 12:45 PM
DBasher's Avatar
DBasher DBasher is offline
Senior Member
 
Join Date: Oct 2011
Location: Renton, Wa
Posts: 1,911
Thanks: 254
Thanked 271 Times in 79 Posts
Default

Looks great Rusty, thanks for the step by step pictures!

Whose sheet metal do you use for all the replacement panels?
Reply With Quote
  #9  
Old 05-04-2015, 08:36 AM
GPR's Avatar
GPR GPR is offline
Senior Member
 
Join Date: Jan 2010
Location: Port Richey Fl
Posts: 660
Thanks: 0
Thanked 12 Times in 11 Posts
Default

Quote:
Originally Posted by DBasher View Post
Looks great Rusty, thanks for the step by step pictures!

Whose sheet metal do you use for all the replacement panels?
I'm a dealer for Dynacorn.
__________________
Rusty Gillis
Gillis Performance Restorations
Port Richey Fl
www.gillisrestorations.com
Reply With Quote
  #10  
Old 05-29-2015, 11:08 AM
GPR's Avatar
GPR GPR is offline
Senior Member
 
Join Date: Jan 2010
Location: Port Richey Fl
Posts: 660
Thanks: 0
Thanked 12 Times in 11 Posts
Default

Brian has done a lot of work since I last posted

The rear frame rails had a little rust and needed to be replaced


Test fitting the trunk floor and gas tank


Plug welding the trunk drop offs


Fitting the rear package tray and sail panels


The quarter panels were shaped wrong and had to be modified


Fitting the taillight panel and end caps


Left outer wheelhouse welded in place


The right side was to long and had to be modified


Starting to weld the sail panels


Rear panel welded in place along with the sail panels


__________________
Rusty Gillis
Gillis Performance Restorations
Port Richey Fl
www.gillisrestorations.com
Reply With Quote
Reply


Posting Rules
You may not post new threads
You may not post replies
You may not post attachments
You may not edit your posts

BB code is On
Smilies are On
[IMG] code is On
HTML code is Off

Forum Jump


All times are GMT -5. The time now is 11:51 PM.


Powered by vBulletin® Version 3.8.11
Copyright ©2000 - 2024, vBulletin Solutions Inc.
Copyright Lateral-g.net