...

Go Back   Lateral-g Forums > Lateral-G Open Discussions > Project Updates
User Name
Password


Reply
 
Thread Tools Display Modes
  #191  
Old 07-22-2009, 01:26 PM
joe440's Avatar
joe440 joe440 is offline
Senior Member
 
Join Date: Aug 2007
Location: SoCal
Posts: 164
Thanks: 0
Thanked 0 Times in 0 Posts
Default

everything looks awsome
Reply With Quote
  #192  
Old 07-22-2009, 01:44 PM
DRJDVM's '69's Avatar
DRJDVM's '69 DRJDVM's '69 is offline
Senior Member
 
Join Date: Jul 2004
Location: Manteca, CA
Posts: 1,299
Thanks: 2
Thanked 48 Times in 26 Posts
Default

Always the smartass .... Just a little scale to the pix.... I couldnt hold the tape measure and the camera at the same time

The "small" bay is my work area.... the larger section is the home of the '69 and the '98 SS Camaro..... my wife parks in the driveway The only way she'll ever get a spot inside the garage is if we move and I get a full shop to myself...... I always tell her the rest of the house is hers and she can do whatever she wants to it....but the garage is mine.

The small bay is also about 8 feet deeper that the other section and has a garage door that opens to the back of the house so its a nice space to work in where I can walk out back to grind/cut/pain/weld etc etc....
Reply With Quote
  #193  
Old 07-27-2009, 10:45 PM
rwhite692's Avatar
rwhite692 rwhite692 is offline
Senior Member
 
Join Date: Sep 2004
Location: Tracy, CA
Posts: 1,912
Thanks: 0
Thanked 0 Times in 0 Posts
Default

Greg you know, Only the "rich guys" use pressure treated 4x4s...LOL

<<<GIT ER DONE!>>>
__________________
______________________________________________
1969 Camaro/ Tom Nelson TT 434 / Wayne Due C5 / DSE QLink / and a bunch of other stuff...

Project update thread here:
https://lateral-g.net/forums/showthread.php4?t=12743

My Lateral-G Page

My Shop Build:

http://www.garagejournal.com/forum/s...ad.php?t=16310
Reply With Quote
  #194  
Old 09-30-2009, 08:38 AM
DRJDVM's '69's Avatar
DRJDVM's '69 DRJDVM's '69 is offline
Senior Member
 
Join Date: Jul 2004
Location: Manteca, CA
Posts: 1,299
Thanks: 2
Thanked 48 Times in 26 Posts
Default

Time for some updates...

Well I havent had as much time into the car as I would have hoped but I've been in "waiting mode" for some parts..

This is the frotn frame rail driver side with the mock up motor, and "pre-new inner fenders" etc. One of the things that bothered me was that there is a big old flange on the inside upper edge where the frame walls met and were spot welded together.


So since Tim channeled the Alterkation frame up into the frame rails and welded that stuff all solid, I figured I would get rid of that flange and weld the seam and then fill in some of the gaps between the k-frame and the frame rails to give a cleaner look and make sure it was all as solid as I could make it.

So I cut off the flange alittle at a time....created a small gap between the vertical edge and horizontal edge to make sure I got good weld penetration, and welded alittle at a time.


Reply With Quote
  #195  
Old 09-30-2009, 08:46 AM
DRJDVM's '69's Avatar
DRJDVM's '69 DRJDVM's '69 is offline
Senior Member
 
Join Date: Jul 2004
Location: Manteca, CA
Posts: 1,299
Thanks: 2
Thanked 48 Times in 26 Posts
Default

Then a made a small piece and filled in the gap between the k-frame and frame rail. I figured that would look cleaner and also distribute the force and weight over a larger area to make sure my new welded seam would hold up okay. (I'm a relatively new welder and welding an outside corner on a frame was a little concerning for me). I'm also going to fill the gap on the underside of the k-frame to frame so, this thing should be rock soild, so I think the new seam should be fine.

Before...


After......much cleaner look..


Then I boxed the motor mounts..probably overkill, but it never hurts..

Reply With Quote
  #196  
Old 09-30-2009, 09:01 AM
DRJDVM's '69's Avatar
DRJDVM's '69 DRJDVM's '69 is offline
Senior Member
 
Join Date: Jul 2004
Location: Manteca, CA
Posts: 1,299
Thanks: 2
Thanked 48 Times in 26 Posts
Default

Then I made a new mount for the AC condensor from some flat stock aluminum. Since we opened the radiator area and moved the mounts, the Vintage air bracket wouldnt work.


Then my next big goal was to get the brakes worked out so I could get my wheels alll measured and ordered. Thats where the big delay came up..........

I've been working with Tarrant Tutogi at Wilwood and he's been fantastic. Probably one of the best company reps I've worked with.... He really wants me to be able to run the big WS6 calipers but right now they dont have a caliper bracket that will work with my application. So Tarrant has been putting in a lot of work to get the guys at Wilwood to make one for future production for my application etc. So that took some time to sort out and we werent sure if that was going to happen. So after alot of back and forth Wilwood sent me out their 14 inch rotors and some other stuff to get started while we figured out the bracket situation....

Its a Wilwood Christmas !!!!


Reply With Quote
  #197  
Old 09-30-2009, 09:19 AM
DRJDVM's '69's Avatar
DRJDVM's '69 DRJDVM's '69 is offline
Senior Member
 
Join Date: Jul 2004
Location: Manteca, CA
Posts: 1,299
Thanks: 2
Thanked 48 Times in 26 Posts
Default

At first we had some clearence issue with the steering arm attachment, so I we had to swap out to a more shallow hat and move the rotor out a tad... its close but they fit now

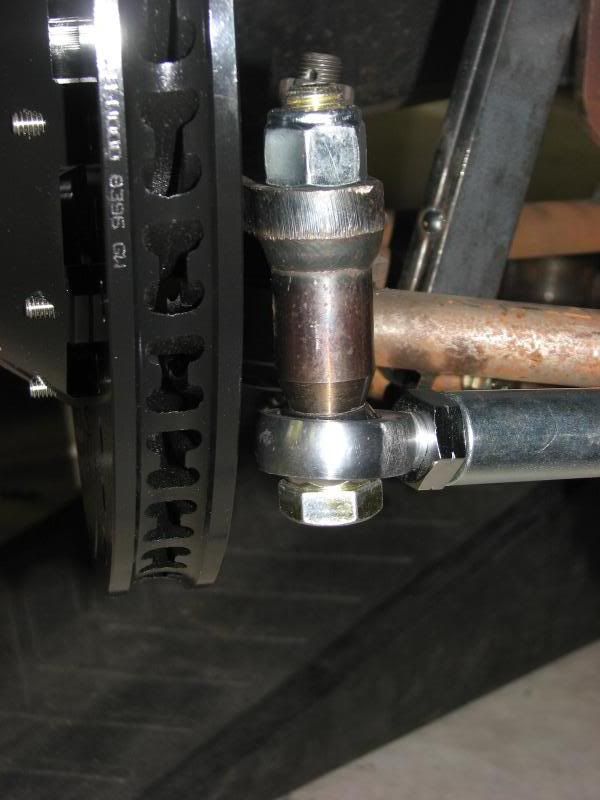

Since thats been all mounted up, I've been trying to measure for wheels....that has been a huge PITA.

I wanted to thank Marty (Syborg) for lending me his Mount Mate to help the job. I borrowed it back in late July (anticipating my brakes would arrive soon) and then we had all the brake delays and its been sitting in my garage unused.... thank you Marty for being so understanding on the delays. I'll have it back to you next week, I promise.....

I've also been bugging Jason Rushforth with questions and trying to work out a way to get a decent lip on the front wheel. Unfortuately with these big brakes, its widened my track width some and then the caliper overhang is gonna push the spokes out some, so it dosent look like I will be able to get the dish I was hoping for, but thats life I guess.

Then I got back and forth on the 19x8 or 19x9.....245-35-19..... I tried a ton of BS setting for both, at the current ride height (based on the Air Ride ride height suggested for this shock etc), its pretty close the fender lip near full lock.

So I decided on either a 19x8 with 6 BS or a 19x9 with 6.5 BS and everything clears on the pass side (the one I've been working on the entire time). Figured I should make sure on the driver side.....and neither one works on that side !!!!! I dropped a plum bob from the fender lip and measured to the hub on both side and it looks like my fender is about 1/2 inch pushed in on the driver side. Everywhere elese I measure, it appears that the frame to hub etc is the same so I dont think the frame is moved over. There was some previous damage to the driver side fender, so I think it bowed it in slightly near the fender lip....great...more work......

If I do more BS, then the Mount Mate hits the tie-rod at lock...plus I guess 6 BS is the most I can really do on an 8 inch rim anyway....so best I can figure is do the 19x9 with 6.5 BS, have a slighlty larger lip, and fix the driver side fender opening.....

I can go with a shorter hub and hat and move the track width in, but the caliper is the most "outboard" piece, so it wont do anything for my dish....so by doing the shorter hub, all I'm doing is changing the BS reading.... the mount pad gets thicker and the dish stays the same....

So decisions, decisions......

Last edited by DRJDVM's '69; 09-30-2009 at 09:29 AM.
Reply With Quote
  #198  
Old 09-30-2009, 10:07 AM
GregWeld's Avatar
GregWeld GregWeld is offline
Lateral-g Supporting Member
 
Join Date: Jul 2005
Location: Scottsdale, AriDzona
Posts: 20,741
Thanks: 504
Thanked 1,080 Times in 388 Posts
Default

Or..... You could cut off all the suspension - narrow it... and put it all back on with different pick up points... then you would have header clearance issues... and have to do some custom whacked out header deal - which would cause an issue with the steering column and the "whatchamacallit"....

LOL

Isn't building a custom car phun??


Seriously Ned... Glad to see you're working on it. There is a solution for everything... some just require a lot more work than others. :>)
Reply With Quote
  #199  
Old 09-30-2009, 10:20 AM
96z28ss's Avatar
96z28ss 96z28ss is offline
Senior Member
 
Join Date: Apr 2005
Location: Portland,OR
Posts: 2,024
Thanks: 18
Thanked 10 Times in 6 Posts
Default

Would custom upper and lower a arms be needed to bring everything in?
__________________
1969 Camaro LS2/T56 D1SC
www.automotivedesigneng.com
Special thanks to: DPE Wheel / Columbia Parts Company / US Collision / T. Bruning
Reply With Quote
  #200  
Old 09-30-2009, 10:41 AM
DRJDVM's '69's Avatar
DRJDVM's '69 DRJDVM's '69 is offline
Senior Member
 
Join Date: Jul 2004
Location: Manteca, CA
Posts: 1,299
Thanks: 2
Thanked 48 Times in 26 Posts
Default

Sure I could do custom UCA and LCA but thats getting into bigger $$...and then I'll probably have issues with getting the airbags in there...its already a tight fit.

Oh yes.....fun, fun...there are so many variable that can be changed, but they all effect each other...make one better and two worse...
Reply With Quote
Reply


Posting Rules
You may not post new threads
You may not post replies
You may not post attachments
You may not edit your posts

BB code is On
Smilies are On
[IMG] code is On
HTML code is Off

Forum Jump


All times are GMT -7. The time now is 10:04 AM.


Powered by vBulletin® Version 3.8.11
Copyright ©2000 - 2025, vBulletin Solutions Inc.
Copyright Lateral-g.net