...

Go Back   Lateral-g Forums > Lateral-G Open Discussions > Open Discussion
User Name
Password


Reply
 
Thread Tools Display Modes
  #131  
Old 07-11-2013, 06:17 AM
Al Moreno Al Moreno is offline
Senior Member
 
Join Date: Dec 2004
Posts: 1,502
Thanks: 3
Thanked 1 Time in 1 Post
Default

Quote:
Originally Posted by Ron in SoCal View Post
Al you guys are incredible!

On a side note, those 5th gen rails are stout!
Thanks Ron, saw your car at Best of Show and all I can say is WOW!

Quote:
Originally Posted by Rick D View Post


Al looking great!!
Thanks Rick

Quote:
Originally Posted by bentfab View Post
Looking good Al !!


Mark
Hey Mark, the boys spent all the 4th of July weekend working on the car, they are pushing.

Quote:
Originally Posted by waynieZ View Post
Wow this looks amazing! Very Nice.
Thanks Wayne!

Quote:
Originally Posted by Richio1 View Post
Yeah Al... very nice stuff. Cant wait to see more.
Hey Jeff, can't wait to see your car in person, sounds like your pretty close.

Here are a few pics of some of the work they did.

In order to make room for the intake,the rad support needed some massaging. They cut out a portion of the center section to make room.


To give it a finish look, the boxed the ends.


After metal finishing it, let's just say I was proud, LOL


Reply With Quote
  #132  
Old 07-11-2013, 08:51 AM
214Chevy's Avatar
214Chevy 214Chevy is offline
Lateral-g Supporting Member
 
Join Date: Jul 2008
Location: DALLAS, Texas
Posts: 4,692
Thanks: 459
Thanked 695 Times in 425 Posts
Default

Very nice modification Al. Looks like it was born from the factory there.
__________________
'68 C10 swb
'69 Camaro convertible
'72 Chevelle

Reply With Quote
  #133  
Old 07-11-2013, 05:58 PM
Al Moreno Al Moreno is offline
Senior Member
 
Join Date: Dec 2004
Posts: 1,502
Thanks: 3
Thanked 1 Time in 1 Post
Default

Quote:
Originally Posted by 214Chevelle View Post
Very nice modification Al. Looks like it was born from the factory there.
Thanks Marcus.

Here is a quickie of what going on at the other end. A lot of work has gone into the trunk cutting, slicing and dicing. Goten rid of something like 50 lbs of metal all together. I will post more pics later but here is a quick shot of the panel. Received the billet trunk hinges, they will also save a few ounces, LOL. I will post pics later.

The logo will have a brush finish while the panel and the rest of the trunk will be done in a satin gun metal. Thinking of doing a carbon panel for the divider.


Last edited by Al Moreno; 07-11-2013 at 06:04 PM.
Reply With Quote
  #134  
Old 07-12-2013, 10:31 AM
WSSix WSSix is offline
Lateral-g Supporting Member
 
Join Date: Nov 2008
Location: Dunwoody, GA
Posts: 6,554
Thanks: 1,423
Thanked 825 Times in 625 Posts
Default

I like it!
__________________
Trey

Current rides: 2000 BMW 540i/6 and 86 C10.

Former ride: 1979 Trans Am WS6: LT1/T56, Kore 3 C5/6 brakes, BMW 18in rims
Reply With Quote
  #135  
Old 07-15-2013, 07:50 AM
syborg tt's Avatar
syborg tt syborg tt is offline
Lateral-g Supporting Member
 
Join Date: Jun 2005
Posts: 8,405
Thanks: 5,528
Thanked 1,958 Times in 1,059 Posts
Default

The car is looking great and there are plenty of great idea's going into this build. I am looking forward to seeing it at Sema.
__________________
marty-mj
Is a car ever really done???? It's like a ball of yarn unwinding, that has no end... Author DKz Garage

Projects - Syborg TT 4.3l v6 Mini-Truck, 2nd Chance Camaro & SLP575 Bumble Bee - 4Sale
Reply With Quote
  #136  
Old 07-15-2013, 11:55 AM
waynieZ's Avatar
waynieZ waynieZ is offline
Lateral-g Supporting Member
 
Join Date: Oct 2006
Location: Ma
Posts: 8,491
Thanks: 939
Thanked 342 Times in 231 Posts
Default

Quote:
Originally Posted by WSSix View Post
I like it!
Me too !
__________________
_Wayne________

___________________________________
https://lateral-g.net/forums/show...ghlight=FNQUIK
Reply With Quote
  #137  
Old 07-15-2013, 01:38 PM
Operations's Avatar
Operations Operations is offline
Lateral-g Supporting Member
 
Join Date: May 2012
Posts: 31
Thanks: 0
Thanked 0 Times in 0 Posts
Default

Love the build, great job!
Reply With Quote
  #138  
Old 08-07-2013, 07:02 PM
Al Moreno Al Moreno is offline
Senior Member
 
Join Date: Dec 2004
Posts: 1,502
Thanks: 3
Thanked 1 Time in 1 Post
Default

Quote:
Originally Posted by WSSix View Post
I like it!
Quote:
Originally Posted by syborg tt View Post
The car is looking great and there are plenty of great idea's going into this build. I am looking forward to seeing it at Sema.
Quote:
Originally Posted by waynieZ View Post
Me too !
Quote:
Originally Posted by Operations View Post
Love the build, great job!
Thanks guys! What they lack in experience they are making up in innovation. What till you see what they are up to next.

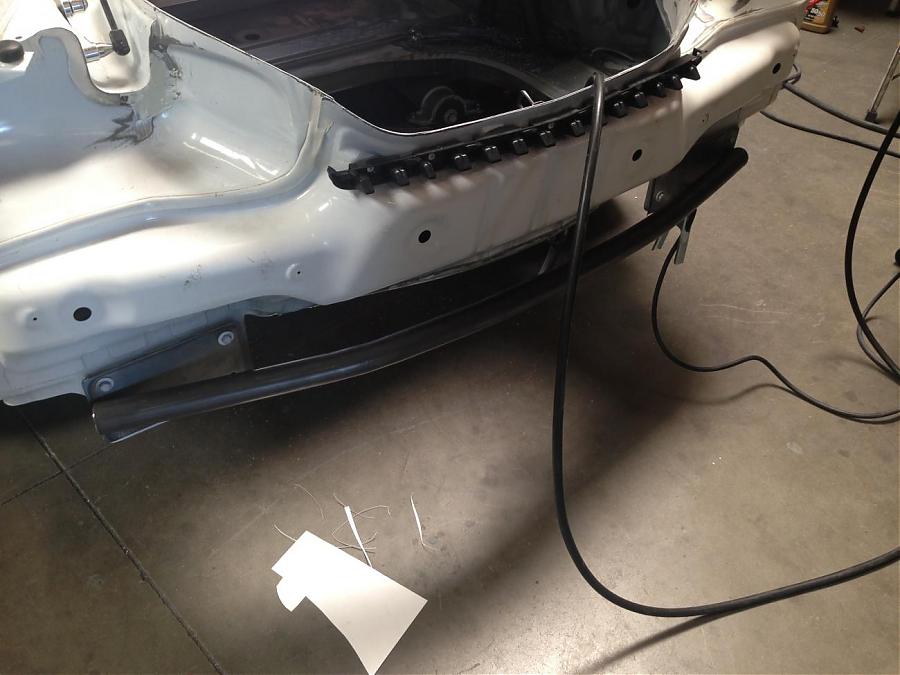
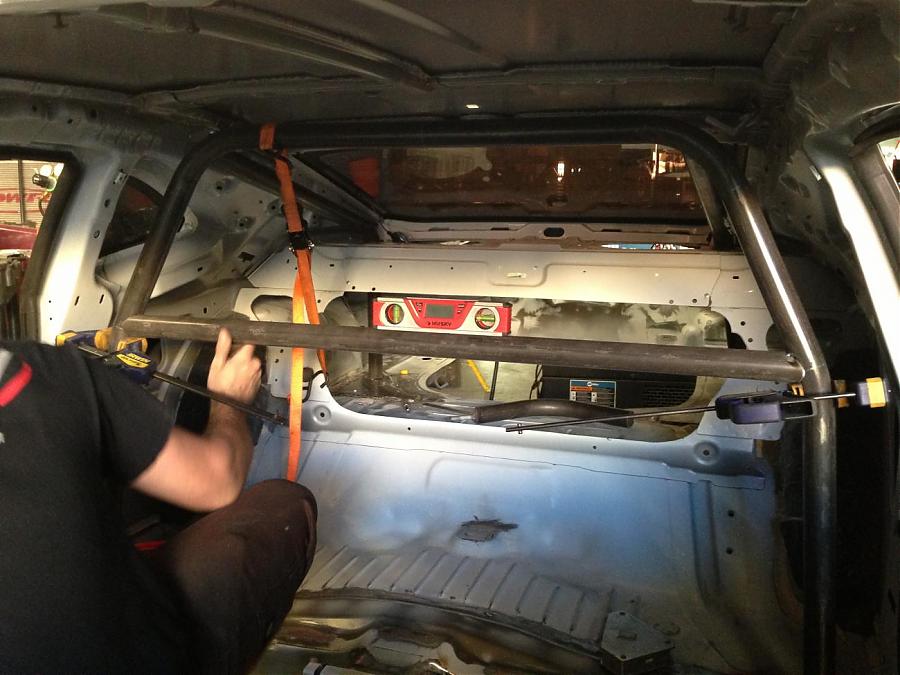
Here are a few progress pics. My buddy Kevin at HM Racing Design helped the boys with the roll bar and bumpers. They specialize in $500,000 Trophy trucks, so this was a cake walk for them.

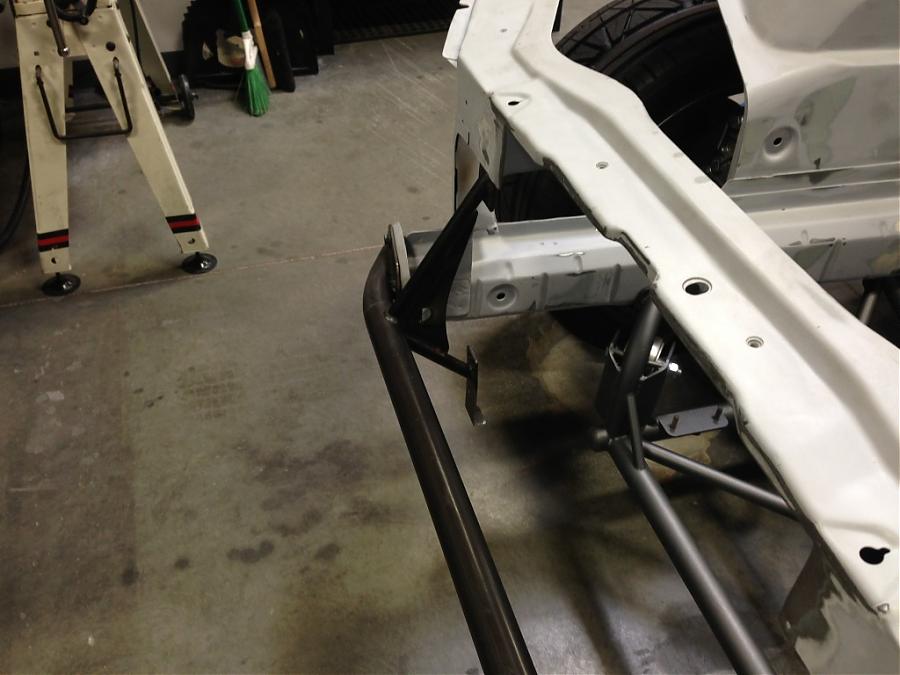
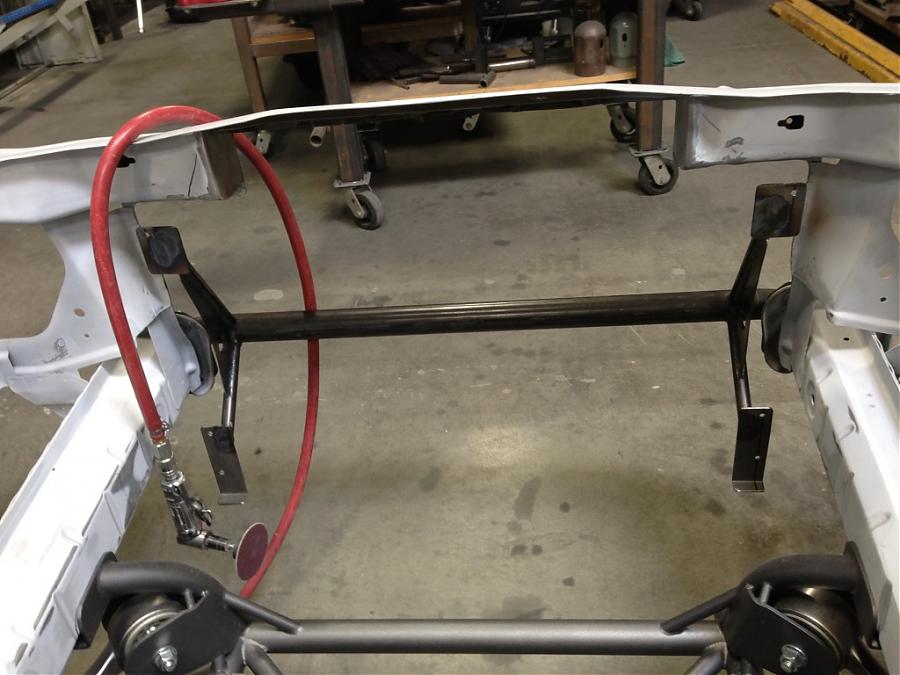
Replaced the front and rear bumper which are made from sheet metal with chromoly tubing and dropped over 30 lbs.

Name:  11.jpg
Views: 536
Size:  65.1 KB


Name:  12.jpg
Views: 523
Size:  65.5 KB

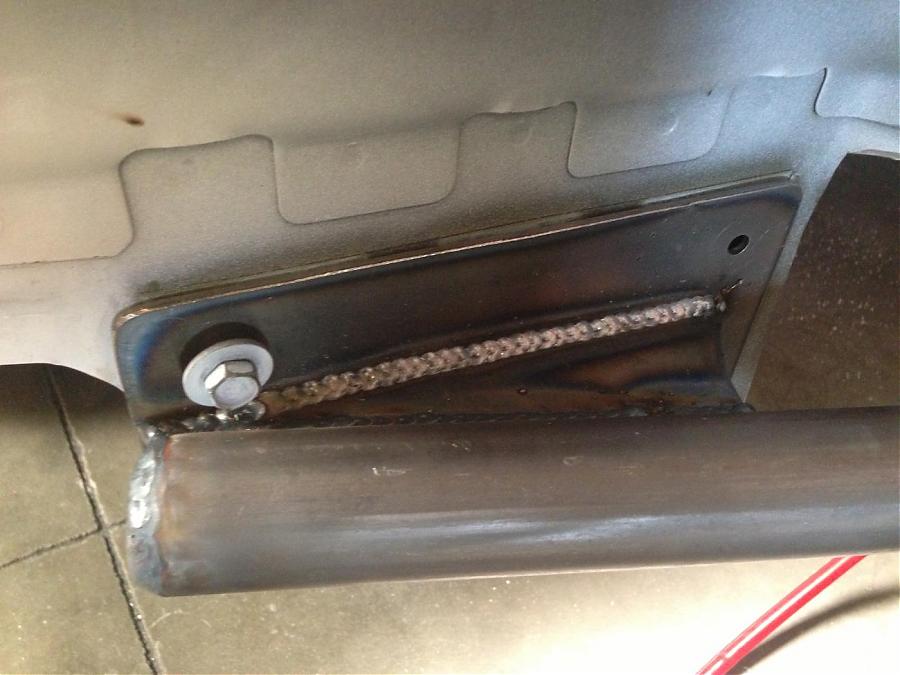
They also tied in the mounting points for the rad off the new bumper. From the inside of the engine bay, the rad will have a floating look to it.

Name:  null_zpsb5adf0ba.jpg
Views: 527
Size:  62.9 KB


Name:  null_zps560de02b.jpg
Views: 530
Size:  73.5 KB

Since they got rid of the rear seat, they were able to mount the main hoop on the ledge were the rear seat would normally be. This allowed to set it back were you can't see it from the side view. All the other bars we've seen, come off the floor by the front seats, so they are always visible.

Name:  068.jpg
Views: 522
Size:  78.4 KB


Attachment 41401

Check out how the down bar came down just above the rear solid mount. The secondary bar fall right above the strut mount solidifying the rear section. Finished it up with a gusset and small dimple.

Name:  null_zps43ae3e3e.jpg
Views: 529
Size:  70.9 KB

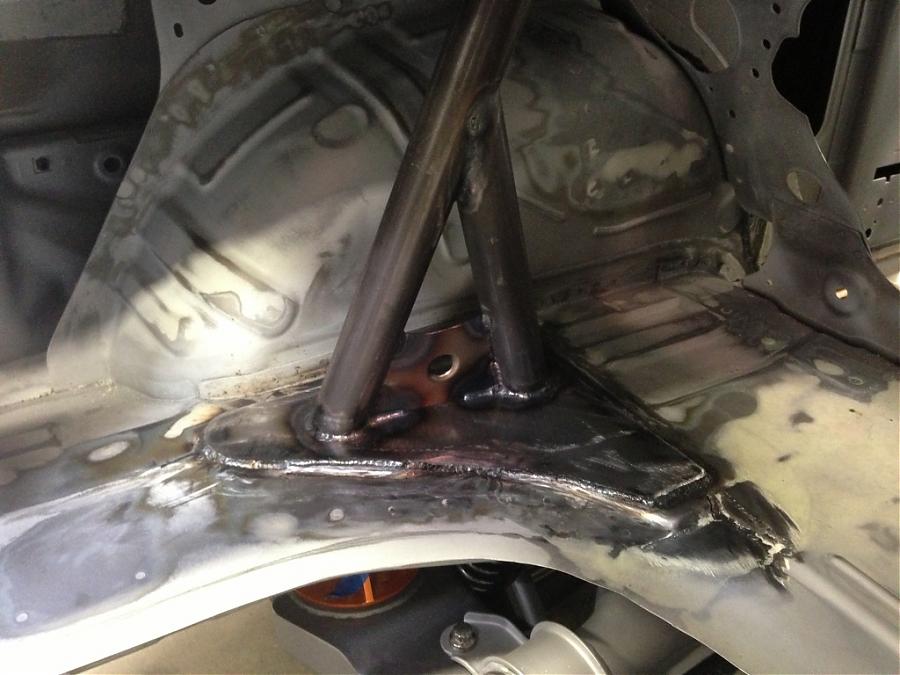
For future planning, they welded in the mounting plates for the front down bar in case they want to go the a full cage down the road.

Name:  null_zpsc167d14e.jpg
Views: 525
Size:  90.7 KB

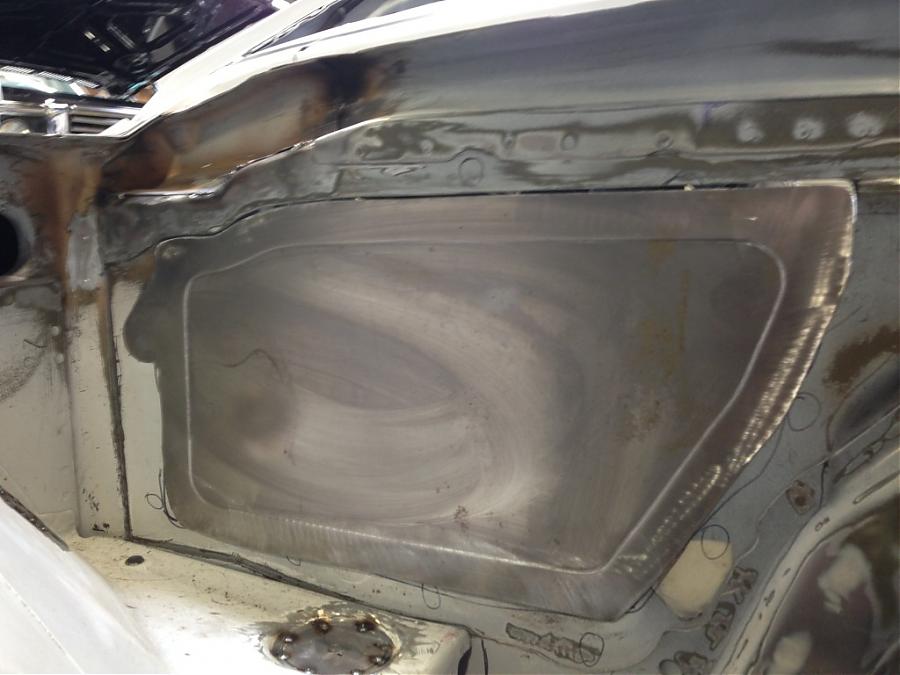
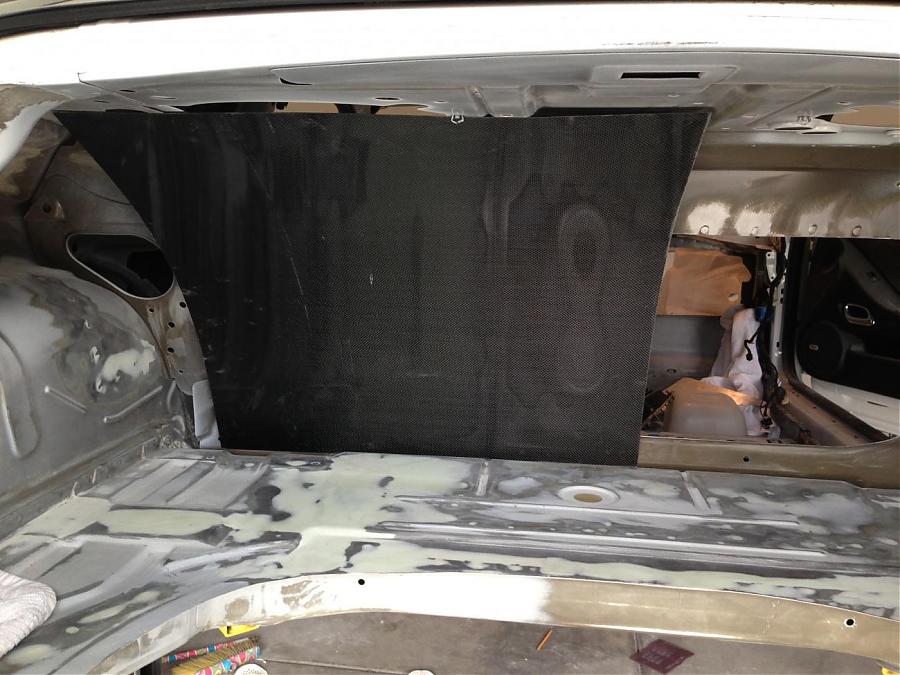
Filler panel for passenger side of the firewall. This is were the factory cabin filter use to be.

Name:  null_zps349e141f.jpg
Views: 532
Size:  60.9 KB

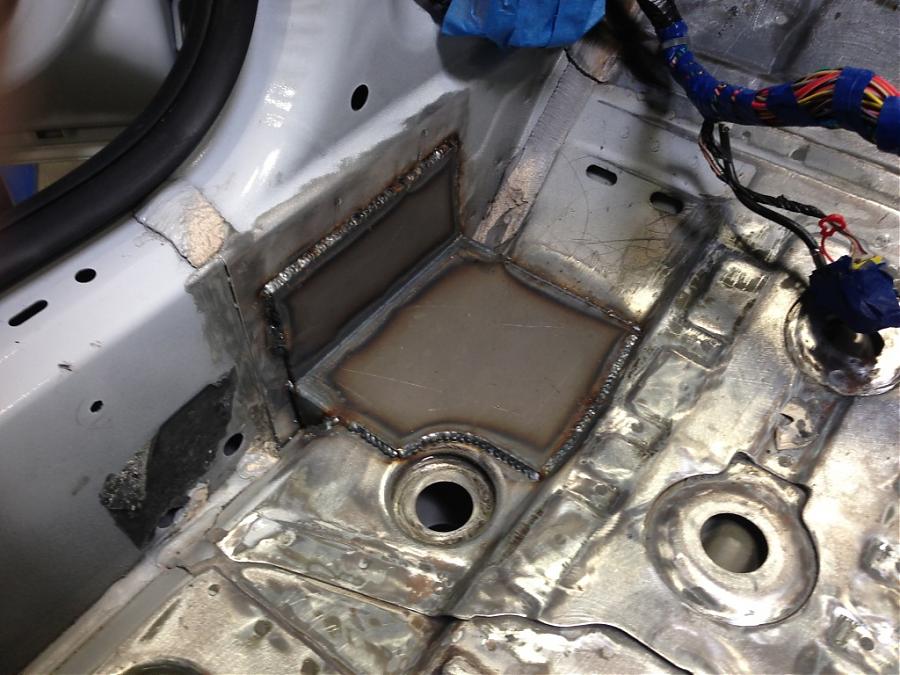
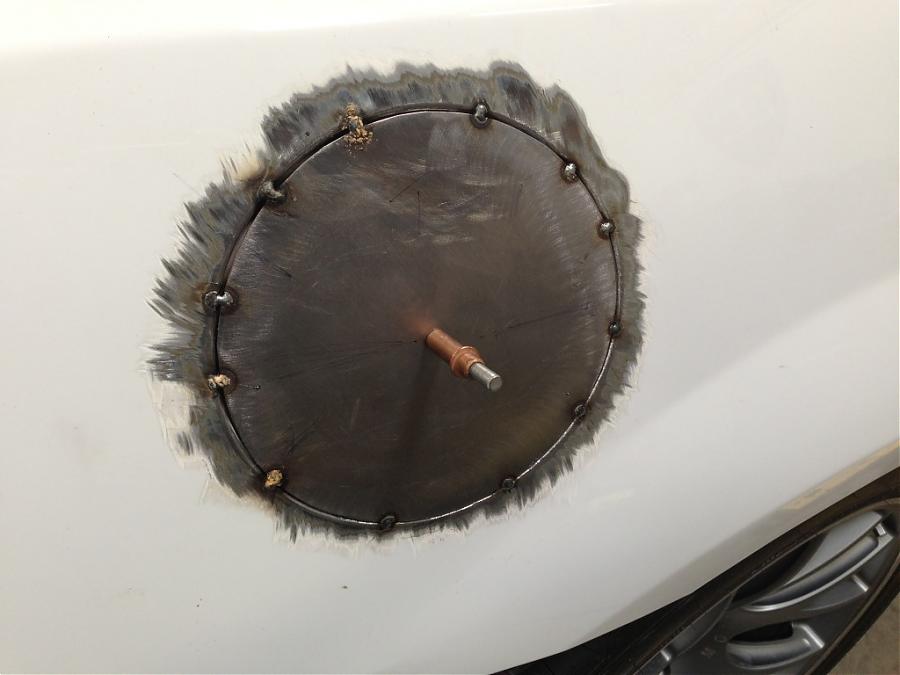
Gas filler is being relocated to the trunk.

Name:  null_zps121c13fe.jpg
Views: 521
Size:  43.6 KB

This is a preview of things to come. They have gotten rid of 30 lbs of metal bracing that was there to support the rear seats.

Name:  021.jpg
Views: 513
Size:  87.5 KB
Reply With Quote
  #139  
Old 08-07-2013, 07:24 PM
waynieZ's Avatar
waynieZ waynieZ is offline
Lateral-g Supporting Member
 
Join Date: Oct 2006
Location: Ma
Posts: 8,491
Thanks: 939
Thanked 342 Times in 231 Posts
Default

Wow big changes! Should make a big difference.
__________________
_Wayne________

___________________________________
https://lateral-g.net/forums/show...ghlight=FNQUIK
Reply With Quote
  #140  
Old 08-09-2013, 02:29 PM
Al Moreno Al Moreno is offline
Senior Member
 
Join Date: Dec 2004
Posts: 1,502
Thanks: 3
Thanked 1 Time in 1 Post
Default

Thanks Wayne, pushing to get it done for SEMA. Going to be Line-Xing the entire floor panel next.

The boys did a tremendous amount of work for something that will look so simple in the end. Creating a flat firewall on the driver side.

Here is a pic of the original engine bay. The red circle represent studs (total of 11 studs) that were sticking out about an inch through the firewall into the engine bay. These studs are welded to the plate that hold the buster and pedal assembly.


In order to create a flat firewall driver side, the first step was to cut off the studs off the plate.

Next they had to come up with a way to mount the plate to the firewall.

Seth made the template for what would become a ring the shape of the hole.


Next came cutting the shape out on the plasma cutter


Nathan cleaning out the edges.


They cut the heads off the bolts and here they used the plate as a fixture to weld the bolts to the ring.


There's was about another 20 more steps to get to where they welded the ring


The holes were use to rosette weld the ring to the firewall.


Finally, they welded the ring to the firewall with the stud now facing the cabin. Next on the list is making a carbon fiber firewall.


Last edited by Al Moreno; 08-09-2013 at 06:10 PM.
Reply With Quote
Reply


Posting Rules
You may not post new threads
You may not post replies
You may not post attachments
You may not edit your posts

BB code is On
Smilies are On
[IMG] code is On
HTML code is Off

Forum Jump


All times are GMT -7. The time now is 11:07 PM.


Powered by vBulletin® Version 3.8.11
Copyright ©2000 - 2025, vBulletin Solutions Inc.
Copyright Lateral-g.net