...

Go Back   Lateral-g Forums > Technical Discussions > Shop & Equipment
User Name
Password


Reply
 
Thread Tools Display Modes
  #281  
Old 10-28-2013, 07:52 AM
Sieg's Avatar
Sieg Sieg is offline
Moderator
 
Join Date: Dec 2010
Location: Pacific Northwet
Posts: 8,034
Thanks: 33
Thanked 102 Times in 41 Posts
Default

Jeff, what helped me as much as anything is creating controlled test. Simple well know stuff that had no variables. Metal - Gauge - Tungsten - Filler - Gas Flow - Amperage. Fit up, prep, and clean meticulously so there's no doubt.

Then I use the baseline's Miller provides as reference.

Run a 1" bead at your baseline, then one inch beads at high and low extremes to the baseline and observe my habits during the tests and the results. Knowing the extremes has helped me understand right vs wrong and get the feel for normal or an acceptable average.
Reply With Quote
  #282  
Old 10-28-2013, 12:06 PM
mitch_04 mitch_04 is offline
Senior Member
 
Join Date: Oct 2012
Posts: 195
Thanks: 0
Thanked 1 Time in 1 Post
Default

Any recommendations on tungsten and filler size for sheet metal, 20 gauge specifically?
Reply With Quote
  #283  
Old 10-28-2013, 12:34 PM
Sieg's Avatar
Sieg Sieg is offline
Moderator
 
Join Date: Dec 2010
Location: Pacific Northwet
Posts: 8,034
Thanks: 33
Thanked 102 Times in 41 Posts
Default

Quote:
Originally Posted by mitch_04 View Post
Any recommendations on tungsten and filler size for sheet metal, 20 gauge specifically?
1/16" and 1/16" should work.

Miller app only goes down to 1/16" material

For butt joints they say 50-80 amps for stainless +10% for mild steel.

Argon at 11 cfh or 20 psi.

Speed 12" per minute.

Prep and fit-up!!!
Reply With Quote
  #284  
Old 10-28-2013, 03:42 PM
GregWeld's Avatar
GregWeld GregWeld is offline
Lateral-g Supporting Member
 
Join Date: Jul 2005
Location: Scottsdale, AriDzona
Posts: 20,741
Thanks: 504
Thanked 1,080 Times in 388 Posts
Default

Quote:
Originally Posted by mitch_04 View Post
Any recommendations on tungsten and filler size for sheet metal, 20 gauge specifically?


Download the miller welder app --- it has all that info at your fingertips.
Reply With Quote
  #285  
Old 10-28-2013, 04:08 PM
GregWeld's Avatar
GregWeld GregWeld is offline
Lateral-g Supporting Member
 
Join Date: Jul 2005
Location: Scottsdale, AriDzona
Posts: 20,741
Thanks: 504
Thanked 1,080 Times in 388 Posts
Default

Watch this on tight fit ups!!!


and watch this video too…..


Reply With Quote
  #286  
Old 10-28-2013, 06:27 PM
mitch_04 mitch_04 is offline
Senior Member
 
Join Date: Oct 2012
Posts: 195
Thanks: 0
Thanked 1 Time in 1 Post
Default

Quote:
Originally Posted by GregWeld View Post
Download the miller welder app --- it has all that info at your fingertips.
I actually got rid of my smart phone and went back to a "dumb" phone! I use the Miller calculator on their website, but, like Sieg said, it only goes down to 1/16 so I wasn't sure. I had watched that first video before, I watched a ton of Jody's videos when I first bought the TIG. That's where I learned of the online tubing coper, awesome "tool".

I'll give it some more practice when I get a chance to work on my own pickup again. Until then I'll stick to the larger steel or a MIG.
Reply With Quote
  #287  
Old 10-29-2013, 11:18 AM
stephen wilson stephen wilson is offline
Junior Member
 
Join Date: May 2006
Posts: 4
Thanks: 0
Thanked 0 Times in 0 Posts
Default

In general the filler should match the material thickness, so for 20 Ga I would use .045 , or even .035 if you have a tight fit that doesn't require much filler.
Reply With Quote
  #288  
Old 12-01-2013, 08:31 PM
Sieg's Avatar
Sieg Sieg is offline
Moderator
 
Join Date: Dec 2010
Location: Pacific Northwet
Posts: 8,034
Thanks: 33
Thanked 102 Times in 41 Posts
Default

Created a project to get some heavy gauge practice on. The heavy stuff was good for me and my aging eyes as it's like looking at the puddle under a microscope.

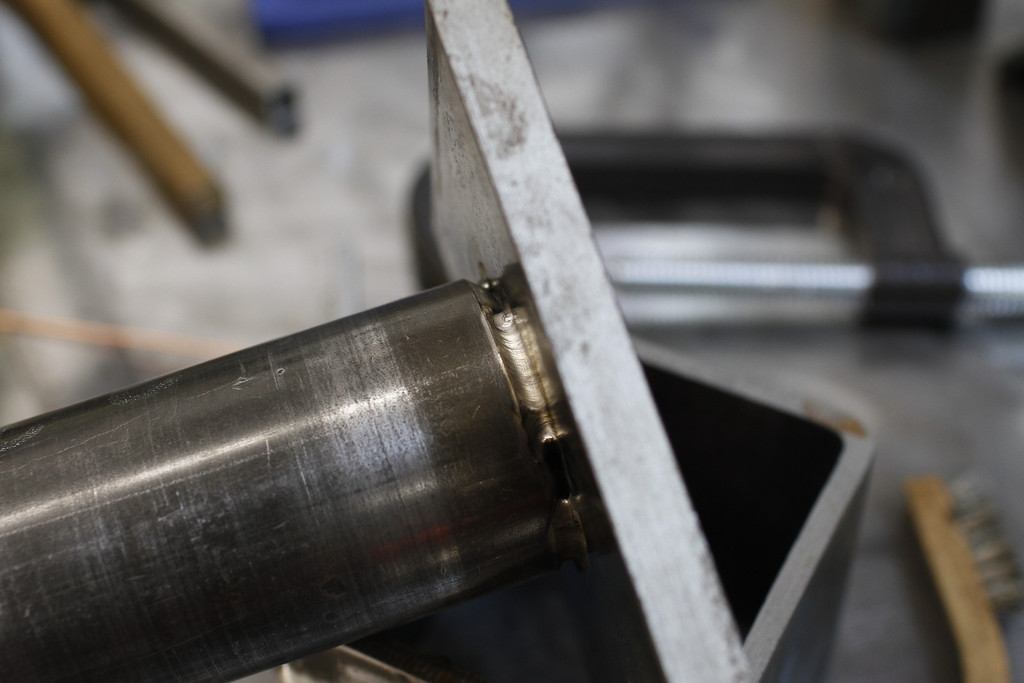
Basically I welded a piece of seamless tube with a 12mm wall and 34mm ID to a 13.5MM base plate. The tube was beveled at 45* giving it an approx. 7mm face.

Tube fuse tacked to base.


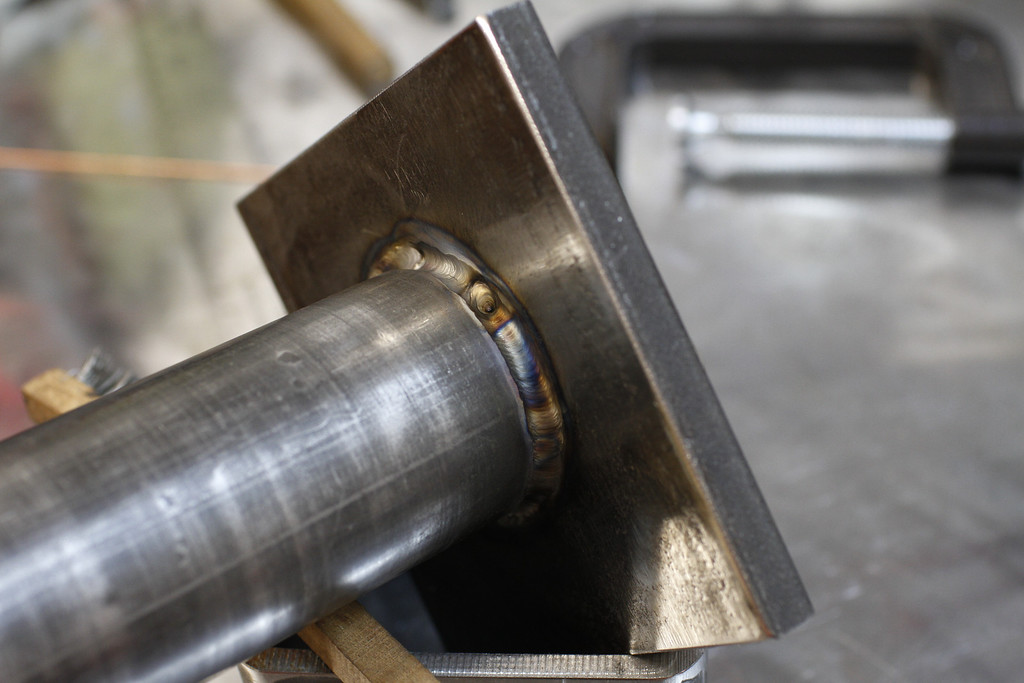
I alternated fusing opposed 20mm sections.


Fused 360*


Then I started experimenting laying cover passed by dabbing 1/16 70S rod and 3/32 70S, then lay-wire method with 3/32. I lost control of the heat due to puddle chasing mainly related to poor positioning/posture techniques.


Final pass using 3/32 lay-wire and weave pattern with the torch.
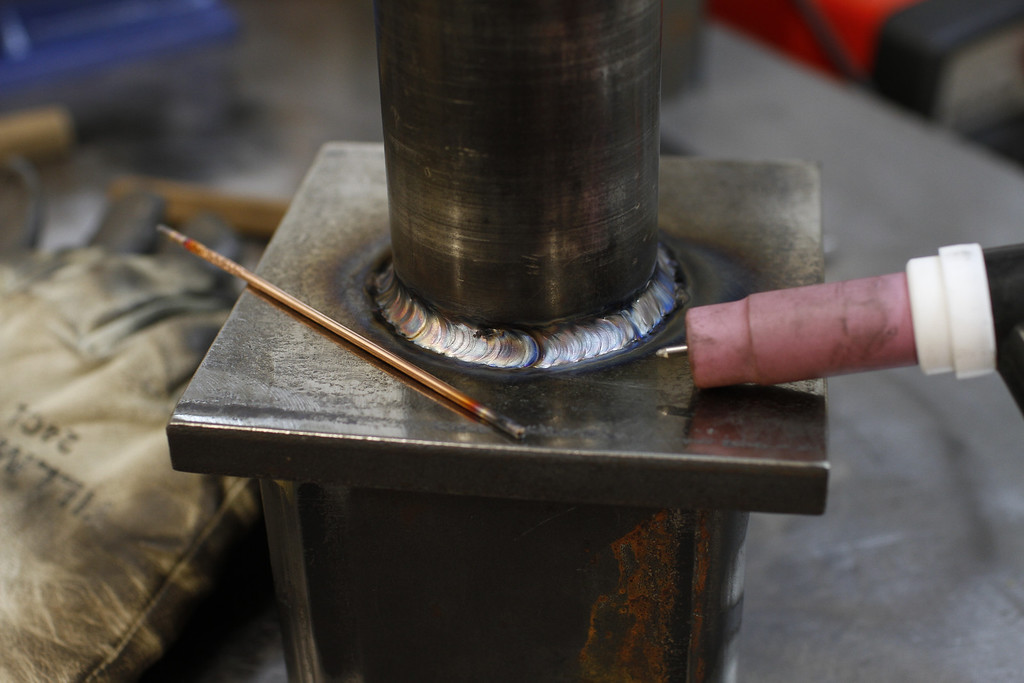

End result


I plan on stress testing it in the near future.

The larger material was good practice for me as most of my practice has been at a much smaller scale. The visual scale made connecting the dots much easier. A water-cooled torch would have been nice to protect from the material heat, surprisingly the torch never got uncomfortable with my non-insulated TIG gloves. A TIG Finger for heat protection would have been nice when propping on the tube though. Ended up laying my insulated MIG glove over it.
Reply With Quote
  #289  
Old 12-01-2013, 09:09 PM
GregWeld's Avatar
GregWeld GregWeld is offline
Lateral-g Supporting Member
 
Join Date: Jul 2005
Location: Scottsdale, AriDzona
Posts: 20,741
Thanks: 504
Thanked 1,080 Times in 388 Posts
Default

So first things first --- it looks real good -- and projects like this teach a guy A LOT --- such as you mentioned -- positioning and clamping and heat and on and on…


#2 -- when we say CLEAN is the paramount thing to TIG welding (MIG you can get away with a lot) ---- I would have cleaned the mill scale off down to clean bare shiny metal…


Did I mention it looks real good?
Reply With Quote
  #290  
Old 12-01-2013, 09:15 PM
Sieg's Avatar
Sieg Sieg is offline
Moderator
 
Join Date: Dec 2010
Location: Pacific Northwet
Posts: 8,034
Thanks: 33
Thanked 102 Times in 41 Posts
Default

Thank you!

It was clean metal in the weld circle. Didn't have any contamination flares at all which really surprised me.........other than sticking the tungsten in the puddle 3 times.....which is a win for me.
Reply With Quote
Reply


Posting Rules
You may not post new threads
You may not post replies
You may not post attachments
You may not edit your posts

BB code is On
Smilies are On
[IMG] code is On
HTML code is Off

Forum Jump


All times are GMT -7. The time now is 03:33 PM.


Powered by vBulletin® Version 3.8.11
Copyright ©2000 - 2026, vBulletin Solutions Inc.
Copyright Lateral-g.net