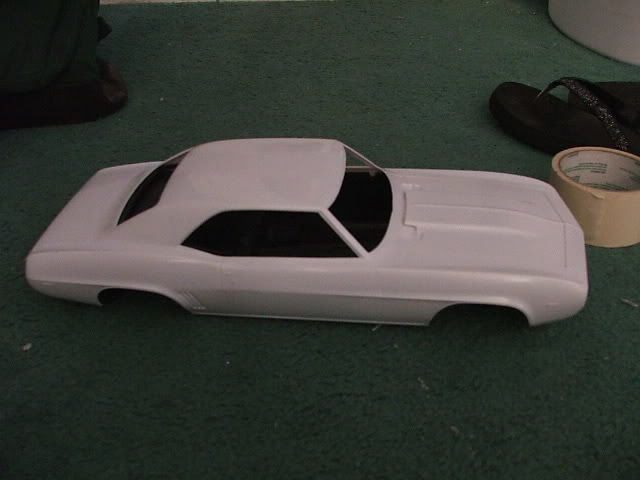
...

Go Back   Lateral-g Forums > Lateral-G Open Discussions > Artwork and Collectibles
User Name
Password


Reply
 
Thread Tools Display Modes
  #71  
Old 05-16-2006, 09:28 PM
black2002ls black2002ls is offline
Senior Member
 
Join Date: May 2005
Location: greenville, tx
Posts: 675
Thanks: 0
Thanked 1 Time in 1 Post
Default

I agree, it does look a tad too round. I'll have to correct that. I spent some more time on the tail section. How are the sleeves coming?
__________________
1/12th scale 1969 Sunset Orange Metallic Camaro Pro Touring Style>>
Progress Thread

Artwork Page
Reply With Quote
  #72  
Old 05-16-2006, 09:50 PM
black2002ls black2002ls is offline
Senior Member
 
Join Date: May 2005
Location: greenville, tx
Posts: 675
Thanks: 0
Thanked 1 Time in 1 Post
Default

here is the intake that I am planning for this beast, paired with Twin Turbos.


__________________
1/12th scale 1969 Sunset Orange Metallic Camaro Pro Touring Style>>
Progress Thread

Artwork Page
Reply With Quote
  #73  
Old 05-18-2006, 09:30 AM
black2002ls black2002ls is offline
Senior Member
 
Join Date: May 2005
Location: greenville, tx
Posts: 675
Thanks: 0
Thanked 1 Time in 1 Post
Default

Well, here is some more progress. I thought that I had an LS1 timing cover, but I don't. I've got the rear main cover and valley cover. So I had to eyeball it. It still needs the plug for the sensor but other than that I am happy with it. Once all of the pullies, accessories, and the snails are in there, it will no longer be the highlight of the front side of the motor. Also, I managed to get the hats constructed for the rotors. This will be universal for the front and the rear. I think I am going to make some smaller rotors for the rear. 15" is overkill for the front. But they helped to fill out the wheels a little bit. I am going to play around with the axle length today. Maybe I can get that sorted out and then begin on the 4-link rear suspension. enjoy the pictures


__________________
1/12th scale 1969 Sunset Orange Metallic Camaro Pro Touring Style>>
Progress Thread

Artwork Page
Reply With Quote
  #74  
Old 05-20-2006, 10:01 AM
black2002ls black2002ls is offline
Senior Member
 
Join Date: May 2005
Location: greenville, tx
Posts: 675
Thanks: 0
Thanked 1 Time in 1 Post
Default

Here we go. I began the mods to the rear end. I settled on 4 3/4" of offset on the wheels. I wrapped them in THIN .05 styrene cut to the proper width for the rear wheels and played around until I was happy. This then allowed me to mock up the rear wheels and brakes and get a proper measurement for the new axle tubes. They were made from 1/4" Brass Tube. There is a slightly smaller tube inside of that that helped me to keep the outter tubes square with the main housing, and also to help the rear axle support the weight of the car without buckling. Once that was complete I referred to pictures of Scott's 4-link set up and began to work on the 4-link brackets. Originally I was going to cut them from brass sheet and solder it all together. Well that didn't pan out so they got cut from styrene sheet and will be superglued to the axle. The inner bracket is for the upper link and the coil over shocks, the outer bracket is for the upper link. All that is left, as far as the rear end is concerned is the panhard bar bracket, housing ends, and caliper brackets. I am hoping to have it completed sunday and ready for primer. I am just about read to pour some RTV for the little things. Heads, remaining wheel parts and the breaks. The next round of RTV will include intake parts, and the rear brake parts. This is coming along quite nicely. I begin Summer I classes on June the 5th so I am cramming as much work in as possible until then. Enjoy the pics.


__________________
1/12th scale 1969 Sunset Orange Metallic Camaro Pro Touring Style>>
Progress Thread

Artwork Page
Reply With Quote
  #75  
Old 05-24-2006, 07:39 AM
black2002ls black2002ls is offline
Senior Member
 
Join Date: May 2005
Location: greenville, tx
Posts: 675
Thanks: 0
Thanked 1 Time in 1 Post
Default

here is a small update. I managed to get some heads cast. so it is beginning to look like an engine. I had to pick up some more brass tubing yesterday so I could continue on with the four link and the intake. I am going to the lake this weekend so progress will halt after tomorrow afternoon. but stay tuned and keep the comments rolling!

__________________
1/12th scale 1969 Sunset Orange Metallic Camaro Pro Touring Style>>
Progress Thread

Artwork Page
Reply With Quote
  #76  
Old 05-24-2006, 10:08 AM
Buick Motorsports's Avatar
Buick Motorsports Buick Motorsports is offline
Senior Member
 
Join Date: Aug 2005
Location: Winnipeg, Manitoba
Posts: 170
Thanks: 2
Thanked 1 Time in 1 Post
Default

I truly admire your scratchbuilding talents.....scratchbuilding is one of my shortfalls.
Reply With Quote
  #77  
Old 05-24-2006, 11:31 AM
astroracer astroracer is offline
Member
 
Join Date: Dec 2004
Location: Mid-Michigan
Posts: 76
Thanks: 0
Thanked 0 Times in 0 Posts
Default

Hey Russ, you are doing a bang-up job. I love the color. I wish I had time to pursue my latent modeling desires...
If I could offer a couple of suggestions I will pursue them through your efforts...
When I look at your 4 link brackets it looks like you are making them one at a time. Can I suggest "stacking" them? Cut them out to their rough shape, drill two holes (the "axle" hole and one suspension attachment point work well) to pin them together and then finish sand the final shape on ALL of the pieces at one time. Doing this will make them all identical and they will look like you stamped them out...
You can use the same process for the brake rotors. Cut them to rough shape drill one hole and use that to run a screw through the stack. Chuck the asm into a drill motor and sand the shape on all discs at one time... Only use alumnum sheet to make the rotors... no painting and they will look good in the natural aluminum color.
Mark
__________________
"Bad Ast" Astro Van Pro-Touring Project.... Heat, beat, file to fit, paint to match...

Last edited by astroracer; 05-24-2006 at 11:34 AM.
Reply With Quote
  #78  
Old 05-24-2006, 09:32 PM
black2002ls black2002ls is offline
Senior Member
 
Join Date: May 2005
Location: greenville, tx
Posts: 675
Thanks: 0
Thanked 1 Time in 1 Post
Default

Mark thanks for the comments. The way I cut the brackets was to drill several holes in a sheet of styrene and trace out the bracket. I then stacked them and shaped them the same. There is one bracket that is not the same. The link and coil over holes were all drilled at the same time when they were stacked. The rotors will be cast in resin I'd much rather use up some RTV and have them available for future builds, than to re create the vents on the rotors 4 times over. I have about 3 hours of VERY tedious work in them. I am gone to the lake all weekend. I hope to have the main parts of the intake and the smaller brakes for the rear done early next week so I can pour those molds.
__________________
1/12th scale 1969 Sunset Orange Metallic Camaro Pro Touring Style>>
Progress Thread

Artwork Page
Reply With Quote
  #79  
Old 05-25-2006, 09:03 AM
MaxHarvard's Avatar
MaxHarvard MaxHarvard is offline
Senior Member
 
Join Date: Jul 2004
Location: Hugo, Minnesota
Posts: 2,001
Thanks: 0
Thanked 1 Time in 1 Post
Default

wow... just amazing! Good work, love the color too. I'm a big fan of shaving the drip rails too
Reply With Quote
  #80  
Old 06-10-2006, 09:03 AM
black2002ls black2002ls is offline
Senior Member
 
Join Date: May 2005
Location: greenville, tx
Posts: 675
Thanks: 0
Thanked 1 Time in 1 Post
Default

Alright, somewhat of an update....ITS WHEELS!!!! well...kind of. lol. I got my aluminum ordered. I finished playing around with the offset and here are the wheel dimensions

Rear
11x20 with 5.2" of offset

Front
8.5x20 with 2.25 inches of offset

My girlfriends brother is going to be writing the CAD program and machining the wheels for me. After I receive the sleeves, I'll be getting back to this, cleaning up all 4 wheel blanks and getting them mounted on the sleeves and beginning on the tires.


on a side note, I've heard talk here and there of machining pieces by hand. If anyone can shed some light on this, please share! If you'd like to explain in an e-mail send it to, [email protected]
__________________
1/12th scale 1969 Sunset Orange Metallic Camaro Pro Touring Style>>
Progress Thread

Artwork Page
Reply With Quote
Reply


Posting Rules
You may not post new threads
You may not post replies
You may not post attachments
You may not edit your posts

BB code is On
Smilies are On
[IMG] code is On
HTML code is Off

Forum Jump


All times are GMT -5. The time now is 03:41 AM.


Powered by vBulletin® Version 3.8.11
Copyright ©2000 - 2025, vBulletin Solutions Inc.
Copyright Lateral-g.net