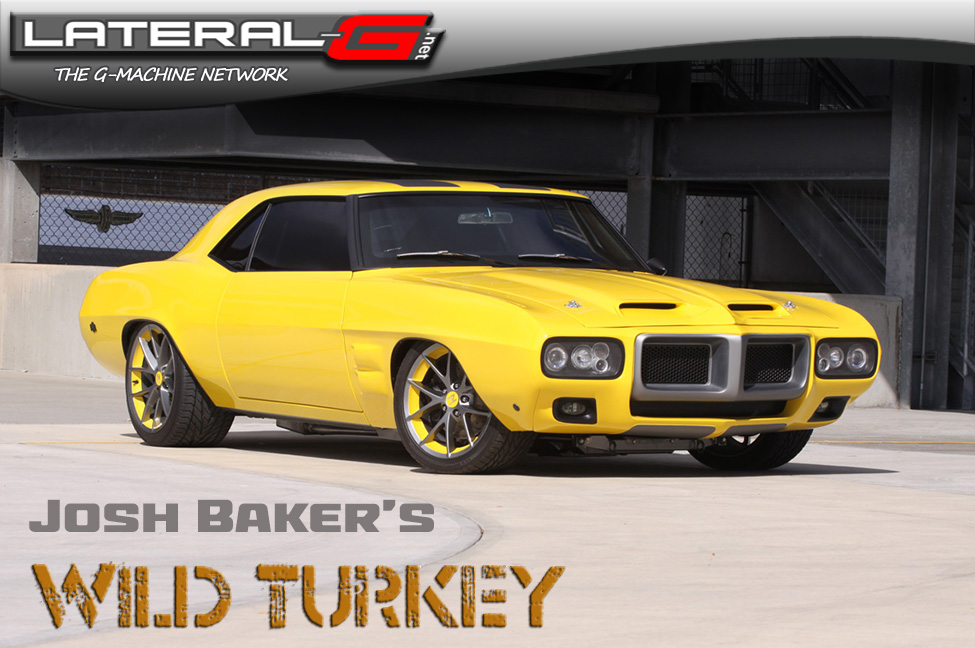
Story by Josh Baker
 This project has been a long and “wild” journey that has filled me with moments of great satisfaction, subdued by annoying frustration, feelings of euphoria and great loss. To explain the longevity of the build, it wasn’t that I worked at it slow, but that I started a shop and did many complete restorations and only worked on this on the side.
It all started in my back yard garage in 2006 at the age of 28 when my hopes of building custom cars was new, exciting and undefiled by the coming struggles that lie ahead. I spent many long hours honing my custom paint skills on cheap cars that I bought and sold while working at a trailer factory doing mind numbing, body breaking hard labor for close to 8 years with a small break in the middle for back surgery. I was forced to take my hobby to the next level when another back injury led to me being laid off and unemployed. With 2 kids to feed and one on the way I did what I could to pay the bills painting my neighbors truck was my first “customer” job. I soon had a few small jobs here and there but needed a little steadier work. That is when my brother stepped in and graciously helped me out with a “small” project. I of course would work at a “family” rate and just “restore” his 1969 Firebird to driver condition. ….floor pans quarters etc….nice paint.
 It only took a few weeks of tearing down the car and looking at its naked form for me to see changes that would make it something more than what the factory built and at the same time exactly what they should have, IMHO. And it only took a few shots of Wild Turkey 101 Rare Breed fine Kentucky bourbon to convince my brother to let me just do a “few things here and there”. I felt a little like a 19th century French fur trader every time I told my wife I needed to “talk turkey” with my brother, knowing that the fire water would not only give me a smoother way of talking, but also help him to realize that many otherwise unnecessary customizations seem like they were meant to be.
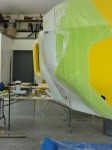
My business picked up and I needed to get out of my home shop for the sake of the EPA. Me and my brother along with my father in law built my shop about a half hour from my home just in time for the economy to bust. It has been tough as many other small businesses know. Anyway I moved the car there and resumed doing large restorations and custom paint as work came. The breaks in working on other projects allowed me to think about the car and changes I would implement when I finished up a job and waited for something else.
The entire build was like this: I would see something that I wanted to do, then over simplify it in my mind, explain it wearing rose colored glasses and throw a completely sincere but unrealistic number out there and then spend my own time making up the ten-fold difference. Not always cool for me, but in the end, I hoped, cool for the car. This started out as a real budget build with my sweat equity being the only thing that may set it apart. However, as my brother’s construction business picked up, the ebb and flow of money meant occasions for really nice parts and some bigger mods.
I didn’t start out with a list of customizations. I really have to look at the shapes of a car and see what they are saying to me. I could shape any ideas I had but as far as implementing my ideas into a finished product the biggest help for me was hiring a friend who was in the custom fiberglass business for the last 25-30 years. He showed me the ropes in how to build molds that produced good quality pieces. One of the best learning opportunities I have had. So it provided a solution to some of the more complicated modifications I wanted to do. With the help of my longtime friend and employee who trained and learned with me from a young age, we could make just about anything we wanted. Really itchy work but the results are worth it. My whole approach of design stems from my love of import, mostly European super car style. I wanted to tastefully meld the styles of Lambos, Ferraris and others into American muscle.
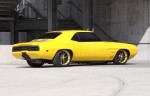
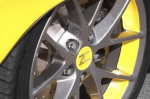
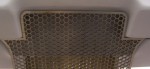
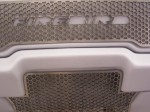
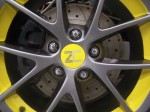
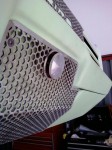
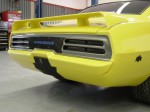
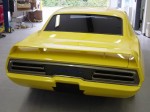
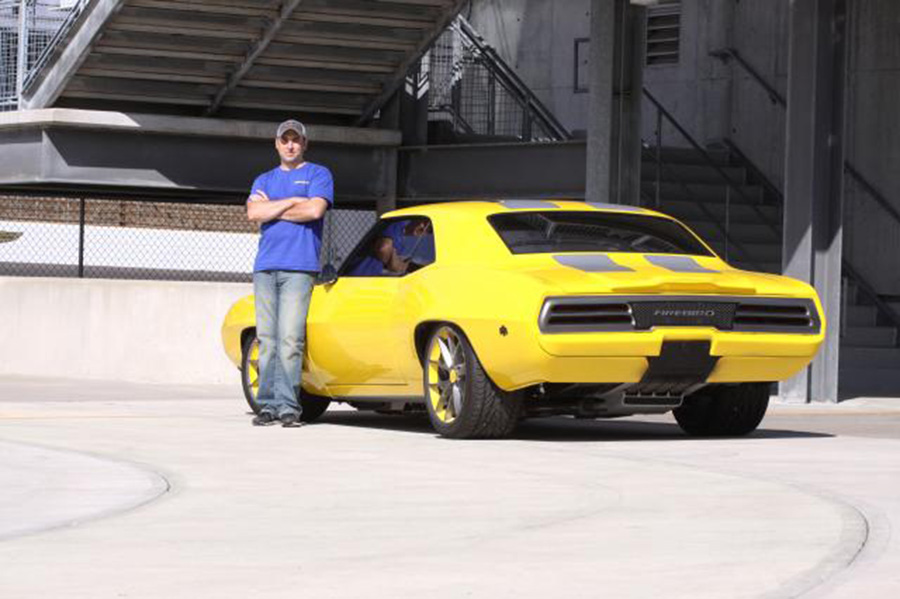
 The Honeycomb pattern on the front and rear comes from both Firebirds but also Lamborghini. The center exit exhaust was inspired by the Lamborghini Murcielago. The wheels were originally nasty chrome Corvette repos. I wanted to paint them since the day we bolted them on. So I eventually stripped the chrome and painted them to reflect the overall, perhaps over the top race look I was going for, influenced by Lamborghini wheels. The front nose design was influenced by a 2009 Nissan GT-R. The interior with the center console was Ferrari and Lambo inspired. Over all I was building a race car for the street with some occasional autocross fun so I wanted it to say “race” and not “stock”. Hood pins and stripes help to accomplish that.
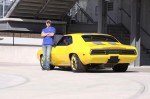
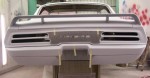
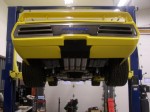
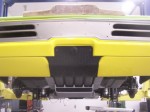
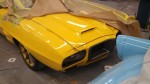
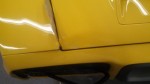
My first major modification was the rear. The factory covered up one the nicest details in my opinion. A small radiused body line that was completely covered by the rear bumper. That simple shape would become the theme for everything I built on the rear of the car. The bumper was cut, shortened in every direction and fit not over but under that shape and the lower area built out to meet up. As I continued, every other modification had to complement that shape, from the honey comb parts to the wing and the heat shield on the exhaust.
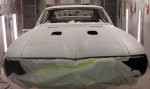
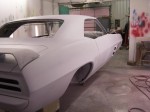
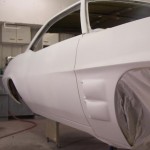
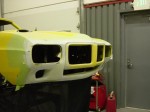
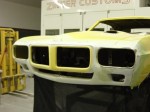
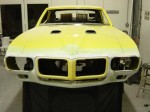
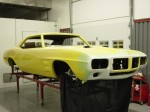
I started designing the front nose several years ago, getting rid of the over engineered multi-directional, multi-adjustable mess that is a 1969 Firebird nose. I wanted more than anything like many Firebird owners to ditch the hideous black rubber headlight/fender gaskets. I shaped my vision in metal, foam and bondo until it matched what I saw in my head. A little more aggressive with less of a side profile overbite and a more modern look. I wanted the center to look as if it was separate and being wrapped around by the yellow, just like the Nissan GT-R. The pattern turned out great, the mold was made and we made my first part.
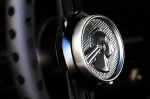
I also wanted modern headlights and we ended up cannibalizing an aftermarket set for the lights and rings and building my own 2 part housings. We made molds and produced some nice parts. I used Honda Accord fog lights down low. The head lights are completely adjustable and function great.
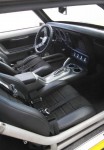
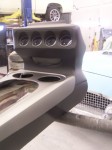
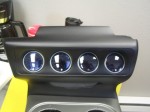
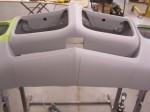
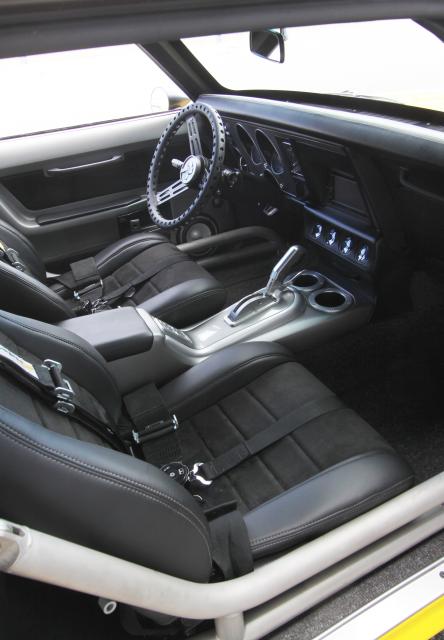 The interior was its own monster. I didn’t want an over the top smoothed out custom look. I wanted a purpose built, factory detailed look, usable and custom at the same time. A nice waterfall console like in the Ferrari FF was calling my name. I was enamored with its sleek style and honestly useless details, in that it had an armrest with storage in the back and rear a/c vents. I figured the Firebird had as much a chance at having back seat passengers as the Ferrari, so why not. I also liked the shifter bezel in the Lamborghini Gallardo. Raised up, separated, pod like in shape…so that’s what I went with in my design. I wanted center located power window buttons installed at a comfortable angle while your arm is resting on the center lid. I removed any name brand engraving on the shifter and tried to make it appear as if I pulled the console out of a high end car and put it in the bird.
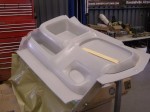
The door panels were originally deluxe but I wanted to do something there as well. I wanted component speakers. After we made the parts we purchased a Ride Tech Tiger cage with door bars and realized they don’t clear deluxe door panels when you shut the doors on Firebirds and Camaros, so it worked out having glass parts, we cut and moved the arm rest end about 3 inches, just enough to clear and enough you wouldn’t know. Made molds and some nice parts. I had to create my own back seats. I had originally purchase an entire 2001 Camaro seat set but realized with the Detroit speed 4 link pockets it was going to be an issue and the back seat upright was not near big enough. I looked outside and saw my younger brother prepping his broke down 87 Honda Civic hatchback for the junk yard and had an idea. I went out and measured the rear seat, pulled the bottom out and set it in the bird and it was exactly the right size, almost perfect. I pulled the rest and started cutting to make room for my then future console. I shortened each folding rear upright half by 4/5 inches and cut the foam to fit. Really quick fix. Plus I loved the fact that they each folded down independently for access to the rear area where I planned on putting my amps. And the head rests looked great too. I mocked up the side panels to fit tight to the seats and made some parts. Interior figured out! I had help from a friend who did upholstery on the side and he made and installed the suede headliner and glued in the german square weave carpet. We sent the seats out to a local upholstery shop and had them wrapped in black ultra-leather. The only outside sourced work done on the interior.
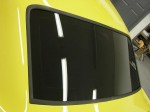
Back to the exterior; I molded the original style TA scoops into the fenders, shaved the door handles (wish I hadn’t) and shaved the roof drip edge off. I wanted a wraparound affect from the windshield to the quarter glass so I trimmed it out in flat black and blacked out all the chrome trim as well. I modernized the look of the windows by etching and painting the inside of the glass to give it a black matrix around the perimeter.
 The stripes were both a difficult sell and application…I had them designed a couple years back and even had photoshopped them on the car. The overall response was pretty negative from the forums, and my brother….but I knew they would work. I totally agreed on the hood; leave it clean, but the roof….. I just had to paint them on and let people see the real thing. I got my brothers approval to do it.
“If he didn’t like it I would remove them”. Although I never intended on doing that.
When it came time to lay them out, it took me a little bit to figure out that I had to actually create an optical illusion to make them look right. The “s” curve break in them was originally laid out with an exact ¾ inch gap all the way. It looked great in my computer program from above, however when you looked at it on the car it was all messed up. I finally figured out that I had to widen the ends a whole inch as well as widen the pinstripes x3 gradually as it changed direction at the ends of the “S” to make them “appear” to be ¾ of an inch from your vantage point standing in front of the car or behind it. So as you walk around the car the break seems to change in shape.
The wing …..we originally purchased a TA wing and I spent hours with that poor quality part to get it straight and after all that, when I bolted it on I was disappointed every time I saw it, and that was every day. The car just didn’t need a wing at certain angles, it looked so sleek and mean, however, at other angles it needed something. It took a while, years, for me to take the time to resolve that thorn in my side. I finally took it on late one night while racing to get ready for a show. No one was there to stop my crazy last minute change. I tried to make the wing pull at the stripes and flow with the shape of the car from every angle you can see it. Some angles you can’t. I know some think it is a little weird but most of the feedback has been positive. It has a hidden LED third brake light that is epoxied inside the fiberglass part, painted over and hidden until you hit the brakes.
Well, I have spent most my time on the things that I could change…some things aren’t in that area for me. So on to the mechanical side. I hired a mechanic to wire up the LS2, install the cam and intake, and finish up the brakes and such. He ended up staying on and has been a huge help in getting things done.
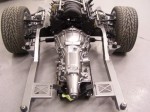
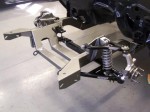
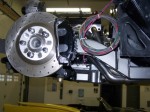
Before we started, my brother would take it to the Pontiac Nationals in Norwalk and drag race it. It had a built 455 in it and was a wild ride. He planned on putting a built 400 in it. Looking back I have mixed feelings about engine choice. You have to know that, although I understand mechanical things, I am not a motorhead at all. I don’t think that way about cars; I like shapes and styling. etc. So, apparently going with the LS2 out of a Pontiac GTO is not in fact using Poncho power but bastardizing the car instead. Although the hardcore Pontiac guys have really made their feelings clear, I am happy with the “look” and performance of the LS motor in the end. We didn’t skimp on suspension; I went with two different brands mostly because of cost in the front area. The brakes were not so great in the rear originally but now we fixed that with c5/c6 all around. I was pleasantly surprised to see the results of it being weighed by Ride Tech. It weighs 3729lbs and the balance is 49.5% up front and 50.5% in back. Not bad for a custom build with a kick butt stereo system and a/c.
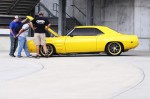
Well, remember in the beginning I said I suffered feelings of great loss? That brings me almost to the end of the build. It is March and we have worked endlessly to finish in time for the Detroit Autorama 2013. I had my spot paid for, it was 8 am and we were only 4 hours from leaving for Detroit. Just a few hours earlier, the night before, I had seen my years of work, stress and vision come together for the first time. Seeing my front end painted and on, headlights working, and a mean stance, things I questioned I would ever really get done; well, besides seeing my wife walk down the aisle and my 3 children being born, it was one of the best moments of my life. We took a step back dropped our wrenches and opened a beer and snapped a few pics with a swell in our hearts and resurgence of energy in our tired bodies. That may sound over the top but it is the truth. I honestly thought it was never going to be done. I only had to put the front seats in it and a few loose ends to finish up. The stripes needed some touch up…..so we decided to move it into the booth. Previously we had trouble with our SSBC billet master cylinder (we have since switched to Wilwood) and had taken it on and off bench bleeding it per their instructions but in the end we ended up getting another. We installed that and finally had front brake pressure…or we thought. It seems that after we had bled the brakes over and over and over…. the right front caliper bleeder was stripped out and felt tight but was ready to give way under load….I had those stupid 85 cheap Cadillac Eldorado disc in the back and didn’t realize that with the parking brake out (removed the night before to install the kick panels) the rear calipers where useless. It sets the calipers….anyhooo I did have front brakes, right? Well I did for a moment. I backed into my booth no problem, stopped and pulled forward to straighten out. I bumped the gas to get over the threshold of my booth and when I went to stop….nothing, I did what anyone does….pump the brakes and try to put it in park. Note: B&M shifter doesn’t go from 1st to park quickly, slap, slap, pull, slap etc. Directly in front of me was a perfectly restored, show quality painted 1957 Thunderbird I had spent a year restoring for a customer. I couldn’t see how close I was to it since the Firebird was masked for paint. My friend was guiding me into the booth and now was simply yelling stop, stop and perhaps crapping himself….I know I was. Well it took a second to stop, suddenly, loudly and painfully. What stopped me wasn’t the brakes, it wasn’t me getting it into park and it wasn’t the beautiful did I say “finished” Thunderbird and thankfully it wasn’t my friend who I imagined throwing his body in between the cars to save them…it was my large overhead garage door. The door that I shoved the beautifully finished ready to deliver Thunderbird into and almost through. I was in disbelief. Isn’t that the first stage of grief?
 “Did I really just hit the T-bird”? I yelled? I couldn’t even get out of the car. I just sat there as my friend freaked out over the damage I hadn’t seen yet. Handmade front nose? Driver side: busted, crushed, every mounting point cracked around the entire front end. Custom headlight, shattered. Hood? Bent, tweaked, rippled. Fender with molded scoops? Bent, buckled, shoved into a now scratched rippled and chipped up passenger door. Custom painted windshield? Cracked! $90,000 cherry, museum quality, customer owned and going to kill me Thunderbird? Finished ready to deliver Thunderbird? Fender pushed out, cracked tweaked, $3000 freshly chromed bumper pushed into fender, whole new paint job needing, wrecked…..
Ahhhh……
In retrospect, instead of pumping the pedal and trying to shift to park I should have killed the key….I would still have hit the T-bird though, just 15 feet or so away, just not as bad.
Needless to say, I missed the Autorama and several other car shows I have been saying every year for years that I was going to go to “next year”. I finally got the T-bird repainted and delivered. I planned on going to the Good Guys Columbus show and competing in the street machine of the year competition. I knew I wouldn’t win but just wanted to be a part of it. I had a lot of work for just 4 weeks. I worked and worked and worked. Friday morning came I was on 48 hours of no sleep… my friends left to go to the show. I kept working. I took an hour nap after I realized I wasn’t making it Friday. My friends called and said another 69 Firebird was in the competition…I wanted to be there sooo bad. I kept working, I worked all night again, 60 hours passed and my dad showed up to help at 6 am the next morning. After 77 hours at precisely 12 noon we loaded up, I took a quick shower for the first time since Tuesday…. It would still take a couple weeks for the fiberglass to leave my body. We wouldn’t make if in time for the street machine competition, but at least Saturday is a big day right? Well we were going to be there by 4:00ish and set up for the next day, maybe catch some looks from the Saturday crowd. I slept most of the way, well that is until the serpentine belt broke….. So, we didn’t make it again. I fixed the belt on the side of the road. Thankfully the guys at O’Reilly’s delivered it to me on site. I went to my hotel, kissed my wife and kids and passed out. There you have it. I feel sometimes this car should be called “ANGRY BIRD” but it is done and I am ready for the rest of the summer.
Spec Sheet:
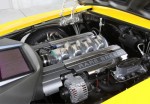
2006 Pontiac GTO 6.0 LS2
Mods: bigger cam, 1.7 roller rockers. Ported/Polished heads.
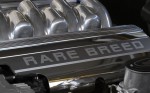
Professional Products intake manifold and fuel rail. Intake is ported/polished to match heads.
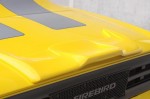
Autokraft LS race oil pan. Custom made ram air with upper plenum on underside of hood and lower filler panel that seals to hand made air box. K&N air filter.
Drivetrain: 4L60E auto transmission. Moser built 9in rear. 35 spline 3.89 gears
Brakes: C5/C6 front and rear disc w/working parking brake. Wilwood master cylinder with hydroboost power assist.
Suspension: Speedtech full front subframe tubular control arm and coilover kit with afx spindles and power rack. Rear is Detroit Speed 4 link with mini tub installed.
Bracing: Ride Tech Tiger Cage with door bars and 5 point harnesses.
Wheels: Custom painted 2010 Corvette spyder wheels. 19in rear 18in front. General brand performance tires.
Paint: De beer European brand by Valspar. 9414 GM yellow. Custom painted flat charcoal and silver stripes and tail panel and stripes outlined in HOK true blue pearl.
Interior: Recovered 2001 Camaro front seats. Rear seats are made from a chopped up 1987 Honda Civic SI rear hatchback bench seat.
Center console is a multi-piece hand-made fiberglass design that goes from front to rear splitting back seats and has two lifting armrest with storage. Console has built in duct for rear a/c vents.
Door panels are redesigned deluxe door panels that were made to clear the Ride Tech Tiger Cage with door bars. Also built in speaker locations were added. Parts made of fiberglass, painted with soft touch clear.
Rear side panels also custom made to fit rear seats. Black suede inserts.
Headliner is Black suede. Dash was reworked to include a digital gas gauge and the controls for vintage a/c. Gauges are Pro Sport digital.
Custom made glove box insert.
Carpet is German square weave vintage Mercedes style carpet.
Steering wheel is a long acre racing quick disconnect with custom mount to newer style gm tilt column. Center is molded off an old Pontiac emblem.
Body: Every panel including front and back windows (painted edges) has been changed in some way. One piece custom fiberglass front bumper, hand-made headlight housings, machined front grills. Hood has counter sunk ring bros hood pins. Doors are shaved as is roof drip edge. All seams solid welded. Rear is fabricated in sheet metal. Rear bumper shortened and tucked. Plasma cut upper and lower honey comb trim panels. Gas filler is in original location using a flush fit pop out chopper gas lid.
Exhaust: Stainless steel headers to oval pipe using x-pipe with Spintech mufflers. Exhaust exits center rear with 4 oval pipes behind lower honey comb grill. Custom made heat shield protects gas tank.
Sound: Pioneer touch screen double din head unit using Infinity Perfect 6.1 components in doors and Infinity 3 way 6×9 running off of a 1200 watt 4 channel amp. 10inch JBL subs in custom enclosure each have their own 1600 watt amp.